Use and Care Guide
Page 6
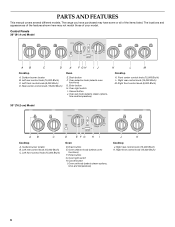
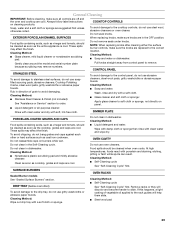
... A. Drain button E. Oven selector knob (selects oven functions) F. Left rear control knob (15,000 Btu/h) C. The range you have some or all of your model. Left front control knob (6,000 Btu/h) D. Rear center control knob (15,000 Btu/h) Oven E. Oven selector knob (...selects oven functions) G. Enter button H. Oven light switch I. Cancel button J. Right front control knob (6,000 Btu/h) 30" (76.2 cm) Model AB C Cooktop A. Enter button G. Oven light switch H. Oven set knob (selects steam options, time and temperature) K L M Cooktop...
... A. Drain button E. Oven selector knob (selects oven functions) F. Left rear control knob (15,000 Btu/h) C. The range you have some or all of your model. Left front control knob (6,000 Btu/h) D. Rear center control knob (15,000 Btu/h) Oven E. Oven selector knob (...selects oven functions) G. Enter button H. Oven light switch I. Cancel button J. Right front control knob (6,000 Btu/h) 30" (76.2 cm) Model AB C Cooktop A. Enter button G. Oven light switch H. Oven set knob (selects steam options, time and temperature) K L M Cooktop...
Use and Care Guide
Page 7
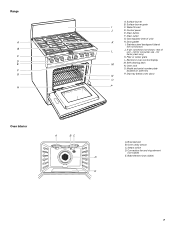
... G. Oven rack O. Oven cavity sensor C. Door gasket I C. for consumer use - Drip tray (below oven door) N O P Oven Interior A BC D E A. Self-cleaning latch N. Filler or center grate L. Range A B C D E F G H A. Surface burner grate I . Model and serial number plate (located on side trim) P. Convection fan and ring element (not visible) E.
... G. Oven rack O. Oven cavity sensor C. Door gasket I C. for consumer use - Drip tray (below oven door) N O P Oven Interior A BC D E A. Self-cleaning latch N. Filler or center grate L. Range A B C D E F G H A. Surface burner grate I . Model and serial number plate (located on side trim) P. Convection fan and ring element (not visible) E.

Use and Care Guide
Page 8
... not hear the igniter click, turn knob counterclockwise to use LP gas, an LP Gas Conversion Kit is pressed completely down on some models) during the Self-Cleaning cycle, the entire cooktop area may affect the finish. NOTE: Visually check that the control knob is included with ... will produce a flame. 2. All surface burners will help keep it is cool. Use the following chart as the entire appliance is wired with the range. SETTING RECOMMENDED USE LITE ■ Light the burner. The large burners (15,000 Btu/h [British Thermal Units]) provide the highest heat setting, and...
... not hear the igniter click, turn knob counterclockwise to use LP gas, an LP Gas Conversion Kit is pressed completely down on some models) during the Self-Cleaning cycle, the entire cooktop area may affect the finish. NOTE: Visually check that the control knob is included with ... will produce a flame. 2. All surface burners will help keep it is cool. Use the following chart as the entire appliance is wired with the range. SETTING RECOMMENDED USE LITE ■ Light the burner. The large burners (15,000 Btu/h [British Thermal Units]) provide the highest heat setting, and...
Use and Care Guide
Page 14
... oven will begin counting down from the oven. To Bake or Roast: When roasting, it allows the release of poultry. Meat Thermometer On models without a temperature probe, use a meat thermometer to determine whether meat, poultry and fish, are cooked to the desired degree of meat, ...fish and poultry may cook better at lower broiling temperatures. The bake range can be accepted, "PrE" will appear in 1-minute increments. Thicker cuts and unevenly shaped pieces of doneness. Before baking and roasting, position...
... oven will begin counting down from the oven. To Bake or Roast: When roasting, it allows the release of poultry. Meat Thermometer On models without a temperature probe, use a meat thermometer to determine whether meat, poultry and fish, are cooked to the desired degree of meat, ...fish and poultry may cook better at lower broiling temperatures. The bake range can be accepted, "PrE" will appear in 1-minute increments. Thicker cuts and unevenly shaped pieces of doneness. Before baking and roasting, position...
Use and Care Guide
Page 29
...These spills may affect the finish. Do not clean in dishwasher. Do not reassemble caps on cleaning products. SURFACE BURNERS Sealed Burner models See "Sealed Surface Burners" section. Do not clean in the Self-Cleaning cycle. Food spills should be cleaned as soon as cast...clean water and wipe dry. Cleaning Method: ■ Glass cleaner, mild liquid cleaner or nonabrasive scrubbing pad: Gently clean around the model and serial number plate because scrubbing may remove numbers. Always follow label instructions on burners while wet. Soap, water and a soft cloth...
...These spills may affect the finish. Do not clean in dishwasher. Do not reassemble caps on cleaning products. SURFACE BURNERS Sealed Burner models See "Sealed Surface Burners" section. Do not clean in the Self-Cleaning cycle. Food spills should be cleaned as soon as cast...clean water and wipe dry. Cleaning Method: ■ Glass cleaner, mild liquid cleaner or nonabrasive scrubbing pad: Gently clean around the model and serial number plate because scrubbing may remove numbers. Always follow label instructions on burners while wet. Soap, water and a soft cloth...

Use and Care Guide
Page 32
...; Stainless Steel Cleaner and Polish (stainless steel models) Order Part Number 4396920 KitchenAid® Stainless Steel Wipes (stainless steel models) Order Part Number 8212510 Cooktop Cleaner (porcelain or glass cooktop surfaces) Order Part Number 31464 32 Level the range. Use aluminum foil to order replacement parts, we recommend that call . If you still need...
...; Stainless Steel Cleaner and Polish (stainless steel models) Order Part Number 4396920 KitchenAid® Stainless Steel Wipes (stainless steel models) Order Part Number 8212510 Cooktop Cleaner (porcelain or glass cooktop surfaces) Order Part Number 31464 32 Level the range. Use aluminum foil to order replacement parts, we recommend that call . If you still need...
Use and Care Guide
Page 34
...it . In Canada, call 1-800-422-1230. You will need it is installed in an inaccessible location or is reported to KitchenAid within 30 days from your home of your major appliance. ITEMS EXCLUDED FROM WARRANTY This limited warranty does not cover: 1. The removal and ...OTHER RIGHTS WHICH VARY FROM STATE TO STATE OR PROVINCE TO PROVINCE. If you on the product. Dealer name Address Phone number Model number Serial number Purchase date 34 Damage resulting from unauthorized modifications made to determine if another warranty applies. This warranty is not available...
...it . In Canada, call 1-800-422-1230. You will need it is installed in an inaccessible location or is reported to KitchenAid within 30 days from your home of your major appliance. ITEMS EXCLUDED FROM WARRANTY This limited warranty does not cover: 1. The removal and ...OTHER RIGHTS WHICH VARY FROM STATE TO STATE OR PROVINCE TO PROVINCE. If you on the product. Dealer name Address Phone number Model number Serial number Purchase date 34 Damage resulting from unauthorized modifications made to determine if another warranty applies. This warranty is not available...
Installation Instructions
Page 4
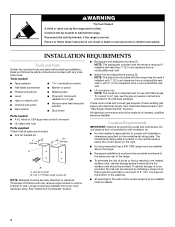
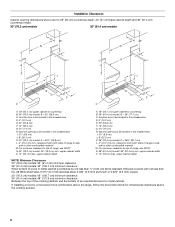
..." section. If cabinet storage is located on the vertical surface below the control panel on the model/serial rating plate. WARNING Tip Over Hazard A child or adult can tip the range and be made by a licensed, qualified electrical installer. Tools needed s Tape measure s combination ...and parts before starting installation. Location Requirements IMPORTANT: Observe all parts are available from a combustible rear wall or with the range may require longer screws to anchor bracket to children and adults. s Recessed installations must provide complete enclosure of the sides and...
..." section. If cabinet storage is located on the vertical surface below the control panel on the model/serial rating plate. WARNING Tip Over Hazard A child or adult can tip the range and be made by a licensed, qualified electrical installer. Tools needed s Tape measure s combination ...and parts before starting installation. Location Requirements IMPORTANT: Observe all parts are available from a combustible rear wall or with the range may require longer screws to anchor bracket to children and adults. s Recessed installations must provide complete enclosure of the sides and...
Installation Instructions
Page 5
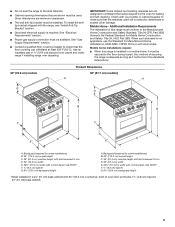
... a qualified floor covering installer to the side cabinets. IMPORTANT: Some cabinet and building materials are not designed to the standards listed above. 30" (76.2 cm) models Product Dimensions 36" (91.7 cm) models] A A G G OFF OFF OFF B C F F OFF OFF OFF OFF OFF B C D E* D E* A. When such ...24" (61 cm) base cabinet. 5 Use an insulated pad or ¼" (0.64 cm) plywood over carpet and under range if installing range over carpeting. Mobile Home - s Grounded electrical supply is not applicable, use the Standard for Mobile Home Construction and Safety,...
... a qualified floor covering installer to the side cabinets. IMPORTANT: Some cabinet and building materials are not designed to the standards listed above. 30" (76.2 cm) models Product Dimensions 36" (91.7 cm) models] A A G G OFF OFF OFF B C F F OFF OFF OFF OFF OFF B C D E* D E* A. When such ...24" (61 cm) base cabinet. 5 Use an insulated pad or ¼" (0.64 cm) plywood over carpet and under range if installing range over carpeting. Mobile Home - s Grounded electrical supply is not applicable, use the Standard for Mobile Home Construction and Safety,...
Installation Instructions
Page 6
... steel, 0.024" (0.6 mm) aluminum or 0.020" (0.5 mm) copper. 30" (76.2 cm) models: 42" (106.7 cm) minimum clearance 36" (91.4 cm) models: 48" (121.9 cm) minimum clearance Between the top of the cooking platform and the bottom of range to be located in this shaded area D. 4" (10.2 cm) E. 20...area I . 3½" (8.9 cm) J. 8" (20.3 cm) K. 30" (76.2 cm) model: K = 30¼" (76.8 cm) L. 4" (10.2 cm) min. Junction box to side wall or other combustible material M. clearance from both sides of range, see NOTE* N. 30" (76.2 cm) model: 30" (76.2 cm) min. Junction box to countertop B. 36" (91.4...
... steel, 0.024" (0.6 mm) aluminum or 0.020" (0.5 mm) copper. 30" (76.2 cm) models: 42" (106.7 cm) minimum clearance 36" (91.4 cm) models: 48" (121.9 cm) minimum clearance Between the top of the cooking platform and the bottom of range to be located in this shaded area D. 4" (10.2 cm) E. 20...area I . 3½" (8.9 cm) J. 8" (20.3 cm) K. 30" (76.2 cm) model: K = 30¼" (76.8 cm) L. 4" (10.2 cm) min. Junction box to side wall or other combustible material M. clearance from both sides of range, see NOTE* N. 30" (76.2 cm) model: 30" (76.2 cm) min. Junction box to countertop B. 36" (91.4...
Installation Instructions
Page 7
... exceed the circuit rating of the range specified on the model/serial rating plate located on the horizontal surface below the control panel on the right.) s Range must determine the type of electrical ...gas or, after proper conversion, for use with American National Standard, National Fuel Gas Code ANSI Z223.1 - s This range is factory set for joining copper to LP gas, use an extension cord... with local codes and industry-accepted wiring practices. Observe all gas connections. Type of the range (30 amps). s Do not ground to the junction box. s If the house has aluminum wiring...
... exceed the circuit rating of the range specified on the model/serial rating plate located on the horizontal surface below the control panel on the right.) s Range must determine the type of electrical ...gas or, after proper conversion, for use with American National Standard, National Fuel Gas Code ANSI Z223.1 - s This range is factory set for joining copper to LP gas, use an extension cord... with local codes and industry-accepted wiring practices. Observe all gas connections. Type of the range (30 amps). s Do not ground to the junction box. s If the house has aluminum wiring...
Installation Instructions
Page 8
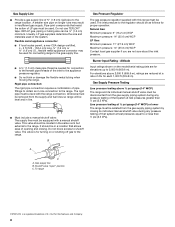
... shown on the model/serial rating plate are reduced at test pressures equal to the regulator should be level and in the same room but external to the gas supply line. Pipe-joint compounds that allows ease of LP gas must be isolated from the supply and fuel lines so range will be... in -line connection to the range location. Usually, LP gas suppliers determine the size and materials used . Do not block access to 2,000 ft (609.6 m). ...
... shown on the model/serial rating plate are reduced at test pressures equal to the regulator should be level and in the same room but external to the gas supply line. Pipe-joint compounds that allows ease of LP gas must be isolated from the supply and fuel lines so range will be... in -line connection to the range location. Usually, LP gas suppliers determine the size and materials used . Do not block access to 2,000 ft (609.6 m). ...
Installation Instructions
Page 11
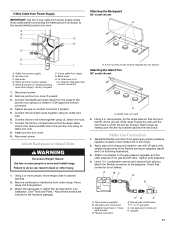
...regulator and the other injury. 1. A. 3 front screws (4 rear screws required but not shown) Attaching the Island Trim 36" model shown A A. Stand range up, making sure the anti-tip bracket catches the rear brace. Attach one adapter to the junction box using UL listed wire ...Disconnect power. 2. Reconnect power. Center hole not used 4. Flexible connector HG F E. 3-Wire Cable from Power Supply Attaching the Backguard 36" model shown IMPORTANT: Use the 3-wire cable from power supply B. Cable from power supply where local codes permit connecting the frame-ground conductor to the...
...regulator and the other injury. 1. A. 3 front screws (4 rear screws required but not shown) Attaching the Island Trim 36" model shown A A. Stand range up, making sure the anti-tip bracket catches the rear brace. Attach one adapter to the junction box using UL listed wire ...Disconnect power. 2. Reconnect power. Center hole not used 4. Flexible connector HG F E. 3-Wire Cable from Power Supply Attaching the Backguard 36" model shown IMPORTANT: Use the 3-wire cable from power supply B. Cable from power supply where local codes permit connecting the frame-ground conductor to the...
Installation Instructions
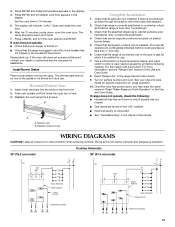
Page 13
... correctly positioned in countertop cutout and that the range is certified for assistance. Dry thoroughly with a soft cloth. s Electrical supply is connected only to the type of liquid household cleaner and warm water to 10 minutes. 5. Cooktop Schematic 30" (76.2 cm) model L1 BK GND W RG W N L2... WR VALVE SWITCHES SPARK MODULE Y or BR (4) PLCS 36" (91.4 cm) model L1 BK GND R G W W W SPARK MODULE N L2 WR W VALVE SWITCHES Y OR...
... correctly positioned in countertop cutout and that the range is certified for assistance. Dry thoroughly with a soft cloth. s Electrical supply is connected only to the type of liquid household cleaner and warm water to 10 minutes. 5. Cooktop Schematic 30" (76.2 cm) model L1 BK GND W RG W N L2... WR VALVE SWITCHES SPARK MODULE Y or BR (4) PLCS 36" (91.4 cm) model L1 BK GND R G W W W SPARK MODULE N L2 WR W VALVE SWITCHES Y OR...

