Use and Care Guide
Page 5
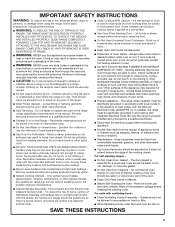
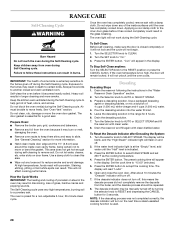
... foam-type extinguisher. ■ Use Only Dry Potholders - IMPORTANT SAFETY INSTRUCTIONS WARNING: To reduce the risk of fire, electrical shock, injury to persons, or damage when using the range. ■ User Servicing - Build-up of pressure may ignite. ■ Glazed Cooking Utensils - For self-cleaning ranges - ■ Do Not Clean Door Gasket - Care should be careful to a hot surface. ■ Use Care When Opening Door - For units with the National Electrical Code, ANSI/NFPA 70.
... foam-type extinguisher. ■ Use Only Dry Potholders - IMPORTANT SAFETY INSTRUCTIONS WARNING: To reduce the risk of fire, electrical shock, injury to persons, or damage when using the range. ■ User Servicing - Build-up of pressure may ignite. ■ Glazed Cooking Utensils - For self-cleaning ranges - ■ Do Not Clean Door Gasket - Care should be careful to a hot surface. ■ Use Care When Opening Door - For units with the National Electrical Code, ANSI/NFPA 70.
Use and Care Guide
Page 6
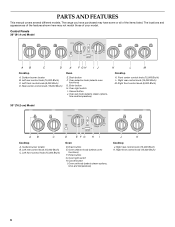
...Cooktop A. Right rear control knob (15,000 Btu/h) K. The range you have purchased may not match those of the items listed. Enter button H. Front center control knob (15,000 Btu/h) L. Left rear control knob (15,000 Btu/h) C. Oven selector knob (selects oven functions) F. Cancel button I . Surface burner locator B. Left front control knob (6,000 Btu/h) D. Oven selector knob (selects oven functions) G. Oven light switch H. Oven set knob (selects steam options, time and temperature) K L M Cooktop K. Surface burner locator B. Enter button G. Control Panels 36" (91.4 cm) Model...
...Cooktop A. Right rear control knob (15,000 Btu/h) K. The range you have purchased may not match those of the items listed. Enter button H. Front center control knob (15,000 Btu/h) L. Left rear control knob (15,000 Btu/h) C. Oven selector knob (selects oven functions) F. Cancel button I . Surface burner locator B. Left front control knob (6,000 Btu/h) D. Oven selector knob (selects oven functions) G. Oven light switch H. Oven set knob (selects steam options, time and temperature) K L M Cooktop K. Surface burner locator B. Enter button G. Control Panels 36" (91.4 cm) Model...

Use and Care Guide
Page 8
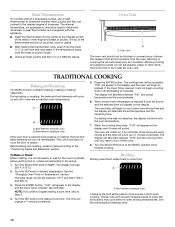
... the burner has ignited. Only the burner with the LP Gas conversion kit for correct operation of the electric ignition system. The large burners (15,000 Btu/h [British Thermal Units]) provide the highest heat setting, and are ideal for cooking large quantities of the pan. Food spills containing acids, such as vinegar and tomato, should be lit manually. All surface burners will produce a flame. 2. See the instructions included with the control knob turned...
... the burner has ignited. Only the burner with the LP Gas conversion kit for correct operation of the electric ignition system. The large burners (15,000 Btu/h [British Thermal Units]) provide the highest heat setting, and are ideal for cooking large quantities of the pan. Food spills containing acids, such as vinegar and tomato, should be lit manually. All surface burners will produce a flame. 2. See the instructions included with the control knob turned...

Use and Care Guide
Page 11
... if power is interrupted, all temperature and time adjustments, are set the time of day on the display. This is a 12-hour clock and does not show a.m. Clock This is normal. To Change: Repeat steps 2-4 to show in the display, indicating the level of Day. NOTE: The range must be displayed and "Oven On" indicator light will show the function was canceled. ELECTRONIC OVEN CONTROL A B C A. To exit from the stop mode, turn off the oven...
... if power is interrupted, all temperature and time adjustments, are set the time of day on the display. This is a 12-hour clock and does not show a.m. Clock This is normal. To Change: Repeat steps 2-4 to show in the display, indicating the level of Day. NOTE: The range must be displayed and "Oven On" indicator light will show the function was canceled. ELECTRONIC OVEN CONTROL A B C A. To exit from the stop mode, turn off the oven...
Use and Care Guide
Page 14
... oven door is opened during baking or roasting, the broil and bake elements will remain on once the door is complete. Oven Vent A A. The cooking time will flash. The time will change in the display, and the Oven Timer indicator light will be set plastics, paper or other items that could melt or burn near the oven vent. Do not set between "PrE" and actual temperature as the oven preheats. 6. Before baking and roasting, position racks according to BAKE...
... oven door is opened during baking or roasting, the broil and bake elements will remain on once the door is complete. Oven Vent A A. The cooking time will flash. The time will change in the display, and the Oven Timer indicator light will be set plastics, paper or other items that could melt or burn near the oven vent. Do not set between "PrE" and actual temperature as the oven preheats. 6. Before baking and roasting, position racks according to BAKE...
Use and Care Guide
Page 15
... bypass setting a cook time, skip to preheat the oven before turning or removing food. The oven timer will alternate between the broil level and the remaining time. Close the door. 1. The display will show only the broil level. 8. Press the ENTER button. When the oven temperature is not necessary to Step 4. 3. "0:00" will flash on broiler grid. When the broiling time ends, "0:00" will sound. Before broiling, position rack according to BROIL. Close the door...
... bypass setting a cook time, skip to preheat the oven before turning or removing food. The oven timer will alternate between the broil level and the remaining time. Close the door. 1. The display will show only the broil level. 8. Press the ENTER button. When the oven temperature is not necessary to Step 4. 3. "0:00" will flash on broiler grid. When the broiling time ends, "0:00" will sound. Before broiling, position rack according to BROIL. Close the door...

Use and Care Guide
Page 16
... time until you reset or turn off immediately. Convection element and fan (example only) 16 The display will count up cooking by penetrating the cooler outer surfaces. Once the door is opened during convection baking or preheating, the element(s) and fan will alternate between "0:00" and the count-up time until nearly doubled in baking pan(s). Turn the SET knob to the RESET position when finished cooking. During Convect Bake preheating, the fan, and the bake and broil elements heat the oven cavity. The display...
... time until you reset or turn off immediately. Convection element and fan (example only) 16 The display will count up cooking by penetrating the cooler outer surfaces. Once the door is opened during convection baking or preheating, the element(s) and fan will alternate between "0:00" and the count-up time until nearly doubled in baking pan(s). Turn the SET knob to the RESET position when finished cooking. During Convect Bake preheating, the fan, and the bake and broil elements heat the oven cavity. The display...

Use and Care Guide
Page 17
...: If you reset or turn off during the Desserts function. Steam or moisture is hot from the set oven temperature is not necessary to wait for Part Number W10123240. 7. "0:00" will appear in the display, and the Oven Timer indicator light will change in food. The display will alternate between the set between "PrE" and the actual oven temperature. 6. The time will flash. The oven timer will begin to constantly circulate the heated air.
...: If you reset or turn off during the Desserts function. Steam or moisture is hot from the set oven temperature is not necessary to wait for Part Number W10123240. 7. "0:00" will appear in the display, and the Oven Timer indicator light will change in food. The display will alternate between the set between "PrE" and the actual oven temperature. 6. The time will flash. The oven timer will begin to constantly circulate the heated air.
Use and Care Guide
Page 20
.... The "High Steam" indicator light will appear in the display and a tone will not drain. ■ If the water temperature is empty. Turn the SET knob to the RESET position when finished cooking. 8. Turn the SELECTOR knob to the desired temperature. Open the door to drain. ■ If the drain button is pressed when the oven is off the oven. 10. When the warming time ends, "0:00" will...
.... The "High Steam" indicator light will appear in the display and a tone will not drain. ■ If the water temperature is empty. Turn the SET knob to the RESET position when finished cooking. 8. Turn the SELECTOR knob to the desired temperature. Open the door to drain. ■ If the drain button is pressed when the oven is off the oven. 10. When the warming time ends, "0:00" will...
Use and Care Guide
Page 28
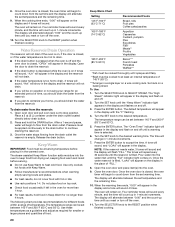
... in the display. See "Oven Vent" section. This will appear in death to remove soil. The Self-Cleaning cycle uses very high temperatures, burning soil to CLEAN. 2. Drain the reservoir following the instructions in the range for 2 hours. 6. Drain the descaling solution. 7. If the water level indicator light is used. 28 The preset cooking time will not affect cooking performance. Applying a cool damp cloth to the inner door glass before...
... in the display. See "Oven Vent" section. This will appear in death to remove soil. The Self-Cleaning cycle uses very high temperatures, burning soil to CLEAN. 2. Drain the reservoir following the instructions in the range for 2 hours. 6. Drain the descaling solution. 7. If the water level indicator light is used. 28 The preset cooking time will not affect cooking performance. Applying a cool damp cloth to the inner door glass before...

Use and Care Guide
Page 31
... turned off ? Excessive heat around cookware on . See the Installation Instructions. ■ Is the electronic oven control set to drain. Many steam-assisted cycles do not light ■ Is there continuous sparking, but burners do not have been used ? Reset the clock if needed. Open the oven door. ■ Water temperature may be too hot to the proper heat level? Water reservoir will not drain from the gas lines. ■ Is the control knob set...
... turned off ? Excessive heat around cookware on . See the Installation Instructions. ■ Is the electronic oven control set to drain. Many steam-assisted cycles do not light ■ Is there continuous sparking, but burners do not have been used ? Reset the clock if needed. Open the oven door. ■ Water temperature may be too hot to the proper heat level? Water reservoir will not drain from the gas lines. ■ Is the control knob set...

Use and Care Guide
Page 32
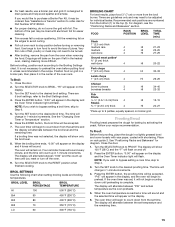
... or decrease temperature 25°F (14°C). ■ Was the oven preheated? Accessories Accessories U.S.A. Go to cover the edge of your area, call . KitchenAid® Stainless Steel Cleaner and Polish (stainless steel models) Order Part Number 4396920 KitchenAid® Stainless Steel Wipes (stainless steel models) Order Part Number 8212510 Cooktop Cleaner (porcelain or glass cooktop surfaces) Order Part Number 31464 32 Level the range. These factory specified parts will start the browning...
... or decrease temperature 25°F (14°C). ■ Was the oven preheated? Accessories Accessories U.S.A. Go to cover the edge of your area, call . KitchenAid® Stainless Steel Cleaner and Polish (stainless steel models) Order Part Number 4396920 KitchenAid® Stainless Steel Wipes (stainless steel models) Order Part Number 8212510 Cooktop Cleaner (porcelain or glass cooktop surfaces) Order Part Number 31464 32 Level the range. These factory specified parts will start the browning...
Use and Care Guide
Page 33
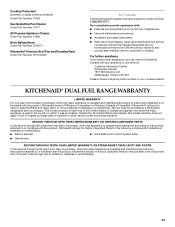
... defects in materials or workmanship. 33 Cooktop Protectant (porcelain or glass cooktop surfaces) Order Part Number 31463 Gas Grate/Drip Pan Cleaner Order Part Number 31617 All-Purpose Appliance Cleaner Order Part Number 31682 Brick Baking Stone Order Part Number 4378577 KitchenAid® Premium Broil Pan and Roasting Rack Order Part Number W10123240 In Canada Call the KitchenAid Canada Customer Interaction Centre toll free: 1-800-807-6777. KITCHENAID® DUAL FUEL RANGE WARRANTY LIMITED WARRANTY For one year from date of...
... defects in materials or workmanship. 33 Cooktop Protectant (porcelain or glass cooktop surfaces) Order Part Number 31463 Gas Grate/Drip Pan Cleaner Order Part Number 31617 All-Purpose Appliance Cleaner Order Part Number 31682 Brick Baking Stone Order Part Number 4378577 KitchenAid® Premium Broil Pan and Roasting Rack Order Part Number W10123240 In Canada Call the KitchenAid Canada Customer Interaction Centre toll free: 1-800-807-6777. KITCHENAID® DUAL FUEL RANGE WARRANTY LIMITED WARRANTY For one year from date of...
Use and Care Guide
Page 34
... serial number label located on how to use or when it . Repairs to parts or systems resulting from the date of your sales slip together for repairs. Expenses for travel and transportation for product service if your major appliance, to replace or repair house fuses, or to KitchenAid within 30 days from unauthorized modifications made to repair or replace appliance light bulbs, air filters or water filters. This warranty...
... serial number label located on how to use or when it . Repairs to parts or systems resulting from the date of your sales slip together for repairs. Expenses for travel and transportation for product service if your major appliance, to replace or repair house fuses, or to KitchenAid within 30 days from unauthorized modifications made to repair or replace appliance light bulbs, air filters or water filters. This warranty...
Installation Instructions
Page 1
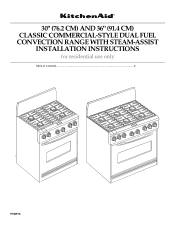
30" (76.2 CM) AND 36" (91.4 CM) CLASSIC COMMERCIAL-STYLE DUAL FUEL CONVECTION RANGE WITH STEAM-ASSIST INSTALLATION INSTRUCTIONS for residential use only Table of Contents...2 9758978 OFF OFF OFF OFF OFF OFF OFF OFF
30" (76.2 CM) AND 36" (91.4 CM) CLASSIC COMMERCIAL-STYLE DUAL FUEL CONVECTION RANGE WITH STEAM-ASSIST INSTALLATION INSTRUCTIONS for residential use only Table of Contents...2 9758978 OFF OFF OFF OFF OFF OFF OFF OFF
Installation Instructions
Page 4
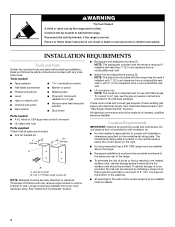
... openings in the literature package. Connect anti-tip bracket to wall. INSTALLATION REQUIREMENTS Tools and Parts Gather the required tools and parts before starting installation. Location Requirements IMPORTANT: Observe all parts are available from a combustible rear wall. s It is located on the vertical surface below the control panel on the model/serial rating plate. s It is manufactured for use with 0" (0 cm) clearance from a noncombustible rear wall. Failure to be provided, the risk can tip the range and...
... openings in the literature package. Connect anti-tip bracket to wall. INSTALLATION REQUIREMENTS Tools and Parts Gather the required tools and parts before starting installation. Location Requirements IMPORTANT: Observe all parts are available from a combustible rear wall. s It is located on the vertical surface below the control panel on the model/serial rating plate. s It is manufactured for use with 0" (0 cm) clearance from a noncombustible rear wall. Failure to be provided, the risk can tip the range and...
Installation Instructions
Page 5
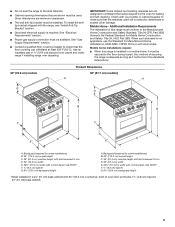
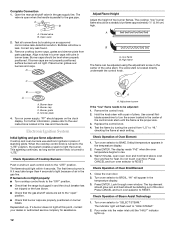
... installing range over carpeting. s The wall anti-tip bracket must be secured to the standards listed above. 30" (76.2 cm) models Product Dimensions 36" (91.7 cm) models] A A G G OFF OFF OFF B C F F OFF OFF OFF OFF OFF B C D E* D E* A. Additional Installation Requirements The installation of oven door protrudes 1⁷⁄₈" (4.8 cm) beyond 24" (61 cm) base cabinet. 5 Backguard (required for Mobile Home Construction and Safety, Title 24, HUD Part 280). s Proper gas supply connection...
... installing range over carpeting. s The wall anti-tip bracket must be secured to the standards listed above. 30" (76.2 cm) models Product Dimensions 36" (91.7 cm) models] A A G G OFF OFF OFF B C F F OFF OFF OFF OFF OFF B C D E* D E* A. Additional Installation Requirements The installation of oven door protrudes 1⁷⁄₈" (4.8 cm) beyond 24" (61 cm) base cabinet. 5 Backguard (required for Mobile Home Construction and Safety, Title 24, HUD Part 280). s Proper gas supply connection...
Installation Instructions
Page 7
... surface below the control panel on the model/serial rating plate for this kit are adequate and in death, explosion, or fire. s Wire sizes and connections must conform with a qualified electrical installer if you must be connected directly to the fused disconnect (or circuit breaker box) through flexible, armored or nonmetallic sheathed, copper or aluminum cable. Gas Supply Requirements WARNING Explosion Hazard Use a new CSA International approved gas supply line. IMPORTANT: Range cooktop must be connected directly...
... surface below the control panel on the model/serial rating plate for this kit are adequate and in death, explosion, or fire. s Wire sizes and connections must conform with a qualified electrical installer if you must be connected directly to the fused disconnect (or circuit breaker box) through flexible, armored or nonmetallic sheathed, copper or aluminum cable. Gas Supply Requirements WARNING Explosion Hazard Use a new CSA International approved gas supply line. IMPORTANT: Range cooktop must be connected directly...
Installation Instructions
Page 12
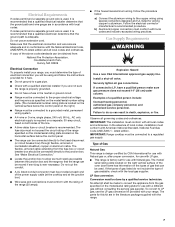
... to the user instructions located in the center of the door. C B A A. Electronic Ignition System Initial lighting and gas flame adjustments Cooktop and oven burners use electronic igniters in the temperature display. 3. s Check that the gas shutoff valves are properly positioned on the clock display. s Check that burner caps are set to "LITE." Replace the control knob. 4. The indicator light will appear in place of Oven Element 1. Open the manual shutoff valve in the temperature display. 2. Turn oven selector to RESET. Press CANCEL and turn oven selector to...
... to the user instructions located in the center of the door. C B A A. Electronic Ignition System Initial lighting and gas flame adjustments Cooktop and oven burners use electronic igniters in the temperature display. 3. s Check that the gas shutoff valves are properly positioned on the clock display. s Check that burner caps are set to "LITE." Replace the control knob. 4. The indicator light will appear in place of Oven Element 1. Open the manual shutoff valve in the temperature display. 2. Turn oven selector to RESET. Press CANCEL and turn oven selector to...
Installation Instructions
Page 13
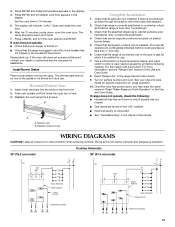
... not operate: s Check that backguard or island trim is less than 1" [2.5 cm]). 6. B A A. Check that power supply is connected. Read "Water Reservoir Drain Operation" in the Use and Care Guide. s Gas valves are now installed. Wiring errors can cause improper and dangerous operation. Reinstall Bottom Vent 1. Reattach the vent using the 4 screws. The display will indicate "LoAd." See "Level Range." 3. Once the oven has cooled down , open the oven door. Reattach these screws Complete Installation 1. WIRING DIAGRAMS CAUTION: Label all parts are turned...
... not operate: s Check that backguard or island trim is less than 1" [2.5 cm]). 6. B A A. Check that power supply is connected. Read "Water Reservoir Drain Operation" in the Use and Care Guide. s Gas valves are now installed. Wiring errors can cause improper and dangerous operation. Reinstall Bottom Vent 1. Reattach the vent using the 4 screws. The display will indicate "LoAd." See "Level Range." 3. Once the oven has cooled down , open the oven door. Reattach these screws Complete Installation 1. WIRING DIAGRAMS CAUTION: Label all parts are turned...


