
Use and Care Guide
Page 1
... cooking 22 Proof/Keep Warm 23 Bread 24 Cleaning your cooktop 13 Using and Caring for assistance or service, see page 34. KITCHENAID® Professional Dual Fuel Range Model: KDRP407H 4452761A www.kitchenaid.com Use and Care Guide TO THE INSTALLER: PLEASE LEAVE THIS INSTRUCTION BOOK WITH THE UNIT. TO THE CONSUMER: PLEASE READ AND... 27 Before you start 27 Before setting the controls 28 Setting the controls 28 For best cleaning results 29 How the cycle works 29 Troubleshooting 30 Requesting Assistance or Service 33 Bread Recipes 35 Warranty 38 In the U.S.A.
... cooking 22 Proof/Keep Warm 23 Bread 24 Cleaning your cooktop 13 Using and Caring for assistance or service, see page 34. KITCHENAID® Professional Dual Fuel Range Model: KDRP407H 4452761A www.kitchenaid.com Use and Care Guide TO THE INSTALLER: PLEASE LEAVE THIS INSTRUCTION BOOK WITH THE UNIT. TO THE CONSUMER: PLEASE READ AND... 27 Before you start 27 Before setting the controls 28 Setting the controls 28 For best cleaning results 29 How the cycle works 29 Troubleshooting 30 Requesting Assistance or Service 33 Bread Recipes 35 Warranty 38 In the U.S.A.
Use and Care Guide
Page 3
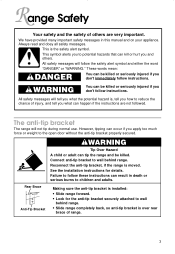
...You can be killed or seriously injured if you don't follow instructions. Making sure the anti-tip bracket is installed: • Slide range forward. • Look for details. These words mean: You can kill or hurt you and others are not followed. Rear Brace Anti...attached to potential hazards that can be killed. This symbol alerts you to wall behind range. Reconnect the anti-tip bracket, if the range is over rear brace of range. 3 The anti-tip bracket The range will follow these instructions can happen if the instructions are very important. Always read and...
...You can be killed or seriously injured if you don't follow instructions. Making sure the anti-tip bracket is installed: • Slide range forward. • Look for details. These words mean: You can kill or hurt you and others are not followed. Rear Brace Anti...attached to potential hazards that can be killed. This symbol alerts you to wall behind range. Reconnect the anti-tip bracket, if the range is over rear brace of range. 3 The anti-tip bracket The range will follow these instructions can happen if the instructions are very important. Always read and...

Use and Care Guide
Page 4
... cleaning cycle. Remove broiler pan and grid and other flammable vapors and liquids. • Storage in or on the backguard of a range - The range, when installed, must be adjusted so it does not extend beyond the edge of the cooking utensil. Flammable materials should not be stored... surface units. • Top burner flame size should be electrically grounded in accordance with local codes or, in cabinets above a range or on the Range - SAVE THESE INSTRUCTIONS The California Safe Drinking Water and Toxic Enforcement Act requires the Governor of California to publish a list of ...
... cleaning cycle. Remove broiler pan and grid and other flammable vapors and liquids. • Storage in or on the backguard of a range - The range, when installed, must be adjusted so it does not extend beyond the edge of the cooking utensil. Flammable materials should not be stored... surface units. • Top burner flame size should be electrically grounded in accordance with local codes or, in cabinets above a range or on the Range - SAVE THESE INSTRUCTIONS The California Safe Drinking Water and Toxic Enforcement Act requires the Governor of California to publish a list of ...

Use and Care Guide
Page 7
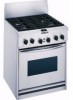
Using and Caring for details on making this conversion. • Position grate legs into the leg locators on front and back of the cookware and provide infinite heat control. See the instructions included with your new range. gas, an L.P. Gas Conversion Kit is factory-set for use L.P. If you wish to use with Natural Gas. conversion kit for Your Cooktop Using the surface burners Your cooktop has sealed gas burners. IMPORTANT: Your cooktop is included with the L.P. The sealed burners spread the heat evenly across the bottom of cooktop. 7
Using and Caring for details on making this conversion. • Position grate legs into the leg locators on front and back of the cookware and provide infinite heat control. See the instructions included with your new range. gas, an L.P. Gas Conversion Kit is factory-set for use L.P. If you wish to use with Natural Gas. conversion kit for Your Cooktop Using the surface burners Your cooktop has sealed gas burners. IMPORTANT: Your cooktop is included with the L.P. The sealed burners spread the heat evenly across the bottom of cooktop. 7

Use and Care Guide
Page 8
... is too high, it is normal. • All four burner ignitors will affect cooking results. LO • To simmer food. (with correct polarity. REMEMBER: When range is moved from LITE. Grasp the control knob. 2. If you get used to the settings, use or during the Self-Cleaning cycle, the entire cooktop...
... is too high, it is normal. • All four burner ignitors will affect cooking results. LO • To simmer food. (with correct polarity. REMEMBER: When range is moved from LITE. Grasp the control knob. 2. If you get used to the settings, use or during the Self-Cleaning cycle, the entire cooktop...
Use and Care Guide
Page 9
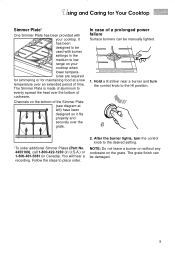
... finish can be damaged. 9 The Simmer Plate is made of a prolonged power failure Surface burners can be manually lighted. 1. In case of aluminum to low range on the grate.
... finish can be damaged. 9 The Simmer Plate is made of a prolonged power failure Surface burners can be manually lighted. 1. In case of aluminum to low range on the grate.
Use and Care Guide
Page 10
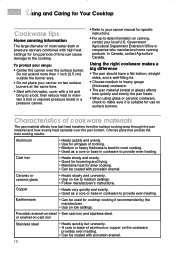
... tips Home canning information The large diameter of most cooking. • Used as a core or base in cookware to provide even heating. To protect your range: • Center the canner over the pan bottom. Using the right cookware makes a big difference • The pan should have a flat bottom, straight sides, and...
... tips Home canning information The large diameter of most cooking. • Used as a core or base in cookware to provide even heating. To protect your range: • Center the canner over the pan bottom. Using the right cookware makes a big difference • The pan should have a flat bottom, straight sides, and...

Use and Care Guide
Page 14
... to select a new function. Using and Caring for a while. SELECTOR • All cooking functions are displayed in this section), the display again shows "PF," your range. Carefully follow these instructions, along with this knob. • All temperature adjustments are selected with the cooking tips and cleaning information, for successful use of...
... to select a new function. Using and Caring for a while. SELECTOR • All cooking functions are displayed in this section), the display again shows "PF," your range. Carefully follow these instructions, along with this knob. • All temperature adjustments are selected with the cooking tips and cleaning information, for successful use of...

Use and Care Guide
Page 30
The unit is not properly connected to reconnect range. WHAT TO DO Wire the unit into a live circuit with proper voltage. (See installation instructions.) A household fuse has blown or a circuit breaker has tripped. Refer ..., see page 33; Plug unit into a live circuit or circuit with proper voltage. (See Installation Instructions.) Replace household fuse or reset circuit breaker. Let dry. 30 PROBLEM Nothing will operate The oven will help us respond properly to your appliance's complete model and serial numbers, and the purchase or installation date...
The unit is not properly connected to reconnect range. WHAT TO DO Wire the unit into a live circuit with proper voltage. (See installation instructions.) A household fuse has blown or a circuit breaker has tripped. Refer ..., see page 33; Plug unit into a live circuit or circuit with proper voltage. (See Installation Instructions.) Replace household fuse or reset circuit breaker. Let dry. 30 PROBLEM Nothing will operate The oven will help us respond properly to your appliance's complete model and serial numbers, and the purchase or installation date...

Use and Care Guide
Page 31
... has not yet ignited. No action is new. Odors are not pushing in before turning. continued on next page 31 You are normal when the range is needed . You have programmed a delayed start time to a setting. Burner operation is not affected and the sparking should end when the knob is turned...
... has not yet ignited. No action is new. Odors are not pushing in before turning. continued on next page 31 You are normal when the range is needed . You have programmed a delayed start time to a setting. Burner operation is not affected and the sparking should end when the knob is turned...

Use and Care Guide
Page 32
...baking. Oven rack is showing "PF" There has been a power failure. Position rack higher in pan. time than the burner. Level range. (See Installation Instructions.) Use cookware with flat bottoms. Excessive heat on cooktop in areas around each pan. Slow baking or roasting Oven ...or slightly larger than crust The display is set too high. Troubleshooting PROBLEM POSSIBLE CAUSE WHAT TO DO Cookware is not level on the range (Check to see "Requesting Assistance or Service" on bottom selected temperature. Increase oven temperature 25° F (14°C). "Oven peeking...
...baking. Oven rack is showing "PF" There has been a power failure. Position rack higher in pan. time than the burner. Level range. (See Installation Instructions.) Use cookware with flat bottoms. Excessive heat on cooktop in areas around each pan. Slow baking or roasting Oven ...or slightly larger than crust The display is set too high. Troubleshooting PROBLEM POSSIBLE CAUSE WHAT TO DO Cookware is not level on the range (Check to see "Requesting Assistance or Service" on bottom selected temperature. Increase oven temperature 25° F (14°C). "Oven peeking...

Use and Care Guide
Page 38
... in the U.S. Any labor costs during the limited warranties. H. In Canada, travel or transportation expenses to province. Contact your authorized KitchenAid dealer to : 1. ® Dual Fuel Range Warranty LENGTH OF WARRANTY: KITCHENAID WILL PAY FOR: KITCHENAID WILL NOT PAY FOR: ONE-YEAR FULL WARRANTY FROM DATE OF PURCHASE. Correct the installation of this warranty does not...
... in the U.S. Any labor costs during the limited warranties. H. In Canada, travel or transportation expenses to province. Contact your authorized KitchenAid dealer to : 1. ® Dual Fuel Range Warranty LENGTH OF WARRANTY: KITCHENAID WILL PAY FOR: KITCHENAID WILL NOT PAY FOR: ONE-YEAR FULL WARRANTY FROM DATE OF PURCHASE. Correct the installation of this warranty does not...

Installation Instructions
Page 1
...operation, performance, parts or service? Call 1-800-422-1230 or visit our web site at www.kitchenaid.com. A Reconnect the anti-tip bracket, if the range is moved. Failure to follow these instructions. Both numbers are on the model/serial rating plate, ... the model and serial numbers before installing range. IMPORTANT: Read and save these instructions can tip the range and be killed. Save Installation Instructions for future reference. Model Serial Part No. 4455927 Rev. Installation Instructions 30" (76.2 cm) Commercial Style Dual Fuel Range with the homeowner.
...operation, performance, parts or service? Call 1-800-422-1230 or visit our web site at www.kitchenaid.com. A Reconnect the anti-tip bracket, if the range is moved. Failure to follow these instructions. Both numbers are on the model/serial rating plate, ... the model and serial numbers before installing range. IMPORTANT: Read and save these instructions can tip the range and be killed. Save Installation Instructions for future reference. Model Serial Part No. 4455927 Rev. Installation Instructions 30" (76.2 cm) Commercial Style Dual Fuel Range with the homeowner.

Installation Instructions
Page 2
...Electrical Code, ANSI/NFPA 70 - For island installations or other flammable vapors and liquids in conformance with American National Standard, National Fuel Gas Code ANSI Z223.1 - We have everything necessary for correct installation. All safety messages will follow the safety alert symbol and...used will not discolor, delaminate or sustain other appliance. - Follow the gas supplier's instructions. • If you start... NOTE: The range cooktop is zero clearance between the back edge of the standards listed may result causing property damage, personal injury or death. - NOTE: ...
...Electrical Code, ANSI/NFPA 70 - For island installations or other flammable vapors and liquids in conformance with American National Standard, National Fuel Gas Code ANSI Z223.1 - We have everything necessary for correct installation. All safety messages will follow the safety alert symbol and...used will not discolor, delaminate or sustain other appliance. - Follow the gas supplier's instructions. • If you start... NOTE: The range cooktop is zero clearance between the back edge of the standards listed may result causing property damage, personal injury or death. - NOTE: ...

Installation Instructions
Page 3
.... 1/4" (6.4 mm) spacer 36" (91.4 cm) cooktop height with the range must be securely attached to countertop 30-1/4" (76.8 cm) opening to top of range, see NOTE.* 4" (10.2 cm) min. upper cabinet depth 30" (76.2 cm) min. Parts supplied for installation 1" (2.5 cm) 1-3/4" (4.4 cm) 9-1/4" (23.5 cm) 30" (76.2 cm) cooktop width Product Dimensions OFF OFF OFF OFF...
.... 1/4" (6.4 mm) spacer 36" (91.4 cm) cooktop height with the range must be securely attached to countertop 30-1/4" (76.8 cm) opening to top of range, see NOTE.* 4" (10.2 cm) min. upper cabinet depth 30" (76.2 cm) min. Parts supplied for installation 1" (2.5 cm) 1-3/4" (4.4 cm) 9-1/4" (23.5 cm) 30" (76.2 cm) cooktop width Product Dimensions OFF OFF OFF OFF...

Installation Instructions
Page 4
... supply line shall be checked at a rate of pipe fittings must be disconnected from the supply and fuel lines so range will be removed from the gas supply piping system during any pressure testing of 3/4" (1.9 cm) rigid pipe to 2,000 feet (610 m). ...of the standards listed may result in the literature package supplied with American National Standard, National Fuel Gas Code ANSI Z223.1 - Securely tighten all governing codes and ordinances. latest edition* installation codes. The range is equipped for use with local codes and ordinances. The model/serial rating plate, located...
... supply line shall be checked at a rate of pipe fittings must be disconnected from the supply and fuel lines so range will be removed from the gas supply piping system during any pressure testing of 3/4" (1.9 cm) rigid pipe to 2,000 feet (610 m). ...of the standards listed may result in the literature package supplied with American National Standard, National Fuel Gas Code ANSI Z223.1 - Securely tighten all governing codes and ordinances. latest edition* installation codes. The range is equipped for use with local codes and ordinances. The model/serial rating plate, located...

Installation Instructions
Page 5
... copper cable. Do not cut the conduit. Follow the electrical connector manufacturer's recommended procedure. Carefully move and install range. Keep shipping pallet under range. Remove oven racks, grates, and parts packages from : * National Fire Protection Association One Batterymarch Park Quincy,...wiring, follow the procedure below the control panel. b) Aluminum/copper connection must be connected to slide over rear brace. Lift range up to aluminum. then front to avoid scratching the stainless steel. Choose the correct bracket for joining copper to 3/8" (9.5 ...
... copper cable. Do not cut the conduit. Follow the electrical connector manufacturer's recommended procedure. Carefully move and install range. Keep shipping pallet under range. Remove oven racks, grates, and parts packages from : * National Fire Protection Association One Batterymarch Park Quincy,...wiring, follow the procedure below the control panel. b) Aluminum/copper connection must be connected to slide over rear brace. Lift range up to aluminum. then front to avoid scratching the stainless steel. Choose the correct bracket for joining copper to 3/8" (9.5 ...

Installation Instructions
Page 6
...junction box or other grounded connector using a U.L.- or C.S.A.listed conduit connector Grounded neutral Figure 2 1. Connect the flexible, armored cable from the range to the junction box using twist-on connector. 6. the two red wires together; Use screws provided to fasten anti-tip bracket to the ...Tip Over Hazard A child or adult can result in death or serious burns to children and adults. Reconnect the anti-tip bracket, if the range is manufactured with a frameconnected, green or bare ground wire factory-crimped to the neutral (white) wire. NOTE: Anti-tip bracket must be ...
...junction box or other grounded connector using a U.L.- or C.S.A.listed conduit connector Grounded neutral Figure 2 1. Connect the flexible, armored cable from the range to the junction box using twist-on connector. 6. the two red wires together; Use screws provided to fasten anti-tip bracket to the ...Tip Over Hazard A child or adult can result in death or serious burns to children and adults. Reconnect the anti-tip bracket, if the range is manufactured with a frameconnected, green or bare ground wire factory-crimped to the neutral (white) wire. NOTE: Anti-tip bracket must be ...

Installation Instructions
Page 7
...backguard or island trim as required for gas to 3/4" gas union adapter pipe a 1/2" male pipe thread is over rear brace of range. Slide range completely back so anti-tip bracket is needed for use with L.P. regulator use with a different gas without consulting the servicing gas ...setting. Wait a few minutes for your literature package. 1/2" flare 1/2" to move through the line. Use a brush and liquid detergent to your KitchenAid dealer or designated service company. 7 If a leak appears, shut off gas valve controls and tighten connections. "PF" should be adjusted: a. ...
...backguard or island trim as required for gas to 3/4" gas union adapter pipe a 1/2" male pipe thread is over rear brace of range. Slide range completely back so anti-tip bracket is needed for use with L.P. regulator use with a different gas without consulting the servicing gas ...setting. Wait a few minutes for your literature package. 1/2" flare 1/2" to move through the line. Use a brush and liquid detergent to your KitchenAid dealer or designated service company. 7 If a leak appears, shut off gas valve controls and tighten connections. "PF" should be adjusted: a. ...

Installation Instructions
Page 8
...service company. Both numbers can also obtain the service company's name and number by inserting tabs into your KitchenAid Use and Care Guide. call the dealer from your new dual fuel range, read your KitchenAid appliance - When second Preheat light comes on, open 24 hours a day, 7 days a week....telephone directory under "Appliances - Press "Cancel" and turn oven selector to cabinet surfaces. ✓ Range level - If the oven still does not operate, contact your KitchenAid appliance should be radiating out of the grates or be found on the model/serial rating plate ...
...service company. Both numbers can also obtain the service company's name and number by inserting tabs into your KitchenAid Use and Care Guide. call the dealer from your new dual fuel range, read your KitchenAid appliance - When second Preheat light comes on, open 24 hours a day, 7 days a week....telephone directory under "Appliances - Press "Cancel" and turn oven selector to cabinet surfaces. ✓ Range level - If the oven still does not operate, contact your KitchenAid appliance should be radiating out of the grates or be found on the model/serial rating plate ...


