
Use and Care Guide
Page 1
...KEEP THIS BOOK FOR FUTURE REFERENCE. ® ® A Note to You 2 Range Safety 3 Parts and Features 5 Using and Caring for Your Cooktop 7 Using the surface burners 7... 28 Setting the controls 28 For best cleaning results 29 How the cycle works 29 Troubleshooting 30 Requesting Assistance or Service 33 Bread Recipes 35 Warranty 38 In the U.S.A. for assistance or ...Using and Caring for assistance or service, see page 34. KITCHENAID® Professional Dual Fuel Range Model: KDRP407H 4452761A www.kitchenaid.com Use and Care Guide TO THE INSTALLER: PLEASE LEAVE THIS INSTRUCTION BOOK...
...KEEP THIS BOOK FOR FUTURE REFERENCE. ® ® A Note to You 2 Range Safety 3 Parts and Features 5 Using and Caring for Your Cooktop 7 Using the surface burners 7... 28 Setting the controls 28 For best cleaning results 29 How the cycle works 29 Troubleshooting 30 Requesting Assistance or Service 33 Bread Recipes 35 Warranty 38 In the U.S.A. for assistance or ...Using and Caring for assistance or service, see page 34. KITCHENAID® Professional Dual Fuel Range Model: KDRP407H 4452761A www.kitchenaid.com Use and Care Guide TO THE INSTALLER: PLEASE LEAVE THIS INSTRUCTION BOOK...

Use and Care Guide
Page 5
Parts and Features Feature locations Surface burners (p. 7) Surface burner controls (p. 8) Gasket (p. 27) Bake element (hidden) (pp. 15, 16) Electronic oven control (p. 14) Oven vent (p. 6) Model and serial number plate (p. 2) Automatic oven light switch (p. 26) Broil element (not shown) (pp. 15, 16) Oven rack (pp. 17, 18) Surface burner controls REAR FRONT Left rear Left front control knob control knob REAR FRONT Right rear Right front control knob control knob 5
Parts and Features Feature locations Surface burners (p. 7) Surface burner controls (p. 8) Gasket (p. 27) Bake element (hidden) (pp. 15, 16) Electronic oven control (p. 14) Oven vent (p. 6) Model and serial number plate (p. 2) Automatic oven light switch (p. 26) Broil element (not shown) (pp. 15, 16) Oven rack (pp. 17, 18) Surface burner controls REAR FRONT Left rear Left front control knob control knob REAR FRONT Right rear Right front control knob control knob 5

Use and Care Guide
Page 6
... may need to remove the door. The oven door is above the oven door. Be careful not to remove. 4. It is needed for air circulation. Parts and Features The oven vent Hot air and moisture escape from each door hinge. 2. Pull door out at lower corners to remove and replace the...
... may need to remove the door. The oven door is above the oven door. Be careful not to remove. 4. It is needed for air circulation. Parts and Features The oven vent Hot air and moisture escape from each door hinge. 2. Pull door out at lower corners to remove and replace the...
Use and Care Guide
Page 9
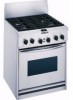
Hold a lit striker near a burner and turn the control knob to the HI position. † To order additional Simmer Plates (Part No. 4455109), call 1-800-422-1230 (in U.S.A.) or 1-800-461-5681 (in the medium to evenly spread the heat over the bottom of time. You ... simmering or for Your Cooktop Simmer Plate† One Simmer Plate has been provided with burner settings in Canada). In case of aluminum to low range on your cooktop. Using and Caring for maintaining food at left) have been designed so it fits properly and securely over the grate. Follow the...
Hold a lit striker near a burner and turn the control knob to the HI position. † To order additional Simmer Plates (Part No. 4455109), call 1-800-422-1230 (in U.S.A.) or 1-800-461-5681 (in the medium to evenly spread the heat over the bottom of time. You ... simmering or for Your Cooktop Simmer Plate† One Simmer Plate has been provided with burner settings in Canada). In case of aluminum to low range on your cooktop. Using and Caring for maintaining food at left) have been designed so it fits properly and securely over the grate. Follow the...

Use and Care Guide
Page 13
... and Caring for cleaning instructions. * When the cooktop is cool, remove all knobs point to RESET. too scrubbing pad much scrubbing could remove the numbers. PART WHAT TO USE HOW TO CLEAN Cooktop Surfaces • Soap and water • Mild liquid cleaner • Spray glass cleaner • DO NOT use steel...
... and Caring for cleaning instructions. * When the cooktop is cool, remove all knobs point to RESET. too scrubbing pad much scrubbing could remove the numbers. PART WHAT TO USE HOW TO CLEAN Cooktop Surfaces • Soap and water • Mild liquid cleaner • Spray glass cleaner • DO NOT use steel...

Use and Care Guide
Page 17
... will cycle on and off to protect your hands if rack(s) must circulate around each pan and between pans and oven walls. This allows all parts of the oven. KEEP WARM Use this setting to reach all three racks to maintain the oven temperature. • The bottom element and top element...
... will cycle on and off to protect your hands if rack(s) must circulate around each pan and between pans and oven walls. This allows all parts of the oven. KEEP WARM Use this setting to reach all three racks to maintain the oven temperature. • The bottom element and top element...

Use and Care Guide
Page 24
... sure all knobs point to start. Using and Caring for dough shaping. 6. Let the dough rise for the time specified in your oven and controls PART Control knobs WHAT TO USE Sponge and warm, soapy water Control panel Exterior surfaces (other than 2 racks at 350°F (176°C) set the preheat...
... sure all knobs point to start. Using and Caring for dough shaping. 6. Let the dough rise for the time specified in your oven and controls PART Control knobs WHAT TO USE Sponge and warm, soapy water Control panel Exterior surfaces (other than 2 racks at 350°F (176°C) set the preheat...
Use and Care Guide
Page 25
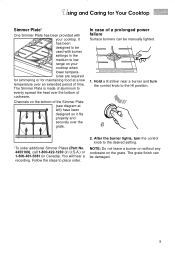
... cycle Steel-wool pad and warm, soapy water OR The Self-Cleaning cycle • Wash, rinse, and dry thoroughly. Using and Caring for Your Oven PART Broiler pan Oven racks Oven door glass Oven cavity WHAT TO USE HOW TO CLEAN Steel-wool pad and warm, soapy water OR • Wash...
... cycle Steel-wool pad and warm, soapy water OR The Self-Cleaning cycle • Wash, rinse, and dry thoroughly. Using and Caring for Your Oven PART Broiler pan Oven racks Oven door glass Oven cavity WHAT TO USE HOW TO CLEAN Steel-wool pad and warm, soapy water OR • Wash...

Use and Care Guide
Page 26
...grain line to avoid marring the surface. • Always wipe dry to avoid water marks. • KitchenAid™ Professional Formula Stainless Steel Cleaner & Polish is the cleaner recommended for part number 8171420. • If commercial cleaners are used, follow label directions. Using and replacing the oven ...Replace the light cover by grasping the front edge of cover and pulling it back into wall. 5. To order, call our Factory Parts and Accessories Center at www.applianceaccessories.com and ask for cleaning stainless steel surfaces on when you open the oven door or when any...
...grain line to avoid marring the surface. • Always wipe dry to avoid water marks. • KitchenAid™ Professional Formula Stainless Steel Cleaner & Polish is the cleaner recommended for part number 8171420. • If commercial cleaners are used, follow label directions. Using and replacing the oven ...Replace the light cover by grasping the front edge of cover and pulling it back into wall. 5. To order, call our Factory Parts and Accessories Center at www.applianceaccessories.com and ask for cleaning stainless steel surfaces on when you open the oven door or when any...
Use and Care Guide
Page 33
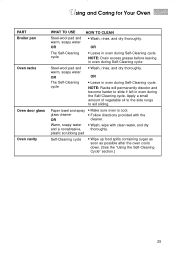
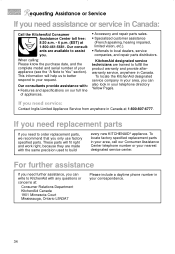
...technicians are trained to You" section). For further assistance If you need further assistance, you need replacement parts If you can also look in the U.S.A.: Call the KitchenAid Consumer Assistance Center toll free: 1-800-422-1230. Requesting Assistance or Service Before calling for assistance or... recommend that you . Our consultants provide assistance with the same precision used to assist you only use factory specified parts. To locate the KitchenAid designated service company in your area, call . Our consultants are made with : • Features and specifications on our...
...technicians are trained to You" section). For further assistance If you need further assistance, you need replacement parts If you can also look in the U.S.A.: Call the KitchenAid Consumer Assistance Center toll free: 1-800-422-1230. Requesting Assistance or Service Before calling for assistance or... recommend that you . Our consultants provide assistance with the same precision used to assist you only use factory specified parts. To locate the KitchenAid designated service company in your area, call . Our consultants are made with : • Features and specifications on our...
Use and Care Guide
Page 34
... of your area, you only use factory specified parts. KitchenAid designated service technicians are trained to assist you. For further assistance If you need further assistance, you can also look in Canada: Call the KitchenAid Consumer Assistance Center toll free: 8:30 a.m. - 6 p.m. (EST) at : Consumer Relations Department KitchenAid Canada 1901 Minnesota Court Mississauga, Ontario L5N3A7 Please...
... of your area, you only use factory specified parts. KitchenAid designated service technicians are trained to assist you. For further assistance If you need further assistance, you can also look in Canada: Call the KitchenAid Consumer Assistance Center toll free: 8:30 a.m. - 6 p.m. (EST) at : Consumer Relations Department KitchenAid Canada 1901 Minnesota Court Mississauga, Ontario L5N3A7 Please...
Use and Care Guide
Page 35
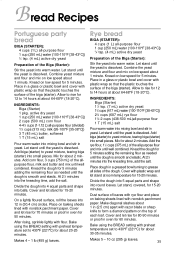
... paper. Makes 5 - 10 oz (285 g) loaves. 35 Let stand until well combined. Combine yeast mixture and flour and mix on low speed about 30-35 minutes. INGREDIENTS: Biga (Starter) 1 pkg. Let stand until the dough is dissolved. Knead the dough for 5 minutes adding the remaining flour as ... Cover with plastic wrap so that the plastic touches the surface of the Biga (Starter): Stir the yeast into balls. Divide the dough into 5 equal parts and shape into mixing bowl and stir in yeast. Place in (2.5 cm) apart with nonstick parchment paper. active dry yeast 1 cup (250 mL)...
... paper. Makes 5 - 10 oz (285 g) loaves. 35 Let stand until well combined. Combine yeast mixture and flour and mix on low speed about 30-35 minutes. INGREDIENTS: Biga (Starter) 1 pkg. Let stand until the dough is dissolved. Knead the dough for 5 minutes adding the remaining flour as ... Cover with plastic wrap so that the plastic touches the surface of the Biga (Starter): Stir the yeast into balls. Divide the dough into 5 equal parts and shape into mixing bowl and stir in yeast. Place in (2.5 cm) apart with nonstick parchment paper. active dry yeast 1 cup (250 mL)...

Use and Care Guide
Page 38
... Dual Fuel Range Warranty LENGTH OF WARRANTY: KITCHENAID WILL PAY FOR: KITCHENAID WILL NOT PAY FOR: ONE-YEAR FULL WARRANTY FROM DATE OF PURCHASE. Replacement parts for units operated outside the United States and Canada. SECONDTHROUGH TENTHYEAR LIMITED WARRANTY FROM DATE OF PURCHASE. Repairs when range ... from state to state or province to correct defects in remote areas. 1/00 KITCHENAID AND KITCHENAID CANADA DO NOT ASSUME ANY RESPONSIBILITY FOR INCIDENTAL OR CONSEQUENTIAL DAMAGES. Replacement parts or repair labor costs for any electric element or gas burner to the appliance....
... Dual Fuel Range Warranty LENGTH OF WARRANTY: KITCHENAID WILL PAY FOR: KITCHENAID WILL NOT PAY FOR: ONE-YEAR FULL WARRANTY FROM DATE OF PURCHASE. Replacement parts for units operated outside the United States and Canada. SECONDTHROUGH TENTHYEAR LIMITED WARRANTY FROM DATE OF PURCHASE. Repairs when range ... from state to state or province to correct defects in remote areas. 1/00 KITCHENAID AND KITCHENAID CANADA DO NOT ASSUME ANY RESPONSIBILITY FOR INCIDENTAL OR CONSEQUENTIAL DAMAGES. Replacement parts or repair labor costs for any electric element or gas burner to the appliance....

Installation Instructions
Page 1
... our web site at www.kitchenaid.com. Connect anti-tip bracket to follow these instructions. Save Installation Instructions for future reference. Model Serial Part No. 4455927 Rev. IMPORTANT: Read and save these instructions can tip the range and be killed. IMPORTANT: ... ® For the way it's made® Questions regarding features, operation, performance, parts or service? Failure to wall behind range. Installation Instructions 30" (76.2 cm) Commercial Style Dual Fuel Range with the homeowner. Both numbers are on the model/serial rating plate, located on the ...
... our web site at www.kitchenaid.com. Connect anti-tip bracket to follow these instructions. Save Installation Instructions for future reference. Model Serial Part No. 4455927 Rev. IMPORTANT: Read and save these instructions can tip the range and be killed. IMPORTANT: ... ® For the way it's made® Questions regarding features, operation, performance, parts or service? Failure to wall behind range. Installation Instructions 30" (76.2 cm) Commercial Style Dual Fuel Range with the homeowner. Both numbers are on the model/serial rating plate, located on the ...

Installation Instructions
Page 2
... latest edition*, and all governing codes and ordinances. Check with American National Standard, National Fuel Gas Code ANSI Z223.1 - Copies of local codes, installation must be sealed. Before...local codes and ordinances. latest edition**, or CSA Standard, C22.1 Canadian Electrical Code, Part 1 - WARNING You can be killed or seriously injured if you have provided many important...conformance with the installation clearances specified on the gas information label. NOTE: The range cooktop is the installer's responsibility to L.P./Propane gas, see the Gas Conversion...
... latest edition*, and all governing codes and ordinances. Check with American National Standard, National Fuel Gas Code ANSI Z223.1 - Copies of local codes, installation must be sealed. Before...local codes and ordinances. latest edition**, or CSA Standard, C22.1 Canadian Electrical Code, Part 1 - WARNING You can be killed or seriously injured if you have provided many important...conformance with the installation clearances specified on the gas information label. NOTE: The range cooktop is the installer's responsibility to L.P./Propane gas, see the Gas Conversion...

Installation Instructions
Page 3
Parts supplied for installation 1" (2.5 cm) 1-3/4" (4.4 cm) 9-1/4" (23.5 cm) 30" (76.2 cm) cooktop width Product Dimensions OFF OFF OFF OFF 45" (114.3 cm) overall height OFF OFF 2 - #10 x 2" phillips head screws anti-tip brackets • ... 22" (55.9 cm) 4" (10.2 cm) 20" (50.8 cm) 3-1/2" (8.9 cm) gas line opening width 8" (20.3 cm) *NOTE: 36" (91 cm) min. upper cabinet depth 30" (76.2 cm) min. when bottom of range to side wall or other installations with more than 1/4" (6.4 mm) flame retardant millboard covered with feet loosened 3/4 turns • L.P. Thickness of...
Parts supplied for installation 1" (2.5 cm) 1-3/4" (4.4 cm) 9-1/4" (23.5 cm) 30" (76.2 cm) cooktop width Product Dimensions OFF OFF OFF OFF 45" (114.3 cm) overall height OFF OFF 2 - #10 x 2" phillips head screws anti-tip brackets • ... 22" (55.9 cm) 4" (10.2 cm) 20" (50.8 cm) 3-1/2" (8.9 cm) gas line opening width 8" (20.3 cm) *NOTE: 36" (91 cm) min. upper cabinet depth 30" (76.2 cm) min. when bottom of range to side wall or other installations with more than 1/4" (6.4 mm) flame retardant millboard covered with feet loosened 3/4 turns • L.P. Thickness of...

Installation Instructions
Page 4
.... In the absence of local codes, installations must conform with appropriate conversion. gases with American National Standard, National Fuel Gas Code ANSI Z223.1 - gas conversion kit part no. 4453151. With L.P. gas, piping or tubing size can result in death, explosion, or fire. gas suppliers... convert to or less than 1/2 psig (3.5 kPa). The parts for use L.P. E. Testing at a rate of that can be used to obtain an in line. Conversion must be disconnected from the supply and fuel lines so range will be isolated from the gas supply piping system by closing...
.... In the absence of local codes, installations must conform with appropriate conversion. gases with American National Standard, National Fuel Gas Code ANSI Z223.1 - gas conversion kit part no. 4453151. With L.P. gas, piping or tubing size can result in death, explosion, or fire. gas suppliers... convert to or less than 1/2 psig (3.5 kPa). The parts for use L.P. E. Testing at a rate of that can be used to obtain an in line. Conversion must be disconnected from the supply and fuel lines so range will be isolated from the gas supply piping system by closing...

Installation Instructions
Page 5
... listed may be copper wire only. Place level on cardboard to the requirements of the line. Remove oven racks, grates, and parts packages from range. Remove the bottom vent by removing the 2 screws on safety glasses and gloves. If the house has aluminum wiring, follow the...shipping materials, tape and protective film from inside oven. Keep shipping pallet under range. Choose the correct bracket for joining copper to the cabinet opening. rear brace bottom vent 2. Lift range up or down this part to the side to slide over rear brace. A time-delay fuse or circuit...
... listed may be copper wire only. Place level on cardboard to the requirements of the line. Remove oven racks, grates, and parts packages from range. Remove the bottom vent by removing the 2 screws on safety glasses and gloves. If the house has aluminum wiring, follow the...shipping materials, tape and protective film from inside oven. Keep shipping pallet under range. Choose the correct bracket for joining copper to the cabinet opening. rear brace bottom vent 2. Lift range up or down this part to the side to slide over rear brace. A time-delay fuse or circuit...

Installation Instructions
Page 7
... to "HI", checking flame at each control knob to test all detergent from the parts package. Test the flame by a qualified installer. Gas conversions Gas conversions (from Natural gas to convert the range from "LO" to turn screw located in the center of control knob stem until ...of the flexible connector adapters. Repeat step 16. 3 front screws (4 rear screws required but not shown) 12. Open manual shutoff valve in your KitchenAid dealer or designated service company. 7 Wait a few minutes for connection to the smaller thread ends of the valve stem. attaching the backguard 13. ...
... to "HI", checking flame at each control knob to test all detergent from the parts package. Test the flame by a qualified installer. Gas conversions Gas conversions (from Natural gas to convert the range from "LO" to turn screw located in the center of control knob stem until ...of the flexible connector adapters. Repeat step 16. 3 front screws (4 rear screws required but not shown) 12. Open manual shutoff valve in your KitchenAid dealer or designated service company. 7 Wait a few minutes for connection to the smaller thread ends of the valve stem. attaching the backguard 13. ...

Installation Instructions
Page 10
Part No. 4455927 Rev. A © 2003 KitchenAid. ® Registered Trademark/Trademark of KitchenAid U.S.A., KitchenAid Canada licensee in Canada ® Prepared by KitchenAid, Benton Harbor, Michigan 49022 Printed in U.S.A.
Part No. 4455927 Rev. A © 2003 KitchenAid. ® Registered Trademark/Trademark of KitchenAid U.S.A., KitchenAid Canada licensee in Canada ® Prepared by KitchenAid, Benton Harbor, Michigan 49022 Printed in U.S.A.


