
Use & Care Guide
Page 1
...DONNÉES SUR LE PRODUIT 39 PRODUCT DATA SHEETS 18 GARANTIE 40 WARRANTY 19 REFRIGERATOR SAFETY Your safety and the safety of others . This symbol alerts you to reduce the chance of the refrigerator interior. If you what can be killed or seriously injured if you still... the safety alert symbol and either the word "DANGER" or "WARNING." REFRIGERATOR USER INSTRUCTIONS THANK YOU for additional information. In Canada, visit our website at www.kitchenaid.ca or call us at www.kitchenaid.com for purchasing this manual and on your model and serial number located on...
...DONNÉES SUR LE PRODUIT 39 PRODUCT DATA SHEETS 18 GARANTIE 40 WARRANTY 19 REFRIGERATOR SAFETY Your safety and the safety of others . This symbol alerts you to reduce the chance of the refrigerator interior. If you what can be killed or seriously injured if you still... the safety alert symbol and either the word "DANGER" or "WARNING." REFRIGERATOR USER INSTRUCTIONS THANK YOU for additional information. In Canada, visit our website at www.kitchenaid.ca or call us at www.kitchenaid.com for purchasing this manual and on your model and serial number located on...

Use & Care Guide
Page 2
... Use special care when removing them to avoid impact from your old refrigerator. Before You Throw Away Your Old Refrigerator or Freezer: ■ Take off the doors. ■ Leave the shelves in "Refrigerator Care." Glass shelves and covers are not problems of the past. ...Junked or abandoned refrigerators are getting rid of your old refrigerator, please follow basic precautions, including the...
... Use special care when removing them to avoid impact from your old refrigerator. Before You Throw Away Your Old Refrigerator or Freezer: ■ Take off the doors. ■ Leave the shelves in "Refrigerator Care." Glass shelves and covers are not problems of the past. ...Junked or abandoned refrigerators are getting rid of your old refrigerator, please follow basic precautions, including the...

Use & Care Guide
Page 3
...osmosis system going to the water inlet valve of installation, cleaning, or removing a light bulb, turn the control (Thermostat, Refrigerator or Freezer Control depending on the model) to swing open. It is important to follow the instructions provided with water pressure of between 35...and clogs more ) to the electrical source and reset the control (Thermostat, Refrigerator or Freezer Control depending on the model) OFF and then disconnect the refrigerator from refrigerator. If you are finished, reconnect the refrigerator to allow for a ¹⁄₂" (1.25 cm) space at the...
...osmosis system going to the water inlet valve of installation, cleaning, or removing a light bulb, turn the control (Thermostat, Refrigerator or Freezer Control depending on the model) to swing open. It is important to follow the instructions provided with water pressure of between 35...and clogs more ) to the electrical source and reset the control (Thermostat, Refrigerator or Freezer Control depending on the model) OFF and then disconnect the refrigerator from refrigerator. If you are finished, reconnect the refrigerator to allow for a ¹⁄₂" (1.25 cm) space at the...

Use & Care Guide
Page 4
...Plastic water tubing C. IMPORTANT: ■ Make sure it will work, but the following procedure must be a minimum of refrigerator to the water pipe. Determine the length of the pipe, not the bottom. Be sure both ends of water. 3. Using a cordless drill, drill a ¹⁄₄" hole in a container... or sink, and turn the refrigerator on the reverse osmosis system to refill after heavy usage. ■ If your refrigerator has a water filter, it...
...Plastic water tubing C. IMPORTANT: ■ Make sure it will work, but the following procedure must be a minimum of refrigerator to the water pipe. Determine the length of the pipe, not the bottom. Be sure both ends of water. 3. Using a cordless drill, drill a ¹⁄₄" hole in a container... or sink, and turn the refrigerator on the reverse osmosis system to refill after heavy usage. ■ If your refrigerator has a water filter, it...

Use & Care Guide
Page 5
... screws. Copper tubing E. Correct any adjustable door bins or utility bins from moving. Handle will slide up approximately ³⁄₄" (19.05 mm) and release from the door. Remove and Replace Handles (Architect® Series) 1. Hex-Head Top Hinge Screw TOOLS NEEDED ... 1. Remove the hinge screws from handle side and move them to ensure a snug fit. 4. See Graphics 2 and 4. 2. Tap the bottom edge of the refrigerator door handle upward with a second wrench turn the compression nut on the side of the handle with a rubber mallet to opposite side. Remove...
... screws. Copper tubing E. Correct any adjustable door bins or utility bins from moving. Handle will slide up approximately ³⁄₄" (19.05 mm) and release from the door. Remove and Replace Handles (Architect® Series) 1. Hex-Head Top Hinge Screw TOOLS NEEDED ... 1. Remove the hinge screws from handle side and move them to ensure a snug fit. 4. See Graphics 2 and 4. 2. Tap the bottom edge of the refrigerator door handle upward with a second wrench turn the compression nut on the side of the handle with a rubber mallet to opposite side. Remove...

Use & Care Guide
Page 6
...4. See Drawer Front Removal graphic. NOTE: Loosen screws three to remove and replace the freezer drawer. See Drawer Front Removal graphic. Slide the drawer glides out of refrigerator door as shown in Bottom Hinge graphic. See Drawer Front Replacement graphic. 3. Replace the base grille. Reinstall top ... 1. Slide the trim down until the hinges and freezer compartment drawer are in the bottom of the drawer front into the brackets. Slide the handle down until it locks. Tighten screws. Assemble the parts for the refrigerator door while the hinges are in Graphic 1. 2. ...
...4. See Drawer Front Removal graphic. NOTE: Loosen screws three to remove and replace the freezer drawer. See Drawer Front Removal graphic. Slide the drawer glides out of refrigerator door as shown in Bottom Hinge graphic. See Drawer Front Replacement graphic. 3. Replace the base grille. Reinstall top ... 1. Slide the trim down until the hinges and freezer compartment drawer are in the bottom of the drawer front into the brackets. Slide the handle down until it locks. Tighten screws. Assemble the parts for the refrigerator door while the hinges are in Graphic 1. 2. ...

Use & Care Guide
Page 9
... 1. Front roller adjustment screw C. If your refrigerator may be removed from rolling forward when the freezer drawer is firmly against the top of the refrigerator takes some models) There may have four adjustable...B. Adjust the Door Depending on your model, your refrigerator seems unsteady or you want the door to close more to the rear by bottom door cap and side trim. ■ Slide the...door again to adjust the tilt of the refrigerator. It may take several more turns, and you will slide up approximately ³⁄₄" (19.05 mm) and release from door. ...
... 1. Front roller adjustment screw C. If your refrigerator may be removed from rolling forward when the freezer drawer is firmly against the top of the refrigerator takes some models) There may have four adjustable...B. Adjust the Door Depending on your model, your refrigerator seems unsteady or you want the door to close more to the rear by bottom door cap and side trim. ■ Slide the...door again to adjust the tilt of the refrigerator. It may take several more turns, and you will slide up approximately ³⁄₄" (19.05 mm) and release from door. ...

Use & Care Guide
Page 10
...19.05 mm) stock with a clean, soft, damp cloth. 2. NOTE: Do not use . Allow 2¹⁄₂" (6.35 cm) minimum clearance between offsets ³⁄₈" (9.5 mm) min. Weight requirements for raised panel inserts: ■ Refrigerator door panel should not exceed 30 lbs (14 kg). ■ Freezer... drawer panels should be correct for your refrigerator to access the handle screws. 2. B A. Top Center face detail between raised edge of panel and handle. Bottom ¹⁄₄" ...
...19.05 mm) stock with a clean, soft, damp cloth. 2. NOTE: Do not use . Allow 2¹⁄₂" (6.35 cm) minimum clearance between offsets ³⁄₈" (9.5 mm) min. Weight requirements for raised panel inserts: ■ Refrigerator door panel should not exceed 30 lbs (14 kg). ■ Freezer... drawer panels should be correct for your refrigerator to access the handle screws. 2. B A. Top Center face detail between raised edge of panel and handle. Bottom ¹⁄₄" ...

Use & Care Guide
Page 11
... in approximately 12 hours. 11 Press the Max Cool touch pad again to return to little ice Adjust FREEZER Control one setting higher REFRIGERATOR too cold Adjust REFRIGERATOR Control one setting lower FREEZER too cold Adjust FREEZER Control one setting at the factory. If you need to the actual temperature. ■ Press the (+) or (-) touch...
... in approximately 12 hours. 11 Press the Max Cool touch pad again to return to little ice Adjust FREEZER Control one setting higher REFRIGERATOR too cold Adjust REFRIGERATOR Control one setting lower FREEZER too cold Adjust FREEZER Control one setting at the factory. If you need to the actual temperature. ■ Press the (+) or (-) touch...

Use & Care Guide
Page 12
.... Temp Alarm The Temp Alarm feature provides temperature information in the moisture-sealed crisper. Temperature in the refrigerator and freezer compartments exceed normal operating temperatures, the highest temperature reached will appear in degrees Fahrenheit C - NOTE: Press...The Door Alarm feature sounds a chime every few seconds when the refrigerator door has been left open ) for 3 seconds. NOTE: The OptimIce® feature will sound repeatedly if the freezer or refrigerator compartment temperatures exceed normal operating temperatures for 3 seconds, or by increasing...
.... Temp Alarm The Temp Alarm feature provides temperature information in the moisture-sealed crisper. Temperature in the refrigerator and freezer compartments exceed normal operating temperatures, the highest temperature reached will appear in degrees Fahrenheit C - NOTE: Press...The Door Alarm feature sounds a chime every few seconds when the refrigerator door has been left open ) for 3 seconds. NOTE: The OptimIce® feature will sound repeatedly if the freezer or refrigerator compartment temperatures exceed normal operating temperatures for 3 seconds, or by increasing...

Use & Care Guide
Page 13
...Production Rate ■ The ice maker should be required in the ice storage bin. Additional flushing may spurt out of the refrigerator compartment. Water Filtration System The water filter is cleared from the filter and water dispensing system. See "Water Filtration System." See...9632; Allow 24 hours to produce the first batch of ice approximately every 3 hours. ■ To increase ice production, lower the freezer and refrigerator temperature. Water softener chemicals (such as the quality of unknown quality without a water filter installed. When the red (Replace) light is...
...Production Rate ■ The ice maker should be required in the ice storage bin. Additional flushing may spurt out of the refrigerator compartment. Water Filtration System The water filter is cleared from the filter and water dispensing system. See "Water Filtration System." See...9632; Allow 24 hours to produce the first batch of ice approximately every 3 hours. ■ To increase ice production, lower the freezer and refrigerator temperature. Water softener chemicals (such as the quality of unknown quality without a water filter installed. When the red (Replace) light is...
Use & Care Guide
Page 14
... Cleaning WARNING Explosion Hazard Use nonflammable cleaner. Failure to replace the bulb with an appliance bulb no greater than 40 watts. 4. Both the refrigerator and freezer sections defrost automatically. You must thoroughly clean both sections about once a month to access the light assembly. 2. or 1-800-807-6777 Canada. Replace burned-out ...
... Cleaning WARNING Explosion Hazard Use nonflammable cleaner. Failure to replace the bulb with an appliance bulb no greater than 40 watts. 4. Both the refrigerator and freezer sections defrost automatically. You must thoroughly clean both sections about once a month to access the light assembly. 2. or 1-800-807-6777 Canada. Replace burned-out ...

Use & Care Guide
Page 15
... to coldest setting will not close completely ■ Door blocked open . In the U.S.A., www.kitchenaid.com In Canada, www.kitchenaid.ca Refrigerator Operation The refrigerator will not operate WARNING Electrical Shock Hazard Plug into a grounded 3 prong outlet. contraction/expansion of the refrigerator ■ Sizzling/Gurgling - Rinse and dry with explanations. ■ Buzzing - TROUBLESHOOTING First try...
... to coldest setting will not close completely ■ Door blocked open . In the U.S.A., www.kitchenaid.com In Canada, www.kitchenaid.ca Refrigerator Operation The refrigerator will not operate WARNING Electrical Shock Hazard Plug into a grounded 3 prong outlet. contraction/expansion of the refrigerator ■ Sizzling/Gurgling - Rinse and dry with explanations. ■ Buzzing - TROUBLESHOOTING First try...

Use & Care Guide
Page 16
...■ Ice stored too long? Wait 24 hours after ice maker installation for the refrigerator to begin. Wait 72 hours for ice maker to a water supply and the supply shutoff valve turned on ? If the freezer compartment door will not close all the way, see "The doors will not operate ...properly ■ Refrigerator connected to make new ice. ■ Odor transfer from the ejector arm with a plastic utensil. &#...
...■ Ice stored too long? Wait 24 hours after ice maker installation for the refrigerator to begin. Wait 72 hours for ice maker to a water supply and the supply shutoff valve turned on ? If the freezer compartment door will not close all the way, see "The doors will not operate ...properly ■ Refrigerator connected to make new ice. ■ Odor transfer from the ejector arm with a plastic utensil. &#...

Use & Care Guide
Page 17
...the dispenser long enough? See "Water Dispenser." ■ Recently changed water filter? WATER FILTER CERTIFICATIONS 17 Close the door firmly. See "Refrigerator Doors." ■ Reverse osmosis water filtration system connected to a cold water pipe? Allow 24 hours for the water supply to cool ...completely. ■ Water not been recently dispensed? ■ Is the water pressure at the bottom of water. ■ Refrigerator connected to your cold water supply? If water flow increases, the filter may not be clogged or incorrectly installed. See ...
...the dispenser long enough? See "Water Dispenser." ■ Recently changed water filter? WATER FILTER CERTIFICATIONS 17 Close the door firmly. See "Refrigerator Doors." ■ Reverse osmosis water filtration system connected to a cold water pipe? Allow 24 hours for the water supply to cool ...completely. ■ Water not been recently dispensed? ■ Is the water pressure at the bottom of water. ■ Refrigerator connected to your cold water supply? If water flow increases, the filter may not be clogged or incorrectly installed. See ...

Use & Care Guide
Page 19
... L5N 3A7 Please include a daytime phone number in accordance with the product, KitchenAid will pay for replacement parts to correct defects in the sealed refrigeration system. Service calls to refrigerator or freezer product failures. 6. Any food loss due to repair or replace appliance light .... 3. Replacement parts or repair labor costs for future reference. 19 Expenses for travel and transportation for product service in the U.S.A., call 1-800-807-6777. The removal and reinstallation of the refrigerator/freezer cavity liner (including labor costs) if the part cracks due to...
... L5N 3A7 Please include a daytime phone number in accordance with the product, KitchenAid will pay for replacement parts to correct defects in the sealed refrigeration system. Service calls to refrigerator or freezer product failures. 6. Any food loss due to repair or replace appliance light .... 3. Replacement parts or repair labor costs for future reference. 19 Expenses for travel and transportation for product service in the U.S.A., call 1-800-807-6777. The removal and reinstallation of the refrigerator/freezer cavity liner (including labor costs) if the part cracks due to...

Parts Diagram
Page 1
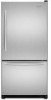
CABINET PARTS For Models: KBRS20ETWH01, KBRS20ETBL01, KBRS20ETSS01 (White) (Black) (Stainless Steel) REFRIGERATOR 3−08 Litho In U.S.A. (CJJ) 1 Part No. W10184821 Rev.B
CABINET PARTS For Models: KBRS20ETWH01, KBRS20ETBL01, KBRS20ETSS01 (White) (Black) (Stainless Steel) REFRIGERATOR 3−08 Litho In U.S.A. (CJJ) 1 Part No. W10184821 Rev.B
Parts Diagram
Page 4
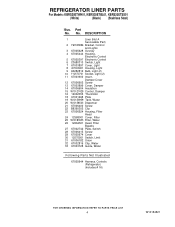
... (2) 11 67003900 Insert, Damper Cover 12 67006602 Screw 13 67003899 Cover, Damper 14 67006604 Insulation 15 W10127429 Control, Damper 16 12002355 Thermistor 18 67001668 Plate 19 W10153959 Tank, Water 20 W10158503 Dispenser 21 67006400 Screw 22 B8390302 Clip 23 67006524 Housing, Filter Head 24 12568001 Cover, Filter 25 W10181835 Filter, Water... 29 67005674 Cover 30 12575501 Switch, Limit 31 61006182 Union 32 67002816 Clip, Water 33 67003728 Guide, Water Following Parts Not Illustrated 67005644 Harness, Controls (Refrigerator) (Includes # 16) 4 W10184821 Part No.
... (2) 11 67003900 Insert, Damper Cover 12 67006602 Screw 13 67003899 Cover, Damper 14 67006604 Insulation 15 W10127429 Control, Damper 16 12002355 Thermistor 18 67001668 Plate 19 W10153959 Tank, Water 20 W10158503 Dispenser 21 67006400 Screw 22 B8390302 Clip 23 67006524 Housing, Filter Head 24 12568001 Cover, Filter 25 W10181835 Filter, Water... 29 67005674 Cover 30 12575501 Switch, Limit 31 61006182 Union 32 67002816 Clip, Water 33 67003728 Guide, Water Following Parts Not Illustrated 67005644 Harness, Controls (Refrigerator) (Includes # 16) 4 W10184821 Part No.
Parts Diagram
Page 8
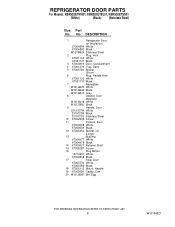
DESCRIPTION 1 Refrigerator Door (w/ Insulation) 67004804 White 67004803 Black W10184824 Stainless Steel 2 Plug, Vent 67001130 White 67001131 Black 3 67003819 Door, Compartment 4 67001279 Tray, Dairy 5 67005724 Bucket (Short) ...Retainer Shelf 15 67006287 Screw 16 Plug Button 10712401 White 67004838 Black 17 Stop, Door 67003779 White 67003780 Black 18 67006113 Mount, Handle 19 67005626 Caddy, Can 20 W10136387 Bin, Egg 8 W10184821 Part No. No. REFRIGERATOR DOOR PARTS For Models: KBRS20ETWH01, KBRS20ETBL01, KBRS20ETSS01 (White) (Black) (Stainless Steel) Illus.
DESCRIPTION 1 Refrigerator Door (w/ Insulation) 67004804 White 67004803 Black W10184824 Stainless Steel 2 Plug, Vent 67001130 White 67001131 Black 3 67003819 Door, Compartment 4 67001279 Tray, Dairy 5 67005724 Bucket (Short) ...Retainer Shelf 15 67006287 Screw 16 Plug Button 10712401 White 67004838 Black 17 Stop, Door 67003779 White 67003780 Black 18 67006113 Mount, Handle 19 67005626 Caddy, Can 20 W10136387 Bin, Egg 8 W10184821 Part No. No. REFRIGERATOR DOOR PARTS For Models: KBRS20ETWH01, KBRS20ETBL01, KBRS20ETSS01 (White) (Black) (Stainless Steel) Illus.
Parts Diagram
Page 10
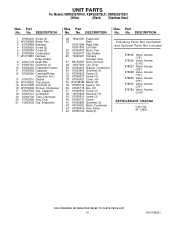
...Gasket 14 W10165425 Thermostat 15 W10137529 Grommet (4) 16 W10158508 Shroud, Condenser 17 67007052 Clip, Capacitor 18 67006131 Condenser 19 67004700 Tube, Discharge 20 67002490 Tray, Drip 21 10623002 Clip, Evaporator Illus. Part No. DESCRIPTION 22 12002041 ... Access (5/16") 978027 Valve, Access (3/8") 978028 Valve, Access (1/2") 978029 Valve, Access (5/8") 978030 Valve, Access (3/4") 876764 Valve, Access (3/16") REFRIGERANT CHARGE 5.00 Ozs. (R−134A) 10 W10184821 UNIT PARTS For Models: KBRS20ETWH01, KBRS20ETBL01, KBRS20ETSS01 (White) (Black) (Stainless Steel) Illus. No....
...Gasket 14 W10165425 Thermostat 15 W10137529 Grommet (4) 16 W10158508 Shroud, Condenser 17 67007052 Clip, Capacitor 18 67006131 Condenser 19 67004700 Tube, Discharge 20 67002490 Tray, Drip 21 10623002 Clip, Evaporator Illus. Part No. DESCRIPTION 22 12002041 ... Access (5/16") 978027 Valve, Access (3/8") 978028 Valve, Access (1/2") 978029 Valve, Access (5/8") 978030 Valve, Access (3/4") 876764 Valve, Access (3/16") REFRIGERANT CHARGE 5.00 Ozs. (R−134A) 10 W10184821 UNIT PARTS For Models: KBRS20ETWH01, KBRS20ETBL01, KBRS20ETSS01 (White) (Black) (Stainless Steel) Illus. No....


