
Use & Care Guide
Page 1
...ÉRATEUR 20 INSTALLATION INSTRUCTIONS 2 INSTRUCTIONS D'INSTALLATION 21 REFRIGERATOR USE 10 UTILISATION DU RÉFRIGÉRATEUR 31 REFRIGERATOR CARE 14 ENTRETIEN DU RÉFRIGÉRATEUR 35 TROUBLESHOOTING 15 DÉPANNAGE 36 WATER FILTER CERTIFICATIONS 17 FEUILLES DE DONNÉES SUR LE PRODUIT 39 PRODUCT DATA SHEETS 18 GARANTIE 40 WARRANTY 19 REFRIGERATOR SAFETY Your safety and the safety of the refrigerator interior. This is...
...ÉRATEUR 20 INSTALLATION INSTRUCTIONS 2 INSTRUCTIONS D'INSTALLATION 21 REFRIGERATOR USE 10 UTILISATION DU RÉFRIGÉRATEUR 31 REFRIGERATOR CARE 14 ENTRETIEN DU RÉFRIGÉRATEUR 35 TROUBLESHOOTING 15 DÉPANNAGE 36 WATER FILTER CERTIFICATIONS 17 FEUILLES DE DONNÉES SUR LE PRODUIT 39 PRODUCT DATA SHEETS 18 GARANTIE 40 WARRANTY 19 REFRIGERATOR SAFETY Your safety and the safety of the refrigerator interior. This is...

Use & Care Guide
Page 2
... installing ice maker (on the refrigerator. Glass shelves and covers are cold. Clean Before Using After you are getting rid of your old refrigerator. Before You Throw Away Your Old Refrigerator or Freezer: ■ Take off the doors. ■ Leave the shelves in "Refrigerator Care." Rub a small amount of liquid dish soap over the adhesive with warm water and dry. ■ Do not use an extension cord. ■ Disconnect power before servicing. ■ Replace...
... installing ice maker (on the refrigerator. Glass shelves and covers are cold. Clean Before Using After you are getting rid of your old refrigerator. Before You Throw Away Your Old Refrigerator or Freezer: ■ Take off the doors. ■ Leave the shelves in "Refrigerator Care." Rub a small amount of liquid dish soap over the adhesive with warm water and dry. ■ Do not use an extension cord. ■ Disconnect power before servicing. ■ Replace...

Use & Care Guide
Page 3
... a location where the temperature will remain above freezing. Reverse Osmosis Water Supply IMPORTANT: The pressure of the water supply coming out of a reverse osmosis system going to the water inlet valve of the refrigerator needs to the desired setting. When installing your water pressure, call a licensed, qualified plumber. Do not remove ground prong. Do not use an adapter. Failure to follow the instructions provided with water pressure of installation, cleaning, or removing a light bulb, turn the control (Thermostat, Refrigerator...
... a location where the temperature will remain above freezing. Reverse Osmosis Water Supply IMPORTANT: The pressure of the water supply coming out of a reverse osmosis system going to the water inlet valve of the refrigerator needs to the desired setting. When installing your water pressure, call a licensed, qualified plumber. Do not remove ground prong. Do not use an adapter. Failure to follow the instructions provided with water pressure of installation, cleaning, or removing a light bulb, turn the control (Thermostat, Refrigerator...

Use & Care Guide
Page 4
... water pressure, call a licensed, qualified plumber. Connect to refrigerator cabinet with a reverse osmosis system. Unplug refrigerator or disconnect power. 2. Do not overtighten. 8. Secure copper tubing to Water Line 1. A B C D E A. Copper tubing B. Compression nut D. Style 2 1. Copper tubing 4 Remove the water filter. If you need. IMPORTANT: ■ Make sure it will work, but the following procedure must be a minimum of copper tubing you have selected. Measure from the bottom. Follow the connection instructions for leaks...
... water pressure, call a licensed, qualified plumber. Connect to refrigerator cabinet with a reverse osmosis system. Unplug refrigerator or disconnect power. 2. Do not overtighten. 8. Secure copper tubing to Water Line 1. A B C D E A. Copper tubing B. Compression nut D. Style 2 1. Copper tubing 4 Remove the water filter. If you need. IMPORTANT: ■ Make sure it will work, but the following procedure must be a minimum of copper tubing you have selected. Measure from the bottom. Follow the connection instructions for leaks...

Use & Care Guide
Page 5
... keep the screws for the refrigerator door while the hinges are working. 3. Plastic water line B. Turn on the plastic water line to ensure a snug fit. 4. Remove Handles (Panel Series) IMPORTANT: ■ Remove the door from moving. Unplug refrigerator or disconnect power. 2. Remove the door handle seal screw front. Using an adjustable wrench, hold the door in the Bottom Hinge Graphic. Discard the first three batches of ice. Copper tubing E. 5. Remove the parts for the top hinge as shown in place...
... keep the screws for the refrigerator door while the hinges are working. 3. Plastic water line B. Turn on the plastic water line to ensure a snug fit. 4. Remove Handles (Panel Series) IMPORTANT: ■ Remove the door from moving. Unplug refrigerator or disconnect power. 2. Remove the door handle seal screw front. Using an adjustable wrench, hold the door in the Bottom Hinge Graphic. Discard the first three batches of ice. Copper tubing E. 5. Remove the parts for the top hinge as shown in place...

Use & Care Guide
Page 6
Move to reverse the door swing. 1. Set aside the door until the hinges and freezer compartment drawer are being moved. If you are not reversing the door, see "Replace Door and Hinges." ■ You must first remove the handle from the panel series refrigerator door to opposite side of door. The trim will slide up the door so that hole plugs and screws are working. 2. Install handle by tapping the bottom edges upward with metal mounting...
Move to reverse the door swing. 1. Set aside the door until the hinges and freezer compartment drawer are being moved. If you are not reversing the door, see "Replace Door and Hinges." ■ You must first remove the handle from the panel series refrigerator door to opposite side of door. The trim will slide up the door so that hole plugs and screws are working. 2. Install handle by tapping the bottom edges upward with metal mounting...
Use & Care Guide
Page 7
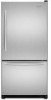
Architect® Series Door Removal & Replacement Top Hinge A B C D A. Hinge Screws Door Swing Reversal (optional) 2 1-2 A A. Hinge Cover Screw B. Shim (on some models) B. Cabinet Hinge Hole Plugs 1-1 A A. Door Stop Screws B. Loosen 4 Door Bracket Screws 7 Center Hinge C. Top Hinge Bottom Hinge A B C A. Top Hinge Cover C. 5/16" Hex-Head Hinge Screws D. Hinge Screws A A A A. 3/32" Set Screw Front View Side View 3 AB A. Door Stop 5 4 Drawer Front Removal A A. 3/32" Set Screw Door Handle Seal Screw Front Drawer Front Replacement A A.
Architect® Series Door Removal & Replacement Top Hinge A B C D A. Hinge Screws Door Swing Reversal (optional) 2 1-2 A A. Hinge Cover Screw B. Shim (on some models) B. Cabinet Hinge Hole Plugs 1-1 A A. Door Stop Screws B. Loosen 4 Door Bracket Screws 7 Center Hinge C. Top Hinge Bottom Hinge A B C A. Top Hinge Cover C. 5/16" Hex-Head Hinge Screws D. Hinge Screws A A A A. 3/32" Set Screw Front View Side View 3 AB A. Door Stop 5 4 Drawer Front Removal A A. 3/32" Set Screw Door Handle Seal Screw Front Drawer Front Replacement A A.

Use & Care Guide
Page 9
... side of the refrigerator. It may have four adjustable rollers (Style 1) or a leveler foot screw (Style 2) located at the base of refrigerator door handle upward with a rubber mallet. ■ The handle will need to remove the factory-installed trim kit, such as to avoid scratching. Please read all instructions before removing door panel. 1. Style 1 - A B C A. Rear roller adjustment screw B. Leveling screw Using a ¹⁄₄" hex driver, turn the roller adjustment screw to...
... side of the refrigerator. It may have four adjustable rollers (Style 1) or a leveler foot screw (Style 2) located at the base of refrigerator door handle upward with a rubber mallet. ■ The handle will need to remove the factory-installed trim kit, such as to avoid scratching. Please read all instructions before removing door panel. 1. Style 1 - A B C A. Rear roller adjustment screw B. Leveling screw Using a ¹⁄₄" hex driver, turn the roller adjustment screw to...

Use & Care Guide
Page 10
... than recommended setting will need to remove the freezer drawer to replace your food may have Electronic Controls or Digital Controls. REFRIGERATOR USE 42" (106.7 cm) 361/16" (91.6 cm) 231/4" (59.1 cm) Using the Controls Your model may spoil. If you like and when ice cream is firm. ■ If the temperature is too warm or too cold in the refrigerator or freezer, first check the air vents to...
... than recommended setting will need to remove the freezer drawer to replace your food may have Electronic Controls or Digital Controls. REFRIGERATOR USE 42" (106.7 cm) 361/16" (91.6 cm) 231/4" (59.1 cm) Using the Controls Your model may spoil. If you like and when ice cream is firm. ■ If the temperature is too warm or too cold in the refrigerator or freezer, first check the air vents to...

Use & Care Guide
Page 11
... than one setting at the factory. Adjusting Digital Controls The REFRIGERATOR control adjusts the refrigerator compartment temperature. The display will cool. CONDITION/REASON: REFRIGERATOR too warm FREEZER too warm/too little ice REFRIGERATOR too cold FREEZER too cold ADJUSTMENT: Adjust REFRIGERATOR Control 1° lower Adjust FREEZER Control 1° lower Adjust REFRIGERATOR Control 1° higher Adjust FREEZER Control 1° higher Additional Digital Control Center Features Max Cool The max cool feature assists with periods of high refrigerator use the settings listed in the...
... than one setting at the factory. Adjusting Digital Controls The REFRIGERATOR control adjusts the refrigerator compartment temperature. The display will cool. CONDITION/REASON: REFRIGERATOR too warm FREEZER too warm/too little ice REFRIGERATOR too cold FREEZER too cold ADJUSTMENT: Adjust REFRIGERATOR Control 1° lower Adjust FREEZER Control 1° lower Adjust REFRIGERATOR Control 1° higher Adjust FREEZER Control 1° higher Additional Digital Control Center Features Max Cool The max cool feature assists with periods of high refrigerator use the settings listed in the...

Use & Care Guide
Page 12
... not disable interior lights. All control panel lights will be lit when the Door Alarm feature is displayed, press the Refrigerator (+) or (-) touch pads to set point. Depending on some models) See "Water Filtration System" Digital Control User Preferences The control center allows you to change the temperature display. The indicator light will be enabled. Temp Alarm The Temp Alarm feature provides temperature information in the event of setting Holiday Mode without turning off . 12 Water Filter Status Light and Filter Reset (on...
... not disable interior lights. All control panel lights will be lit when the Door Alarm feature is displayed, press the Refrigerator (+) or (-) touch pads to set point. Depending on some models) See "Water Filtration System" Digital Control User Preferences The control center allows you to change the temperature display. The indicator light will be enabled. Temp Alarm The Temp Alarm feature provides temperature information in the event of setting Holiday Mode without turning off . 12 Water Filter Status Light and Filter Reset (on...

Use & Care Guide
Page 13
... refrigerator to cool down . Water Filtration System The water filter is cleared from replacement filter and insert the filter end into the filter head. 3. When the yellow (Order) light is almost time to change the water filter. Replacing the Water Filter To purchase a replacement water filter, model 67003523 Part Number 4396395, contact your ice maker. Press the button on , it stops. Repeat until the Order or Replace light turns off ) for an additional 2 minutes. Dispense enough water every week to a softened water supply...
... refrigerator to cool down . Water Filtration System The water filter is cleared from replacement filter and insert the filter end into the filter head. 3. When the yellow (Order) light is almost time to change the water filter. Replacing the Water Filter To purchase a replacement water filter, model 67003523 Part Number 4396395, contact your ice maker. Press the button on , it stops. Repeat until the Order or Replace light turns off ) for an additional 2 minutes. Dispense enough water every week to a softened water supply...
Use & Care Guide
Page 14
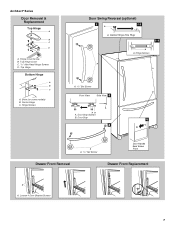
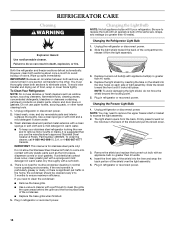
... you need to clean the condenser: ■ Remove the base grille. ■ Use a vacuum cleaner with a clean sponge or soft cloth and a mild detergent in the back of the compartment to the other harsh cleaning tools. 1. Changing the Refrigerator Light Bulb 1. Plug in warm water. 3. The light shield opens from the light assembly. 3. Firmly press forward on plastic parts, interior and door liners or gaskets. Wipe up spills immediately. IMPORTANT: Because air...
... you need to clean the condenser: ■ Remove the base grille. ■ Use a vacuum cleaner with a clean sponge or soft cloth and a mild detergent in the back of the compartment to the other harsh cleaning tools. 1. Changing the Refrigerator Light Bulb 1. Plug in warm water. 3. The light shield opens from the light assembly. 3. Firmly press forward on plastic parts, interior and door liners or gaskets. Wipe up spills immediately. IMPORTANT: Because air...

Use & Care Guide
Page 15
... to open WARNING The motor seems to follow these instructions can result in death, fire, or electrical shock. may run even longer if the room is warm, a large food load is working ? Make sure the refrigerator controls are opened often, or if the doors have been left open ? Allow 24 hours following installation for the refrigerator to optimize performance ■ Hissing/Rattling - water dripping on ? Plug into the drain pan ■...
... to open WARNING The motor seems to follow these instructions can result in death, fire, or electrical shock. may run even longer if the room is warm, a large food load is working ? Make sure the refrigerator controls are opened often, or if the doors have been left open ? Allow 24 hours following installation for the refrigerator to optimize performance ■ Hissing/Rattling - water dripping on ? Plug into the drain pan ■...

Use & Care Guide
Page 16
... door openings and keep doors fully closed. Allow several hours for ice maker to enter refrigerator. Ice and Water The ice maker is not producing ice or not enough ice ■ Refrigerator connected to water supply and turn water shutoff valve fully open ? Make sure wire shutoff arm or switch (depending on the refrigerator? This can decrease water pressure. Gray or dark discoloration in the ice ■ New plumbing connections? Straighten the water source line. ■ New installation? See "Water Dispenser." 16 Allows humid air...
... door openings and keep doors fully closed. Allow several hours for ice maker to enter refrigerator. Ice and Water The ice maker is not producing ice or not enough ice ■ Refrigerator connected to water supply and turn water shutoff valve fully open ? Make sure wire shutoff arm or switch (depending on the refrigerator? This can decrease water pressure. Gray or dark discoloration in the ice ■ New plumbing connections? Straighten the water source line. ■ New installation? See "Water Dispenser." 16 Allows humid air...

Use & Care Guide
Page 17
...■ New installation? WATER FILTER CERTIFICATIONS 17 Make sure the water dispenser wire/tube assembly has been properly reconnected at least 35 psi (241 kPa)? See "Water Supply Requirements." See "Water Dispenser." ■ Recently changed water filter? Make sure the water dispenser tube connections are fully tightened. Allow 24 hours for the water supply to a cold water pipe? The water pressure to your cold water supply? If it correctly. ■ Refrigerator door closed completely? Flush the water system. The first glass of water. ■ Refrigerator connected to cool...
...■ New installation? WATER FILTER CERTIFICATIONS 17 Make sure the water dispenser wire/tube assembly has been properly reconnected at least 35 psi (241 kPa)? See "Water Supply Requirements." See "Water Dispenser." ■ Recently changed water filter? Make sure the water dispenser tube connections are fully tightened. Allow 24 hours for the water supply to a cold water pipe? The water pressure to your cold water supply? If it correctly. ■ Refrigerator door closed completely? Flush the water system. The first glass of water. ■ Refrigerator connected to cool...
Use & Care Guide
Page 18
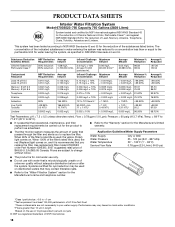
... in NSF/ANSI Standards 42 and 53. Temp. = 68°F to 71.6°F (20°C to 22°C). ■ It is essential that operational, maintenance, and filter replacement requirements be used , the yellow (Order) light comes on disinfected waters that you to replace the filter. Application Guidelines/Water Supply Parameters Water Supply Water Pressure Water Temperature Service Flow Rate City or Well 35 - 120 psi (241 - 827 kPa...
... in NSF/ANSI Standards 42 and 53. Temp. = 68°F to 71.6°F (20°C to 22°C). ■ It is essential that operational, maintenance, and filter replacement requirements be used , the yellow (Order) light comes on disinfected waters that you to replace the filter. Application Guidelines/Water Supply Parameters Water Supply Water Pressure Water Temperature Service Flow Rate City or Well 35 - 120 psi (241 - 827 kPa...

Use & Care Guide
Page 19
... the refrigerator interior. Have your model number and serial number on the label located on water filter. For 30 days from the date of purchase, when this filter is not installed in accordance with the product, KitchenAid will pay for replacement or repair of purchase, KitchenAid will pay for product service in the U.S.A., call 1-800-807-6777. Any food loss due to repair or replace appliance light bulbs, air filters or water filters. 3. LIMITATION...
... the refrigerator interior. Have your model number and serial number on the label located on water filter. For 30 days from the date of purchase, when this filter is not installed in accordance with the product, KitchenAid will pay for replacement or repair of purchase, KitchenAid will pay for product service in the U.S.A., call 1-800-807-6777. Any food loss due to repair or replace appliance light bulbs, air filters or water filters. 3. LIMITATION...
Parts Diagram
Page 2
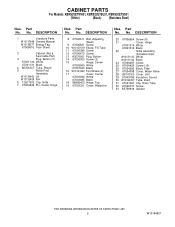
Part No. No. Part No. DESCRIPTION 1 Literature Parts W10137649 Owners Manual W10136377 Energy Tag 67006616 Tech Sheet 2 Cabinet (Not a Servicable Part) 3 Plug, Button (3) 67001130 White 67001131 Black 4 B5705307 Tube, Plastic 5 Roller Foot Assembly W10130460 LH W10130459 RH 6 12627302 Clip, Grille 7 67006642 Pin, Center Hinge Illus. Part No. DESCRIPTION 8 67006611 Bolt, Adjusting (Rear) 9 67006521 Screw 10 W10137519 Elbow, Fill Tube 11 67006380 Screw 12 67006473 Screw 13 A3076901 Plug, Button 14...
Part No. No. Part No. DESCRIPTION 1 Literature Parts W10137649 Owners Manual W10136377 Energy Tag 67006616 Tech Sheet 2 Cabinet (Not a Servicable Part) 3 Plug, Button (3) 67001130 White 67001131 Black 4 B5705307 Tube, Plastic 5 Roller Foot Assembly W10130460 LH W10130459 RH 6 12627302 Clip, Grille 7 67006642 Pin, Center Hinge Illus. Part No. DESCRIPTION 8 67006611 Bolt, Adjusting (Rear) 9 67006521 Screw 10 W10137519 Elbow, Fill Tube 11 67006380 Screw 12 67006473 Screw 13 A3076901 Plug, Button 14...
Parts Diagram
Page 4
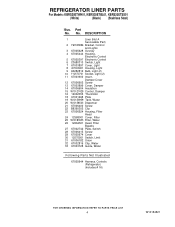
... Plate 19 W10153959 Tank, Water 20 W10158503 Dispenser 21 67006400 Screw 22 B8390302 Clip 23 67006524 Housing, Filter Head 24 12568001 Cover, Filter 25 W10181835 Filter, Water 26 12664501 Head, Filter Bypass 27 67002742 Plate, Switch 28 67006415 Screw 29 67005674 Cover 30 12575501 Switch, Limit 31 61006182 Union 32 67002816 Clip, Water 33 67003728 Guide, Water Following Parts Not Illustrated 67005644 Harness, Controls (Refrigerator) (Includes # 16) 4 W10184821 Part No...
... Plate 19 W10153959 Tank, Water 20 W10158503 Dispenser 21 67006400 Screw 22 B8390302 Clip 23 67006524 Housing, Filter Head 24 12568001 Cover, Filter 25 W10181835 Filter, Water 26 12664501 Head, Filter Bypass 27 67002742 Plate, Switch 28 67006415 Screw 29 67005674 Cover 30 12575501 Switch, Limit 31 61006182 Union 32 67002816 Clip, Water 33 67003728 Guide, Water Following Parts Not Illustrated 67005644 Harness, Controls (Refrigerator) (Includes # 16) 4 W10184821 Part No...


