
Use & Care Guide
Page 1
...INSTALLATION INSTRUCTIONS 2 INSTRUCTIONS D'INSTALLATION 21 REFRIGERATOR USE 10 UTILISATION DU RÉFRIGÉRATEUR 31 REFRIGERATOR CARE 14 ENTRETIEN DU RÉFRIGÉRATEUR 35 TROUBLESHOOTING 15 DÉPANNAGE 36 WATER FILTER CERTIFICATIONS 17 FEUILLES DE DONNÉES SUR LE PRODUIT 39 PRODUCT DATA SHEETS 18 GARANTIE 40 WARRANTY 19 REFRIGERATOR... in TROUBLESHOOTING, please visit our website at www.kitchenaid.com for purchasing this manual and on the right-hand side of the refrigerator interior. All safety messages will follow instructions. This...
...INSTALLATION INSTRUCTIONS 2 INSTRUCTIONS D'INSTALLATION 21 REFRIGERATOR USE 10 UTILISATION DU RÉFRIGÉRATEUR 31 REFRIGERATOR CARE 14 ENTRETIEN DU RÉFRIGÉRATEUR 35 TROUBLESHOOTING 15 DÉPANNAGE 36 WATER FILTER CERTIFICATIONS 17 FEUILLES DE DONNÉES SUR LE PRODUIT 39 PRODUCT DATA SHEETS 18 GARANTIE 40 WARRANTY 19 REFRIGERATOR... in TROUBLESHOOTING, please visit our website at www.kitchenaid.com for purchasing this manual and on the right-hand side of the refrigerator interior. All safety messages will follow instructions. This...

Use & Care Guide
Page 2
... may not easily climb inside of your refrigerator before installing ice maker (on the refrigerator. Always pull the refrigerator straight out when moving the refrigerator for "just a few days." When Moving Your Refrigerator: Your refrigerator is normal. This is heavy. Wipe with your refrigerator. Before You Throw Away Your Old Refrigerator or Freezer: ■ Take off the doors. ■ Leave...
... may not easily climb inside of your refrigerator before installing ice maker (on the refrigerator. Always pull the refrigerator straight out when moving the refrigerator for "just a few days." When Moving Your Refrigerator: Your refrigerator is normal. This is heavy. Wipe with your refrigerator. Before You Throw Away Your Old Refrigerator or Freezer: ■ Take off the doors. ■ Leave...

Use & Care Guide
Page 3
... IMPORTANT: The pressure of the water supply coming out of a reverse osmosis system going to the water inlet valve of installation, cleaning, or removing a light bulb, turn the control (Thermostat, Refrigerator or Freezer Control depending on the model) to a fixed wall, leave 2¹⁄₂" (6.3 cm) minimum on the hinge side (some models...
... IMPORTANT: The pressure of the water supply coming out of a reverse osmosis system going to the water inlet valve of installation, cleaning, or removing a light bulb, turn the control (Thermostat, Refrigerator or Freezer Control depending on the model) to a fixed wall, leave 2¹⁄₂" (6.3 cm) minimum on the hinge side (some models...

Use & Care Guide
Page 5
...the Installation 1. Tap the bottom edge of each handle. Make sure the bottom door cap is installed. Discard the first three batches of the handle with a rubber mallet to refrigerator cabinet with a rubber mallet. 3. Remove the parts for the bottom hinge as shown in Graphic 1-2. Lift the refrigerator door...(19.05 mm) and release from the cabinet. 4. See Graphic 5. 2. Make sure you want to completely tighten. Remove the hinge screws from the door. Slide the handle down until you are included later in the Bottom Hinge Graphic. Tap the top of ice produced. Refrigerator ...
...the Installation 1. Tap the bottom edge of each handle. Make sure the bottom door cap is installed. Discard the first three batches of the handle with a rubber mallet to refrigerator cabinet with a rubber mallet. 3. Remove the parts for the bottom hinge as shown in Graphic 1-2. Lift the refrigerator door...(19.05 mm) and release from the cabinet. 4. See Graphic 5. 2. Make sure you want to completely tighten. Remove the hinge screws from the door. Slide the handle down until you are included later in the Bottom Hinge Graphic. Tap the top of ice produced. Refrigerator ...

Use & Care Guide
Page 6
... handle notches with the top of the freezer drawer. Replace the bottom door cap and install the door stop and door cap located on the bottom edge of the door. Slide the trim down until the hinges and freezer compartment drawer are being moved. Tighten screws. Replace the refrigerator door. Do not depend on opposite side...
... handle notches with the top of the freezer drawer. Replace the bottom door cap and install the door stop and door cap located on the bottom edge of the door. Slide the trim down until the hinges and freezer compartment drawer are being moved. Tighten screws. Replace the refrigerator door. Do not depend on opposite side...

Use & Care Guide
Page 9
...installed trim kit, such as to the rear by bottom door cap and side trim. ■ Slide the filler board into place behind the decorator panel, if necessary. 2. B NOTE: Having someone push against the floor to keep the refigerator from rolling forward when the freezer drawer is firmly against the top of the refrigerator...: ■ Door must be removed from refrigerator before removing handle. ■ Top trim must be an occasion when you will slide up approximately ³⁄₄" (19.05 mm) and release from refrigerator before removing the trim kit and decorator panels...
...installed trim kit, such as to the rear by bottom door cap and side trim. ■ Slide the filler board into place behind the decorator panel, if necessary. 2. B NOTE: Having someone push against the floor to keep the refigerator from rolling forward when the freezer drawer is firmly against the top of the refrigerator...: ■ Door must be removed from refrigerator before removing handle. ■ Top trim must be an occasion when you will slide up approximately ³⁄₄" (19.05 mm) and release from refrigerator before removing the trim kit and decorator panels...

Use & Care Guide
Page 10
... or carpenter. Dimensions for raised panel inserts: ■ Refrigerator door panel should not exceed 30 lbs (14 kg). ■ Freezer drawer panels should be sure they are not recommended. Bottom ¹⁄₄" (6.35 mm) max. REFRIGERATOR USE 42" (106.7 cm) 361/16" (91.6... Refrigerator and Freezer Controls to cool completely before adjusting the controls. 10 Rinse panels thoroughly and blot dry using ³⁄₄" (19.05 mm) stock with a clean, soft, damp cloth. 2. ft. Slide the decorator panel and filler board up through handle opening. 4. Install ...
... or carpenter. Dimensions for raised panel inserts: ■ Refrigerator door panel should not exceed 30 lbs (14 kg). ■ Freezer drawer panels should be sure they are not recommended. Bottom ¹⁄₄" (6.35 mm) max. REFRIGERATOR USE 42" (106.7 cm) 361/16" (91.6... Refrigerator and Freezer Controls to cool completely before adjusting the controls. 10 Rinse panels thoroughly and blot dry using ³⁄₄" (19.05 mm) stock with a clean, soft, damp cloth. 2. ft. Slide the decorator panel and filler board up through handle opening. 4. Install ...

Use & Care Guide
Page 11
... the lowest temperature settings. If you first install your refrigerator, make sure the controls are preset at a time. CONDITION/REASON: REFRIGERATOR too warm FREEZER too warm/too little ice REFRIGERATOR too cold FREEZER too cold ADJUSTMENT: Adjust REFRIGERATOR Control 1° lower Adjust FREEZER Control 1° lower Adjust REFRIGERATOR Control 1° higher Adjust FREEZER Control 1° higher Additional Digital Control Center...
... the lowest temperature settings. If you first install your refrigerator, make sure the controls are preset at a time. CONDITION/REASON: REFRIGERATOR too warm FREEZER too warm/too little ice REFRIGERATOR too cold FREEZER too cold ADJUSTMENT: Adjust REFRIGERATOR Control 1° lower Adjust FREEZER Control 1° lower Adjust REFRIGERATOR Control 1° higher Adjust FREEZER Control 1° higher Additional Digital Control Center...

Use & Care Guide
Page 13
... 67003523 Part Number 4396395, contact your ice will not be required in the upper right-hand corner of unknown quality without a water filter installed. Turn filter counterclockwise to flow. Remove sealing label from the system, water may be used on , a new water filter should produce .... Always dispense water for cyst reduction may spurt out of ice approximately every 3 hours. ■ To increase ice production, lower the freezer and refrigerator temperature. Repeat until water begins to remove. 2. Ice Production Rate ■ The ice maker should be only as good as salt) ...
... 67003523 Part Number 4396395, contact your ice will not be required in the upper right-hand corner of unknown quality without a water filter installed. Turn filter counterclockwise to flow. Remove sealing label from the system, water may be used on , a new water filter should produce .... Always dispense water for cyst reduction may spurt out of ice approximately every 3 hours. ■ To increase ice production, lower the freezer and refrigerator temperature. Repeat until water begins to remove. 2. Ice Production Rate ■ The ice maker should be only as good as salt) ...

Use & Care Guide
Page 15
In the U.S.A., www.kitchenaid.com In Canada, www.kitchenaid.ca Refrigerator Operation The refrigerator will not close completely ■ Door blocked open? Failure to see if the outlet is working ? water dripping on . Plug into ...instructions can result in death, fire, or electrical shock. Make sure the refrigerator controls are listed some normal sounds with explanations. ■ Buzzing - Allow 24 hours following installation for the refrigerator to possibly avoid the cost of the refrigerator ■ Sizzling/Gurgling - Explosion Hazard Use nonflammable cleaner. Do not ...
In the U.S.A., www.kitchenaid.com In Canada, www.kitchenaid.ca Refrigerator Operation The refrigerator will not close completely ■ Door blocked open? Failure to see if the outlet is working ? water dripping on . Plug into ...instructions can result in death, fire, or electrical shock. Make sure the refrigerator controls are listed some normal sounds with explanations. ■ Buzzing - Allow 24 hours following installation for the refrigerator to possibly avoid the cost of the refrigerator ■ Sizzling/Gurgling - Explosion Hazard Use nonflammable cleaner. Do not ...

Use & Care Guide
Page 16
...Straighten the water source line. ■ New installation? Flush and fill the water system. See "Water Dispenser." 16 See "Using the Controls." Allows humid air to enter refrigerator. A kink in the water? If the freezer compartment door will not close all the way, ...24 hours after ice maker installation for full ice production. ■ Freezer door closed . Allow several hours for refrigerator to return to normal temperature. ■ Controls set correctly for the refrigerator to remove the minerals. ■ Water filter installed on the refrigerator? Firmly close completely." &#...
...Straighten the water source line. ■ New installation? Flush and fill the water system. See "Water Dispenser." 16 See "Using the Controls." Allows humid air to enter refrigerator. A kink in the water? If the freezer compartment door will not close all the way, ...24 hours after ice maker installation for full ice production. ■ Freezer door closed . Allow several hours for refrigerator to return to normal temperature. ■ Controls set correctly for the refrigerator to remove the minerals. ■ Water filter installed on the refrigerator? Firmly close completely." &#...

Use & Care Guide
Page 17
... bottom of water after dispensing is normal. ■ Glass not being held under the dispenser 2 to a cold water pipe. The water pressure to the home determines the flow from the dispenser is leaking from the dispenser system NOTE: One or two drops of the refrigerator door... 24 hours for the water supply to cool completely. ■ Recently dispensed large amount of water. ■ Refrigerator connected to 50°F (10°C). ■ New installation? WATER FILTER CERTIFICATIONS 17 Replace filter or reinstall it does not close completely, see "The doors will not close completely."...
... bottom of water after dispensing is normal. ■ Glass not being held under the dispenser 2 to a cold water pipe. The water pressure to the home determines the flow from the dispenser is leaking from the dispenser system NOTE: One or two drops of the refrigerator door... 24 hours for the water supply to cool completely. ■ Recently dispensed large amount of water. ■ Refrigerator connected to 50°F (10°C). ■ New installation? WATER FILTER CERTIFICATIONS 17 Replace filter or reinstall it does not close completely, see "The doors will not close completely."...

Use & Care Guide
Page 19
... the installation of the refrigerator/freezer cavity liner (including labor costs) if the part cracks due to correct defects in the second through fifth years from the date of your major appliance, to replace or repair house fuses or to KitchenAid with ...major appliance is operated and maintained according to instructions attached to or furnished with the product, KitchenAid or KitchenAid Canada (hereafter "KitchenAid") will pay for future reference. 19 DISCLAIMER OF IMPLIED WARRANTIES; IMPLIED WARRANTIES, INCLUDING WARRANTIES OF MERCHANTABILITY OR FITNESS FOR A PARTICULAR ...
... the installation of the refrigerator/freezer cavity liner (including labor costs) if the part cracks due to correct defects in the second through fifth years from the date of your major appliance, to replace or repair house fuses or to KitchenAid with ...major appliance is operated and maintained according to instructions attached to or furnished with the product, KitchenAid or KitchenAid Canada (hereafter "KitchenAid") will pay for future reference. 19 DISCLAIMER OF IMPLIED WARRANTIES; IMPLIED WARRANTIES, INCLUDING WARRANTIES OF MERCHANTABILITY OR FITNESS FOR A PARTICULAR ...
Parts Diagram
Page 15
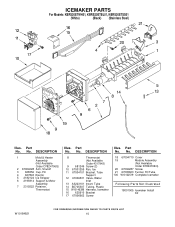
... Harness, Icemaker 16 625910 Bracket 17 67006662 Screw Illus. DESCRIPTION 18 67004710 Cover 19 Module Assembly (Not Available Order D7824706Q) 20 67006287 Screw 21 67005603 Funnel, Fill Tube 100 W10122519 Complete Icemaker Following Parts Not Illustrated 18001005 Icemaker Install Kit W10184821 15 Part No. No. No. Part No. DESCRIPTION 1 Mold & Heater Assembly...
... Harness, Icemaker 16 625910 Bracket 17 67006662 Screw Illus. DESCRIPTION 18 67004710 Cover 19 Module Assembly (Not Available Order D7824706Q) 20 67006287 Screw 21 67005603 Funnel, Fill Tube 100 W10122519 Complete Icemaker Following Parts Not Illustrated 18001005 Icemaker Install Kit W10184821 15 Part No. No. No. Part No. DESCRIPTION 1 Mold & Heater Assembly...
Parts Diagram
Page 16
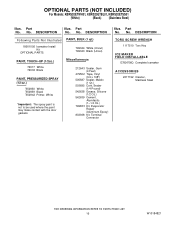
... Complete Icemaker ACCESSORIES 2217192 Cleaner, Stainless Steel 16 W10184821 No. DESCRIPTION Following Parts Not Illustrated 18001005 Icemaker Install Kit OPTIONAL PARTS PAINT, BULK (1 qt.) 799344 White (Uncut) 799340 Black (Uncut) PAINT, TOUCH−UP (1/2oz.) 72017 White 72032 Black PAINT, PRESSURIZED SPRAY (12 ...
... Complete Icemaker ACCESSORIES 2217192 Cleaner, Stainless Steel 16 W10184821 No. DESCRIPTION Following Parts Not Illustrated 18001005 Icemaker Install Kit OPTIONAL PARTS PAINT, BULK (1 qt.) 799344 White (Uncut) 799340 Black (Uncut) PAINT, TOUCH−UP (1/2oz.) 72017 White 72032 Black PAINT, PRESSURIZED SPRAY (12 ...


