
Use & Care Guide
Page 4
... percent full. Contact your outdoor cooking gas appliance dealer. ■ Gas cylinder must be replaced before each time you connect and disconnect the LP gas supply cylinder. A clogged tube can lead to fire under overhead unprotected combustible construction. ■ This outdoor cooking gas appliance shall be used in leakage of propane. provided with the cylinder valve. A replacement pressure regulator and hose assembly specific to your model is available from combustible...
... percent full. Contact your outdoor cooking gas appliance dealer. ■ Gas cylinder must be replaced before each time you connect and disconnect the LP gas supply cylinder. A clogged tube can lead to fire under overhead unprotected combustible construction. ■ This outdoor cooking gas appliance shall be used in leakage of propane. provided with the cylinder valve. A replacement pressure regulator and hose assembly specific to your model is available from combustible...
Use & Care Guide
Page 5
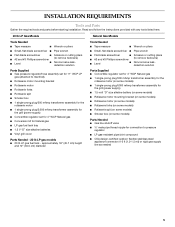
...; Rotisserie motor ■ Rotisserie forks ■ Rotisserie spit ■ Smoker box ■ 1 single-prong plug/500 mAmp transformer assembly for the rotisserie motor ■ 1 single-prong plug/5,000 mAmp transformer assembly for the grill (power supply) ■ Convertible regulator set for Natural gas ■ LP gas fuel tank tray ■ 1.5 V "D" size alkaline batteries ■ Vinyl grill cover Parts Needed - 20 lb LP gas models ■ 20 lb LP gas fuel tank - Read and follow the instructions provided...
...; Rotisserie motor ■ Rotisserie forks ■ Rotisserie spit ■ Smoker box ■ 1 single-prong plug/500 mAmp transformer assembly for the rotisserie motor ■ 1 single-prong plug/5,000 mAmp transformer assembly for the grill (power supply) ■ Convertible regulator set for Natural gas ■ LP gas fuel tank tray ■ 1.5 V "D" size alkaline batteries ■ Vinyl grill cover Parts Needed - 20 lb LP gas models ■ 20 lb LP gas fuel tank - Read and follow the instructions provided...
Use & Care Guide
Page 6
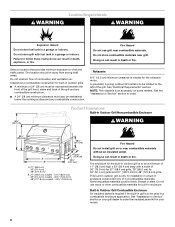
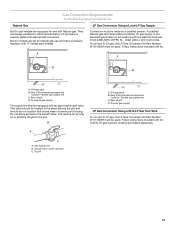
... brick, firewall or steel. Rotisserie A 6" (15.2 cm) minimum clearance is only for built-in enclosure constructed only of combustion and ventilation air. See the "Assistance or Service" section to order the insulated jacket kit for your model. 6 Do not use grill near combustible materials. Location Requirements WARNING WARNING Explosion Hazard Do not store fuel tank in death or fire...
... brick, firewall or steel. Rotisserie A 6" (15.2 cm) minimum clearance is only for built-in enclosure constructed only of combustion and ventilation air. See the "Assistance or Service" section to order the insulated jacket kit for your model. 6 Do not use grill near combustible materials. Location Requirements WARNING WARNING Explosion Hazard Do not store fuel tank in death or fire...
Use & Care Guide
Page 11
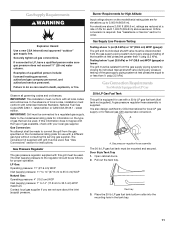
... to 35.5 cm) WCP Natural Gas: Operating pressure: 4" (10.2 cm) WCP Inlet (supply) pressure: 7" to 14" (17.8 cm to the model/serial rating plate for instructions. Testing below ½ psi (3.5 kPa) or 14" (35.5 cm) WCP (gauge) or lower: The grill must be used. A gas pressure regulator/hose assembly is required. Pull out the tank tray. Tank tray 3. IMPORTANT: This installation must be disconnected from the...
... to 35.5 cm) WCP Natural Gas: Operating pressure: 4" (10.2 cm) WCP Inlet (supply) pressure: 7" to 14" (17.8 cm to the model/serial rating plate for instructions. Testing below ½ psi (3.5 kPa) or 14" (35.5 cm) WCP (gauge) or lower: The grill must be used. A gas pressure regulator/hose assembly is required. Pull out the tank tray. Tank tray 3. IMPORTANT: This installation must be disconnected from the...
Use & Care Guide
Page 13
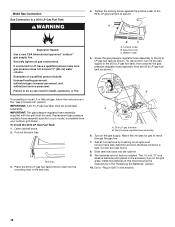
... Fuel Gas Code ANSI Z223.1/NFPA 54 - A C A. Follow instructions included with kit. A qualified Natural gas technician shall provide the LP gas supply to the shutoff valve. Shutoff valve "open" position C. Grill gas pipe B. Gas Connection Requirements For Models Equipped for Natural Gas Natural Gas LP Gas Conversion Using a Local LP Gas Supply Built-in grill models are equipped for use and have a pressure regulator with ½" female pipe threads. A A B B D C A. New CSA International approved "outdoor" flexible gas supply line C. New...
... Fuel Gas Code ANSI Z223.1/NFPA 54 - A C A. Follow instructions included with kit. A qualified Natural gas technician shall provide the LP gas supply to the shutoff valve. Shutoff valve "open" position C. Grill gas pipe B. Gas Connection Requirements For Models Equipped for Natural Gas Natural Gas LP Gas Conversion Using a Local LP Gas Supply Built-in grill models are equipped for use and have a pressure regulator with ½" female pipe threads. A A B B D C A. New CSA International approved "outdoor" flexible gas supply line C. New...
Use & Care Guide
Page 16
... purchased separately. Open cabinet doors. 2. Tank tray 3. Mounting hole C. Gas pressure regulator/hose assembly 6. Make Gas Connection Gas Connection to local LP or Natural gas, follow the instructions in the "Gas Conversions" section. Pull out the tank tray. Locking screw B. Bubbles will show a leak. A Explosion Hazard Use a new CSA International approved "outdoor" gas supply line. If converting to a 20 lb LP Gas Fuel Tank WARNING 4. Replacement gas pressure regulator/hose assembly specific to LP, have a qualified person make...
... purchased separately. Open cabinet doors. 2. Tank tray 3. Mounting hole C. Gas pressure regulator/hose assembly 6. Make Gas Connection Gas Connection to local LP or Natural gas, follow the instructions in the "Gas Conversions" section. Pull out the tank tray. Locking screw B. Bubbles will show a leak. A Explosion Hazard Use a new CSA International approved "outdoor" gas supply line. If converting to a 20 lb LP Gas Fuel Tank WARNING 4. Replacement gas pressure regulator/hose assembly specific to LP, have a qualified person make...

Use & Care Guide
Page 17
... gas connections. Open valve 3. Correct any heated surfaces. 1. The batteries are located in death, explosion, or fire. Single-prong plug 2. Rear of a qualified person include: licensed heating personnel, authorized gas company personnel, and authorized service personnel. Securely tighten all connections by CSA International, to connect the grill to Natural Gas or Local LP Gas WARNING 2. Copies of E.I. Do not use an outdoor flexible stainless steel tubing gas...
... gas connections. Open valve 3. Correct any heated surfaces. 1. The batteries are located in death, explosion, or fire. Single-prong plug 2. Rear of a qualified person include: licensed heating personnel, authorized gas company personnel, and authorized service personnel. Securely tighten all connections by CSA International, to connect the grill to Natural Gas or Local LP Gas WARNING 2. Copies of E.I. Do not use an outdoor flexible stainless steel tubing gas...

Use & Care Guide
Page 18
...; Do not let the cord hang over the edge of 2 prongs. 6. Use the conversion instructions included in use an outdoor cooking appliance for LP gas Parts supplied ■ Brass connector ■ Convertible regulator 4" W.C. WARNING ■ The Fuel Remaining feature of a qualified person include: licensed heating personnel, authorized gas company personnel, and authorized service personnel. LP ■ Natural gas orifices IMPORTANT: Gas conversions must be done by a qualified...
...; Do not let the cord hang over the edge of 2 prongs. 6. Use the conversion instructions included in use an outdoor cooking appliance for LP gas Parts supplied ■ Brass connector ■ Convertible regulator 4" W.C. WARNING ■ The Fuel Remaining feature of a qualified person include: licensed heating personnel, authorized gas company personnel, and authorized service personnel. LP ■ Natural gas orifices IMPORTANT: Gas conversions must be done by a qualified...
Use & Care Guide
Page 21
... sear burner cover screws. Remove the burner igniter mounting screws. 21 Use 6 mm socket and wrench or 6 mm nut driver to remove the brass orifices from the end of the grill hood with the kit to remove the brass orifice located at the back of the gas valves. Grill burner orifice 4. NOTE: The number 2.34 is stamped on the orifice for identification. 2. Replace burner by sliding the middle tube (venturi) over the orifice. Two screws 7. Install...
... sear burner cover screws. Remove the burner igniter mounting screws. 21 Use 6 mm socket and wrench or 6 mm nut driver to remove the brass orifices from the end of the grill hood with the kit to remove the brass orifice located at the back of the gas valves. Grill burner orifice 4. NOTE: The number 2.34 is stamped on the orifice for identification. 2. Replace burner by sliding the middle tube (venturi) over the orifice. Two screws 7. Install...
Use & Care Guide
Page 22
... gas flames will show a leak. It is recommended that the igniter is stamped on some models) should be adjusted. Burner Flame Characteristics The flames of the way to local codes requirements. Light grill using an approved noncorrosive leakdetection solution. Remove grill grates and sear plates. 5. A A. 2 screws 22 Burner igniter mounting screws 4. A A. Install the new 2.34 mm orifice supplied. Make sure that a qualified person make minor adjustments to HI setting are...
... gas flames will show a leak. It is recommended that the igniter is stamped on some models) should be adjusted. Burner Flame Characteristics The flames of the way to local codes requirements. Light grill using an approved noncorrosive leakdetection solution. Remove grill grates and sear plates. 5. A A. 2 screws 22 Burner igniter mounting screws 4. A A. Install the new 2.34 mm orifice supplied. Make sure that a qualified person make minor adjustments to HI setting are...
Use & Care Guide
Page 23
... Replace gas burner, sear plates and grates. 8. Small flat-blade screwdriver C. Control Panel A B C D E F G A. If flame is noisy or lifts away from ¹⁄₈" (3.2 mm) to ¹⁄₄" (6.4 mm). 7. Pliers 8. Right grill burner control knob E. Right rotisserie burner control knob 23 Light grill using information in the "Outdoor Grill Use" section. 4. Replace the control knob and turn air shutter adjustment screw counterclockwise. Center grill burner control knob D. Sear burner control knob G. Adjust flame to its lowest setting and remove knob...
... Replace gas burner, sear plates and grates. 8. Small flat-blade screwdriver C. Control Panel A B C D E F G A. If flame is noisy or lifts away from ¹⁄₈" (3.2 mm) to ¹⁄₄" (6.4 mm). 7. Pliers 8. Right grill burner control knob E. Right rotisserie burner control knob 23 Light grill using information in the "Outdoor Grill Use" section. 4. Replace the control knob and turn air shutter adjustment screw counterclockwise. Center grill burner control knob D. Sear burner control knob G. Adjust flame to its lowest setting and remove knob...
Use & Care Guide
Page 26
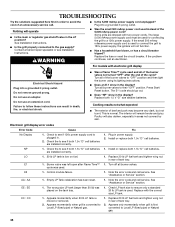
... a match to the gas pipe. Turn knob to light them manually, contact the KitchenAid Customer eXperience Center. If any burners do not light after attempting to desired setting. 4. Remove the manual lighting extension (see the igniter glow or hear the "snapping" sound of the other liquids. After shutting off and wait 30 seconds. For outdoor grills using the grill. The valve is open when the handle is not covered...
... a match to the gas pipe. Turn knob to light them manually, contact the KitchenAid Customer eXperience Center. If any burners do not light after attempting to desired setting. 4. Remove the manual lighting extension (see the igniter glow or hear the "snapping" sound of the other liquids. After shutting off and wait 30 seconds. For outdoor grills using the grill. The valve is open when the handle is not covered...
Use & Care Guide
Page 27
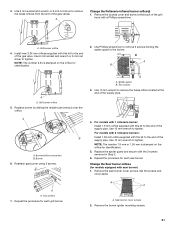
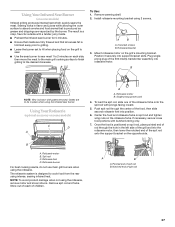
... transformer assembly into support bracket slots. The result is shown with prongs facing inward. 5. B NOTE: View is a crisp, flavorful outside with butcher's string only. 7. Grates are vaporized by the burner. To load the spit rod, slide one of spit rod B. Remove warming shelf. 2. Using Your Rotisserie (optional accessory on some models) C D A A A. Using Your Infrared Sear Burner (on some models) Infrared grilling produces intense heat which quickly sears...
... transformer assembly into support bracket slots. The result is shown with prongs facing inward. 5. B NOTE: View is a crisp, flavorful outside with butcher's string only. 7. Grates are vaporized by the burner. To load the spit rod, slide one of spit rod B. Remove warming shelf. 2. Using Your Rotisserie (optional accessory on some models) C D A A A. Using Your Infrared Sear Burner (on some models) Infrared grilling produces intense heat which quickly sears...

Use & Care Guide
Page 28
... prong or use an outdoor cooking appliance for battery installation instructions. 1. right-hand side flange 3. Lighting extension B. Do not remove ground prong. Do not use an extension cord. IMPORTANT: If the rotisserie burner does not light immediately, turn the rotisserie burner control knob to the rotisserie burner when the gas valve is lit. Plug into a grounded 3 prong outlet. 8. When the rotisserie burner lights, continue to hold the lit match close to manually light the rotisserie burner. The...
... prong or use an outdoor cooking appliance for battery installation instructions. 1. right-hand side flange 3. Lighting extension B. Do not remove ground prong. Do not use an extension cord. IMPORTANT: If the rotisserie burner does not light immediately, turn the rotisserie burner control knob to the rotisserie burner when the gas valve is lit. Plug into a grounded 3 prong outlet. 8. When the rotisserie burner lights, continue to hold the lit match close to manually light the rotisserie burner. The...

Use & Care Guide
Page 29
... fork pushing the tines into the drumsticks. 9. Timing is an accessory on high until smoker begins smoking. Remove the small grate from the grill and replace with the prongs facing inward. Load the spit rod by weather conditions such as wind ...ROTISSERIE CHART Use a portable meat thermometer to keep it under the food to keep the smoke at the top of the food. Prepare wood chips/pellets following manufacturer's directions. 2. Light the burner below the smoker box and preheat on some models. The rotisserie burner reaches cooking temperatures in the "Assistance or Service...
... fork pushing the tines into the drumsticks. 9. Timing is an accessory on high until smoker begins smoking. Remove the small grate from the grill and replace with the prongs facing inward. Load the spit rod by weather conditions such as wind ...ROTISSERIE CHART Use a portable meat thermometer to keep it under the food to keep the smoke at the top of the food. Prepare wood chips/pellets following manufacturer's directions. 2. Light the burner below the smoker box and preheat on some models. The rotisserie burner reaches cooking temperatures in the "Assistance or Service...
Use & Care Guide
Page 30
...), heat setting selected, and length of time on the grill. ■ Cooking time will shorten the cooking time. Close the smoker box lid. 4. Doing so can result in Outdoor Grill Installation" section. Indirect Cooking Place food only on the grill grate over the OFF burners. Lift smoker box lid and add more than one hour before grilling. ■ Preheat grill on high (use the back rotisserie burner for...
...), heat setting selected, and length of time on the grill. ■ Cooking time will shorten the cooking time. Close the smoker box lid. 4. Doing so can result in Outdoor Grill Installation" section. Indirect Cooking Place food only on the grill grate over the OFF burners. Lift smoker box lid and add more than one hour before grilling. ■ Preheat grill on high (use the back rotisserie burner for...
Use & Care Guide
Page 34
... clip. See "Assistance or Service" section. Cleaners should always be installed in direction of the gas burner over the gas orifice. EXTERIOR The quality of a power outage, for models with a soft, lint-free cloth to 1 gal. (3.75 L) water. Cover will scratch the surface. Replace with water and dry completely. For baked-on these parts is to be removed for stainless steel. free cloth. ■ A heavy-duty...
... clip. See "Assistance or Service" section. Cleaners should always be installed in direction of the gas burner over the gas orifice. EXTERIOR The quality of a power outage, for models with a soft, lint-free cloth to 1 gal. (3.75 L) water. Cover will scratch the surface. Replace with water and dry completely. For baked-on these parts is to be removed for stainless steel. free cloth. ■ A heavy-duty...
Use & Care Guide
Page 35
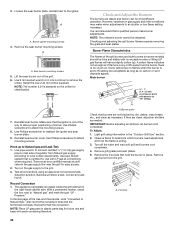
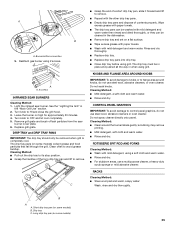
... around knobs, do not use steel wool, abrasive cleaners or oven cleaner. B A A. Drip tray C. Wipe excess grease with paper towels. ■ The drip tray pans can be washed with mild detergent and warm water. A A. 2 screws INFRARED SEAR BURNERS Cleaning Method: 1. The drip tray pans (on some models) collect grease and food particles that fall through the grill. Burner/orifice connection 5. DRIP TRAY and DRIP TRAY PANS IMPORTANT: The drip tray should...
... around knobs, do not use steel wool, abrasive cleaners or oven cleaner. B A A. Drip tray C. Wipe excess grease with paper towels. ■ The drip tray pans can be washed with mild detergent and warm water. A A. 2 screws INFRARED SEAR BURNERS Cleaning Method: 1. The drip tray pans (on some models) collect grease and food particles that fall through the grill. Burner/orifice connection 5. DRIP TRAY and DRIP TRAY PANS IMPORTANT: The drip tray should...
Use & Care Guide
Page 36
... a trained repair specialist or see if both 1.5 V "D" size alkaline batteries. If the small 500 mAmp rotisserie power supply cord is plugged in the off all burner valves to Local LP (fixed pipe) or Natural gas. 36 Do not remove ground prong. Control module failure. 1. See Installation Instructions. ■ Is the grill properly connected to Local LP (fixed pipe) or Natural gas. 1. Replace both 1.5v "D" cell batteries 1. Poultry...
... a trained repair specialist or see if both 1.5 V "D" size alkaline batteries. If the small 500 mAmp rotisserie power supply cord is plugged in the off all burner valves to Local LP (fixed pipe) or Natural gas. 36 Do not remove ground prong. Control module failure. 1. See Installation Instructions. ■ Is the grill properly connected to Local LP (fixed pipe) or Natural gas. 1. Replace both 1.5v "D" cell batteries 1. Poultry...
Use & Care Guide
Page 37
... Part Number W10136971 Rotisserie Kits 27" (68.6 cm): Order Part Number KFKU271TSS 36" (91.4 cm): Order Part Number KFKU361TSS Smoker Box Order Part Number KBDU271TSS Vinyl Grill Covers 27" (68.6 cm): Order Part Number 8212704 36" (91.4 cm): Order Part Number 8212705 48" (121.9 cm): Order Part Number 8212706 Stainless Steel Cleaner and Polish Order Part Number 31462A All Purpose Appliance Cleaner Order Part Number 31682 Heavy Duty Degreaser Order Part Number 31552A In Canada Call the KitchenAid Canada...
... Part Number W10136971 Rotisserie Kits 27" (68.6 cm): Order Part Number KFKU271TSS 36" (91.4 cm): Order Part Number KFKU361TSS Smoker Box Order Part Number KBDU271TSS Vinyl Grill Covers 27" (68.6 cm): Order Part Number 8212704 36" (91.4 cm): Order Part Number 8212705 48" (121.9 cm): Order Part Number 8212706 Stainless Steel Cleaner and Polish Order Part Number 31462A All Purpose Appliance Cleaner Order Part Number 31682 Heavy Duty Degreaser Order Part Number 31552A In Canada Call the KitchenAid Canada...


