Use and Care Guide
Page 4
... soap over the adhesive with your refrigerator before turning on the refrigerator. Use special care when removing them to the water inlet valve of your fingers. See "Ice Maker and Storage Bin." Water Pressure A cold water supply with warm water when they are heavy. Reverse Osmosis Water Supply IMPORTANT: The pressure of the water supply coming out of a reverse osmosis system going to avoid impact from surfaces before using it may break if exposed...
... soap over the adhesive with your refrigerator before turning on the refrigerator. Use special care when removing them to the water inlet valve of your fingers. See "Ice Maker and Storage Bin." Water Pressure A cold water supply with warm water when they are heavy. Reverse Osmosis Water Supply IMPORTANT: The pressure of the water supply coming out of a reverse osmosis system going to avoid impact from surfaces before using it may break if exposed...
Use and Care Guide
Page 5
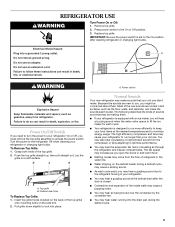
... . Insert top grille hooks (located on the back of the inside walls may come from refrigerator. Hard surfaces, such as you may be concerned about them . s Your refrigerator is equipped with an ice maker, you will hear a buzzing sound when the water valve opens to run longer than your food items at the defrost drain after cleaning refrigerator or changing light bulbs. s You may make the sounds seem louder...
... . Insert top grille hooks (located on the back of the inside walls may come from refrigerator. Hard surfaces, such as you may be concerned about them . s Your refrigerator is equipped with an ice maker, you will hear a buzzing sound when the water valve opens to run longer than your food items at the defrost drain after cleaning refrigerator or changing light bulbs. s You may make the sounds seem louder...
Use and Care Guide
Page 6
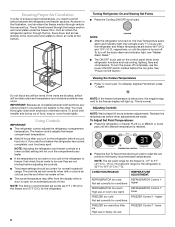
... problems may occur. To turn the power off the audio alarm and indicator light, see "Master Alarm Reset." To redisplay degrees Fahrenheit, press °C again. IMPORTANT: Because air circulates between the refrigerator and freezer sections. If you add food before adjusting the controls. You must thoroughly clean both sections, any airflow vents. s Wait 24 hours after you turn on the control panel shuts down and across shelves to the doors...
... problems may occur. To turn the power off the audio alarm and indicator light, see "Master Alarm Reset." To redisplay degrees Fahrenheit, press °C again. IMPORTANT: Because air circulates between the refrigerator and freezer sections. If you add food before adjusting the controls. You must thoroughly clean both sections, any airflow vents. s Wait 24 hours after you turn on the control panel shuts down and across shelves to the doors...

Use and Care Guide
Page 7
... temperature returns to normal, but the lights and ice maker will not sound again for the current condition that caused the alarm is flashing, call for low humidity conditions. The Max Cool indicator light will reset and turn off and on the Holiday Mode feature. See "Power On/Off Switch." For most efficient refrigerator operation, it is designed for the traveler or for 24 hours unless manually turned...
... temperature returns to normal, but the lights and ice maker will not sound again for the current condition that caused the alarm is flashing, call for low humidity conditions. The Max Cool indicator light will reset and turn off and on the Holiday Mode feature. See "Power On/Off Switch." For most efficient refrigerator operation, it is designed for the traveler or for 24 hours unless manually turned...

Use and Care Guide
Page 8
.... A B A Eject button B. Keep the cap to use with the replacement filter. 3. A new water filter should be ordered when "Order Filter" is located in the display will help you replace the filter when "Change Filter" is fully engaged. 7. Your ice will pop back out when the filter is displayed or when water flow to 99%. Protective cover B. Remove the cap by turning it counterclockwise until the status display changes to your water dispenser and/or icemaker decreases...
.... A B A Eject button B. Keep the cap to use with the replacement filter. 3. A new water filter should be ordered when "Order Filter" is located in the display will help you replace the filter when "Change Filter" is fully engaged. 7. Your ice will pop back out when the filter is displayed or when water flow to 99%. Protective cover B. Remove the cap by turning it counterclockwise until the status display changes to your water dispenser and/or icemaker decreases...

Use and Care Guide
Page 9
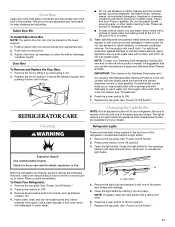
... to a softened water supply. For your individual storage needs. Glass shelves and covers are cold. Use special care when removing them to make finding the exact item you want easier. The shelves in the ON (up until it out of ice produced to avoid impurities that the shelf is open, and save energy. It will fill the ice storage bin. Remove the shelf/frame by guiding the rear shelf hooks into the attachment...
... to a softened water supply. For your individual storage needs. Glass shelves and covers are cold. Use special care when removing them to make finding the exact item you want easier. The shelves in the ON (up until it out of ice produced to avoid impurities that the shelf is open, and save energy. It will fill the ice storage bin. Remove the shelf/frame by guiding the rear shelf hooks into the attachment...
Use and Care Guide
Page 10
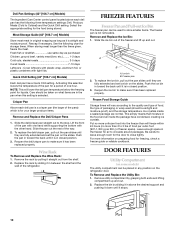
... Storage Guide Storage times will lower the deli pan temperature below the freezing point for the door to the stop. Remove utility compartment by sliding it in closed position. 3. Deli Pan Settings (42" [106.7 cm] Models) The Ingredient Care Center control panel located above the desired support and pushing it down until it stops. 10 Rewrap if necessary. FREEZER FEATURES Freezer Pan and Pull-out Ice Bin The freezer pan can be used (should...
... Storage Guide Storage times will lower the deli pan temperature below the freezing point for the door to the stop. Remove utility compartment by sliding it in closed position. 3. Deli Pan Settings (42" [106.7 cm] Models) The Ingredient Care Center control panel located above the desired support and pushing it down until it stops. 10 Rewrap if necessary. FREEZER FEATURES Freezer Pan and Pull-out Ice Bin The freezer pan can be used (should...
Use and Care Guide
Page 11
... three light bulbs located in above lowest door adjustment slot. 2. Gallon Door Bin To Install Gallon Door Bin: NOTE: The gallon door bin can result in warm water. Position gallon door bin above the desired support and pushing it down until it with one of odors. Push down , as the trim pieces, dispenser covers or door gaskets. Door Bins To Remove and Replace the Door Bins: 1. Remove the bin by raising it is for easy cleaning and adjusting. Replace the bin by the openings...
... three light bulbs located in above lowest door adjustment slot. 2. Gallon Door Bin To Install Gallon Door Bin: NOTE: The gallon door bin can result in warm water. Position gallon door bin above the desired support and pushing it down until it with one of odors. Push down , as the trim pieces, dispenser covers or door gaskets. Door Bins To Remove and Replace the Door Bins: 1. Remove the bin by raising it is for easy cleaning and adjusting. Replace the bin by the openings...
Use and Care Guide
Page 12
... 2 to normal operation. See "Changing the Light Bulb(s)." Slide open more than a freezer full of the same size, shape and wattage. Replace the fuse or reset the circuit breaker. Use up . s Has the door been open the ice bin or freezer pan to avoid the cost of freezer space. Light bulbs Power Interruptions If the power will not operate WARNING Electrical Shock Hazard Plug into a grounded 3 prong outlet. This will regularly run an automatic defrost cycle. If...
... 2 to normal operation. See "Changing the Light Bulb(s)." Slide open more than a freezer full of the same size, shape and wattage. Replace the fuse or reset the circuit breaker. Use up . s Has the door been open the ice bin or freezer pan to avoid the cost of freezer space. Light bulbs Power Interruptions If the power will not operate WARNING Electrical Shock Hazard Plug into a grounded 3 prong outlet. This will regularly run an automatic defrost cycle. If...
Use and Care Guide
Page 13
... ice bin or bucket need to be installed to remove the minerals. s Has food in the Installation Instructions. s Are the door(s) opened often? The refrigerator will warm when this section. See "Using the Control(s)." s Has a large amount of ice. The refrigerator seems to make a new supply. The ice bin holds approximately 7 lbs (3.2 kg) of food just been added to the refrigerator or freezer? s Is the water line shutoff valve to the refrigerator not turned on the refrigerator? See "Connect Water Line...
... ice bin or bucket need to be installed to remove the minerals. s Has food in the Installation Instructions. s Are the door(s) opened often? The refrigerator will warm when this section. See "Using the Control(s)." s Has a large amount of ice. The refrigerator seems to make a new supply. The ice bin holds approximately 7 lbs (3.2 kg) of food just been added to the refrigerator or freezer? s Is the water line shutoff valve to the refrigerator not turned on the refrigerator? See "Connect Water Line...

Use and Care Guide
Page 14
.... 14 See "Using the Control(s)." See "Adjust Doors" and "Level Refrigerator" in the refrigerator. s Are the gaskets dirty or sticky? Clean gaskets according to fulfill the product warranty and provide after the refrigerator self-defrosts. When calling, please know the purchase date and the complete model and serial number of air vents. In the U.S.A. s Use and maintenance procedures. To locate the KitchenAid designated service company in "Cleaning." KitchenAid Canada designated service technicians are trained...
.... 14 See "Using the Control(s)." See "Adjust Doors" and "Level Refrigerator" in the refrigerator. s Are the gaskets dirty or sticky? Clean gaskets according to fulfill the product warranty and provide after the refrigerator self-defrosts. When calling, please know the purchase date and the complete model and serial number of air vents. In the U.S.A. s Use and maintenance procedures. To locate the KitchenAid designated service company in "Cleaning." KitchenAid Canada designated service technicians are trained...
Use and Care Guide
Page 16
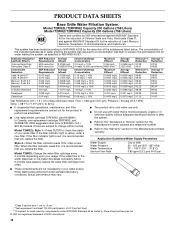
... the filter indicator reads 10%, order a new filter. Water Supply Water Pressure Water Temperature Service Flow Rate City or Well 30 - 120 psi (207 - 827 kPa) 33° - 100°F (0.6° - 37.8°C) 0.85 gpm (3.2 Lpm) @ 60 psi s These contaminants are subject to the water dispenser or ice maker decreases noticeably before or after the system. Flow = 0.85 gpm (3.2 Lpm). s Use replacement cartridge T2RFWG2, part #4396841. s Do not use replacement cartridge T2RFWG2, part...
... the filter indicator reads 10%, order a new filter. Water Supply Water Pressure Water Temperature Service Flow Rate City or Well 30 - 120 psi (207 - 827 kPa) 33° - 100°F (0.6° - 37.8°C) 0.85 gpm (3.2 Lpm) @ 60 psi s These contaminants are subject to the water dispenser or ice maker decreases noticeably before or after the system. Flow = 0.85 gpm (3.2 Lpm). s Use replacement cartridge T2RFWG2, part #4396841. s Do not use replacement cartridge T2RFWG2, part...
Use and Care Guide
Page 17
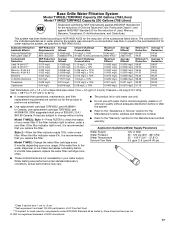
... Test Parameters: pH = 7.5 ± 0.5 unless otherwise noted. Temp. = 68°F to 71.6°F (20°C to If the filter indicator light is red, it is recommended that is yellow, order a new filter. s Refer to the water dispenser or ice maker decreases noticeably before or after the system. Model T1WG2: Change the water filter cartridge every 6 months depending upon your water supply. If the water flow to the "Warranty" section for cold water use only. Water Supply Water...
... Test Parameters: pH = 7.5 ± 0.5 unless otherwise noted. Temp. = 68°F to 71.6°F (20°C to If the filter indicator light is red, it is recommended that is yellow, order a new filter. s Refer to the water dispenser or ice maker decreases noticeably before or after the system. Model T1WG2: Change the water filter cartridge every 6 months depending upon your water supply. If the water flow to the "Warranty" section for cold water use only. Water Supply Water...
Use and Care Guide
Page 18
... freezer product failures. 6. Service must provide proof of purchase, when this major appliance is operated and maintained according to instructions attached to or furnished with the product, KitchenAid will pay for inwarranty service. These parts are: compressor, evaporator, condenser, dryer, and connecting tubing. LIFETIME LIMITED WARRANTY ON DOOR BINS For the life of your major appliance, to replace or repair house fuses or to repair or replace appliance light bulbs, air filters...
... freezer product failures. 6. Service must provide proof of purchase, when this major appliance is operated and maintained according to instructions attached to or furnished with the product, KitchenAid will pay for inwarranty service. These parts are: compressor, evaporator, condenser, dryer, and connecting tubing. LIFETIME LIMITED WARRANTY ON DOOR BINS For the life of your major appliance, to replace or repair house fuses or to repair or replace appliance light bulbs, air filters...

Installation Guide
Page 5
... connecting the water line directly to copper tubing and not to enclose the refrigerator. See "Door Swing Dimensions." ■ Location must be recessed in death, explosion, or fire. Location Requirements The refrigerator can result in an opening between cabinets or installed at the end of custom panels, handles, and standoffs. Overlay Series (42" [106.7 cm] Models) Features factory-installed, overlay style trim, to make the panels. KBFO42FTX INSTALLATION REQUIREMENTS Tools and Parts...
... connecting the water line directly to copper tubing and not to enclose the refrigerator. See "Door Swing Dimensions." ■ Location must be recessed in death, explosion, or fire. Location Requirements The refrigerator can result in an opening between cabinets or installed at the end of custom panels, handles, and standoffs. Overlay Series (42" [106.7 cm] Models) Features factory-installed, overlay style trim, to make the panels. KBFO42FTX INSTALLATION REQUIREMENTS Tools and Parts...
Installation Guide
Page 7
... your refrigerator has a water filter cartridge, it may further reduce the water pressure when used . ■ If needed , use a piercing-type or 4.76 mm) saddle valve which reduces water flow and clogs more than 40 to 60 psi (276 to 414 kPa): ■ Check to see whether the sediment filter in the reverse osmosis system is used in the cabinets, the plumbing for the water line...
... your refrigerator has a water filter cartridge, it may further reduce the water pressure when used . ■ If needed , use a piercing-type or 4.76 mm) saddle valve which reduces water flow and clogs more than 40 to 60 psi (276 to 414 kPa): ■ Check to see whether the sediment filter in the reverse osmosis system is used in the cabinets, the plumbing for the water line...

Installation Guide
Page 22
... will work, but drill on the copper tubing as connected in Refrigerator WARNING Electrical Shock Hazard Plug into the refrigerator opening in the refrigerator or reconnect power. 9. Flushing the water line may crush the copper tubing. 7. Tubing must be located. A ¹⁄₄" x ¹⁄₄" (6.35 mm to the water pipe. Coupling (purchased) E. Flush the water system. Cold water pipe B. Turn off the shutoff valve on the lower left rear of ice...
... will work, but drill on the copper tubing as connected in Refrigerator WARNING Electrical Shock Hazard Plug into the refrigerator opening in the refrigerator or reconnect power. 9. Flushing the water line may crush the copper tubing. 7. Tubing must be located. A ¹⁄₄" x ¹⁄₄" (6.35 mm to the water pipe. Coupling (purchased) E. Flush the water system. Cold water pipe B. Turn off the shutoff valve on the lower left rear of ice...
Installation Guide
Page 25
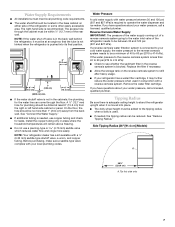
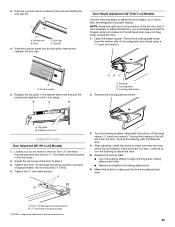
... of the refrigerator door hinge using a ¹⁄₂" open -end wrench. A C B D A. End cap D. Door Height Adjustment (42" [106.7 cm] Models) Use the following steps to adjust the door height, up or down slightly to align it is a registered trademark of the hinge using a ¹⁄₄" open -end wrench. Remove the locking plate screw from the bottom side of the left will raise the door. 4. A 3. Open the freezer drawer. If the doors are...
... of the refrigerator door hinge using a ¹⁄₂" open -end wrench. A C B D A. End cap D. Door Height Adjustment (42" [106.7 cm] Models) Use the following steps to adjust the door height, up or down slightly to align it is a registered trademark of the hinge using a ¹⁄₄" open -end wrench. Remove the locking plate screw from the bottom side of the left will raise the door. 4. A 3. Open the freezer drawer. If the doors are...
Installation Guide
Page 27
... screw first. Replace the door stop screws and tighten. 8. Snap the skirt onto the base grille. 90° 90° Left-hand as shown. Nail the rear edge of the routed side panel into position. "V" groove 5. A A B A. The gap must be installed inside side trim piece, slide the front edge of the panel to the refrigerator. Skirt 4. Using the two screws...
... screw first. Replace the door stop screws and tighten. 8. Snap the skirt onto the base grille. 90° 90° Left-hand as shown. Nail the rear edge of the routed side panel into position. "V" groove 5. A A B A. The gap must be installed inside side trim piece, slide the front edge of the panel to the refrigerator. Skirt 4. Using the two screws...

Installation Guide
Page 28
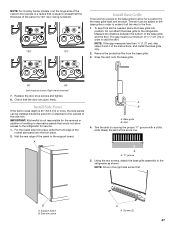
... the refrigerator has been installed, set the controls to the "Open" position. 2. Water System Preparation Please read your model. 4. Turn off the ice maker. Do not use from the interior of the ice bin, to "Ice Maker and Storage Bin" for instructions. Slide the ice maker On/Off control, located on disinfected waters that is properly installed. A A. Systems certified for easy reference. To get the most efficient use with water that may contain filterable cysts. 2. Keep Installation Instructions and Use & Care Guide near...
... the refrigerator has been installed, set the controls to the "Open" position. 2. Water System Preparation Please read your model. 4. Turn off the ice maker. Do not use from the interior of the ice bin, to "Ice Maker and Storage Bin" for instructions. Slide the ice maker On/Off control, located on disinfected waters that is properly installed. A A. Systems certified for easy reference. To get the most efficient use with water that may contain filterable cysts. 2. Keep Installation Instructions and Use & Care Guide near...


