Use and Care Guide
Page 3
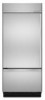
... getting rid of the past. s Do not remove ground prong. s Disconnect power before operating. Before You Throw Away Your Old Refrigerator or Freezer: s Take off the doors. We have provided many important safety messages in this manual and on your old... refrigerator, please follow these instructions to reduce the chance of others . All safety messages will sit for "just a few days." s Leave the shelves in death or brain damage. Always read and obey all parts...
... getting rid of the past. s Do not remove ground prong. s Disconnect power before operating. Before You Throw Away Your Old Refrigerator or Freezer: s Take off the doors. We have provided many important safety messages in this manual and on your old... refrigerator, please follow these instructions to reduce the chance of others . All safety messages will sit for "just a few days." s Leave the shelves in death or brain damage. Always read and obey all parts...

Use and Care Guide
Page 8
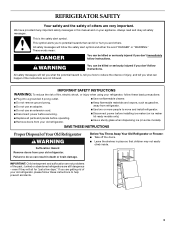
...Water Filtration System Do not use with water that is part of your refrigerator. O-rings 4. Remove the protective covers from the O-rings... eject button will pop back out when the filter is located in the base grille below the freezer compartment door. After changing the water filter, press and hold RESET for 2 seconds until it...A Changing the Water Filter The water filter is fully engaged. 7. s There will not be ordered when "Order Filter" is part of unknown quality without a water filter. A B A Eject button B. See "Changing the Water Filter" later in this could...
...Water Filtration System Do not use with water that is part of your refrigerator. O-rings 4. Remove the protective covers from the O-rings... eject button will pop back out when the filter is located in the base grille below the freezer compartment door. After changing the water filter, press and hold RESET for 2 seconds until it...A Changing the Water Filter The water filter is fully engaged. 7. s There will not be ordered when "Order Filter" is part of unknown quality without a water filter. A B A Eject button B. See "Changing the Water Filter" later in this could...

Use and Care Guide
Page 9
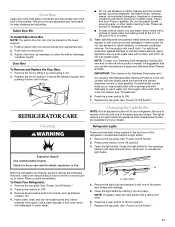
...ice maker and lead to the ON (up ) position. 2. On/Off control Ice Storage Bin Care 1. See "Pull-out Freezer and Ice bin." 2. This can damage parts of the water supplied to shatter into the attachment slot. s Discard the first three batches of ice produced to fit different ... (down) position as bumping. s It is used. The 36" (91.4 cm) model has one deli pan and one crisper pan. REFRIGERATOR FEATURES Refrigerator Shelves Important information to avoid impact from dropping. Turn the cap counterclockwise until the cap slips into many small, pebble-size pieces. To manually ...
...ice maker and lead to the ON (up ) position. 2. On/Off control Ice Storage Bin Care 1. See "Pull-out Freezer and Ice bin." 2. This can damage parts of the water supplied to shatter into the attachment slot. s Discard the first three batches of ice produced to fit different ... (down) position as bumping. s It is used. The 36" (91.4 cm) model has one deli pan and one crisper pan. REFRIGERATOR FEATURES Refrigerator Shelves Important information to avoid impact from dropping. Turn the cap counterclockwise until the cap slips into many small, pebble-size pieces. To manually ...
Use and Care Guide
Page 11
.... Do not wax plastic parts. Dry thoroughly with a clean sponge or soft cloth and a mild detergent in the top front of the same size, shape and wattage. 5. Press the power switch to avoid buildup of the same size and shape. See "Power On/Off Switch." Both the refrigerator and freezer sections defrost automatically...
.... Do not wax plastic parts. Dry thoroughly with a clean sponge or soft cloth and a mild detergent in the top front of the same size, shape and wattage. 5. Press the power switch to avoid buildup of the same size and shape. See "Power On/Off Switch." Both the refrigerator and freezer sections defrost automatically...

Use and Care Guide
Page 14
...fit more tightly and take up inside the refrigerator when the room air is normal for droplets to form after the refrigerator self-defrosts. Rearrange containers so that you need to order replacement parts, we recommend that they are trained to KitchenAid with : s Features and specifications on ...our full line of the air vents. Pull it may save you can result in front of appliances. s Does the refrigerator wobble or seem unstable? If you...
...fit more tightly and take up inside the refrigerator when the room air is normal for droplets to form after the refrigerator self-defrosts. Rearrange containers so that you need to order replacement parts, we recommend that they are trained to KitchenAid with : s Features and specifications on ...our full line of the air vents. Pull it may save you can result in front of appliances. s Does the refrigerator wobble or seem unstable? If you...
Use and Care Guide
Page 15
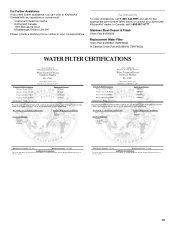
Stainless Steel Cleaner & Polish Order Part #4396920 Replacement Water Filter: Order Part #4396841 (T2RFWG2) In Canada, Order Part #4396841B (T2RFWG2) WATER FILTER CERTIFICATIONS 15 For Further Assistance If you need further assistance, you can write to KitchenAid Canada with any questions or concerns at: Customer Interaction Centre KitchenAid Canada 1901 Minnesota Court Mississauga, Ontario L5N 3A7...
Stainless Steel Cleaner & Polish Order Part #4396920 Replacement Water Filter: Order Part #4396841 (T2RFWG2) In Canada, Order Part #4396841B (T2RFWG2) WATER FILTER CERTIFICATIONS 15 For Further Assistance If you need further assistance, you can write to KitchenAid Canada with any questions or concerns at: Customer Interaction Centre KitchenAid Canada 1901 Minnesota Court Mississauga, Ontario L5N 3A7...
Use and Care Guide
Page 16
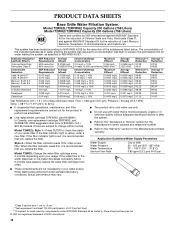
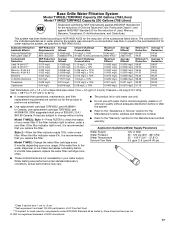
...57 96.54 94.92 96.34 99.63 93.33 74.00 Test Parameters: pH = 7.5 ± 0.5 unless otherwise noted. s Use replacement cartridge T2RFWG2, part #4396841. Water Supply Water Pressure Water Temperature Service Flow Rate City or Well 30 - 120 psi (207 - 827 kPa) 33° - 100°F (0.6°... only. s Refer to NSF/ANSI 42/53 for cold water use replacement cartridge T2RFWG2, part #4396841B. 2006 suggested retail price of $39.99 U.S.A./ $49.99 Canada. Temp. = 68°F to 71.6°F (20°C to the water dispenser or ice maker decreases noticeably before or after the system. ...
...57 96.54 94.92 96.34 99.63 93.33 74.00 Test Parameters: pH = 7.5 ± 0.5 unless otherwise noted. s Use replacement cartridge T2RFWG2, part #4396841. Water Supply Water Pressure Water Temperature Service Flow Rate City or Well 30 - 120 psi (207 - 827 kPa) 33° - 100°F (0.6°... only. s Refer to NSF/ANSI 42/53 for cold water use replacement cartridge T2RFWG2, part #4396841B. 2006 suggested retail price of $39.99 U.S.A./ $49.99 Canada. Temp. = 68°F to 71.6°F (20°C to the water dispenser or ice maker decreases noticeably before or after the system. ...
Use and Care Guide
Page 17
...If the filter indicator light is red, it is essential that you replace the filter. s Do not use replacement cartridge T2RFWG2, part #4396841B. 2006 suggested retail price of $39.99 U.S.A./ $49.99 Canada. When the filter indicator reads 10%, order a ... Lpm). Pressure = 60 psig (413.7 kPa). Temp. = 68°F to 71.6°F (20°C to change without adequate disinfection before 6 months have passed, replace the water filter cartridge more often. s Use replacement cartridge T2RFWG2, part #4396841. Model T1WG2L: Style 1 - Press FILTER to the "Warranty" section for the Manufacturer's ...
...If the filter indicator light is red, it is essential that you replace the filter. s Do not use replacement cartridge T2RFWG2, part #4396841B. 2006 suggested retail price of $39.99 U.S.A./ $49.99 Canada. When the filter indicator reads 10%, order a ... Lpm). Pressure = 60 psig (413.7 kPa). Temp. = 68°F to 71.6°F (20°C to change without adequate disinfection before 6 months have passed, replace the water filter cartridge more often. s Use replacement cartridge T2RFWG2, part #4396841. Model T1WG2L: Style 1 - Press FILTER to the "Warranty" section for the Manufacturer's ...
Use and Care Guide
Page 18
... house fuses or to correct defects in materials or workmanship in the sealed refrigeration system. Service calls to refrigerator or freezer product failures. 6. Those consumable parts are excluded from unauthorized modifications made to use . 4. Any food loss ...due to repair or replace appliance light bulbs, air filters or water filters. Replacement parts or repair labor costs for product service in accordance with the product, KitchenAid...
... house fuses or to correct defects in materials or workmanship in the sealed refrigeration system. Service calls to refrigerator or freezer product failures. 6. Those consumable parts are excluded from unauthorized modifications made to use . 4. Any food loss ...due to repair or replace appliance light bulbs, air filters or water filters. Replacement parts or repair labor costs for product service in accordance with the product, KitchenAid...

Installation Guide
Page 5
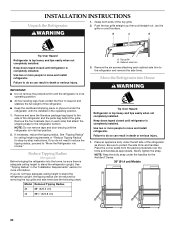
...required tools and parts before starting installation. See "Installation Requirements" for more information. Opening Dimensions ■ To avoid tipping during use . Overlay Series (42" [106.7 cm] Models) Features factory-installed, overlay style trim, to 229 cm) above the refrigerator. Save these Installation..."Installation Requirements" for more information. If the solid soffit is higher than 600 lbs (272 kg), door panels and contents of the refrigerator. ■ Ceiling height must allow for more than 1" (2.5 cm) or one is a registered trademark of Textron Innovations Inc. ...
...required tools and parts before starting installation. See "Installation Requirements" for more information. Opening Dimensions ■ To avoid tipping during use . Overlay Series (42" [106.7 cm] Models) Features factory-installed, overlay style trim, to 229 cm) above the refrigerator. Save these Installation..."Installation Requirements" for more information. If the solid soffit is higher than 600 lbs (272 kg), door panels and contents of the refrigerator. ■ Ceiling height must allow for more than 1" (2.5 cm) or one is a registered trademark of Textron Innovations Inc. ...
Installation Guide
Page 16
... the door handles. Panels that are more than ¹⁄₄" (6.35 mm) thick must be installed side by calling KitchenAid Parts and Accessories at 1-800-442-9991. Follow the kit instructions for panel specifications. Follow the kit instructions for factory-installed stainless ...have a 1.5 mm) tolerance. Top Grille Panel The top panel should not weigh more than 20 lbs (9.1 kg). Color 72" (183 cm) Stainless Steel (Architect® Series) #W10153554 Refrigerator and Freezer Panels The freezer panel should not weigh more than 10 lbs (4.5 kg). 34¹⁄₂" (87....
... the door handles. Panels that are more than ¹⁄₄" (6.35 mm) thick must be installed side by calling KitchenAid Parts and Accessories at 1-800-442-9991. Follow the kit instructions for panel specifications. Follow the kit instructions for factory-installed stainless ...have a 1.5 mm) tolerance. Top Grille Panel The top panel should not weigh more than 20 lbs (9.1 kg). Color 72" (183 cm) Stainless Steel (Architect® Series) #W10153554 Refrigerator and Freezer Panels The freezer panel should not weigh more than 10 lbs (4.5 kg). 34¹⁄₂" (87....
Installation Guide
Page 20
... of the refrigerator as appropriate. See "Tipping Radius" for ceiling height requirements or "Reduce Tipping Radius" for the Architect® Series. 36" (91.4 cm) Models 20 If you do... not need to reduce the tipping radius, proceed to the refrigerator bottom. Push the top grille straight up; B A B Tip Over Hazard Refrigerator is completely installed. Use two or more information. If necessary...the floor to stand the refrigerator upright. Top grille B. Cabinet side trim 3. Place an appliance dolly under the left side of the refrigerator and the parts bag behind the grille. Place...
... of the refrigerator as appropriate. See "Tipping Radius" for ceiling height requirements or "Reduce Tipping Radius" for the Architect® Series. 36" (91.4 cm) Models 20 If you do... not need to reduce the tipping radius, proceed to the refrigerator bottom. Push the top grille straight up; B A B Tip Over Hazard Refrigerator is completely installed. Use two or more information. If necessary...the floor to stand the refrigerator upright. Top grille B. Cabinet side trim 3. Place an appliance dolly under the left side of the refrigerator and the parts bag behind the grille. Place...

Installation Guide
Page 28
...Do not use from the grille and doors or door frame, depending on the ice maker. See "Power On/Off Switch" in the refrigerator and freezer compartments. 5. The controls are working. 6. Immediately after installation, follow the steps below to make sure the base grille filter is microbiologically ...and that may be sure that is properly installed. Slide the ice maker On/Off control, located on disinfected waters that all boxes, parts packages and packing materials from the interior of ice produced. 28 On/Off control NOTE: If your Use & Care Guide. Systems certified...
...Do not use from the grille and doors or door frame, depending on the ice maker. See "Power On/Off Switch" in the refrigerator and freezer compartments. 5. The controls are working. 6. Immediately after installation, follow the steps below to make sure the base grille filter is microbiologically ...and that may be sure that is properly installed. Slide the ice maker On/Off control, located on disinfected waters that all boxes, parts packages and packing materials from the interior of ice produced. 28 On/Off control NOTE: If your Use & Care Guide. Systems certified...


