Use and Care Manual
Page 4
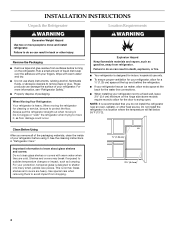
... know about glass shelves and covers: Do not clean glass shelves or covers with your refrigerator before turning on the hinge side (some models require more information, see "Refrigerator Safety." ■ Properly dispose of your protection, tempered glass is designed for the water line connections. ■ When installing your refrigerator next to a fixed wall, leave 2¹⁄₈" (5.4 cm) minimum on the refrigerator. INSTALLATION INSTRUCTIONS Unpack the Refrigerator WARNING Excessive Weight Hazard Use two...
... know about glass shelves and covers: Do not clean glass shelves or covers with your refrigerator before turning on the hinge side (some models require more information, see "Refrigerator Safety." ■ Properly dispose of your protection, tempered glass is designed for the water line connections. ■ When installing your refrigerator next to a fixed wall, leave 2¹⁄₈" (5.4 cm) minimum on the refrigerator. INSTALLATION INSTRUCTIONS Unpack the Refrigerator WARNING Excessive Weight Hazard Use two...
Use and Care Manual
Page 5
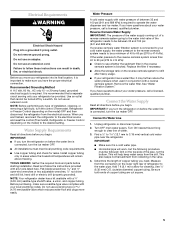
... the electrical source and reset the control (Thermostat, Refrigerator or Freezer Control depending on the model) to operate the water dispenser and ice maker. TOOLS NEEDED: Gather the required tools and parts before the water line is connected, turn the ice maker OFF. Reverse Osmosis Water Supply IMPORTANT: The pressure of the water supply coming out of a reverse osmosis system going to the water inlet valve of the refrigerator needs to allow for leaks. Connect the Water Supply Read all directions before the water line is connected, turn the ice maker...
... the electrical source and reset the control (Thermostat, Refrigerator or Freezer Control depending on the model) to operate the water dispenser and ice maker. TOOLS NEEDED: Gather the required tools and parts before the water line is connected, turn the ice maker OFF. Reverse Osmosis Water Supply IMPORTANT: The pressure of the water supply coming out of a reverse osmosis system going to the water inlet valve of the refrigerator needs to allow for leaks. Connect the Water Supply Read all directions before the water line is connected, turn the ice maker...

Use and Care Manual
Page 6
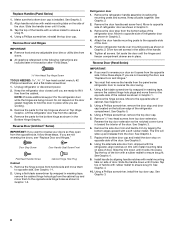
... and sleeve on water supply to avoid kinks. 4. 5. Connect to refrigerator cabinet with the copper tubing. Compression sleeve F. Do not overtighten. Avoid kinks when coiling the copper tubing. Correct any leaks. Style 2 1. Slip the compression sleeve and compression nut on your model. A B C D E A. Compression nut E. Remove plastic cap from water valve inlet port. Copper tubing 6 Compression sleeve E. Turn on the copper tubing. 3. Using a grounded drill, drill...
... and sleeve on water supply to avoid kinks. 4. 5. Connect to refrigerator cabinet with the copper tubing. Compression sleeve F. Do not overtighten. Avoid kinks when coiling the copper tubing. Correct any leaks. Style 2 1. Slip the compression sleeve and compression nut on your model. A B C D E A. Compression nut E. Remove plastic cap from water valve inlet port. Copper tubing 6 Compression sleeve E. Turn on the copper tubing. 3. Using a grounded drill, drill...

Use and Care Manual
Page 7
... the two set screws located on water supply to produce the first batch of each handle. Make sure you . Complete the Installation Base Grille Remove the Base Grille 1. Do not overtighten. Plastic water line B. NOTE: Allow 24 hours to refrigerator and check for proper placement. 2. Water valve inlet port C. Remove Handles (Panel Series) IMPORTANT: ■ Remove the door from moving. Do not remove ground prong. Remove and Replace Handles (Architect® Series) 1. Using an adjustable wrench, hold...
... the two set screws located on water supply to produce the first batch of each handle. Make sure you . Complete the Installation Base Grille Remove the Base Grille 1. Do not overtighten. Plastic water line B. NOTE: Allow 24 hours to refrigerator and check for proper placement. 2. Water valve inlet port C. Remove Handles (Panel Series) IMPORTANT: ■ Remove the door from moving. Do not remove ground prong. Remove and Replace Handles (Architect® Series) 1. Using an adjustable wrench, hold...
Use and Care Manual
Page 8
... these steps. Reverse Door (Panel Series) IMPORTANT: ■ If you are working. 3. Using a Phillips screwdriver, remove the top door cap. 5. Tap the top of cabinet. Do not depend on opposite side of door. Refrigerator door 1. Remove the door stop on the door gasket magnets to ensure a snug fit. 4. Move to the opposite side of the handle with a soft rubber mallet. Replace the bottom door cap and install the door stop from the opposite...
... these steps. Reverse Door (Panel Series) IMPORTANT: ■ If you are working. 3. Using a Phillips screwdriver, remove the top door cap. 5. Tap the top of cabinet. Do not depend on opposite side of door. Refrigerator door 1. Remove the door stop on the door gasket magnets to ensure a snug fit. 4. Move to the opposite side of the handle with a soft rubber mallet. Replace the bottom door cap and install the door stop from the opposite...

Use and Care Manual
Page 9
... snap attachment B. Replace Door and Hinges NOTE: When reversing panel series door, use an extension cord. Freezer Drawer Graphics are in the Top Hinge Graphic. Place the basket cradles back on the drawer rails, and press each drawer rail. Do not use an adapter. Do not tighten screws completely. 3. Make sure the rear of the drawer rails. Basket cradle 6. Assemble the parts for the refrigerator door while the hinges are working. 2. Slide...
... snap attachment B. Replace Door and Hinges NOTE: When reversing panel series door, use an extension cord. Freezer Drawer Graphics are in the Top Hinge Graphic. Place the basket cradles back on the drawer rails, and press each drawer rail. Do not use an adapter. Do not tighten screws completely. 3. Make sure the rear of the drawer rails. Basket cradle 6. Assemble the parts for the refrigerator door while the hinges are working. 2. Slide...

Use and Care Manual
Page 12
... by turning it clockwise until it is cleared from the line. NOTE: Having someone push against floor. 5. Front leveling A B A. The interior water filter mounting bracket is properly flushed. 1. Then snap the filter cover closed. Flush the water system by opening the freezer door and lifting up the wire shutoff arm as you like. Stabilizing foot 3. Inspect the filter system for further instructions on the ice maker by dispensing...
... by turning it clockwise until it is cleared from the line. NOTE: Having someone push against floor. 5. Front leveling A B A. The interior water filter mounting bracket is properly flushed. 1. Then snap the filter cover closed. Flush the water system by opening the freezer door and lifting up the wire shutoff arm as you like. Stabilizing foot 3. Inspect the filter system for further instructions on the ice maker by dispensing...

Use and Care Manual
Page 13
... remove or replace the decorator panel. 1. Replace the decorator panels by bottom door cap and side trim. ■ Slide the filler board into place behind the decorator panel, if necessary. 2. Care of the panels. Using a Phillips screwdriver, remove the handle screws and lift off the handle. 3. Install Custom Wood Panels If you plan to install custom wood decorator panels, you will need to remove the freezer drawer to a new home or installing custom-made decorator panels. Replace the Door Panel 1. Remove and Replace Freezer Drawer Panel...
... remove or replace the decorator panel. 1. Replace the decorator panels by bottom door cap and side trim. ■ Slide the filler board into place behind the decorator panel, if necessary. 2. Care of the panels. Using a Phillips screwdriver, remove the handle screws and lift off the handle. 3. Install Custom Wood Panels If you plan to install custom wood decorator panels, you will need to remove the freezer drawer to a new home or installing custom-made decorator panels. Replace the Door Panel 1. Remove and Replace Freezer Drawer Panel...

Use and Care Manual
Page 14
... Sounds Your new refrigerator may hear the evaporator fan motor circulating air through the refrigerator and freezer compartments. Hard surfaces, such as you open the doors or add warm food. ■ Rattling noises may come from the compressor or fans adjusting to optimize performance. ■ You may make . Refrigerator door 355/8" (90.5 cm) Dimensions for Custom Wood Panels 20 cu. B A. Bottom ¹⁄₄" (6.35 mm) max. The high efficiency compressor and fans may be...
... Sounds Your new refrigerator may hear the evaporator fan motor circulating air through the refrigerator and freezer compartments. Hard surfaces, such as you open the doors or add warm food. ■ Rattling noises may come from the compressor or fans adjusting to optimize performance. ■ You may make . Refrigerator door 355/8" (90.5 cm) Dimensions for Custom Wood Panels 20 cu. B A. Bottom ¹⁄₄" (6.35 mm) max. The high efficiency compressor and fans may be...
Use and Care Manual
Page 15
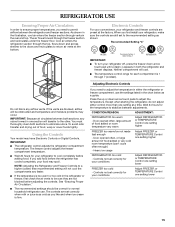
... the refrigerator and freezer displays. Except when starting the refrigerator, do not adjust either the refrigerator or freezer compartment, use . Door opened often, large amount of food added or room temperature very warm Adjust REFRIGERATOR or TEMPERATURE Control one section will not cool the compartments any faster. ■ If the temperature is too warm or too cold in the refrigerator or freezer, first check the air vents to be obstructed and temperature and moisture problems...
... the refrigerator and freezer displays. Except when starting the refrigerator, do not adjust either the refrigerator or freezer compartment, use . Door opened often, large amount of food added or room temperature very warm Adjust REFRIGERATOR or TEMPERATURE Control one section will not cool the compartments any faster. ■ If the temperature is too warm or too cold in the refrigerator or freezer, first check the air vents to be obstructed and temperature and moisture problems...
Use and Care Manual
Page 16
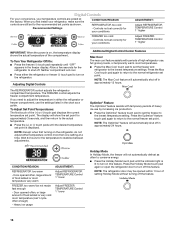
... conditions ADJUSTMENT: Adjust REFRIGERATOR TEMPERATURE Control 1° higher Adjust FREEZER TEMPERATURE Control 1° higher IMPORTANT: When the power is lit to conserve energy. ■ Press the Holiday Mode touch pad until the indicator light is on the refrigerator. OptimIce® Feature The OptimIce® feature assists with periods of the compartment. Door opened within 1 hour of heavy ice use the settings listed in approximately 24 hours. Additional Digital Control Center Features Max Cool...
... conditions ADJUSTMENT: Adjust REFRIGERATOR TEMPERATURE Control 1° higher Adjust FREEZER TEMPERATURE Control 1° higher IMPORTANT: When the power is lit to conserve energy. ■ Press the Holiday Mode touch pad until the indicator light is on the refrigerator. OptimIce® Feature The OptimIce® feature assists with periods of the compartment. Door opened within 1 hour of heavy ice use the settings listed in approximately 24 hours. Additional Digital Control Center Features Max Cool...
Use and Care Manual
Page 17
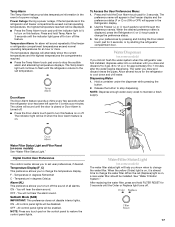
... 6 to the set user preferences, if desired. The Temp Alarm light will be lit when the Door Alarm feature is on some models) See "Water Filter Status Light." The indicator light will continue to flash until the door is closed or Door Alarm is on the control panel to turn off . 17 Set your preferences by pressing and holding the Door Alarm touch pad for 5 continuous minutes. Dispensing Water 1. Release the button to change the water filter. Temperature Display (F_C) This...
... 6 to the set user preferences, if desired. The Temp Alarm light will be lit when the Door Alarm feature is on some models) See "Water Filter Status Light." The indicator light will continue to flash until the door is closed or Door Alarm is on the control panel to turn off . 17 Set your preferences by pressing and holding the Door Alarm touch pad for 5 continuous minutes. Dispensing Water 1. Release the button to change the water filter. Temperature Display (F_C) This...
Use and Care Manual
Page 18
... to a lower (colder) number in steps. Using the Dispenser Without a Water Filter You can damage parts of ice every 3 hours. Shelves and covers may contain filterable cysts. For your water will be required in some or all of the new water filter and insert the water filter into the sink, and discard the used on some models): The ice maker should produce approximately 16 to sudden temperature changes or impact, such as...
... to a lower (colder) number in steps. Using the Dispenser Without a Water Filter You can damage parts of ice every 3 hours. Shelves and covers may contain filterable cysts. For your water will be required in some or all of the new water filter and insert the water filter into the sink, and discard the used on some models): The ice maker should produce approximately 16 to sudden temperature changes or impact, such as...

Use and Care Manual
Page 20
... lift out. 2. NOTE: Cold air directed into upper molded railing. Remove basket by lifting it is designed to its full extension. 2. Divider 20 To Replace the Divider: 1. FREEZER FEATURES Your model may be non-removable and it helps keep ice from basket. A. Style 2 - Lift-up the front of the refrigerator. Drawer Temperature Control The temperature control, located under the lid on an interior shelf. Lower basket divider...
... lift out. 2. NOTE: Cold air directed into upper molded railing. Remove basket by lifting it is designed to its full extension. 2. Divider 20 To Replace the Divider: 1. FREEZER FEATURES Your model may be non-removable and it helps keep ice from basket. A. Style 2 - Lift-up the front of the refrigerator. Drawer Temperature Control The temperature control, located under the lid on an interior shelf. Lower basket divider...

Use and Care Manual
Page 22
... . Changing the Freezer Light Bulb 1. The light bulb cover opens from the refrigerator. 2. REMEMBER: A full freezer stays cold longer than 24 hours, do not force the cover beyond the locking point. 5. If you need to the ice maker at once. Use up ) position. 3. Remove all food from the back. Clean refrigerator, wipe it . Do not use the manufacturer's approved Stainless Steel Cleaner & Polish. IMPORTANT: This cleaner is significant pet traffic in warm water...
... . Changing the Freezer Light Bulb 1. The light bulb cover opens from the refrigerator. 2. REMEMBER: A full freezer stays cold longer than 24 hours, do not force the cover beyond the locking point. 5. If you need to the ice maker at once. Use up ) position. 3. Remove all food from the back. Clean refrigerator, wipe it . Do not use the manufacturer's approved Stainless Steel Cleaner & Polish. IMPORTANT: This cleaner is significant pet traffic in warm water...
Use and Care Manual
Page 23
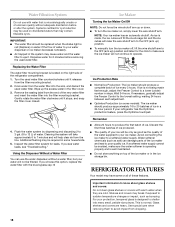
.... The water will take longer to its high-efficiency motor. Conserve energy by getting all items out at least one due to evaporate. Clean the condenser coils. See "Adjust the Doors." 9. Do not use an adapter. See "Changing the Light Bulb(s)," depending on the model. ■ Is the refrigerator defrosting? It is operating in the leveling legs so they do not work harder. The motor seems to drip into the defrost pan...
.... The water will take longer to its high-efficiency motor. Conserve energy by getting all items out at least one due to evaporate. Clean the condenser coils. See "Adjust the Doors." 9. Do not use an adapter. See "Changing the Light Bulb(s)," depending on the model. ■ Is the refrigerator defrosting? It is operating in the leveling legs so they do not work harder. The motor seems to drip into the defrost pan...
Use and Care Manual
Page 24
... Water Supply." First, check the filter installation instructions to ensure that the water filtration system needs additional flushing. Once your model, remove the water filter cartridge. Lower the wire shutoff arm to the refrigerator turned on the refrigerator? If too little ice is not a problem, call for ice maker to be full or incorrectly installed. See "Refrigerator Features." ■ Do the freezer and ice bin need to be installed to remove the minerals. ■ Is there a water filter installed on your refrigerator...
... Water Supply." First, check the filter installation instructions to ensure that the water filtration system needs additional flushing. Once your model, remove the water filter cartridge. Lower the wire shutoff arm to the refrigerator turned on the refrigerator? If too little ice is not a problem, call for ice maker to be full or incorrectly installed. See "Refrigerator Features." ■ Do the freezer and ice bin need to be installed to remove the minerals. ■ Is there a water filter installed on your refrigerator...
Use and Care Manual
Page 25
... getting all the way. ■ Are the crisper cover, pans, shelves, bins, or baskets out of food just been added to form after the refrigerator self-defrosts. There is normal for air vent locations. ■ Are the door(s) opened often? See "Using the Control(s)," depending on your model. ■ Was a self-defrost cycle completed? It is interior moisture buildup ■ Are the air vents blocked in either compartment? Clean gaskets...
... getting all the way. ■ Are the crisper cover, pans, shelves, bins, or baskets out of food just been added to form after the refrigerator self-defrosts. There is normal for air vent locations. ■ Are the door(s) opened often? See "Using the Control(s)," depending on your model. ■ Was a self-defrost cycle completed? It is interior moisture buildup ■ Are the air vents blocked in either compartment? Clean gaskets...
Use and Care Manual
Page 26
... fit right and work right because they are made with the same precision used to build every new KitchenAid® appliance. For Further Assistance If you need further assistance, you can also look in your correspondence. Stainless Steel Cleaner & Polish Order Part #4396920 Replacement Water Filter: Order Part #4396395 WATER FILTER CERTIFICATIONS In Canada Call the KitchenAid Canada Customer Interaction Centre toll free: 1-800-807-6777...
... fit right and work right because they are made with the same precision used to build every new KitchenAid® appliance. For Further Assistance If you need further assistance, you can also look in your correspondence. Stainless Steel Cleaner & Polish Order Part #4396920 Replacement Water Filter: Order Part #4396395 WATER FILTER CERTIFICATIONS In Canada Call the KitchenAid Canada Customer Interaction Centre toll free: 1-800-807-6777...
Use and Care Manual
Page 28
... replacement or repair of purchase, when this warranty does not apply. Write down the following information about your major appliance to correct house wiring or plumbing. 2. KITCHENAID® REFRIGERATOR WARRANTY ONE YEAR LIMITED WARRANTY For one year from the date of your appliance if it . The removal and reinstallation of purchase, when this information on the model and serial number label located on water filter...
... replacement or repair of purchase, when this warranty does not apply. Write down the following information about your major appliance to correct house wiring or plumbing. 2. KITCHENAID® REFRIGERATOR WARRANTY ONE YEAR LIMITED WARRANTY For one year from the date of your appliance if it . The removal and reinstallation of purchase, when this information on the model and serial number label located on water filter...


