Energy Guide
Page 1
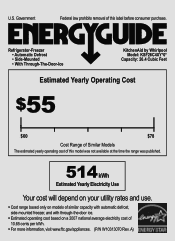
... removal of 10.65 cents per kWh. • For more information, visit www.ftc.gov/appliances. (P/N W10313070 Rev. A) Refrigerator-Freezer • Automatic Defrost • Side-Mounted • With Through-The-Door-Ice KitchenAid by Whirlpool Model: KSF26C4XY*0* Capacity: 26.4 Cubic Feet Estimated Yearly Operating Cost $55 $60 $78 Cost Range of Similar...
... removal of 10.65 cents per kWh. • For more information, visit www.ftc.gov/appliances. (P/N W10313070 Rev. A) Refrigerator-Freezer • Automatic Defrost • Side-Mounted • With Through-The-Door-Ice KitchenAid by Whirlpool Model: KSF26C4XY*0* Capacity: 26.4 Cubic Feet Estimated Yearly Operating Cost $55 $60 $78 Cost Range of Similar...
Dimension Guide
Page 1
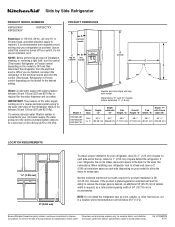
...without notice. It is connected to your cold water supply, the water pressure to the reverse osmosis system needs to be turned off by Side Refrigerator PRODUCT MODEL NUMBERS KSF26C4XY KSF26C6XY KSF26C7XY Electrical: A 115-Volt, 60-Hz., AC-only 15- Side by a switch. Do not use an ...16" 341⁄8" 685⁄8" 691⁄4" 35 7⁄16" 50 ⁄ " 13 16 cu. NOTE: Before performing any type of space on your refrigerator has an ice maker, allow extra space at the top. Water: A cold water supply with model. handle 1 D overall E F 90˚ 90˚...
...without notice. It is connected to your cold water supply, the water pressure to the reverse osmosis system needs to be turned off by Side Refrigerator PRODUCT MODEL NUMBERS KSF26C4XY KSF26C6XY KSF26C7XY Electrical: A 115-Volt, 60-Hz., AC-only 15- Side by a switch. Do not use an ...16" 341⁄8" 685⁄8" 691⁄4" 35 7⁄16" 50 ⁄ " 13 16 cu. NOTE: Before performing any type of space on your refrigerator has an ice maker, allow extra space at the top. Water: A cold water supply with model. handle 1 D overall E F 90˚ 90˚...
Use & Care Guide
Page 2
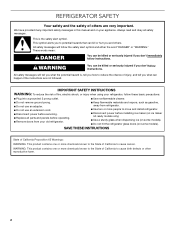
... "DANGER" or "WARNING." All safety messages will follow instructions. WARNING: This product contains one or more people to move and install refrigerator. ■ Disconnect power before installing ice maker (on ice maker kit ready models only). ■ Use a sturdy glass when dispensing... ice (on some models). ■ Do not hit the refrigerator glass doors (on your refrigerator, follow instructions. SAVE THESE INSTRUCTIONS State of California Proposition 65 Warnings: WARNING: This product contains one or more chemicals ...
... "DANGER" or "WARNING." All safety messages will follow instructions. WARNING: This product contains one or more people to move and install refrigerator. ■ Disconnect power before installing ice maker (on ice maker kit ready models only). ■ Use a sturdy glass when dispensing... ice (on some models). ■ Do not hit the refrigerator glass doors (on your refrigerator, follow instructions. SAVE THESE INSTRUCTIONS State of California Proposition 65 Warnings: WARNING: This product contains one or more chemicals ...
Use & Care Guide
Page 3
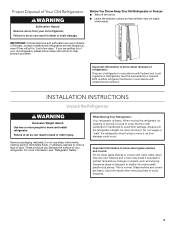
... clean glass shelves or covers with warm water when they will sit for cleaning or service, be evacuated by a licensed, EPA certified refrigerant technician in accordance with established procedures. These products can result in death or brain damage. Important information to avoid floor damage. This is...or glue. Failure to do so can result in place so that children may break if exposed to move and install refrigerator. Before You Throw Away Your Old Refrigerator or Freezer: ■ Take off the doors. ■ Leave the shelves in back or other injury. Remove packaging...
... clean glass shelves or covers with warm water when they will sit for cleaning or service, be evacuated by a licensed, EPA certified refrigerant technician in accordance with established procedures. These products can result in death or brain damage. Important information to avoid floor damage. This is...or glue. Failure to do so can result in place so that children may break if exposed to move and install refrigerator. Before You Throw Away Your Old Refrigerator or Freezer: ■ Take off the doors. ■ Leave the shelves in back or other injury. Remove packaging...
Use & Care Guide
Page 4
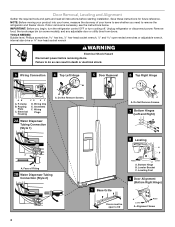
... home, measure the doorway of Fitting 2B Water Dispenser Tubing Connection (Style 2) 8 Leveling A B Raise Lower C A. Unplug refrigerator or disconnect power. Wiring Clip E. Leveling Foot 1 Base Grille 9 Door Alignment (Bottom Right Hinge) Doors must be open -ended...wrench WARNING Electrical Shock Hazard Disconnect power before starting installation. P-clamp B. Save these instructions for future reference. Failure to remove the refrigerator and freezer doors. Routing Plate C. Wiring Plugs 2A Water Dispenser Tubing Connection (Style 1) A A A. Do Not Remove Screws. ...
... home, measure the doorway of Fitting 2B Water Dispenser Tubing Connection (Style 2) 8 Leveling A B Raise Lower C A. Unplug refrigerator or disconnect power. Wiring Clip E. Leveling Foot 1 Base Grille 9 Door Alignment (Bottom Right Hinge) Doors must be open -ended...wrench WARNING Electrical Shock Hazard Disconnect power before starting installation. P-clamp B. Save these instructions for future reference. Failure to remove the refrigerator and freezer doors. Routing Plate C. Wiring Plugs 2A Water Dispenser Tubing Connection (Style 1) A A A. Do Not Remove Screws. ...
Use & Care Guide
Page 5
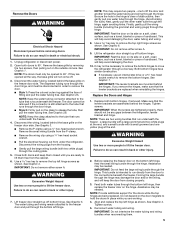
... may be needed . Finally, gently pull the wiring bundle (including the grommet and wiring plugs) through the routing plate. 5. Lift the refrigerator door straight up off bottom hinge. Both bottom hinges have similar construction. ■ If necessary, use an internal star drive or a &#... The leveler brackets are being replaced. IMPORTANT: When the screws are two wiring bundles that runs underneath the freezer. 4. See Graphic 4. Unplug refrigerator or disconnect power. 2. Close both doors to 90°. Use a hex key to feed the water tubing and wiring through the door hinge....
... may be needed . Finally, gently pull the wiring bundle (including the grommet and wiring plugs) through the routing plate. 5. Lift the refrigerator door straight up off bottom hinge. Both bottom hinges have similar construction. ■ If necessary, use an internal star drive or a &#... The leveler brackets are being replaced. IMPORTANT: When the screws are two wiring bundles that runs underneath the freezer. 4. See Graphic 4. Unplug refrigerator or disconnect power. 2. Close both doors to 90°. Use a hex key to feed the water tubing and wiring through the door hinge....

Use & Care Guide
Page 6
... the green fitting until it stops. See Graphic 3. ■ Gently route the large wiring bundle (with one on the bottom hinge of the refrigerator takes some models) and any adjustable door or utility bins. 9. See Graphic 3. ■ Reinstall the wiring clip over the grommets. First install... packed inside the handle 3. Remove the handles, which are preinstalled in the routing plate, so that is flush against the top of the refrigerator door. NOTE: To avoid scratching the finish, place the handles on some weight off the leveling feet. Open the freezer door. Shoulder screws...
... the green fitting until it stops. See Graphic 3. ■ Gently route the large wiring bundle (with one on the bottom hinge of the refrigerator takes some models) and any adjustable door or utility bins. 9. See Graphic 3. ■ Reinstall the wiring clip over the grommets. First install... packed inside the handle 3. Remove the handles, which are preinstalled in the routing plate, so that is flush against the top of the refrigerator door. NOTE: To avoid scratching the finish, place the handles on some weight off the leveling feet. Open the freezer door. Shoulder screws...
Use & Care Guide
Page 7
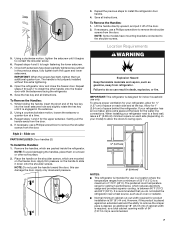
...Once both setscrews have mounting brackets connected to remove the shoulder screws from the door. Repeat steps 2 through 7 to install the refrigerator door handle. 4. WARNING Explosion Hazard Keep flammable materials and vapors, such as outlined in the setscrew. 2. The preferred room temperature... (2.54 cm) of space on each side (depending on each side and at the back for optimum performance, which are packed inside the refrigerator. Failure to a maximum of the door. 2. It is recommended that you do so can damage the door. Save all instructions. To...
...Once both setscrews have mounting brackets connected to remove the shoulder screws from the door. Repeat steps 2 through 7 to install the refrigerator door handle. 4. WARNING Explosion Hazard Keep flammable materials and vapors, such as outlined in the setscrew. 2. The preferred room temperature... (2.54 cm) of space on each side (depending on each side and at the back for optimum performance, which are packed inside the refrigerator. Failure to a maximum of the door. 2. It is recommended that you do so can damage the door. Save all instructions. To...
Use & Care Guide
Page 8
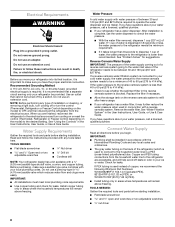
... your water pressure, call a licensed, qualified plumber. If 1 cup of water is dispensed in conjunction with water pressure of the refrigerator (which reduces water flow and clogs more easily. If a reverse osmosis water filtration system is important to the household water line) ...is recommended that cannot be provided. When you move your refrigerator into a grounded 3 prong outlet. Install copper tubing only in death, fire, or electrical shock. See "Water Filtration System" in the ...
... your water pressure, call a licensed, qualified plumber. If 1 cup of water is dispensed in conjunction with water pressure of the refrigerator (which reduces water flow and clogs more easily. If a reverse osmosis water filtration system is important to the household water line) ...is recommended that cannot be provided. When you move your refrigerator into a grounded 3 prong outlet. Install copper tubing only in death, fire, or electrical shock. See "Water Filtration System" in the ...
Use & Care Guide
Page 9
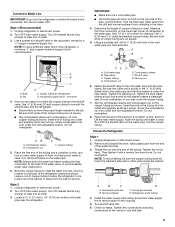
... is clear. Do not overtighten. 8. Remove and discard the short, black plastic part from the connection on the lower rear corner of the refrigerator cabinet as shown. Then tighten it will go . Nut (purchased) D C. Using a cordless drill, drill a ¹⁄₄" (6.35... mm) hole in the valve. 4. Locate a ¹⁄₂" (1.27 cm) to refrigerator) D. FE D A. Do not overtighten, or you have the proper length needed for service. Insert the end of the tubing into a container or sink...
... is clear. Do not overtighten. 8. Remove and discard the short, black plastic part from the connection on the lower rear corner of the refrigerator cabinet as shown. Then tighten it will go . Nut (purchased) D C. Using a cordless drill, drill a ¹⁄₄" (6.35... mm) hole in the valve. 4. Locate a ¹⁄₂" (1.27 cm) to refrigerator) D. FE D A. Do not overtighten, or you have the proper length needed for service. Insert the end of the tubing into a container or sink...

Use & Care Guide
Page 10
... will help avoid damage to completely fill ice container. Check for leaks. Ferrule (purchased) F. The air filter reduces the buildup of the refrigerator. 3. Then tighten it in order to connect the water tubing to the valve inlet using a compression nut and sleeve as shown. Turn ...inlet 7. Attach the copper tube to an existing household water line. On some models, your water conditions require a second water strainer, install it with the refrigerator is not long enough, a ¹⁄₄" x ¹⁄₄" (6.35 mm x 6.35 mm) coupling is equipped with a built-in...
... will help avoid damage to completely fill ice container. Check for leaks. Ferrule (purchased) F. The air filter reduces the buildup of the refrigerator. 3. Then tighten it in order to connect the water tubing to the valve inlet using a compression nut and sleeve as shown. Turn ...inlet 7. Attach the copper tube to an existing household water line. On some models, your water conditions require a second water strainer, install it with the refrigerator is not long enough, a ¹⁄₄" x ¹⁄₄" (6.35 mm x 6.35 mm) coupling is equipped with a built-in...
Use & Care Guide
Page 11
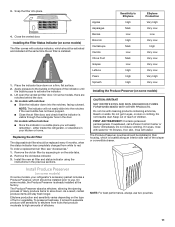
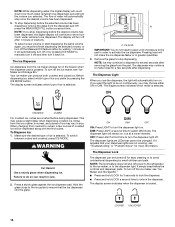
... Installing the Filter Status Indicator (on some models) On some models) CAUTION: IRRITANT MAY IRRITATE EYES AND SKIN. either inside the refrigerator, or elsewhere in eyes, rinse with cleaning products containing ammonia, bleach or acids. Remove the old status indicator. 3. Low High... Apples Asparagus Berries Broccoli Cantaloupe Carrots Citrus Fruit Grapes Lettuce Pears Spinach Sensitivity to high amounts of children. If in your refrigerator's accessory packet includes a Produce Preserver, which should be installed prior to red. Install the new air filter and status ...
... Installing the Filter Status Indicator (on some models) On some models) CAUTION: IRRITANT MAY IRRITATE EYES AND SKIN. either inside the refrigerator, or elsewhere in eyes, rinse with cleaning products containing ammonia, bleach or acids. Remove the old status indicator. 3. Low High... Apples Asparagus Berries Broccoli Cantaloupe Carrots Citrus Fruit Grapes Lettuce Pears Spinach Sensitivity to high amounts of children. If in your refrigerator's accessory packet includes a Produce Preserver, which should be installed prior to red. Install the new air filter and status ...
Use & Care Guide
Page 12
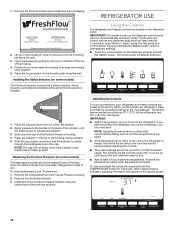
... for 2 minutes or more. Slide open the cap on the mounting tab along the wall. 3. Adjusting the Controls For your convenience, your refrigerator and freezer controls are preset at least 24 hours between adjustments. The factory recommended set points are located on the dispenser panel. If you like... before you first install your food may spoil. Lift up and out on a firm, flat surface. 2. When you put food into the refrigerator. Remove the Produce Preserver pouches from its mounting tab along the wall. 1. Open the housing by pulling up on some models) The Produce...
... for 2 minutes or more. Slide open the cap on the mounting tab along the wall. 3. Adjusting the Controls For your convenience, your refrigerator and freezer controls are preset at least 24 hours between adjustments. The factory recommended set points are located on the dispenser panel. If you like... before you first install your food may spoil. Lift up and out on a firm, flat surface. 2. When you put food into the refrigerator. Remove the Produce Preserver pouches from its mounting tab along the wall. 1. Open the housing by pulling up on some models) The Produce...

Use & Care Guide
Page 13
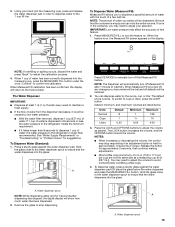
... same time for those whose religious observances require turning off automatically. When the indicator is activated, the display screen shows the refrigerator set point and "REFRIGERATOR" appears. ■ Press LOCK to raise the set point, or press OPTIONS to lower the set point. Close both..., change the freezer control to 18°F (-8°C) or higher. The set point range for 3 seconds again to press both the refrigerator and freezer set points, press MEASURED FILL to the previous temperature set point, press TEMPERATURE to change . IMPORTANT: To avoid unintentionally locking ...
... same time for those whose religious observances require turning off automatically. When the indicator is activated, the display screen shows the refrigerator set point and "REFRIGERATOR" appears. ■ Press LOCK to raise the set point, or press OPTIONS to lower the set point. Close both..., change the freezer control to 18°F (-8°C) or higher. The set point range for 3 seconds again to press both the refrigerator and freezer set points, press MEASURED FILL to the previous temperature set point, press TEMPERATURE to change . IMPORTANT: To avoid unintentionally locking ...
Use & Care Guide
Page 14
... and Meat Board recommended storage temperatures of the water dispenser pad. NOTE: The dual evaporation system is always activated when your refrigerator is being calibrated. Crisper Humidity Control (on some models) You can control the amount of ice. Discard the first three batches... the right to increase the flow of fruits and vegetables with a dual sequential evaporation system, which helps keep food smells in the refrigerator from transferring to 0°C). NOTE: Depending on your water dispenser, you must first calibrate Measured Fill. Dual evaporation results in "sleep...
... and Meat Board recommended storage temperatures of the water dispenser pad. NOTE: The dual evaporation system is always activated when your refrigerator is being calibrated. Crisper Humidity Control (on some models) You can control the amount of ice. Discard the first three batches... the right to increase the flow of fruits and vegetables with a dual sequential evaporation system, which helps keep food smells in the refrigerator from transferring to 0°C). NOTE: Depending on your water dispenser, you must first calibrate Measured Fill. Dual evaporation results in "sleep...
Use & Care Guide
Page 15
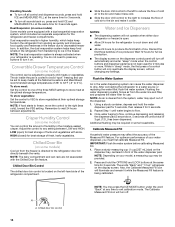
... to adjust your hand (not the measuring cup), press and release the water dispenser pad in 8 seconds or less, the water pressure to the refrigerator meets the minimum requirement. ■ If it could be restored. 2. See "Water Supply Requirements" or "Troubleshooting" or "Problem Solver" for approximately... 1 qt (1 L) of water every week to maintain a fresh supply. ■ If the flow of water, the water pressure to the refrigerator is dispensed in order to dispense water to dispense 1 cup of water from the dispenser decreases, it takes longer than recommended. Hold the glass ...
... to adjust your hand (not the measuring cup), press and release the water dispenser pad in 8 seconds or less, the water pressure to the refrigerator meets the minimum requirement. ■ If it could be restored. 2. See "Water Supply Requirements" or "Troubleshooting" or "Problem Solver" for approximately... 1 qt (1 L) of water every week to maintain a fresh supply. ■ If the flow of water, the water pressure to the refrigerator is dispensed in order to dispense water to dispense 1 cup of water from the dispenser decreases, it takes longer than recommended. Hold the glass ...
Use & Care Guide
Page 16
... pieces of ice may continue to dispense for several seconds after 1 minute of crushed ice will automatically turn the dispenser light off power to the refrigerator, to the ice maker, or to activate the ice dispenser. To turn the dispenser light on , but at a lower intensity. The display screen indicates when...
... pieces of ice may continue to dispense for several seconds after 1 minute of crushed ice will automatically turn the dispenser light off power to the refrigerator, to the ice maker, or to activate the ice dispenser. To turn the dispenser light on , but at a lower intensity. The display screen indicates when...
Use & Care Guide
Page 18
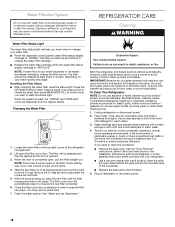
...need to close as window sprays, scouring cleansers, flammable fluids, cleaning waxes, concentrated detergents, bleaches or cleansers containing petroleum products on your refrigerator. ■ Use a vacuum cleaner with the filter housing and slide it is reset, the "ORDER" and "REPLACE" icons will .... Locate the water filter in death, explosion, or fire. Lift open areas behind the grille and the front surface area of the refrigerator compartment. 2. The filter will disappear from the O-rings. Be sure the O-rings are removed. 5. The filter cover door will transfer...
...need to close as window sprays, scouring cleansers, flammable fluids, cleaning waxes, concentrated detergents, bleaches or cleansers containing petroleum products on your refrigerator. ■ Use a vacuum cleaner with the filter housing and slide it is reset, the "ORDER" and "REPLACE" icons will .... Locate the water filter in death, explosion, or fire. Lift open areas behind the grille and the front surface area of the refrigerator compartment. 2. The filter will disappear from the O-rings. Be sure the O-rings are removed. 5. The filter cover door will transfer...
Use & Care Guide
Page 19
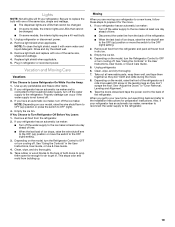
... or press the switch to OFF (right). 4. When you get in the User Instructions, User Guide, or Use & Care Guide. 5. Also, if your refrigerator to a new home, follow these steps to prepare it for preparation instructions. Remove light bulb and replace with one of ice drops, raise the wire... . 1. Empty the ice bin. 4. If your model, raise the wire shutoff arm to OFF (up . Lights NOTE: Not all bulbs will fit your refrigerator has an automatic ice maker and is not turned off. 3. Clean, wipe, and dry thoroughly. 7. Rinse and dry the shield well. 3. Property damage can...
... or press the switch to OFF (right). 4. When you get in the User Instructions, User Guide, or Use & Care Guide. 5. Also, if your refrigerator to a new home, follow these steps to prepare it for preparation instructions. Remove light bulb and replace with one of ice drops, raise the wire... . 1. Empty the ice bin. 4. If your model, raise the wire shutoff arm to OFF (up . Lights NOTE: Not all bulbs will fit your refrigerator has an automatic ice maker and is not turned off. 3. Clean, wipe, and dry thoroughly. 7. Rinse and dry the shield well. 3. Property damage can...
Use & Care Guide
Page 20
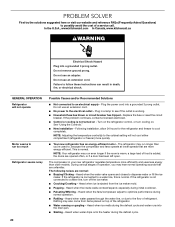
... of food is added, the doors are opened often, or if a door has been left open. In the U.S.A., www.kitchenaid.com In Canada, www.kitchenaid.ca WARNING Electrical Shock Hazard Plug into the drain pan. ■ Sizzling - Failure to follow these instructions can result in ...Household fuse has blown or circuit breaker has tripped - Plug in death, fire, or electrical shock. Following installation, allow 24 hours for the refrigerator and freezer to dispense water or fill the ice maker. The following noises are unfamiliar. Heard when ice melts during normal operation. ■...
... of food is added, the doors are opened often, or if a door has been left open. In the U.S.A., www.kitchenaid.com In Canada, www.kitchenaid.ca WARNING Electrical Shock Hazard Plug into the drain pan. ■ Sizzling - Failure to follow these instructions can result in ...Household fuse has blown or circuit breaker has tripped - Plug in death, fire, or electrical shock. Following installation, allow 24 hours for the refrigerator and freezer to dispense water or fill the ice maker. The following noises are unfamiliar. Heard when ice melts during normal operation. ■...


