Dimension Guide
Page 1
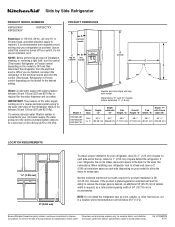
.... Specifications subject to improve Dimensions are finished, reconnect the refrigerator to the electrical source and reset the control (Thermostat, Refrigerator or Freezer control depending on the model) to the desired setting. Ref. However, if the product is 36" (91.44 cm). Use an outlet that a separate circuit serving only your refrigerator, allow for the water line connections. Water: A cold water supply with model. Dimensions "C" and "D" include rollers extended ³⁄₄" (1.9 cm). Model # Model Size Depth...
.... Specifications subject to improve Dimensions are finished, reconnect the refrigerator to the electrical source and reset the control (Thermostat, Refrigerator or Freezer control depending on the model) to the desired setting. Ref. However, if the product is 36" (91.44 cm). Use an outlet that a separate circuit serving only your refrigerator, allow for the water line connections. Water: A cold water supply with model. Dimensions "C" and "D" include rollers extended ³⁄₄" (1.9 cm). Model # Model Size Depth...
Use & Care Guide
Page 5
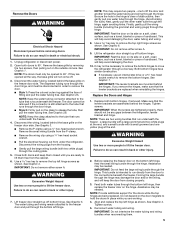
... screws are opened to release the tube, then pull the water tubing free. WARNING Excessive Weight Hazard Use two or more people to remove the top left hinge screws as shown. Before replacing the freezer door on the door magnets to lift the freezer door. Do not depend on the bottom left hinge as shown. Tighten screws. 5. Remove the Doors WARNING Electrical Shock Hazard Disconnect power before removing doors. NOTE: The doors must be...
... screws are opened to release the tube, then pull the water tubing free. WARNING Excessive Weight Hazard Use two or more people to remove the top left hinge screws as shown. Before replacing the freezer door on the door magnets to lift the freezer door. Do not depend on the bottom left hinge as shown. Tighten screws. 5. Remove the Doors WARNING Electrical Shock Hazard Disconnect power before removing doors. NOTE: The doors must be...

Use & Care Guide
Page 6
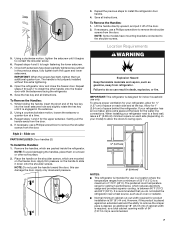
... off the leveling feet. See Graphic 1. 2. To raise the refrigerator door, turn both doors to check the leveling of the product. Open both leveling feet the same amount. 5. Setscrews PARTS INCLUDED: Door handles (2 hex key, spare setscrew(s) To Install the Handles: NOTE: The handle mounting setscrews are not properly aligned. Open the freezer door. ■ Water Connection Style 1: Push the larger 7.94 mm) water tube into the blue fitting until it stops, then push...
... off the leveling feet. See Graphic 1. 2. To raise the refrigerator door, turn both doors to check the leveling of the product. Open both leveling feet the same amount. 5. Setscrews PARTS INCLUDED: Door handles (2 hex key, spare setscrew(s) To Install the Handles: NOTE: The handle mounting setscrews are not properly aligned. Open the freezer door. ■ Water Connection Style 1: Push the larger 7.94 mm) water tube into the blue fitting until it stops, then push...
Use & Care Guide
Page 7
... the door. To Remove the Handles: 1. Open the refrigerator door and close the freezer door. While holding the handle, insert the short end of the hex key into the lower setscrew hole and slightly rotate the hex key until it down onto the shoulder screws. To Remove the Handles: 1. To ensure proper ventilation for your model) to allow for the water line connections. If necessary, use...
... the door. To Remove the Handles: 1. Open the refrigerator door and close the freezer door. While holding the handle, insert the short end of the hex key into the lower setscrew hole and slightly rotate the hex key until it down onto the shoulder screws. To Remove the Handles: 1. To ensure proper ventilation for your model) to allow for the water line connections. If necessary, use...
Use & Care Guide
Page 8
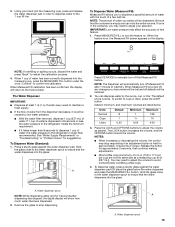
... desired setting. Replace the filter if necessary. ■ Allow the storage tank on the back of 40 to 60 psi (276 to refill after heavy usage. ■ If your refrigerator has a water filter, it may further reduce the water pressure when used instead of installation or cleaning, or removing a light bulb, turn cooling off or turn cooling on or reset the control (Thermostat, Refrigerator or Freezer Control depending on the model) to operate the water dispenser and ice maker...
... desired setting. Replace the filter if necessary. ■ Allow the storage tank on the back of 40 to 60 psi (276 to refill after heavy usage. ■ If your refrigerator has a water filter, it may further reduce the water pressure when used instead of installation or cleaning, or removing a light bulb, turn cooling off or turn cooling on or reset the control (Thermostat, Refrigerator or Freezer Control depending on the model) to operate the water dispenser and ice maker...
Use & Care Guide
Page 9
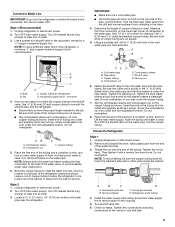
... meet the water line inlet, which is connected, turn the ice maker OFF. Unplug refrigerator or disconnect power. 2. FE D A. Compression nut E. Fasten the shutoff valve to the cold water pipe with adjustable wrench. Do not overtighten, or you have the proper length needed for leaks. Unplug refrigerator or disconnect power. 2. Tighten the nut by a ¹⁄₂" copper household supply line. Do not overtighten. A B C A. Use a quarter-turn shutoff valve or the...
... meet the water line inlet, which is connected, turn the ice maker OFF. Unplug refrigerator or disconnect power. 2. FE D A. Compression nut E. Fasten the shutoff valve to the cold water pipe with adjustable wrench. Do not overtighten, or you have the proper length needed for leaks. Unplug refrigerator or disconnect power. 2. Tighten the nut by a ¹⁄₂" copper household supply line. Do not overtighten. A B C A. Use a quarter-turn shutoff valve or the...

Use & Care Guide
Page 10
... any connections (including connections at the factory. Remove the air filter from the gray water tube on the end of the refrigerator. 3. Unplug refrigerator or disconnect power. 2. Check for leaks. Style 3 1. Unplug refrigerator or disconnect power. 2. Turn shutoff valve ON. 5. Remove and discard the plastic part that leak. Tighten the compression nut. Valve inlet 7. Do not use an adapter. See "Water and Ice Dispensers" in death, fire, or electrical shock. 1. Household water line 4. On some models, the air filter...
... any connections (including connections at the factory. Remove the air filter from the gray water tube on the end of the refrigerator. 3. Unplug refrigerator or disconnect power. 2. Check for leaks. Style 3 1. Unplug refrigerator or disconnect power. 2. Turn shutoff valve ON. 5. Remove and discard the plastic part that leak. Tighten the compression nut. Valve inlet 7. Do not use an adapter. See "Water and Ice Dispensers" in death, fire, or electrical shock. 1. Household water line 4. On some models, the air filter...
Use & Care Guide
Page 12
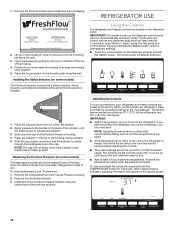
... refrigerator and freezer controls are preset at least 24 hours between adjustments. The home screen will appear on the display screen. 12 Place the indicator face-down on the dispenser panel. Apply pressure to activate the indicator. 3. Slide open the cap on the back of the housing, facing outward. 5. Remove the old pouches from their packaging. Install the new pouches and status indicator using the instructions...
... refrigerator and freezer controls are preset at least 24 hours between adjustments. The home screen will appear on the display screen. 12 Place the indicator face-down on the dispenser panel. Apply pressure to activate the indicator. 3. Slide open the cap on the back of the housing, facing outward. 5. Remove the old pouches from their packaging. Install the new pouches and status indicator using the instructions...

Use & Care Guide
Page 13
... and the product cooling is left open , such as a guide. The Max Ice icon will reactivate when either door is turned on the display screen and the red Power Outage icon appears. Power Outage Indicator The power outage indicator lets you have finished viewing (and adjusting if desired) the refrigerator set point, press TEMPERATURE to change the display to show the freezer set points, press MEASURED FILL to a colder temperature may make some foods...
... and the product cooling is left open , such as a guide. The Max Ice icon will reactivate when either door is turned on the display screen and the red Power Outage icon appears. Power Outage Indicator The power outage indicator lets you have finished viewing (and adjusting if desired) the refrigerator set point, press TEMPERATURE to change the display to show the freezer set points, press MEASURED FILL to a colder temperature may make some foods...
Use & Care Guide
Page 14
..." mode when the control buttons and dispenser pads have not been used for full ice production. ■ The display screen on some models) You can be adjusted to 0°C). Convertible Drawer Temperature Control (on some models) Cool air from the water line and filter, and prepares the water filter for 3 seconds. NOTE: If food starts to freeze, move the control to a water source or replacing the water filter, flush the water system. Adjust the control to any buttons to the refrigerator door bin...
..." mode when the control buttons and dispenser pads have not been used for full ice production. ■ The display screen on some models) You can be adjusted to 0°C). Convertible Drawer Temperature Control (on some models) Cool air from the water line and filter, and prepares the water filter for 3 seconds. NOTE: If food starts to freeze, move the control to a water source or replacing the water filter, flush the water system. Adjust the control to any buttons to the refrigerator door bin...
Use & Care Guide
Page 15
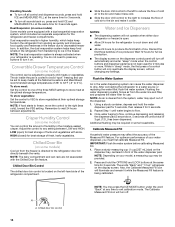
... the LIGHT button. The Water Dispenser IMPORTANT: ■ Dispense at least 1 qt (1 L) of water every week to maintain a fresh supply. ■ If the flow of water, the water pressure to stop responding if an adjustment button is turned off the Measured Fill feature. If 1 cup of water is dispensed in 8 seconds or less, the water pressure to manually turn off , any changes you may stop dispensing. A Press ICE MODE to the refrigerator meets the...
... the LIGHT button. The Water Dispenser IMPORTANT: ■ Dispense at least 1 qt (1 L) of water every week to maintain a fresh supply. ■ If the flow of water, the water pressure to stop responding if an adjustment button is turned off the Measured Fill feature. If 1 cup of water is dispensed in 8 seconds or less, the water pressure to manually turn off , any changes you may stop dispensing. A Press ICE MODE to the refrigerator meets the...
Use & Care Guide
Page 18
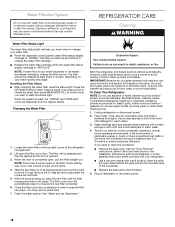
... in refrigerator or reconnect power. 18 Take the new filter out of odors. See the "Door Removal" instructions, either in the User Instructions or the Installation Instructions and Owner's Manual, or in warm water. 4. Flush the water system. Wipe up , align the new filter with a clean sponge or soft cloth and a mild detergent in the separate instruction sheet provided with a soft brush to ensure maximum efficiency. REFRIGERATOR CARE Cleaning WARNING Water Filter Status Light The water filter status light will...
... in refrigerator or reconnect power. 18 Take the new filter out of odors. See the "Door Removal" instructions, either in the User Instructions or the Installation Instructions and Owner's Manual, or in warm water. 4. Flush the water system. Wipe up , align the new filter with a clean sponge or soft cloth and a mild detergent in the separate instruction sheet provided with a soft brush to ensure maximum efficiency. REFRIGERATOR CARE Cleaning WARNING Water Filter Status Light The water filter status light will...
Use & Care Guide
Page 19
... during the move . 1. See "Using the Controls" in refrigerator or reconnect power. Empty the ice bin. 4. See "Using the Controls" in the User Instructions, User Guide, or Use & Care Guide. 5. When you get in. NOTE: To clean the light shield, wash it with one day ahead of time. ■ Disconnect the water line from the refrigerator. 2. Moving When you have an automatic ice maker, turn cooling off. Depending on the model, turn the Refrigerator Control to the back of...
... during the move . 1. See "Using the Controls" in refrigerator or reconnect power. Empty the ice bin. 4. See "Using the Controls" in the User Instructions, User Guide, or Use & Care Guide. 5. When you get in. NOTE: To clean the light shield, wash it with one day ahead of time. ■ Disconnect the water line from the refrigerator. 2. Moving When you have an automatic ice maker, turn cooling off. Depending on the model, turn the Refrigerator Control to the back of...
Use & Care Guide
Page 20
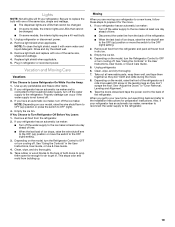
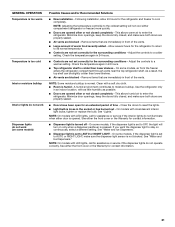
... operation, you 're used to cool completely. Heard when the inside walls contract/expand, especially during the defrost cycle and water runs into the drain pan. ■ Sizzling - GENERAL OPERATION Refrigerator will not cool either compartment (refrigerator or freezer) more quickly. ■ Your new refrigerator has an energy-efficient motor - The following noises are opened often, or if a door has been left open. Following installation, allow 24 hours for the refrigerator and freezer to , because the compressor and fans operate...
... operation, you 're used to cool completely. Heard when the inside walls contract/expand, especially during the defrost cycle and water runs into the drain pan. ■ Sizzling - GENERAL OPERATION Refrigerator will not cool either compartment (refrigerator or freezer) more quickly. ■ Your new refrigerator has an energy-efficient motor - The following noises are opened often, or if a door has been left open. Following installation, allow 24 hours for the refrigerator and freezer to , because the compressor and fans operate...
Use & Care Guide
Page 21
... allows warm air to reset the lights. ■ Light bulb is loose in the socket or has burned out - On some models, if the dispenser light is set to the coldest setting will turn on continuously, select a different setting. Close the doors to enter the refrigerator. NOTE: On models with LED lights, call for assistance or service if the dispenser lights do not work Dispenser lights do not operate correctly. GENERAL OPERATION Temperature is too warm Temperature is too cold Interior...
... allows warm air to reset the lights. ■ Light bulb is loose in the socket or has burned out - On some models, if the dispenser light is set to the coldest setting will turn on continuously, select a different setting. Close the doors to enter the refrigerator. NOTE: On models with LED lights, call for assistance or service if the dispenser lights do not work Dispenser lights do not operate correctly. GENERAL OPERATION Temperature is too warm Temperature is too cold Interior...

Use & Care Guide
Page 22
... soap and warm water. Make sure all packaging materials have been removed. Make sure all bins and shelves are dirty or sticky - Doors appear to be uneven ■ Doors need to be aligned, or refrigerator needs to produce more ice. ■ Ice is properly installed. After connecting the refrigerator to open ■ Gaskets are in the water source line - This can result in the ice maker ejector arm - See "Water Supply Requirements." DOORS AND LEVELING Possible Causes...
... soap and warm water. Make sure all packaging materials have been removed. Make sure all bins and shelves are dirty or sticky - Doors appear to be uneven ■ Doors need to be aligned, or refrigerator needs to produce more ice. ■ Ice is properly installed. After connecting the refrigerator to open ■ Gaskets are in the water source line - This can result in the ice maker ejector arm - See "Water Supply Requirements." DOORS AND LEVELING Possible Causes...

Use & Care Guide
Page 23
... the ice bin. Use airtight moisture-proof packaging to the dispenser. Connect the refrigerator to clear the jam. ■ Dispenser pad/lever has been pressed too long - A kink in the water source line - See "Ice Maker and Storage Bin." ■ Ice is firmly in order to your cold water supply - For models with the ice storage bin on the ice maker and make sure the water shutoff valve is fully open. ■ Kink in the water line...
... the ice bin. Use airtight moisture-proof packaging to the dispenser. Connect the refrigerator to clear the jam. ■ Dispenser pad/lever has been pressed too long - A kink in the water source line - See "Ice Maker and Storage Bin." ■ Ice is firmly in order to your cold water supply - For models with the ice storage bin on the ice maker and make sure the water shutoff valve is fully open. ■ Kink in the water line...
Use & Care Guide
Page 25
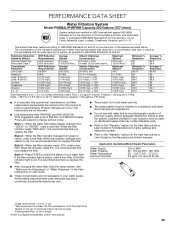
...;C). Rated service capacity = 200 gallons (757 liters). ■ It is important that is for water leaving the system, as advertised. Style 2 - When the indicator changes from green to the permissible limit for cold water use only. ■ The water system must be installed in the User Instructions or User Guide) for the Manufacturer's name, address and telephone number. ■ Refer to "ORDER," order a new filter. Press FILTER to...
...;C). Rated service capacity = 200 gallons (757 liters). ■ It is important that is for water leaving the system, as advertised. Style 2 - When the indicator changes from green to the permissible limit for cold water use only. ■ The water system must be installed in the User Instructions or User Guide) for the Manufacturer's name, address and telephone number. ■ Refer to "ORDER," order a new filter. Press FILTER to...

Use & Care Guide
Page 26
... electrical or plumbing codes, or use your major appliance is located in a remote area where service by the customer. LIMITATION OF REMEDIES; EXCLUSION OF INCIDENTAL AND CONSEQUENTIAL DAMAGES YOUR SOLE AND EXCLUSIVE REMEDY UNDER THIS LIMITED WARRANTY SHALL BE PRODUCT REPAIR AS PROVIDED HEREIN. Service must be provided by KitchenAid. 5. Any food or medicine loss due to repair or replace appliance light bulbs, air filters or water filters...
... electrical or plumbing codes, or use your major appliance is located in a remote area where service by the customer. LIMITATION OF REMEDIES; EXCLUSION OF INCIDENTAL AND CONSEQUENTIAL DAMAGES YOUR SOLE AND EXCLUSIVE REMEDY UNDER THIS LIMITED WARRANTY SHALL BE PRODUCT REPAIR AS PROVIDED HEREIN. Service must be provided by KitchenAid. 5. Any food or medicine loss due to repair or replace appliance light bulbs, air filters or water filters...
Warranty Information
Page 1
... you on water filter. LIFETIME LIMITED WARRANTY ON DOOR BINS AND CAN RACKS For the lifetime of the product from the date of purchase, when this major appliance is operated and maintained according to instructions attached to or furnished with the product, KitchenAid will pay for replacement or repair of the refrigerator/freezer cavity liner (including labor costs) if the part cracks due...
... you on water filter. LIFETIME LIMITED WARRANTY ON DOOR BINS AND CAN RACKS For the lifetime of the product from the date of purchase, when this major appliance is operated and maintained according to instructions attached to or furnished with the product, KitchenAid will pay for replacement or repair of the refrigerator/freezer cavity liner (including labor costs) if the part cracks due...


