

User Manual
Page 2
... 1 LASER PRODUCT The marking is located on the rear panel and says that the component uses laser beams that are of hazardous radiation outside the unit. For replacement, use only a 13Amp ASTA-approved (BS1362) fuse. 2.The fuse cover must be refitted when replacing the fuse in your home or the cable is no danger of a weaker class. If the plug fitted...
... 1 LASER PRODUCT The marking is located on the rear panel and says that the component uses laser beams that are of hazardous radiation outside the unit. For replacement, use only a 13Amp ASTA-approved (BS1362) fuse. 2.The fuse cover must be refitted when replacing the fuse in your home or the cable is no danger of a weaker class. If the plug fitted...

User Manual
Page 3
... 3 Special features 4 Handling of discs and tapes 5 System connection 6 Connection of the System Accessories 6 Connection of Options (Optional Parts 8 Controls and indicators 10 Main Unit 10 Display 12 Remote control Unit 13 Operation of remote control unit 14 Basic section Let's put out some sound 16 Basic use method 16 Playback of CD 18 Playback of tape 20 Searching for the desired music program (DPSS) .. 23 Receiving broadcast station 24 Let's record 26...
... 3 Special features 4 Handling of discs and tapes 5 System connection 6 Connection of the System Accessories 6 Connection of Options (Optional Parts 8 Controls and indicators 10 Main Unit 10 Display 12 Remote control Unit 13 Operation of remote control unit 14 Basic section Let's put out some sound 16 Basic use method 16 Playback of CD 18 Playback of tape 20 Searching for the desired music program (DPSS) .. 23 Receiving broadcast station 24 Let's record 26...

User Manual
Page 4
... shipping damage. 4 Special features Before applying power XD-750/700/550/500 (En) Preparation section Easy operation Playback, recording and input selection can be performed with voice recorded on them can be used as Karaoke software. Dynamic rotary volume control When adjusting the volume, fast turning of the volume control produces a larger volume change , thus permitting fine adjustment. 3-Disc carousel CD player * Three discs can be enjoyed. o When the HIT...
... shipping damage. 4 Special features Before applying power XD-750/700/550/500 (En) Preparation section Easy operation Playback, recording and input selection can be performed with voice recorded on them can be used as Karaoke software. Dynamic rotary volume control When adjusting the volume, fast turning of the volume control produces a larger volume change , thus permitting fine adjustment. 3-Disc carousel CD player * Three discs can be enjoyed. o When the HIT...
User Manual
Page 7
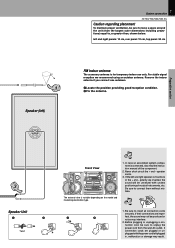
left and right panels: 10 cm, rear panel: 10 cm, top panel: 50 cm Preparation section Basic section 1 Speaker (left) FM indoor antenna The accessory antenna is variable depending on the model and marketing destination type. Before plugging or unplugging a connection cord, be sure to , or greater than, shown below. 7 System connection XD-750/700/550/500 (En) Caution regarding placement To maintain proper ventilation, be...
left and right panels: 10 cm, rear panel: 10 cm, top panel: 50 cm Preparation section Basic section 1 Speaker (left) FM indoor antenna The accessory antenna is variable depending on the model and marketing destination type. Before plugging or unplugging a connection cord, be sure to , or greater than, shown below. 7 System connection XD-750/700/550/500 (En) Caution regarding placement To maintain proper ventilation, be...

User Manual
Page 8
... SURROUND SPEAKERS (8-16Ω) SURROUND FRONT SPEAKERS (6-16Ω) OFF ON Main Unit 1 Surround switch 2 3 Monitor TV Video cord Video input Video output Video deck Audio output R L AUX INPUT Knowledge sections System connection XD-750/700/550/500 (En) In regard to OFF, no surround (rear) speakers are connected. Speaker Unit 1 2 Surround (rear) speakers (RS-N700/N750) 3 Preparation section −+ −+ Basic section Application section +R- - When this switch is set to OFF, normal playback is executed. ÷ Please operate this switch while the power...
... SURROUND SPEAKERS (8-16Ω) SURROUND FRONT SPEAKERS (6-16Ω) OFF ON Main Unit 1 Surround switch 2 3 Monitor TV Video cord Video input Video output Video deck Audio output R L AUX INPUT Knowledge sections System connection XD-750/700/550/500 (En) In regard to OFF, no surround (rear) speakers are connected. Speaker Unit 1 2 Surround (rear) speakers (RS-N700/N750) 3 Preparation section −+ −+ Basic section Application section +R- - When this switch is set to OFF, normal playback is executed. ÷ Please operate this switch while the power...

User Manual
Page 10
...; A/B DISC1 DISC SELECTOR DISC2 DISC3 TIME DISP. 4 7 6 ¢ DISC SKIP OPEN/CLOSE 0 3DISC ROTARY CD PLAYER COMPACT DIGITAL AUDIO $ % ^ & ¢ ∞ § º ⁄ ¤ Application section Knowledge sections MAX. ENTER MODE DEMO TUNING AUTO INPUT PHONES 0 PUSH OPEN 0 PUSH OPEN PLAY REC /PLAY REV. 1 0 Controls and indicators Main Unit XD-750/700/550/500 (En) Preparation section Basic section 78 9 0!@ # 1 2 3 4 5 6 * ON/STANDBY MINI HiFi COMPONENT SYSTEM ROCK CLASSIC M/R EQ.OFF POP UP MULTI CONTROL /VOLUME DOW N RESET ∞ MIC1...
...; A/B DISC1 DISC SELECTOR DISC2 DISC3 TIME DISP. 4 7 6 ¢ DISC SKIP OPEN/CLOSE 0 3DISC ROTARY CD PLAYER COMPACT DIGITAL AUDIO $ % ^ & ¢ ∞ § º ⁄ ¤ Application section Knowledge sections MAX. ENTER MODE DEMO TUNING AUTO INPUT PHONES 0 PUSH OPEN 0 PUSH OPEN PLAY REC /PLAY REV. 1 0 Controls and indicators Main Unit XD-750/700/550/500 (En) Preparation section Basic section 78 9 0!@ # 1 2 3 4 5 6 * ON/STANDBY MINI HiFi COMPONENT SYSTEM ROCK CLASSIC M/R EQ.OFF POP UP MULTI CONTROL /VOLUME DOW N RESET ∞ MIC1...
User Manual
Page 11
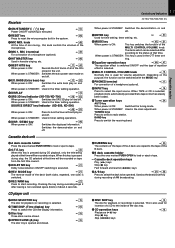
... ¡ Dolby noise reduction ON/OFF switching is pressed during CD playback, only the title being played at that time will be operated. When power is STANDBY: Used in the clock adjustment. When power is STANDBY: This key is also used in timer setting operations. 0DISP. /DEMO key y When power is ON: Switches the tuning mode. When power is selected. CD player unit ¶DISC SELECTOR key The disc for playback (or recording) is STANDBY: Used in the timer setting operation. 8 DISPLAY @ 9SRS...
... ¡ Dolby noise reduction ON/OFF switching is pressed during CD playback, only the title being played at that time will be operated. When power is STANDBY: Used in the clock adjustment. When power is STANDBY: This key is also used in timer setting operations. 0DISP. /DEMO key y When power is ON: Switches the tuning mode. When power is selected. CD player unit ¶DISC SELECTOR key The disc for playback (or recording) is STANDBY: Used in the timer setting operation. 8 DISPLAY @ 9SRS...

User Manual
Page 13
... sound temporarily. #On/Standby ( ) key ^ $N.B. SLEEP 1 2 3 INPUT 4 5 6 DISC SKIP 7 8 9 PTY SEARCH O.T.E. 0 +10 P. CALL A/B TAPE CD AUTO MUTE EQ. ning, random playback, and normal playback. ¡BAND key ¢ ™PTY key fl This is executed between introduction scan- PTY BAND TUNING P. MODE EDIT RANDOM REPEAT RDS TA/NEWS DISPLAY /INFO. key , (REPEAT key ¤ Used for CD edit recording (time edit recording). 6RDS DISPLAY...
... sound temporarily. #On/Standby ( ) key ^ $N.B. SLEEP 1 2 3 INPUT 4 5 6 DISC SKIP 7 8 9 PTY SEARCH O.T.E. 0 +10 P. CALL A/B TAPE CD AUTO MUTE EQ. ning, random playback, and normal playback. ¡BAND key ¢ ™PTY key fl This is executed between introduction scan- PTY BAND TUNING P. MODE EDIT RANDOM REPEAT RDS TA/NEWS DISPLAY /INFO. key , (REPEAT key ¤ Used for CD edit recording (time edit recording). 6RDS DISPLAY...
User Manual
Page 14
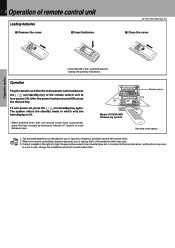
... operation checking, and their service life may occur. If direct sunlight or the light of the batteries with new ones. 3. When the remote controllable distance becomes short, replace both of a high- Basic section Application section Knowledge sections In such a case, change the installation position to turn power off, press the (on/standby) key again. The provided batteries are intended for use in which only the time display...
... operation checking, and their service life may occur. If direct sunlight or the light of the batteries with new ones. 3. When the remote controllable distance becomes short, replace both of a high- Basic section Application section Knowledge sections In such a case, change the installation position to turn power off, press the (on/standby) key again. The provided batteries are intended for use in which only the time display...

User Manual
Page 16
... component connected to the AUX input jacks. ÷ When CD or TAPE is switched OFF. (DIMMER function) 2. ENTER MODE TUNING BAND AUTO INPUT PHONES 0 PUSH OPEN PLAY 0 PUSH OPEN 2 REV. ON/STANDBY 1 INPUT 2 UP MULTI CONTROL /VOLUME 1. Volume adjustment 3 ÷ Quick turning produces a larger change amount. (Dynamic rotary volume control function) ÷ The display shows a reference value. MIC MIX. MODE DOLBY NR REC/ARM DUBBING O.T.E. 1 2 7 3 ¡ A/B 1 DISC DISC SELECTOR 2 DISC 3 DISC TIME DISP. 4 7 6 ¢ DISC SKIP OPEN/CLOSE 0 3DISC ROTARY CD PLAYER...
... component connected to the AUX input jacks. ÷ When CD or TAPE is switched OFF. (DIMMER function) 2. ENTER MODE TUNING BAND AUTO INPUT PHONES 0 PUSH OPEN PLAY 0 PUSH OPEN 2 REV. ON/STANDBY 1 INPUT 2 UP MULTI CONTROL /VOLUME 1. Volume adjustment 3 ÷ Quick turning produces a larger change amount. (Dynamic rotary volume control function) ÷ The display shows a reference value. MIC MIX. MODE DOLBY NR REC/ARM DUBBING O.T.E. 1 2 7 3 ¡ A/B 1 DISC DISC SELECTOR 2 DISC 3 DISC TIME DISP. 4 7 6 ¢ DISC SKIP OPEN/CLOSE 0 3DISC ROTARY CD PLAYER...

User Manual
Page 17
... the display is plugged into the PHONES jack. 1 7 Let's put out some sound XD-750/700/550/500 (En) Preparation section Basic section Muting the sound temporarily (Remote control unit only) MUTE Remote control unit EX.BASS CD Blinks )1 B 1:5 ) 1 REV.MODE ÷ Press again to resume the original volume. ÷ The sound muting is also canceled when the volume is set to on and off automatically by the following operation. Remote control unit Lights...
... the display is plugged into the PHONES jack. 1 7 Let's put out some sound XD-750/700/550/500 (En) Preparation section Basic section Muting the sound temporarily (Remote control unit only) MUTE Remote control unit EX.BASS CD Blinks )1 B 1:5 ) 1 REV.MODE ÷ Press again to resume the original volume. ÷ The sound muting is also canceled when the volume is set to on and off automatically by the following operation. Remote control unit Lights...

User Manual
Page 18
... reverse directions Playback from desired track Skipping tracks To pause playback To stop playback Preparation section SRS 3D EX.BASS N.B. MAX. PTY BAND TUNING P. VOLUME REMOTE CONTROL UNIT RC-H3R ON/STANDBY MINI HiFi COMPONENT SYSTEM ROCK CLASSIC M/R EQ.OFF POP UP MULTI CONTROL /VOLUME DOW N RESET ∞ MIC1 MIC2 EX.BASS MIN. MIC MIX. CALL A/B TAPE CD AUTO MUTE EQ. Start playback. The label must be played. 4 Close the tray.
... reverse directions Playback from desired track Skipping tracks To pause playback To stop playback Preparation section SRS 3D EX.BASS N.B. MAX. PTY BAND TUNING P. VOLUME REMOTE CONTROL UNIT RC-H3R ON/STANDBY MINI HiFi COMPONENT SYSTEM ROCK CLASSIC M/R EQ.OFF POP UP MULTI CONTROL /VOLUME DOW N RESET ∞ MIC1 MIC2 EX.BASS MIN. MIC MIX. CALL A/B TAPE CD AUTO MUTE EQ. Start playback. The label must be played. 4 Close the tray.

User Manual
Page 20
.../STANDBY RESET ∞ MINI HiFi COMPONENT SYSTEM DOW N ROCK CLASSIC M/R EQ.OFF POP UP MULTI CONTROL /VOLUME MIC1 MIC2 EX.BASS MIN. CALL A/B TAPE CD AUTO MUTE EQ. MODE EDIT RANDOM REPEAT RDS TA/NEWS DISPLAY /INFO. PTY BAND TUNING P. MAX. ENTER MODE DEMO TUNING AUTO INPUT PHONES 0 PUSH OPEN 0 PUSH OPEN PLAY REC /PLAY REV. A A Application section Knowledge sections A/B 2 2. MODE DOLBY NR REC/ARM DUBBING O.T.E. 1 2 7 3 ¡ A/B 1 1 DISC DISC SELECTOR 2 DISC 3 DISC TIME DISP. 3DISC ROTARY CD PLAYER 4 7 3 6 ¢ DISC SKIP OPEN...
.../STANDBY RESET ∞ MINI HiFi COMPONENT SYSTEM DOW N ROCK CLASSIC M/R EQ.OFF POP UP MULTI CONTROL /VOLUME MIC1 MIC2 EX.BASS MIN. CALL A/B TAPE CD AUTO MUTE EQ. MODE EDIT RANDOM REPEAT RDS TA/NEWS DISPLAY /INFO. PTY BAND TUNING P. MAX. ENTER MODE DEMO TUNING AUTO INPUT PHONES 0 PUSH OPEN 0 PUSH OPEN PLAY REC /PLAY REV. A A Application section Knowledge sections A/B 2 2. MODE DOLBY NR REC/ARM DUBBING O.T.E. 1 2 7 3 ¡ A/B 1 1 DISC DISC SELECTOR 2 DISC 3 DISC TIME DISP. 3DISC ROTARY CD PLAYER 4 7 3 6 ¢ DISC SKIP OPEN...

User Manual
Page 24
VOLUME REMOTE CONTROL UNIT RC-H3R Collective presetting of stations One-by storing up to receive them by one-touch operations by -one presetting (manual preset) ON/STANDBY MINI HiFi COMPONENT SYSTEM ROCK CLASSIC M/R EQ.OFF POP UP MULTI CONTROL /VOLUME DOW N RESET ∞ MIC1 MIC2 EX.BASS MIN. MODE DOLBY NR REC/ARM DUBBING O.T.E. 1 2 7 3 ¡ A/B 1 DISC DISC SELECTOR 2 DISC 3 DISC TIME DISP. 4 7 6 ¢ DISC SKIP OPEN/CLOSE 0 3DISC ROTARY CD PLAYER COMPACT DIGITAL AUDIO Basic section Application section BAND 1 1. Select a station. MODE ...
VOLUME REMOTE CONTROL UNIT RC-H3R Collective presetting of stations One-by storing up to receive them by one-touch operations by -one presetting (manual preset) ON/STANDBY MINI HiFi COMPONENT SYSTEM ROCK CLASSIC M/R EQ.OFF POP UP MULTI CONTROL /VOLUME DOW N RESET ∞ MIC1 MIC2 EX.BASS MIN. MODE DOLBY NR REC/ARM DUBBING O.T.E. 1 2 7 3 ¡ A/B 1 DISC DISC SELECTOR 2 DISC 3 DISC TIME DISP. 4 7 6 ¢ DISC SKIP OPEN/CLOSE 0 3DISC ROTARY CD PLAYER COMPACT DIGITAL AUDIO Basic section Application section BAND 1 1. Select a station. MODE ...

User Manual
Page 26
... DISPLAY /INFO. HIT MASTER BEST HITS BAND DISP. Load a tape in this cassette deck cannot record onto Metal tapes. B REV.MODE ÷ When recording is started . 3. MIC MIX. MODE DOLBY NR REC/ARM DUBBING O.T.E. 1 2 7 3 ¡ A/B 1 DISC DISC SELECTOR 2 DISC 3 DISC TIME DISP. 4 7 3DISC ROTARY CD PLAYER 5 6 ¢ DISC SKIP 2 OPEN/CLOSE 0 COMPACT DIGITAL AUDIO 1 Basic section Application section A 0 PUSH OPEN 1 1 2 7 3 ¡ 2 REV. SLEEP 1 2 3 INPUT 4 5 6 DISC SKIP 7 8 9 PTY SEARCH O.T.E. 0 +10 P. VOLUME REMOTE CONTROL...
... DISPLAY /INFO. HIT MASTER BEST HITS BAND DISP. Load a tape in this cassette deck cannot record onto Metal tapes. B REV.MODE ÷ When recording is started . 3. MIC MIX. MODE DOLBY NR REC/ARM DUBBING O.T.E. 1 2 7 3 ¡ A/B 1 DISC DISC SELECTOR 2 DISC 3 DISC TIME DISP. 4 7 3DISC ROTARY CD PLAYER 5 6 ¢ DISC SKIP 2 OPEN/CLOSE 0 COMPACT DIGITAL AUDIO 1 Basic section Application section A 0 PUSH OPEN 1 1 2 7 3 ¡ 2 REV. SLEEP 1 2 3 INPUT 4 5 6 DISC SKIP 7 8 9 PTY SEARCH O.T.E. 0 +10 P. VOLUME REMOTE CONTROL...

User Manual
Page 45
... CONTROL /VOLUME INPUT LEVEL adjustment EX.BASS INPUT B Set level -2 CLASSIC ROCK EQ. Preparation section Basic section 1 Select what to the desired atmosphere. The result of the 3D effect) also is displayed. MODE When no operation is executed for 5 seconds or more, the adjustment is ended automatically. (Return will be made to the music genre. POP MANUAL VOL. 1 2 3 REV.MODE RUNNING INDICATOR DOW N INPUT LEVEL adjustment...
... CONTROL /VOLUME INPUT LEVEL adjustment EX.BASS INPUT B Set level -2 CLASSIC ROCK EQ. Preparation section Basic section 1 Select what to the desired atmosphere. The result of the 3D effect) also is displayed. MODE When no operation is executed for 5 seconds or more, the adjustment is ended automatically. (Return will be made to the music genre. POP MANUAL VOL. 1 2 3 REV.MODE RUNNING INDICATOR DOW N INPUT LEVEL adjustment...
User Manual
Page 48
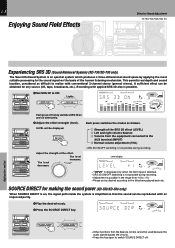
... with an improved purity. 1 Play the desired music. 2 Press the SOURCE DIRECT key. POP MANUAL VOL. 1 2 REV.MODE 3 3 4 56 2 7 1 RUNNING INDICATOR 8 9 10 11 DOW N Each press of the effect. SOURCE DIRECT for any source (CD, tape, broadcasts, etc.). A sufficient effect can be obtained for making the sound purer (XD-550/XD-500 only) When SOURCE DIRECT is on, the signal path inside the system is simplified so that the...
... with an improved purity. 1 Play the desired music. 2 Press the SOURCE DIRECT key. POP MANUAL VOL. 1 2 REV.MODE 3 3 4 56 2 7 1 RUNNING INDICATOR 8 9 10 11 DOW N Each press of the effect. SOURCE DIRECT for any source (CD, tape, broadcasts, etc.). A sufficient effect can be obtained for making the sound purer (XD-550/XD-500 only) When SOURCE DIRECT is on, the signal path inside the system is simplified so that the...

User Manual
Page 52
... Make prepara- ON/STANDBY 4 Select a program No. 1 EX.BASS Within 8 seconds! 2 ENTER ÷ The selected program No. tions for the play (recording). ÷ To listen to radio ÷ To listen to CD ÷ To listen to tape The station should be preset prior to the minimum volume at the moment the power is replaced by the timer. 3 Set the POWER switch to be used every day) and a sleep timer system (which works...
... Make prepara- ON/STANDBY 4 Select a program No. 1 EX.BASS Within 8 seconds! 2 ENTER ÷ The selected program No. tions for the play (recording). ÷ To listen to radio ÷ To listen to CD ÷ To listen to tape The station should be preset prior to the minimum volume at the moment the power is replaced by the timer. 3 Set the POWER switch to be used every day) and a sleep timer system (which works...
User Manual
Page 55
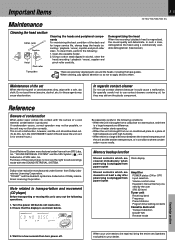
... components For maintaining the best condition of the deck and for several hours.) Sound Retrieval System manufactured under license from power outlet Amplifier POWER status (ON or OFF) Input selection Volume control value Equalizer's manual memory created by the user SRS 3D level Tuner unit Receiving band Frequency Preset stations Program timer setting contents Cassette deck unit Transport direction DOLBY NR Reverse mode When your unit needs to be repaired, bring the entire set...
... components For maintaining the best condition of the deck and for several hours.) Sound Retrieval System manufactured under license from power outlet Amplifier POWER status (ON or OFF) Input selection Volume control value Equalizer's manual memory created by the user SRS 3D level Tuner unit Receiving band Frequency Preset stations Program timer setting contents Cassette deck unit Transport direction DOLBY NR Reverse mode When your unit needs to be repaired, bring the entire set...

User Manual
Page 56
... the factory. Radio stations cannot be received. ÷ The antennas have not been set. ÷ The timer execution was not set up. ÷ Adjust the present time referring to "Clock p adjustment". ÷ Set the timer ON time and OFF time. In this case, execute the following table according to "System con- 6 nection". Receiver, speakers Symptom Sound is not possible. right speakers. ÷ Connect properly referring to the symptom of your trouble. The clock display blinks without changing...
... the factory. Radio stations cannot be received. ÷ The antennas have not been set. ÷ The timer execution was not set up. ÷ Adjust the present time referring to "Clock p adjustment". ÷ Set the timer ON time and OFF time. In this case, execute the following table according to "System con- 6 nection". Receiver, speakers Symptom Sound is not possible. right speakers. ÷ Connect properly referring to the symptom of your trouble. The clock display blinks without changing...


