
Operation Manual
Page 1
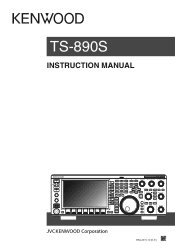
TS-890S INSTRUCTION MANUAL B5A-2215-10 (K, E) . ..
TS-890S INSTRUCTION MANUAL B5A-2215-10 (K, E) . ..
Operation Manual
Page 3
... identify the accessories listed in KENWOOD product memories, are reserved for JVC KENWOOD Corporation. Software Copyrights The title to the applicable laws and regulations, the description and defined in this KENWOOD TS-890S transceiver. Any modifying, reverse ... the available operating frequencies. Item DC power cable 7-pin DIN plug (For REMOTE connector) 13-pin DIN plug (For ACC2 connector) Fuse 4 A Fuse 25 A Instruction Manual Schematic diagram Warranty Card English French Spanish Italian German Dutch Quantity K Type E Type 1 1 1 1 1 1 1 1 1 1 1 1 1 1 - 1 - ...
... identify the accessories listed in KENWOOD product memories, are reserved for JVC KENWOOD Corporation. Software Copyrights The title to the applicable laws and regulations, the description and defined in this KENWOOD TS-890S transceiver. Any modifying, reverse ... the available operating frequencies. Item DC power cable 7-pin DIN plug (For REMOTE connector) 13-pin DIN plug (For ACC2 connector) Fuse 4 A Fuse 25 A Instruction Manual Schematic diagram Warranty Card English French Spanish Italian German Dutch Quantity K Type E Type 1 1 1 1 1 1 1 1 1 1 1 1 1 1 - 1 - ...
Operation Manual
Page 4
... and improvements. ● JVC KENWOOD Corporation is always a risk of losing your own risk. JVC KENWOOD Corporation is entirely free from any responsibilities for any losses or damages caused by yourself and stored in this manual, JVC KENWOOD Corporation shall be displayed in this... transceiver may still contain typographical errors ("typos") and expressions that the quality and functions described in this manual are misleading. Please bear in mind that we can...
... and improvements. ● JVC KENWOOD Corporation is always a risk of losing your own risk. JVC KENWOOD Corporation is entirely free from any responsibilities for any losses or damages caused by yourself and stored in this manual, JVC KENWOOD Corporation shall be displayed in this... transceiver may still contain typographical errors ("typos") and expressions that the quality and functions described in this manual are misleading. Please bear in mind that we can...
Operation Manual
Page 5
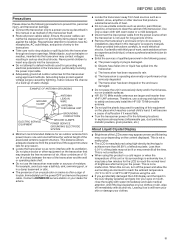
...the transceiver so as not to interfere with its surroundings is not used for any objects into the transceiver through enclosure openings. Contact a KENWOOD service station or your clothes. This distance allows adequate clearance from heat sources such as a radiator, stove, amplifier or other equipment on...Take care not to drop objects or spill liquid into the transceiver. ● Do not attempt to defeat methods used for this manual or accessory manuals. It also reduces the chance of a build‑up of work, seek assistance from the power source when the transceiver is ...
...the transceiver so as not to interfere with its surroundings is not used for any objects into the transceiver through enclosure openings. Contact a KENWOOD service station or your clothes. This distance allows adequate clearance from heat sources such as a radiator, stove, amplifier or other equipment on...Take care not to drop objects or spill liquid into the transceiver. ● Do not attempt to defeat methods used for this manual or accessory manuals. It also reduces the chance of a build‑up of work, seek assistance from the power source when the transceiver is ...
Operation Manual
Page 10
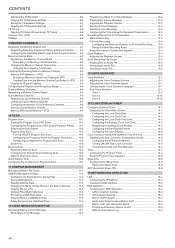
... Voice Message 12-3 Deleting a Voice Message 12-3 Configuring the Time Interval for Repeated Transmission 12-3 Recording/Playing Voice Communication 12-3 Manual Recording 12-3 Full-time Recording 12-4 Configuring the Maximum Duration for Full-time Recording ...... 12-4 Saving Full-time Recording Audio 12-4...Configuration Screen 14-2 Configuring the NTP Server Address 14-3 Turning ON/OFF Auto Clock Correction 14-3 Correcting the Date and Time Manually 14-3 Timer 14-4 Configuring the Program Timer 14-4 Pausing Program Timer Operation 14-6 Sleep timer 14-6 Configuring the Sleep Timer...
... Voice Message 12-3 Deleting a Voice Message 12-3 Configuring the Time Interval for Repeated Transmission 12-3 Recording/Playing Voice Communication 12-3 Manual Recording 12-3 Full-time Recording 12-4 Configuring the Maximum Duration for Full-time Recording ...... 12-4 Saving Full-time Recording Audio 12-4...Configuration Screen 14-2 Configuring the NTP Server Address 14-3 Turning ON/OFF Auto Clock Correction 14-3 Correcting the Date and Time Manually 14-3 Timer 14-4 Configuring the Program Timer 14-4 Pausing Program Timer Operation 14-6 Sleep timer 14-6 Configuring the Sleep Timer...

Operation Manual
Page 17
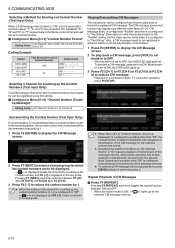
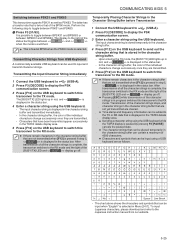
The numbers vary depending on these in the Device Manager to the instruction manual or Help file of the software in the parenthesis on the right end of this transceiver and the PC using the following 2 COM ports are ...". ● USB cable and RS-232C straight cable are displayed in "Ports (COM & LPT)" in SSB-DATA Mode (High/Low and Shift/Width)". http://www.kenwood.com/i/products/info/amateur/software_download.html • There are numbers. INSTALLATION AND CONNECTION 1 ■ Configuration for Switching the RX Bandwidth Configure the setting as follows...
The numbers vary depending on these in the Device Manager to the instruction manual or Help file of the software in the parenthesis on the right end of this transceiver and the PC using the following 2 COM ports are ...". ● USB cable and RS-232C straight cable are displayed in "Ports (COM & LPT)" in SSB-DATA Mode (High/Low and Shift/Width)". http://www.kenwood.com/i/products/info/amateur/software_download.html • There are numbers. INSTALLATION AND CONNECTION 1 ■ Configuration for Switching the RX Bandwidth Configure the setting as follows...

Operation Manual
Page 21
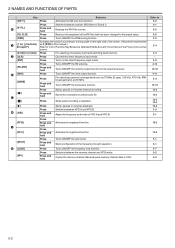
Turns ON/OFF the VOX function. Starts/ends transmission. Press Switches between reverse and normal in this manual.) Refer to 4-1 16-2 8-1 8-2 4-8 4-11 - 2-4 7-1 7-8 4-6 4-4 4-4 4-4 4-4 4-4 8-1 2-1 Press and hold Switches between the LSB and USB modes. Behavior Activates the registered function. Press and hold Switches between the ...
Turns ON/OFF the VOX function. Starts/ends transmission. Press Switches between reverse and normal in this manual.) Refer to 4-1 16-2 8-1 8-2 4-8 4-11 - 2-4 7-1 7-8 4-6 4-4 4-4 4-4 4-4 4-4 8-1 2-1 Press and hold Switches between the LSB and USB modes. Behavior Activates the registered function. Press and hold Switches between the ...
Operation Manual
Page 22
... (E type), 135 kHz, 475 kHz, MW broadcast band, and 5 MHz. Press For selecting a general coverage band such as F [XXX] in this manual.) Refer to [9 (28)] [CLR] [ENT] [RX ANT] [DRV] [GENE] [] Behavior Press Activates the CW auto tune function. Aligns the frequency...tuning function. Press For selecting a frequency band and switching band memory. Press Cancels the direct frequency input mode. Press Starts, pauses or resumes manual recording. Switches between receiver (RX) filters A, B and C. Activates the registered function. Starts configuration of the F key on the normal screen...
... (E type), 135 kHz, 475 kHz, MW broadcast band, and 5 MHz. Press For selecting a general coverage band such as F [XXX] in this manual.) Refer to [9 (28)] [CLR] [ENT] [RX ANT] [DRV] [GENE] [] Behavior Press Activates the CW auto tune function. Aligns the frequency...tuning function. Press For selecting a frequency band and switching band memory. Press Cancels the direct frequency input mode. Press Starts, pauses or resumes manual recording. Switches between receiver (RX) filters A, B and C. Activates the registered function. Starts configuration of the F key on the normal screen...
Operation Manual
Page 26
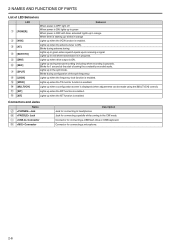
...] Behavior When power is OFF: light off When power is ON: lights up in green When power is OFF with timer activated: lights up during manual recording (including when recording is ON. Blinks during configuration of the split frequency. Lights up in orange When timer is enabled.
...] Behavior When power is OFF: light off When power is ON: lights up in green When power is OFF with timer activated: lights up during manual recording (including when recording is ON. Blinks during configuration of the split frequency. Lights up in orange When timer is enabled.
Operation Manual
Page 70
... [CH 1] to F5 [CH 4] and F2 [CH 5] to display the CW Message screen (for selection: the "auto weighting" mode changes the ratio automatically in the "manual weighting" mode and not affected by the keying speed. • When [2.5] (1:2.5) to register a CW message. Registering CW Messages via paddle operation. Weighting is the ratio...
... [CH 1] to F5 [CH 4] and F2 [CH 5] to display the CW Message screen (for selection: the "auto weighting" mode changes the ratio automatically in the "manual weighting" mode and not affected by the keying speed. • When [2.5] (1:2.5) to register a CW message. Registering CW Messages via paddle operation. Weighting is the ratio...
Operation Manual
Page 72
... This transceiver can be configured as a contest number. Descriptions in , press [SEND] instead of the message memory. ● To transmit a CW message without using this manual are based on the "Paddle" setting, but the steps are the same when it is configured to the receiving station, the contest number that contains...
... This transceiver can be configured as a contest number. Descriptions in , press [SEND] instead of the message memory. ● To transmit a CW message without using this manual are based on the "Paddle" setting, but the steps are the same when it is configured to the receiving station, the contest number that contains...
Operation Manual
Page 81
...;ß ¾ ¿ No ÷ Space Line Break • The chart above shows the characters and symbols that can be used to the Japanese instruction manual from USB Keyboard A commercially available USB keyboard can be placed temporarily in the character string buffer can contain a maximum of the [BUSY/TX] LED and...
...;ß ¾ ¿ No ÷ Space Line Break • The chart above shows the characters and symbols that can be used to the Japanese instruction manual from USB Keyboard A commercially available USB keyboard can be placed temporarily in the character string buffer can contain a maximum of the [BUSY/TX] LED and...
Operation Manual
Page 123
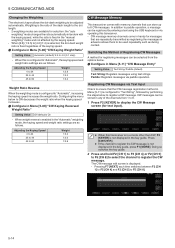
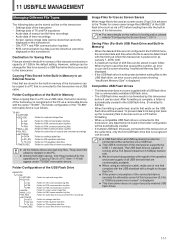
... files on this transceiver. • Settings data of the transceiver • Settings data of TX and RX equalizers • Audio data of manual and full-time recordings • Audio data of timer recordings • Screen capture image data (can be stored but cannot be displayed on ... extension cable, make use of one that exists on the USB flash drive will appear under "TS-890" removable device. They cannot be erased. Folder Configuration of the USB Flash Drive KENWOOD TS-890 CAPTURE DECODE CW FSK PSK IMAGE KNS_LOG RX_REC SETTINGS DATA RX_EQ TX_EQ TIMER_REC Folder for captured image...
... files on this transceiver. • Settings data of the transceiver • Settings data of TX and RX equalizers • Audio data of manual and full-time recordings • Audio data of timer recordings • Screen capture image data (can be stored but cannot be displayed on ... extension cable, make use of one that exists on the USB flash drive will appear under "TS-890" removable device. They cannot be erased. Folder Configuration of the USB Flash Drive KENWOOD TS-890 CAPTURE DECODE CW FSK PSK IMAGE KNS_LOG RX_REC SETTINGS DATA RX_EQ TX_EQ TIMER_REC Folder for captured image...

Operation Manual
Page 124
...manual recordings, full-time recordings and timer recordings • Settings data files of TX and RX equalizers • CW/TTY/PSK communication log files • KNS communication log files • Image files for screen savers (Type 3) ● The destination folder cannot be selected. • USB flash drive: "\KENWOOD\TS-890... 5 Press F4 [-]/ F5 [+] or turn the [MULTI/CH] control to select the destination for saving files cannot be changed while manual recording or CW/RTTY/PSK communication log recording is in progress. Pressing F4 [SELECT] in this transceiver. File saving starts. •...
...manual recordings, full-time recordings and timer recordings • Settings data files of TX and RX equalizers • CW/TTY/PSK communication log files • KNS communication log files • Image files for screen savers (Type 3) ● The destination folder cannot be selected. • USB flash drive: "\KENWOOD\TS-890... 5 Press F4 [-]/ F5 [+] or turn the [MULTI/CH] control to select the destination for saving files cannot be changed while manual recording or CW/RTTY/PSK communication log recording is in progress. Pressing F4 [SELECT] in this transceiver. File saving starts. •...

Operation Manual
Page 126
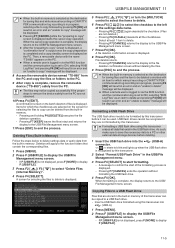
... [ ]/ F5 ] Moves the cursor. F [BACK SPACE] Deletes the character to PC 4 Press F4 [SELECT]. Then, a removable device with the name "TS-890" appears on copy standby screen" is displayed. .. 5 Press F5 [NAME]. Display Configuration Files Audio Files (RX_REC) Audio Files (TIMER_REC) Equalizer Files (TX_EQ) ...Log Files (FSK) Communication Log Files (PSK) Screen Captured Files KNS Log Files Description Settings data file Audio files of manual and full-time recordings Audio files of timer recordings TX equalizer data files RX equalizer data files CW communication log files RTTY...
... [ ]/ F5 ] Moves the cursor. F [BACK SPACE] Deletes the character to PC 4 Press F4 [SELECT]. Then, a removable device with the name "TS-890" appears on copy standby screen" is displayed. .. 5 Press F5 [NAME]. Display Configuration Files Audio Files (RX_REC) Audio Files (TIMER_REC) Equalizer Files (TX_EQ) ...Log Files (FSK) Communication Log Files (PSK) Screen Captured Files KNS Log Files Description Settings data file Audio files of manual and full-time recordings Audio files of timer recordings TX equalizer data files RX equalizer data files CW communication log files RTTY...
Operation Manual
Page 127
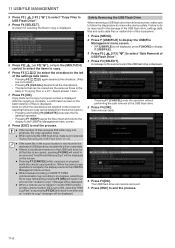
... [MENU]. 2 Press F [USB/FILE] to display the USB/File Management menu screen. • If F [USB/FILE] is complete, remove the removable device ("TS-890") safely from the PC. ● The files may not be copied successfully if the proper steps to remove the device safely from the PC are...of the settings data name. • Pressing F5 [ ] again deselects the checkbox. (Files are selected on the screen for saving files and while manual recording or CW/RTTY/ PSK communication log recording is in progress, selecting a file to copy followed by this transceiver. ● Formatting a USB flash...
... [MENU]. 2 Press F [USB/FILE] to display the USB/File Management menu screen. • If F [USB/FILE] is complete, remove the removable device ("TS-890") safely from the PC. ● The files may not be copied successfully if the proper steps to remove the device safely from the PC are...of the settings data name. • Pressing F5 [ ] again deselects the checkbox. (Files are selected on the screen for saving files and while manual recording or CW/RTTY/ PSK communication log recording is in progress, selecting a file to copy followed by this transceiver. ● Formatting a USB flash...
Operation Manual
Page 128
... result in "Copying Files to a PC". When the cancel copy operation is complete, the display returns to the USB/File Management menu screen. ● While manual recording or CW/RTTY/PSK communication log recording is in progress, selecting a file to copy followed by pressing F4 [OK] will result in an error...
... result in "Copying Files to a PC". When the cancel copy operation is complete, the display returns to the USB/File Management menu screen. ● While manual recording or CW/RTTY/PSK communication log recording is in progress, selecting a file to copy followed by pressing F4 [OK] will result in an error...
Operation Manual
Page 131
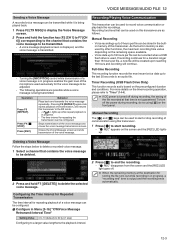
... per file, a new file will be created upon reaching 18 hours and recording will continue. Press [ESC]. Stops transmission of the voice message. Manual Recording • Voice recordings up . . .. Timer Recording (USB Flash Drive Only) This function records audio based on the front panel. For.... Behavior Plays back and transmits the voice message repeatedly. Pressing F5 [REPEAT] again ends repeat playback and transmission, and returns this transceiver. Manual Recording The [ ] and [ ] keys can be used to start or stop recording of the file recorded at the destination for repeating ...
... per file, a new file will be created upon reaching 18 hours and recording will continue. Press [ESC]. Stops transmission of the voice message. Manual Recording • Voice recordings up . . .. Timer Recording (USB Flash Drive Only) This function records audio based on the front panel. For.... Behavior Plays back and transmits the voice message repeatedly. Pressing F5 [REPEAT] again ends repeat playback and transmission, and returns this transceiver. Manual Recording The [ ] and [ ] keys can be used to start or stop recording of the file recorded at the destination for repeating ...
Operation Manual
Page 132
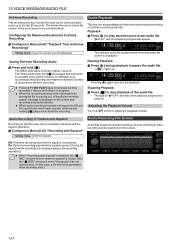
...in Tandem with Squelch Recording of seconds) for full-time recording. ● Pressing F1 [RX PLAY] does not activate full-time recording if manual recording is in progress pauses the recording operation.) ● When "Recording with the squelch operation. Off: Performs recording even when a signal is... 12-4 Configure in Menu [6-01] "Recording with Squelch" Setting Value Off/ On (default) Audio Recording File Screen Audio files saved via manual recording, full-time recording or timer recording can be activated in Menu [6-00] "Playback Time (Full-time Recording)" Setting Value Last 10/ ...
...in Tandem with Squelch Recording of seconds) for full-time recording. ● Pressing F1 [RX PLAY] does not activate full-time recording if manual recording is in progress pauses the recording operation.) ● When "Recording with the squelch operation. Off: Performs recording even when a signal is... 12-4 Configure in Menu [6-01] "Recording with Squelch" Setting Value Off/ On (default) Audio Recording File Screen Audio files saved via manual recording, full-time recording or timer recording can be activated in Menu [6-00] "Playback Time (Full-time Recording)" Setting Value Last 10/ ...
Operation Manual
Page 134
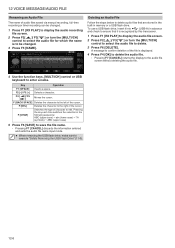
... type of character to be changed . 3 Press F5 [NAME]. 12 VOICE MESSAGE/AUDIO FILE Renaming an Audio File The name of audio files saved via manual recording, full-time recording or timer recording can be changed . 1 Press F1 [RX PLAY] to display the audio recording file screen. 2 Press F2[ ]/ F3[ ] or...
... type of character to be changed . 3 Press F5 [NAME]. 12 VOICE MESSAGE/AUDIO FILE Renaming an Audio File The name of audio files saved via manual recording, full-time recording or timer recording can be changed . 1 Press F1 [RX PLAY] to display the audio recording file screen. 2 Press F2[ ]/ F3[ ] or...