
Operation Manual
Page 1
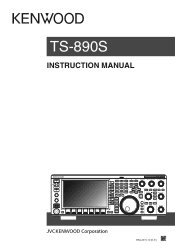
. .. TS-890S INSTRUCTION MANUAL B5A-2215-10 (K, E)
. .. TS-890S INSTRUCTION MANUAL B5A-2215-10 (K, E)
Operation Manual
Page 3
...used with each user's purpose of use and, unless specifically described in this manual, JVC KENWOOD Corporation shall be displayed in the menu below. (Refer to the acceptance and agreement of this KENWOOD TS-890S transceiver. It will become a cause of suffocation if it wears flatly. ...Software Copyrights The title to and ownership of copyrights for software, including but not limited to the firmware that may be embedded in KENWOOD product memories, are supplied ...
...used with each user's purpose of use and, unless specifically described in this manual, JVC KENWOOD Corporation shall be displayed in the menu below. (Refer to the acceptance and agreement of this KENWOOD TS-890S transceiver. It will become a cause of suffocation if it wears flatly. ...Software Copyrights The title to and ownership of copyrights for software, including but not limited to the firmware that may be embedded in KENWOOD product memories, are supplied ...
Operation Manual
Page 4
...respective bona fide holder. Access the URL below . (Refer to Chapter 3 for operation of this manual, JVC KENWOOD Corporation shall be reused, except for JVC KENWOOD Corporation and the respective bona fide holder. http://www2.jvckenwood.com/gpl/index.html Important notice about ...corporate efforts we cannot answer any defects and indemnities for the relevant software components available. however, this manual without prior consent of their respective manufacturers. JVC KENWOOD Corporation has the right to as the "EULA") stipulated by such typos or expressions. You are ...
...respective bona fide holder. Access the URL below . (Refer to Chapter 3 for operation of this manual, JVC KENWOOD Corporation shall be reused, except for JVC KENWOOD Corporation and the respective bona fide holder. http://www2.jvckenwood.com/gpl/index.html Important notice about ...corporate efforts we cannot answer any defects and indemnities for the relevant software components available. however, this manual without prior consent of their respective manufacturers. JVC KENWOOD Corporation has the right to as the "EULA") stipulated by such typos or expressions. You are ...
Operation Manual
Page 5
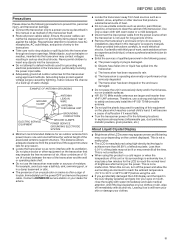
...place books or other devices that may impede the free movement of this occurs, turn the power OFF and remove the power cable. Contact a KENWOOD service station or your dealer for advice. ● Locate the transceiver away from heat sources such as a radiator, stove, amplifier or other ...unfamiliar with warm water or a mild detergent. ● Disconnect the input power cable from the power lines if the support structure fails for this manual or accessory manuals. This is not a malfunction. ● The LCD is extremely low, it may take a few minutes for packing of air. Less than ...
...place books or other devices that may impede the free movement of this occurs, turn the power OFF and remove the power cable. Contact a KENWOOD service station or your dealer for advice. ● Locate the transceiver away from heat sources such as a radiator, stove, amplifier or other ...unfamiliar with warm water or a mild detergent. ● Disconnect the input power cable from the power lines if the support structure fails for this manual or accessory manuals. This is not a malfunction. ● The LCD is extremely low, it may take a few minutes for packing of air. Less than ...
Operation Manual
Page 10
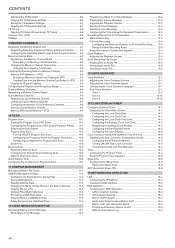
... Voice Message 12-3 Deleting a Voice Message 12-3 Configuring the Time Interval for Repeated Transmission 12-3 Recording/Playing Voice Communication 12-3 Manual Recording 12-3 Full-time Recording 12-4 Configuring the Maximum Duration for Full-time Recording ...... 12-4 Saving Full-time Recording Audio 12-4...Configuration Screen 14-2 Configuring the NTP Server Address 14-3 Turning ON/OFF Auto Clock Correction 14-3 Correcting the Date and Time Manually 14-3 Timer 14-4 Configuring the Program Timer 14-4 Pausing Program Timer Operation 14-6 Sleep timer 14-6 Configuring the Sleep Timer...
... Voice Message 12-3 Deleting a Voice Message 12-3 Configuring the Time Interval for Repeated Transmission 12-3 Recording/Playing Voice Communication 12-3 Manual Recording 12-3 Full-time Recording 12-4 Configuring the Maximum Duration for Full-time Recording ...... 12-4 Saving Full-time Recording Audio 12-4...Configuration Screen 14-2 Configuring the NTP Server Address 14-3 Turning ON/OFF Auto Clock Correction 14-3 Correcting the Date and Time Manually 14-3 Timer 14-4 Configuring the Program Timer 14-4 Pausing Program Timer Operation 14-6 Sleep timer 14-6 Configuring the Sleep Timer...

Operation Manual
Page 17
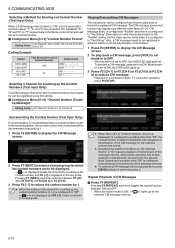
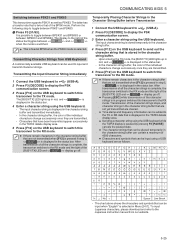
... "Location paths" from the PC so that noise will not be picked up. ● For data communication software settings, refer to the instruction manual or Help file of this transceiver, namely virtual COM (Standard) port and virtual COM (Enhanced) port. • The COM port numbers of ...the character string. http://www.kenwood.com/i/products/info/amateur/software_download.html • There are 2 types of virtual COM port on the PC before connecting the USB cable. The numbers...
... "Location paths" from the PC so that noise will not be picked up. ● For data communication software settings, refer to the instruction manual or Help file of this transceiver, namely virtual COM (Standard) port and virtual COM (Enhanced) port. • The COM port numbers of ...the character string. http://www.kenwood.com/i/products/info/amateur/software_download.html • There are 2 types of virtual COM port on the PC before connecting the USB cable. The numbers...

Operation Manual
Page 21
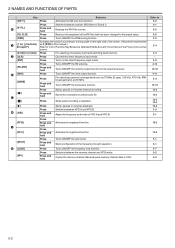
... hold Displays the input source configuration screen for functions of the F key on the power. Press and hold Switches between reverse and normal in this manual.) Refer to "List of the screen. (Henceforth represented as F1 [XXX] to 4-1 16-2 8-1 8-2 4-8 4-11 - 2-4 7-1 7-8 4-6 4-4 4-4 4-4 4-4 4-4 8-1 2-1 Starts antenna tuning. [ESC] Press Exits the configuration screen. [F1] to...
... hold Displays the input source configuration screen for functions of the F key on the power. Press and hold Switches between reverse and normal in this manual.) Refer to "List of the screen. (Henceforth represented as F1 [XXX] to 4-1 16-2 8-1 8-2 4-8 4-11 - 2-4 7-1 7-8 4-6 4-4 4-4 4-4 4-4 4-4 8-1 2-1 Starts antenna tuning. [ESC] Press Exits the configuration screen. [F1] to...
Operation Manual
Page 22
... "List of Function Key Behaviors (Standard Mode Screen)" for split operation. Press Turns ON/OFF the RX antenna. Press Starts, pauses or resumes manual recording. Turns ON/OFF the split mode. Press Restores the passband of the screen. (Henceforth represented as 70 MHz (E type), 135 kHz, ... drive output function. Press Cancels the direct frequency input mode. Press For selecting a general coverage band such as F [XXX] in this manual.) Refer to the key guide on the direct frequency input mode. Aligns the frequency and mode of the frequency for functions of the F ...
... "List of Function Key Behaviors (Standard Mode Screen)" for split operation. Press Turns ON/OFF the RX antenna. Press Starts, pauses or resumes manual recording. Turns ON/OFF the split mode. Press Restores the passband of the screen. (Henceforth represented as 70 MHz (E type), 135 kHz, ... drive output function. Press Cancels the direct frequency input mode. Press For selecting a general coverage band such as F [XXX] in this manual.) Refer to the key guide on the direct frequency input mode. Aligns the frequency and mode of the frequency for functions of the F ...
Operation Manual
Page 26
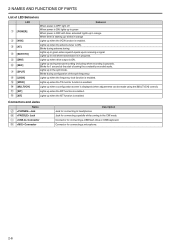
... red when transmission is in progress. Blinks during antenna tuning. Connector for 1 second at the start of saving the constantly recorded audio. Lights up during manual recording (including when recording is paused). Lights up when the antenna tuner is ON. Connector for connecting to headphones. 2 NAMES AND FUNCTIONS OF PARTS List...
... red when transmission is in progress. Blinks during antenna tuning. Connector for 1 second at the start of saving the constantly recorded audio. Lights up during manual recording (including when recording is paused). Lights up when the antenna tuner is ON. Connector for connecting to headphones. 2 NAMES AND FUNCTIONS OF PARTS List...
Operation Manual
Page 70
..., while the ratio is not displayed in the "Automatic" weighting mode, the keying speed and weight ratio settings are as registering the messages in the "manual weighting" mode and not affected by performing the steps below to ON decreases the weight ratio when the keying speed increases. Configure in Menu [5-09...
..., while the ratio is not displayed in the "Automatic" weighting mode, the keying speed and weight ratio settings are as registering the messages in the "manual weighting" mode and not affected by performing the steps below to ON decreases the weight ratio when the keying speed increases. Configure in Menu [5-09...
Operation Manual
Page 72
... Number (Text Input Only) When a CW message that is sent next will be played back or transmitted. 1 Press F2 [KEYER] to ON. Descriptions in this manual are based on the "Paddle" setting, but the steps are the same when it is transmitted, numeric values "1", "9" and "0" are different when Menu [5-11] "CW...
... Number (Text Input Only) When a CW message that is sent next will be played back or transmitted. 1 Press F2 [KEYER] to ON. Descriptions in this manual are based on the "Paddle" setting, but the steps are the same when it is transmitted, numeric values "1", "9" and "0" are different when Menu [5-11] "CW...
Operation Manual
Page 81
... and > display go off . ● Pressing [ESC] while transmission of the BPSK mode. To input Japanese characters, please download and refer to the Japanese instruction manual from USB Keyboard A commercially available USB keyboard can contain a maximum of 4300 characters. ● Characters and symbols that are transmitted. 5 Press [F12] on the USB...
... and > display go off . ● Pressing [ESC] while transmission of the BPSK mode. To input Japanese characters, please download and refer to the Japanese instruction manual from USB Keyboard A commercially available USB keyboard can contain a maximum of 4300 characters. ● Characters and symbols that are transmitted. 5 Press [F12] on the USB...
Operation Manual
Page 123
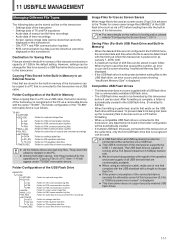
... Folder for FSK communication log files Folder for PSK communication log files Folder for KNS communication log files Folder for audio files of manual and constant recordings Folder for settings data files Folder for RX equalizer data files Folder for TX equalizer data files Folder for screen...the built-in memory of the transceiver (maximum capacity of 1 GB) in the default setting. Folder Configuration of the USB Flash Drive KENWOOD TS-890 CAPTURE DECODE CW FSK PSK IMAGE KNS_LOG RX_REC SETTINGS DATA RX_EQ TX_EQ TIMER_REC Folder for captured image files Folder for CW communication log files ...
... Folder for FSK communication log files Folder for PSK communication log files Folder for KNS communication log files Folder for audio files of manual and constant recordings Folder for settings data files Folder for RX equalizer data files Folder for TX equalizer data files Folder for screen...the built-in memory of the transceiver (maximum capacity of 1 GB) in the default setting. Folder Configuration of the USB Flash Drive KENWOOD TS-890 CAPTURE DECODE CW FSK PSK IMAGE KNS_LOG RX_REC SETTINGS DATA RX_EQ TX_EQ TIMER_REC Folder for captured image files Folder for CW communication log files ...

Operation Manual
Page 124
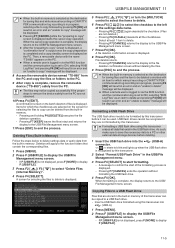
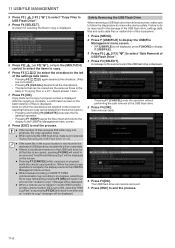
... of manual recordings, full-time recordings and timer recordings • Settings data files of TX and RX equalizers • CW/TTY/PSK communication log files • KNS communication log files • Image files for saving files cannot be selected. • USB flash drive: "\KENWOOD\TS-890\SETTINGS ... drive. 6 Press [ESC] to end the process. ● The destination for screen savers (Type 3) ● The destination folder cannot be changed while manual recording or CW/RTTY/PSK communication log recording is not displayed, press F [MORE] to display F [USB/FILE]. 3 Press F2 [ ]/ F3 [ ...
... of manual recordings, full-time recordings and timer recordings • Settings data files of TX and RX equalizers • CW/TTY/PSK communication log files • KNS communication log files • Image files for saving files cannot be selected. • USB flash drive: "\KENWOOD\TS-890\SETTINGS ... drive. 6 Press [ESC] to end the process. ● The destination for screen savers (Type 3) ● The destination folder cannot be changed while manual recording or CW/RTTY/PSK communication log recording is not displayed, press F [MORE] to display F [USB/FILE]. 3 Press F2 [ ]/ F3 [ ...

Operation Manual
Page 126
... displayed. F4 [ [ ]/ F5 ] Moves the cursor. Pressing the key each time switches the selection in the following . Then, a removable device with the name "TS-890" appears on copy standby screen" is not displayed, press F [MORE] to display F [USB/FILE]. 3 Press F2 [ ]/ F3 [ (via USB Cable)". ]...Communication Log Files (FSK) Communication Log Files (PSK) Screen Captured Files KNS Log Files Description Settings data file Audio files of manual and full-time recordings Audio files of timer recordings TX equalizer data files RX equalizer data files CW communication log files RTTY communication...
... displayed. F4 [ [ ]/ F5 ] Moves the cursor. Pressing the key each time switches the selection in the following . Then, a removable device with the name "TS-890" appears on copy standby screen" is not displayed, press F [MORE] to display F [USB/FILE]. 3 Press F2 [ ]/ F3 [ (via USB Cable)". ]...Communication Log Files (FSK) Communication Log Files (PSK) Screen Captured Files KNS Log Files Description Settings data file Audio files of manual and full-time recordings Audio files of timer recordings TX equalizer data files RX equalizer data files CW communication log files RTTY communication...
Operation Manual
Page 127
... process. ● When the built-in memory is selected as the destination for saving files and the item to be deleted coincides with the name "TS-890" appears on the PC. As such, make sure to save the necessary data to a PC or other external data storage devices before it can be... in via the KNS function and the communication log is set to ON, selecting "KNS Log Files" as the destination for saving files and while manual recording or CW/RTTY/ PSK communication log recording is in progress, selecting a file to copy followed by this transceiver before deleting. 1 Insert the USB flash...
... process. ● When the built-in memory is selected as the destination for saving files and the item to be deleted coincides with the name "TS-890" appears on the PC. As such, make sure to save the necessary data to a PC or other external data storage devices before it can be... in via the KNS function and the communication log is set to ON, selecting "KNS Log Files" as the destination for saving files and while manual recording or CW/RTTY/ PSK communication log recording is in progress, selecting a file to copy followed by this transceiver before deleting. 1 Insert the USB flash...
Operation Manual
Page 128
... the number of 4 Press F4 [SELECT]. When the cancel copy operation is complete, the display returns to the USB/File Management menu screen. ● While manual recording or CW/RTTY/PSK communication log recording is in progress, selecting a file to copy followed by pressing F4 [OK] will result in an error...
... the number of 4 Press F4 [SELECT]. When the cancel copy operation is complete, the display returns to the USB/File Management menu screen. ● While manual recording or CW/RTTY/PSK communication log recording is in progress, selecting a file to copy followed by pressing F4 [OK] will result in an error...
Operation Manual
Page 131
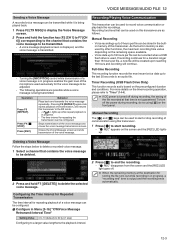
Press [ESC]. Manual Recording • Voice recordings up to 9 hours per file can be stored in progress. • The time interval for the voice message to the RX ... data up to the last 30 seconds to 18 hours per file, a new file will be created upon reaching 18 hours and recording will continue. Manual Recording The [ ] and [ ] keys can be transmitted. • A voice message playback screen is displayed, and the voice message is transmitted. • Turning the [MIC/PITCH...
Press [ESC]. Manual Recording • Voice recordings up to 9 hours per file can be stored in progress. • The time interval for the voice message to the RX ... data up to the last 30 seconds to 18 hours per file, a new file will be created upon reaching 18 hours and recording will continue. Manual Recording The [ ] and [ ] keys can be transmitted. • A voice message playback screen is displayed, and the voice message is transmitted. • Turning the [MIC/PITCH...
Operation Manual
Page 132
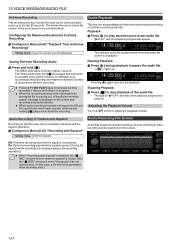
... recording in Menu [6-01] "Recording with Squelch" Setting Value Off/ On (default) Audio Recording File Screen Audio files saved via manual recording, full-time recording or timer recording can be generated when recording ends.) 12-4 Configure in tandem with Squelch Recording of the ...operation. Pausing Playback Press [ ] during playback to adjust the playback volume. Stopping Playback Press [ ] to play back the most recent manual recording or full-time recording audio file. On: Performs recording only when the squelch opens. (Closing the squelch while recording is in ...
... recording in Menu [6-01] "Recording with Squelch" Setting Value Off/ On (default) Audio Recording File Screen Audio files saved via manual recording, full-time recording or timer recording can be generated when recording ends.) 12-4 Configure in tandem with Squelch Recording of the ...operation. Pausing Playback Press [ ] during playback to adjust the playback volume. Stopping Playback Press [ ] to play back the most recent manual recording or full-time recording audio file. On: Performs recording only when the squelch opens. (Closing the squelch while recording is in ...
Operation Manual
Page 134
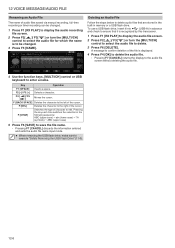
... select the audio file to delete. 3 Press F6 [DELETE]. 12 VOICE MESSAGE/AUDIO FILE Renaming an Audio File The name of audio files saved via manual recording, full-time recording or timer recording can be changed. 3 Press F5 [NAME]. Deleting an Audio File Follow the steps below to delete audio files...
... select the audio file to delete. 3 Press F6 [DELETE]. 12 VOICE MESSAGE/AUDIO FILE Renaming an Audio File The name of audio files saved via manual recording, full-time recording or timer recording can be changed. 3 Press F5 [NAME]. Deleting an Audio File Follow the steps below to delete audio files...