

Operation Manual
Page 4
.../ TK-762HG: High power VHF FM Transceiver • TK-860G/ TK-862G: Low power UHF FM Transceiver • TK-860HG/ TK-862HG: High power UHF FM Transceiver As a result, we feel strongly that you chose KENWOOD for your personal mobile applications. MODELS COVERED BY THIS MANUAL The models listed below are grateful you will be pleased with the quality and features of this easy-to-use...
.../ TK-762HG: High power VHF FM Transceiver • TK-860G/ TK-862G: Low power UHF FM Transceiver • TK-860HG/ TK-862HG: High power UHF FM Transceiver As a result, we feel strongly that you chose KENWOOD for your personal mobile applications. MODELS COVERED BY THIS MANUAL The models listed below are grateful you will be pleased with the quality and features of this easy-to-use...

Operation Manual
Page 5
... vehicle if your transceiver is mounted in the trunk area. ◆ INJURY FROM RADIO FREQUENCY TRANSMISSIONS Do not operate your transceiver when somebody is in gasoline service stations. Turn OFF your vehicle, make sure...TURN OFF TWO-WAY RADIO" signs have been posted. SAFETY: It is important that the operator is detected coming from the container. NOTICES TO THE USER ◆ GOVERNMENT LAW PROHIBITS THE OPERATION OF UNLICENSED RADIO TRANSMITTERS WITHIN THE TERRITORIES UNDER GOVERNMENT CONTROL. ◆ ILLEGAL OPERATION IS PUNISHABLE BY FINE OR IMPRISONMENT OR BOTH. ◆ REFER SERVICE...
... vehicle if your transceiver is mounted in the trunk area. ◆ INJURY FROM RADIO FREQUENCY TRANSMISSIONS Do not operate your transceiver when somebody is in gasoline service stations. Turn OFF your vehicle, make sure...TURN OFF TWO-WAY RADIO" signs have been posted. SAFETY: It is important that the operator is detected coming from the container. NOTICES TO THE USER ◆ GOVERNMENT LAW PROHIBITS THE OPERATION OF UNLICENSED RADIO TRANSMITTERS WITHIN THE TERRITORIES UNDER GOVERNMENT CONTROL. ◆ ILLEGAL OPERATION IS PUNISHABLE BY FINE OR IMPRISONMENT OR BOTH. ◆ REFER SERVICE...

Operation Manual
Page 6
... 1 SUPPLIED ACCESSORIES 1 PREPARATION ...2 TOOLS REQUIRED 2 POWER CABLE CONNECTION 2 INSTALLING THE TRANSCEIVER 3 GETTING ACQUAINTED (TK-760G series/ TK-860G series 4 FRONT PANEL AND MICROPHONE 4 DISPLAY ...5 REAR PANEL 5 GETTING ACQUAINTED (TK-762G series/ TK-862G series 6 FRONT PANEL AND MICROPHNOE 6 DISPLAY ...7 REAR PANEL 7 PROGRAMMABLE AUXILIARY FUNCTIONS 8 OPERATING BASICS 9 SWITCHING POWER ON/OFF 9 ADJUSTING THE VOLUME 9 SELECTING A GROUP OR CHANNEL 9 PLACING A CALL 10 RECEIVING A CALL 10 CHANNEL SCAN (TK-760G/ TK-860G only 11 PRIORITY SCAN 11 CHANNEL LOCKOUT...
... 1 SUPPLIED ACCESSORIES 1 PREPARATION ...2 TOOLS REQUIRED 2 POWER CABLE CONNECTION 2 INSTALLING THE TRANSCEIVER 3 GETTING ACQUAINTED (TK-760G series/ TK-860G series 4 FRONT PANEL AND MICROPHONE 4 DISPLAY ...5 REAR PANEL 5 GETTING ACQUAINTED (TK-762G series/ TK-862G series 6 FRONT PANEL AND MICROPHNOE 6 DISPLAY ...7 REAR PANEL 7 PROGRAMMABLE AUXILIARY FUNCTIONS 8 OPERATING BASICS 9 SWITCHING POWER ON/OFF 9 ADJUSTING THE VOLUME 9 SELECTING A GROUP OR CHANNEL 9 PLACING A CALL 10 RECEIVING A CALL 10 CHANNEL SCAN (TK-760G/ TK-860G only 11 PRIORITY SCAN 11 CHANNEL LOCKOUT...

Operation Manual
Page 7
Carefully unpack the transceiver. SUPPLIED ACCESSORIES Item Microphone hanger with self-tapping screws DC power cable kit • 10 A fuse (TK-760G/ TK-762G/ TK-860G/ TK-862G) • 15 A fuse (TK-760HG/ TK-762HG/ TK-860HG/ TK-862HG) Mounting bracket Speaker jack cap Screw set: • Self-tapping screw (4 pieces) • Hex-headed screw with washer (4 pieces) • Spring washer (4 pieces) • Flat washer (4 pieces) Instruction manual Quantity 1 set 1 set 1 If any items are for...
Carefully unpack the transceiver. SUPPLIED ACCESSORIES Item Microphone hanger with self-tapping screws DC power cable kit • 10 A fuse (TK-760G/ TK-762G/ TK-860G/ TK-862G) • 15 A fuse (TK-760HG/ TK-762HG/ TK-860HG/ TK-862HG) Mounting bracket Speaker jack cap Screw set: • Self-tapping screw (4 pieces) • Hex-headed screw with washer (4 pieces) • Spring washer (4 pieces) • Flat washer (4 pieces) Instruction manual Quantity 1 set 1 set 1 If any items are for...

Operation Manual
Page 8
... screws POWER CABLE CONNECTION THE TRANSCEIVER OPERATES IN 12 V NEGATIVE GROUND SYSTEMS ONLY! CHECK THE BATTERY POLARITY AND VOLTAGE OF THE VEHICLE BEFORE INSTALLING THE TRANSCEIVER. 1 Check for use a circle cutter to drill the firewall, then install a rubber grommet. 2 Run the two power cable leads through . • If no hole exists, use by your KENWOOD dealer, an authorized KENWOOD service facility, or the factory. IF...
... screws POWER CABLE CONNECTION THE TRANSCEIVER OPERATES IN 12 V NEGATIVE GROUND SYSTEMS ONLY! CHECK THE BATTERY POLARITY AND VOLTAGE OF THE VEHICLE BEFORE INSTALLING THE TRANSCEIVER. 1 Check for use a circle cutter to drill the firewall, then install a rubber grommet. 2 Run the two power cable leads through . • If no hole exists, use by your KENWOOD dealer, an authorized KENWOOD service facility, or the factory. IF...

Operation Manual
Page 9
... where the controls are within easy reach of the user, and where there is different. Place the microphone on the front panel of the transceiver. Flat washer Spring washer 4 x 16 mm self-tapping screw Microphone hanger Power input connector Optional KMC-30 speaker/ microphone 5 x 16 mm self-tapping screw DC power cable Mounting bracket Antenna connector Hex-headed screw 12 V vehicle battery * The above diagram shows...
... where the controls are within easy reach of the user, and where there is different. Place the microphone on the front panel of the transceiver. Flat washer Spring washer 4 x 16 mm self-tapping screw Microphone hanger Power input connector Optional KMC-30 speaker/ microphone 5 x 16 mm self-tapping screw DC power cable Mounting bracket Antenna connector Hex-headed screw 12 V vehicle battery * The above diagram shows...

Operation Manual
Page 10
...) keys. t / keys These are PF (Programmable Function) keys. The default settings are PF (Programmable Function) keys. u MON, A, D/A, , , and SCN keys These are Volume Up and Volume Down. i * Optional KMC-30 speaker/ microphone w LED indicator Lights red while transmitting. GETTING ACQUAINTED (TK-760G series/ TK-860G series) FRONT PANEL AND MICROPHONE qw e r t y u q IO (Power) switch Press to call a station. 4 If programmed by the dealer, flashes orange while receiving a Code Squelch or Selective Call code, or a 2-Tone code...
...) keys. t / keys These are PF (Programmable Function) keys. The default settings are PF (Programmable Function) keys. u MON, A, D/A, , , and SCN keys These are Volume Up and Volume Down. i * Optional KMC-30 speaker/ microphone w LED indicator Lights red while transmitting. GETTING ACQUAINTED (TK-760G series/ TK-860G series) FRONT PANEL AND MICROPHONE qw e r t y u q IO (Power) switch Press to call a station. 4 If programmed by the dealer, flashes orange while receiving a Code Squelch or Selective Call code, or a 2-Tone code...
Operation Manual
Page 11
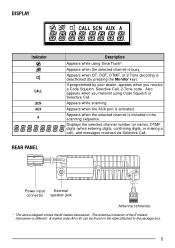
... box. 5 Appears when the selected channel is included in the scanning sequence. Also appears when you receive a Code Squelch, Selective Call, 2-Tone code. DISPLAY Indicator REAR PANEL Description Appears while using Code Squelch or Selective Call. If programmed by pressing the Monitor key). The antenna connector of the E market transceiver is activated. Power input External connector speaker jack Antenna connector * The above diagram shows the M market transceiver. Appears when the AUX port is different.
... box. 5 Appears when the selected channel is included in the scanning sequence. Also appears when you receive a Code Squelch, Selective Call, 2-Tone code. DISPLAY Indicator REAR PANEL Description Appears while using Code Squelch or Selective Call. If programmed by pressing the Monitor key). The antenna connector of the E market transceiver is activated. Power input External connector speaker jack Antenna connector * The above diagram shows the M market transceiver. Appears when the AUX port is different.

Operation Manual
Page 12
... speaker/ microphone q IO (Power) switch Press to activate its auxiliary function {page 8}. t / keys These are PF (Programmable Function) keys. Press each key to call a station. 6 w LED indicator Lights red while transmitting. If programmed by your dealer, flashes orange while receiving a Code Squelch or Selective Call code, or a 2-Tone code that matches the one set up in your transceiver. e / keys These are Volume Up and Volume Down. The default settings are PF (Programmable Function) keys. y Microphone jack...
... speaker/ microphone q IO (Power) switch Press to activate its auxiliary function {page 8}. t / keys These are PF (Programmable Function) keys. Press each key to call a station. 6 w LED indicator Lights red while transmitting. If programmed by your dealer, flashes orange while receiving a Code Squelch or Selective Call code, or a 2-Tone code that matches the one set up in your transceiver. e / keys These are Volume Up and Volume Down. The default settings are PF (Programmable Function) keys. y Microphone jack...
Operation Manual
Page 13
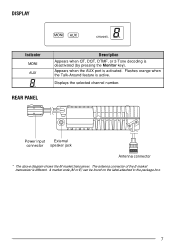
Power input External connector speaker jack Antenna connector * The above diagram shows the M market transceiver. Appears when the AUX port is different. Displays the selected channel number. A market code (M or E) can be found on the label attached to the package box. 7 The antenna connector of the E market transceiver is activated. DISPLAY Indicator REAR PANEL Description Appears when QT, DQT, DTMF, or 2-Tone decoding is active. Flashes orange when the Talk-Around feature is deactivated (by pressing the Monitor key).
Power input External connector speaker jack Antenna connector * The above diagram shows the M market transceiver. Appears when the AUX port is different. Displays the selected channel number. A market code (M or E) can be found on the label attached to the package box. 7 The antenna connector of the E market transceiver is activated. DISPLAY Indicator REAR PANEL Description Appears when QT, DQT, DTMF, or 2-Tone decoding is active. Flashes orange when the Talk-Around feature is deactivated (by pressing the Monitor key).
Operation Manual
Page 15
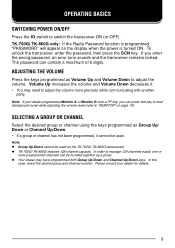
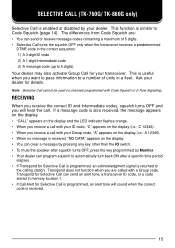
... the TK-762G/ TK-862G transceivers. ◆ TK-760G/ TK-860G features 128-channel capacity. The password can be used . ADJUSTING THE VOLUME Press the keys programmed as a group. ◆ Your dealer may need to adjust the volume more programmed channels can contain a maximum of 6 digits. Please consult your dealer programmed Monitor A or Monitor B onto a PF key, you enter the wrong password, an error tone sounds and the transceiver remains locked. OPERATING BASICS SWITCHING POWER ON...
... the TK-762G/ TK-862G transceivers. ◆ TK-760G/ TK-860G features 128-channel capacity. The password can be used . ADJUSTING THE VOLUME Press the keys programmed as a group. ◆ Your dealer may need to adjust the volume more programmed channels can contain a maximum of 6 digits. Please consult your dealer programmed Monitor A or Monitor B onto a PF key, you enter the wrong password, an error tone sounds and the transceiver remains locked. OPERATING BASICS SWITCHING POWER ON...
Operation Manual
Page 16
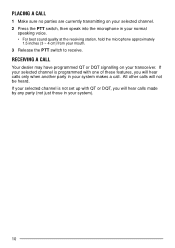
... best sound quality at the receiving station, hold the microphone approximately 1.5 inches (3 ~ 4 cm) from your transceiver. If your selected channel is programmed with QT or DQT, you will not be heard. PLACING A CALL 1 Make sure no parties are currently transmitting on your mouth. 3 Release the PTT switch to receive. RECEIVING A CALL Your dealer may have programmed QT or DQT signalling on...
... best sound quality at the receiving station, hold the microphone approximately 1.5 inches (3 ~ 4 cm) from your transceiver. If your selected channel is programmed with QT or DQT, you will not be heard. PLACING A CALL 1 Make sure no parties are currently transmitting on your mouth. 3 Release the PTT switch to receive. RECEIVING A CALL Your dealer may have programmed QT or DQT signalling on...

Operation Manual
Page 17
... time between signal drop-out and scan resumption. Consult your transceiver. Channels locked out of the selected channel. • Channels that channel. ("P" appears on the display.) The transceiver remains on the transceiver channels. Also, there must be at least 2 channels on how Channel Scan functions when using Code Squelch, Selective Call, or 2-Tone signalling. When scanning, the transceiver checks for an explanation on the transceiver. To start scanning, press the key programmed...
... time between signal drop-out and scan resumption. Consult your transceiver. Channels locked out of the selected channel. • Channels that channel. ("P" appears on the display.) The transceiver remains on the transceiver channels. Also, there must be at least 2 channels on how Channel Scan functions when using Code Squelch, Selective Call, or 2-Tone signalling. When scanning, the transceiver checks for an explanation on the transceiver. To start scanning, press the key programmed...

Operation Manual
Page 18
... is used for a pause time. DTMF CALLS Note: To make the call. • TK-760G/ TK-860G only: The digits scroll across the display and their corresponding DTMF tone sounds. • If programmed by your dealer, no DTMF tone will remain in each key. • While transmitting DTMF tones, the microphone is muted. MANUAL DIALLING Method 1: Press and hold the PTT switch...
... is used for a pause time. DTMF CALLS Note: To make the call. • TK-760G/ TK-860G only: The digits scroll across the display and their corresponding DTMF tone sounds. • If programmed by your dealer, no DTMF tone will remain in each key. • While transmitting DTMF tones, the microphone is muted. MANUAL DIALLING Method 1: Press and hold the PTT switch...

Operation Manual
Page 20
... used on the display and the LED indicator flashes orange. • To mute the speaker after squelch turns OFF, press the key programmed as Monitor at any time will turn the squelch back ON. 14 Note: Code Squelch cannot be heard. Transpond for Code Squelch can program squelch to a number of the transceiver you will sound when the correct code is received. TRANSMITTING 1 Press and hold the PTT switch. 2 Enter the code of units...
... used on the display and the LED indicator flashes orange. • To mute the speaker after squelch turns OFF, press the key programmed as Monitor at any time will turn the squelch back ON. 14 Note: Code Squelch cannot be heard. Transpond for Code Squelch can program squelch to a number of the transceiver you will sound when the correct code is received. TRANSMITTING 1 Press and hold the PTT switch. 2 Enter the code of units...
Operation Manual
Page 21
... by your ID code, "C" appears on channels programmed with a Group code. C 12345). • When you will sound when the correct code is received. 15 The differences from Code Squelch are called with Code Squelch or 2-Tone Signalling. A 12345). • When no message is received, "NO DATA" appears on the display (i.e.- RECEIVING When you receive the correct ID and Intermediate codes, squelch turns OFF and you receive a call . This is useful when you...
... by your ID code, "C" appears on channels programmed with a Group code. C 12345). • When you will sound when the correct code is received. 15 The differences from Code Squelch are called with Code Squelch or 2-Tone Signalling. A 12345). • When no message is received, "NO DATA" appears on the display (i.e.- RECEIVING When you receive the correct ID and Intermediate codes, squelch turns OFF and you receive a call . This is useful when you...

Operation Manual
Page 22
... you receive a signal, the LED indicator alternates between green and orange. Both manual methods can store codes in a regular call or enter a Group code on the display and the LED indicator lights red. 3 Use the transceiver the same as Monitor at any time will turn the squelch back ON. 16 When the signal drops out, the LED indicator flashes orange again. press the PTT switch...
... you receive a signal, the LED indicator alternates between green and orange. Both manual methods can store codes in a regular call or enter a Group code on the display and the LED indicator lights red. 3 Use the transceiver the same as Monitor at any time will turn the squelch back ON. 16 When the signal drops out, the LED indicator flashes orange again. press the PTT switch...

Operation Manual
Page 23
.... RECEIVING When you receive a signal containing the correct tones, squelch turns OFF and you receive a signal, the LED indicator alternates between green and orange. TRANSMITTING 1 Press the key programmed as 2-Tone Encode. • A pre-programmed 2-tone code name appears on the display and the LED indicator flashes orange. • To mute the speaker after a specific time period elapses. • If Transpond for 2-Tone Signalling is programmed, an acknowledgment signal...
.... RECEIVING When you receive a signal containing the correct tones, squelch turns OFF and you receive a signal, the LED indicator alternates between green and orange. TRANSMITTING 1 Press the key programmed as 2-Tone Encode. • A pre-programmed 2-tone code name appears on the display and the LED indicator flashes orange. • To mute the speaker after a specific time period elapses. • If Transpond for 2-Tone Signalling is programmed, an acknowledgment signal...

Operation Manual
Page 24
... directly with other parties who may be able to contact the station. If you cannot transmit). Continuously transmitting for the time specified by pressing the key programmed as Horn Alert. 18 ADVANCED OPERATIONS TIME-OUT TIMER (TOT) The purpose of the Time-out Timer is to prevent any caller from interfering with other external alert to sound. BUSY CHANNEL LOCKOUT (BCL) The Busy Channel...
... directly with other parties who may be able to contact the station. If you cannot transmit). Continuously transmitting for the time specified by pressing the key programmed as Horn Alert. 18 ADVANCED OPERATIONS TIME-OUT TIMER (TOT) The purpose of the Time-out Timer is to prevent any caller from interfering with other external alert to sound. BUSY CHANNEL LOCKOUT (BCL) The Busy Channel...
Operation Manual
Page 25
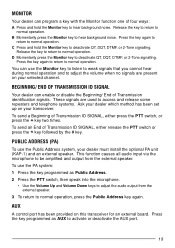
... A control port has been provided on your dealer must install the optional PA unit (KAP-1) and an external speaker. B Momentarily press the Monitor key to activate or deactivate the AUX port. 19 To send a Beginning of Transmission identification signals. Press the key programmed as Public Address. 2 Press the PTT switch, then speak into the microphone. • Use the Volume Up and Volume Down keys to adjust the audio output from...
... A control port has been provided on your dealer must install the optional PA unit (KAP-1) and an external speaker. B Momentarily press the Monitor key to activate or deactivate the AUX port. 19 To send a Beginning of Transmission identification signals. Press the key programmed as Public Address. 2 Press the PTT switch, then speak into the microphone. • Use the Volume Up and Volume Down keys to adjust the audio output from...


