

User Manual 1
Page 2
.... • Ensure that the end of explosion if the battery is easy to the volume level when turning the squelch off in such conditions, it is incorrectly replaced; When using pacemakers. Information on nearby machine. ◆◆ When operating the transceiver in your ear. We recommend you use only a speaker/microphone in these items and their waste byproducts. In addition, do...
.... • Ensure that the end of explosion if the battery is easy to the volume level when turning the squelch off in such conditions, it is incorrectly replaced; When using pacemakers. Information on nearby machine. ◆◆ When operating the transceiver in your ear. We recommend you use only a speaker/microphone in these items and their waste byproducts. In addition, do...
User Manual 1
Page 4
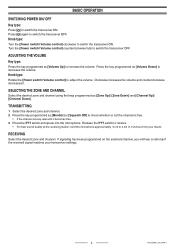
... your transceiver settings. 3 < PO_BASIC_OP_PMR > Release the PTT switch to receive. • For best sound quality at the receiving station, hold the microphone approximately 3 cm to decrease the volume. Press the key programmed as [Monitor] or [Squelch Off] to adjust the volume. Press [ ] again to switch the transceiver OFF. BASIC OPERATION SWITCHING POWER ON/ OFF Key type: Press [ ] to switch the transceiver ON. Knob type: Turn the [Power switch/ Volume control] clockwise to switch the transceiver...
... your transceiver settings. 3 < PO_BASIC_OP_PMR > Release the PTT switch to receive. • For best sound quality at the receiving station, hold the microphone approximately 3 cm to decrease the volume. Press the key programmed as [Monitor] or [Squelch Off] to adjust the volume. Press [ ] again to switch the transceiver OFF. BASIC OPERATION SWITCHING POWER ON/ OFF Key type: Press [ ] to switch the transceiver ON. Knob type: Turn the [Power switch/ Volume control] clockwise to switch the transceiver...
User Manual
Page 6
... unit from the AC mains line. Pay attention to the volume level when turning the squelch off before installing optional accessories. • The charger is the device that the end of the antenna does not touch your neck while near machinery that may catch the cable. • Do not place the transceiver on fuel or while parked at gasoline service stations...
... unit from the AC mains line. Pay attention to the volume level when turning the squelch off before installing optional accessories. • The charger is the device that the end of the antenna does not touch your neck while near machinery that may catch the cable. • Do not place the transceiver on fuel or while parked at gasoline service stations...

User Manual
Page 7
... at such a time may result in a high-frequency burn. • If an abnormal odor or smoke is detected coming from the transceiver, switch the transceiver power off immediately, remove the battery pack from the antenna covering. Please check...use only a speaker/microphone in flates, the transceiver may be ejected and strike the driver or passengers. • Do not transmit while touching the antenna terminal or if any reason. • Do not place the transceiver on nearby machine. • When operating the transceiver in areas where the air is dry, it is incorrectly replaced...
... at such a time may result in a high-frequency burn. • If an abnormal odor or smoke is detected coming from the transceiver, switch the transceiver power off immediately, remove the battery pack from the antenna covering. Please check...use only a speaker/microphone in flates, the transceiver may be ejected and strike the driver or passengers. • Do not transmit while touching the antenna terminal or if any reason. • Do not place the transceiver on nearby machine. • When operating the transceiver in areas where the air is dry, it is incorrectly replaced...

User Manual
Page 13
... progress. Replace the battery pack. ◆ While operating the transceiver using 5% transmit time, 5% receive time, and 90% standby time) is in areas of an ambient temperature of -10°C and lower, operating time may be used for a long time, unplug the AC adapter from the charging slot of the charger. Alternates Flashing Green and Orange: The battery pack has not satisfied the charging start temperature...
... progress. Replace the battery pack. ◆ While operating the transceiver using 5% transmit time, 5% receive time, and 90% standby time) is in areas of an ambient temperature of -10°C and lower, operating time may be used for a long time, unplug the AC adapter from the charging slot of the charger. Alternates Flashing Green and Orange: The battery pack has not satisfied the charging start temperature...

User Manual
Page 17
... this key to select the Digital mode and Analog mode. Release the key to return to normal operation. (Squelch Off Momentary) Speaker/ microphone jacks Insert the Speaker/ microphone or Headset plug into this key to hear background noise. LED Indicator Status Indicator Color Flashes blue Flashes orange Lights red Lights green Flashing red Flashing green Meaning Digital mode Analog mode Transmitting Receiving a call Battery power is low while transmitting Scanning Flashing red/ orange The selected channel has not been programmed and cannot be used. 7 Side 2 key Press...
... this key to select the Digital mode and Analog mode. Release the key to return to normal operation. (Squelch Off Momentary) Speaker/ microphone jacks Insert the Speaker/ microphone or Headset plug into this key to hear background noise. LED Indicator Status Indicator Color Flashes blue Flashes orange Lights red Lights green Flashing red Flashing green Meaning Digital mode Analog mode Transmitting Receiving a call Battery power is low while transmitting Scanning Flashing red/ orange The selected channel has not been programmed and cannot be used. 7 Side 2 key Press...
User Manual 2
Page 4
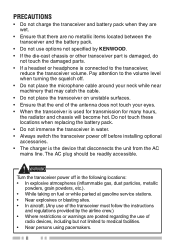
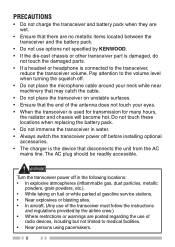
... the cable. • Do not place the transceiver on fuel or while parked at gasoline service stations. • Near explosives or blasting sites. • In aircraft. (Any use of radio devices, including but not limited to medical facilities. • Near persons using pacemakers. Pay attention to the volume level when turning the squelch off before installing optional accessories. • The charger is...
... the cable. • Do not place the transceiver on fuel or while parked at gasoline service stations. • Near explosives or blasting sites. • In aircraft. (Any use of radio devices, including but not limited to medical facilities. • Near persons using pacemakers. Pay attention to the volume level when turning the squelch off before installing optional accessories. • The charger is...

User Manual 2
Page 5
... using an earphone accessory in a high-frequency burn. • If an abnormal odor or smoke is detected coming from the transceiver, switch the transceiver power off immediately, remove the battery pack from the antenna covering. replace only with metal objects, as they may result in such conditions, it is easy to avoid electric shocks. Transmitting at such a time may...
... using an earphone accessory in a high-frequency burn. • If an abnormal odor or smoke is detected coming from the transceiver, switch the transceiver power off immediately, remove the battery pack from the antenna covering. replace only with metal objects, as they may result in such conditions, it is easy to avoid electric shocks. Transmitting at such a time may...

User Manual 2
Page 11
... charger. Replace the battery pack. ◆ While operating the transceiver using 5% transmit time, 5% receive time, and 90% standby time) is completed, the indicator lights green. 3 Slide a battery pack or a transceiver equipped with the charger terminals. • The indicator lights red and charging begins. 4 When charging is 14 hours. 3 Alternates Flashing Green and Orange: The battery pack has not satisfied the charging start temperature. Remove the battery...
... charger. Replace the battery pack. ◆ While operating the transceiver using 5% transmit time, 5% receive time, and 90% standby time) is completed, the indicator lights green. 3 Slide a battery pack or a transceiver equipped with the charger terminals. • The indicator lights red and charging begins. 4 When charging is 14 hours. 3 Alternates Flashing Green and Orange: The battery pack has not satisfied the charging start temperature. Remove the battery...

User Manual 3
Page 4
The AC plug should be readily accessible. Turn the transceiver power off before installing optional accessories. • The charger is the device that disconnects the unit from the AC mains line. Pay attention to the volume level when turning the squelch off. • Do not place the microphone cable around your eyes. • When the transceiver is used for transmission for many hours, the...
The AC plug should be readily accessible. Turn the transceiver power off before installing optional accessories. • The charger is the device that disconnects the unit from the AC mains line. Pay attention to the volume level when turning the squelch off. • Do not place the microphone cable around your eyes. • When the transceiver is used for transmission for many hours, the...

User Manual 3
Page 12
... Supplied battery KNB-69L Optional battery Operating Time/ Hours (Approx.) Digital Mode Analog Mode Battery Saver Battery Saver Battery Saver Battery Saver On Off On Off 16 H 14H 18H 14H 22 H 18H 24H 18H INSTALLING THE BELT CLIP If necessary, attach the belt clip using a Li-ion battery pack in areas of an ambient temperature of -10°C and lower, operating time may be shortened. ◆ The battery...
... Supplied battery KNB-69L Optional battery Operating Time/ Hours (Approx.) Digital Mode Analog Mode Battery Saver Battery Saver Battery Saver Battery Saver On Off On Off 16 H 14H 18H 14H 22 H 18H 24H 18H INSTALLING THE BELT CLIP If necessary, attach the belt clip using a Li-ion battery pack in areas of an ambient temperature of -10°C and lower, operating time may be shortened. ◆ The battery...
User Manual 3
Page 16
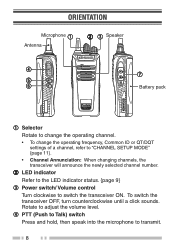
To switch the transceiver OFF, turn counterclockwise until a click sounds. LED indicator Refer to the LED indicator status. {page 9} Power switch/ Volume control Turn clockwise to "CHANNEL SETUP MODE" {page 11}. • Channel Annunciation: When changing channels, the transceiver will announce the newly selected channel number. ORIENTATION Microphone Antenna Speaker Battery pack Selector Rotate to change the operating channel. • To change the operating frequency, Common ID or QT/DQT settings of a channel, refer to switch the transceiver ON. PTT...
To switch the transceiver OFF, turn counterclockwise until a click sounds. LED indicator Refer to the LED indicator status. {page 9} Power switch/ Volume control Turn clockwise to "CHANNEL SETUP MODE" {page 11}. • Channel Annunciation: When changing channels, the transceiver will announce the newly selected channel number. ORIENTATION Microphone Antenna Speaker Battery pack Selector Rotate to change the operating channel. • To change the operating frequency, Common ID or QT/DQT settings of a channel, refer to switch the transceiver ON. PTT...
User Manual 3
Page 19
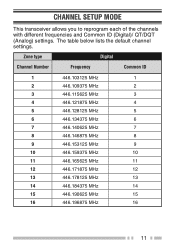
The table below lists the default channel settings. Zone type Digital Channel Number Frequency Common ID 1 446.103125 MHz 1 2 446.109375 MHz 2 3 446.115625 MHz 3 4 446.121875 MHz 4 5 446.128125 MHz 5 6 446.134375 MHz 6 7 446.140625 MHz 7 8 446.146875 ... 446.171875 MHz 12 13 446.178125 MHz 13 14 446.184375 MHz 14 15 446.190625 MHz 15 16 446.196875 MHz 16 11 CHANNEL SETUP MODE This transceiver allows you to reprogram each of the channels with different frequencies and Common ID (Digital)/ QT/DQT (Analog) settings.
The table below lists the default channel settings. Zone type Digital Channel Number Frequency Common ID 1 446.103125 MHz 1 2 446.109375 MHz 2 3 446.115625 MHz 3 4 446.121875 MHz 4 5 446.128125 MHz 5 6 446.134375 MHz 6 7 446.140625 MHz 7 8 446.146875 ... 446.171875 MHz 12 13 446.178125 MHz 13 14 446.184375 MHz 14 15 446.190625 MHz 15 16 446.196875 MHz 16 11 CHANNEL SETUP MODE This transceiver allows you to reprogram each of the channels with different frequencies and Common ID (Digital)/ QT/DQT (Analog) settings.

User Manual 3
Page 20
Zone type Channel Number Frequency Analog QT/DQT 1 446.00625 MHz 94.8 Hz 2 446.09375 MHz 88.5 Hz 3 446.03125 MHz 103.5 Hz 4 446.06875 MHz 79.7 Hz 5 446.04375 ... MHz D132N 14 446.01875 MHz D155N 15 446.05625 MHz D134N 16 446.08125 MHz D243N Note: ◆ You must first select an operating frequency for a channel before you can select a Common ID (Digital)/ QT/DQT (Analog) setting for that same...
Zone type Channel Number Frequency Analog QT/DQT 1 446.00625 MHz 94.8 Hz 2 446.09375 MHz 88.5 Hz 3 446.03125 MHz 103.5 Hz 4 446.06875 MHz 79.7 Hz 5 446.04375 ... MHz D132N 14 446.01875 MHz D155N 15 446.05625 MHz D134N 16 446.08125 MHz D243N Note: ◆ You must first select an operating frequency for a channel before you can select a Common ID (Digital)/ QT/DQT (Analog) setting for that same...

User Manual 3
Page 21
... Frequency Setting and announces "Channel". • If the zone type is changed, the transceiver announces "Confirm". 7 Press the PTT switch and Side 1 key. • All channel frequencies, Common ID and QT/DQT values in the zone type. ZONE SELECTION To change the operating zone: 1 With the transceiver power OFF, press and hold the PTT switch and Side 1 key while turning the transceiver power...
... Frequency Setting and announces "Channel". • If the zone type is changed, the transceiver announces "Confirm". 7 Press the PTT switch and Side 1 key. • All channel frequencies, Common ID and QT/DQT values in the zone type. ZONE SELECTION To change the operating zone: 1 With the transceiver power OFF, press and hold the PTT switch and Side 1 key while turning the transceiver power...

User Manual 3
Page 22
... set up another channel. 6 Turn the transceiver power OFF and then ON again to normal operation if no action is performed for 5 seconds. 14 CHANNEL OPERATING FREQUENCIES To change the operating frequency of a channel: 1 Follow the operating steps in Zone Selection to select the zone. 2 Rotate the Selector to your desired channel. • The transceiver announces Channel number. 3 Press and release the PTT switch. • A beep will sound...
... set up another channel. 6 Turn the transceiver power OFF and then ON again to normal operation if no action is performed for 5 seconds. 14 CHANNEL OPERATING FREQUENCIES To change the operating frequency of a channel: 1 Follow the operating steps in Zone Selection to select the zone. 2 Rotate the Selector to your desired channel. • The transceiver announces Channel number. 3 Press and release the PTT switch. • A beep will sound...
User Manual 3
Page 25
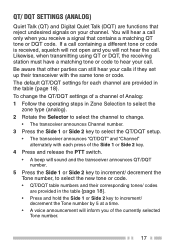
The default QT/DQT settings for each press of the Side 1 or Side 2 key. 4 Press and release the PTT switch. • A beep will inform you receive a signal that contains a matching QT tone or DQT code. Likewise, when transmitting using QT or DQT, the receiving station must have a matching tone or code to change the QT/DQT settings of a channel of the currently selected Tone number. 17 Be...
The default QT/DQT settings for each press of the Side 1 or Side 2 key. 4 Press and release the PTT switch. • A beep will inform you receive a signal that contains a matching QT tone or DQT code. Likewise, when transmitting using QT or DQT, the receiving station must have a matching tone or code to change the QT/DQT settings of a channel of the currently selected Tone number. 17 Be...

User Manual 3
Page 30
... ID setting. Squelch will open with any dPMR446 signals received regardless of 10 calling alert tones. Release the key to return to party members and inform them that you are calling. If each party member uses a different tone, it is easy to know who is active: Key Lock, Monitor, Monitor Momentary, PTT, Squelch Off, Squelch Off Momentary, and Volume. ■ Monitor On digital mode...
... ID setting. Squelch will open with any dPMR446 signals received regardless of 10 calling alert tones. Release the key to return to party members and inform them that you are calling. If each party member uses a different tone, it is easy to know who is active: Key Lock, Monitor, Monitor Momentary, PTT, Squelch Off, Squelch Off Momentary, and Volume. ■ Monitor On digital mode...

User Manual 3
Page 32
.../code set up in your transceiver. CHANNEL ANNUNCIATION When changing the channel, the transceiver will sound. To stop and an alert tone will announce the newly selected channel number. BATTERY SAVER When activated by your dealer, the Battery Saver function decreases the amount of power used after you continuously transmit for an extended duration. BACKGROUND OPERATIONS TIME-OUT TIMER (TOT) The Time-out Timer prevent callers from using a channel...
.../code set up in your transceiver. CHANNEL ANNUNCIATION When changing the channel, the transceiver will sound. To stop and an alert tone will announce the newly selected channel number. BATTERY SAVER When activated by your dealer, the Battery Saver function decreases the amount of power used after you continuously transmit for an extended duration. BACKGROUND OPERATIONS TIME-OUT TIMER (TOT) The Time-out Timer prevent callers from using a channel...
User Manual 3
Page 35
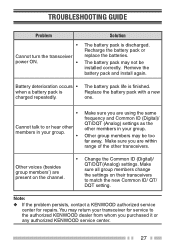
... a KENWOOD authorized service center for service to match the new Common ID/ QT/ DQT setting. Make sure you are using the same frequency and Common ID (Digital)/ QT/DQT (Analog) settings as the other transceivers. Make sure all group members change the settings on the channel. • Change the Common ID (Digital)/ QT/DQT(Analog) settings. Remove the battery pack and install again. when a battery pack is Replace the battery...
... a KENWOOD authorized service center for service to match the new Common ID/ QT/ DQT setting. Make sure you are using the same frequency and Common ID (Digital)/ QT/DQT (Analog) settings as the other transceivers. Make sure all group members change the settings on the channel. • Change the Common ID (Digital)/ QT/DQT(Analog) settings. Remove the battery pack and install again. when a battery pack is Replace the battery...


