

User Manual
Page 3
...Turn off your land mobile radio applications. MODELS COVERED BY THIS MANUAL • TK-2140: VHF FM Transceiver • TK-3140: UHF FM Transceiver NOTICES TO THE USER ◆ Government law prohibits the operation of this easy-to-use transceiver will be pleased with the quality and features of unlicensed radio transmitters within the territories under government control. ◆ Illegal operation... operating at peak efficiency. KENWOOD transceivers incorporate the latest in gasoline service stations. SAFETY: It is punishable by fine and/or imprisonment ◆ Refer service to...
...Turn off your land mobile radio applications. MODELS COVERED BY THIS MANUAL • TK-2140: VHF FM Transceiver • TK-3140: UHF FM Transceiver NOTICES TO THE USER ◆ Government law prohibits the operation of this easy-to-use transceiver will be pleased with the quality and features of unlicensed radio transmitters within the territories under government control. ◆ Illegal operation... operating at peak efficiency. KENWOOD transceivers incorporate the latest in gasoline service stations. SAFETY: It is punishable by fine and/or imprisonment ◆ Refer service to...
User Manual
Page 4
... 1 SUPPLIED ACCESSORIES 1 PREPARATION 2 BATTERY PACK PRECAUTIONS 2 INSTALLING/ REMOVING THE (OPTIONAL) RECHARGEABLE BATTERY PACK OR ALKALINE BATTERY CASE 7 INSTALLING/ REMOVING ALKALINE BATTERIES 8 INSTALLING THE ANTENNA 9 INSTALLING THE BELT CLIP 9 INSTALLING THE COVER OVER THE UNIVERSAL CONNECTOR 10 INSTALLING THE (OPTIONAL KMC-25) SPEAKER/ MICROPHONE 10 GETTING ACQUAINTED 11 DISPLAY 14 PROGRAMMABLE AUXILIARY FUNCTIONS 15 OPERATING BASICS 17 SWITCHING POWER ON/ OFF 17 ADJUSTING THE VOLUME 17 SELECTING A GROUP/ CHANNEL 17 MAKING A CALL 18 RECEIVING A CALL 18 TIME...
... 1 SUPPLIED ACCESSORIES 1 PREPARATION 2 BATTERY PACK PRECAUTIONS 2 INSTALLING/ REMOVING THE (OPTIONAL) RECHARGEABLE BATTERY PACK OR ALKALINE BATTERY CASE 7 INSTALLING/ REMOVING ALKALINE BATTERIES 8 INSTALLING THE ANTENNA 9 INSTALLING THE BELT CLIP 9 INSTALLING THE COVER OVER THE UNIVERSAL CONNECTOR 10 INSTALLING THE (OPTIONAL KMC-25) SPEAKER/ MICROPHONE 10 GETTING ACQUAINTED 11 DISPLAY 14 PROGRAMMABLE AUXILIARY FUNCTIONS 15 OPERATING BASICS 17 SWITCHING POWER ON/ OFF 17 ADJUSTING THE VOLUME 17 SELECTING A GROUP/ CHANNEL 17 MAKING A CALL 18 RECEIVING A CALL 18 TIME...

User Manual
Page 5
... that you identify the items listed in the following unpacking instructions are missing or have been damaged during shipment, file a claim with the carrier immediately. If any items are for use by your KENWOOD dealer, an authorized KENWOOD service facility, or the factory. SUPPLIED ACCESSORIES Item TK-2140 E Antenna TK-3140 E TK-3140 E3 Belt clip Universal connector cap Dressed screw Instruction manual Part Number Quantity T90-0795-XX T90...
... that you identify the items listed in the following unpacking instructions are missing or have been damaged during shipment, file a claim with the carrier immediately. If any items are for use by your KENWOOD dealer, an authorized KENWOOD service facility, or the factory. SUPPLIED ACCESSORIES Item TK-2140 E Antenna TK-3140 E TK-3140 E3 Belt clip Universal connector cap Dressed screw Instruction manual Part Number Quantity T90-0795-XX T90...

User Manual
Page 10
... near heating appliances. • When the battery pack operating time becomes short, even if it is charged and discharged in hotter areas. For charging procedures, refer to the KSC-25 Instruction Manual. 6 Once in place, the battery pack will momentarily light red. ■ Characteristics of the Li-ion Battery Pack • As the battery pack is charged and discharged repeatedly...
... near heating appliances. • When the battery pack operating time becomes short, even if it is charged and discharged in hotter areas. For charging procedures, refer to the KSC-25 Instruction Manual. 6 Once in place, the battery pack will momentarily light red. ■ Characteristics of the Li-ion Battery Pack • As the battery pack is charged and discharged repeatedly...

User Manual
Page 11
... the battery pack safety catch, use a piece of the transceiver, then firmly press the battery pack to lock it in place. 2 Flip the safety catch into place to the transceiver, ensure that is firmly closed. ◆ While operating the transceiver using a Li-ion or Ni-MH battery pack ...a screwdriver, that the safety catch is no more than 6 mm wide and 1 mm thick. INSTALLING/ REMOVING THE (OPTIONAL) RECHARGEABLE BATTERY PACK OR ALKALINE BATTERY CASE 1 Match the guides of the battery pack with an ambient temperature of -10°C/ +14°F and lower, operating time may be shortened. 7
... the battery pack safety catch, use a piece of the transceiver, then firmly press the battery pack to lock it in place. 2 Flip the safety catch into place to the transceiver, ensure that is firmly closed. ◆ While operating the transceiver using a Li-ion or Ni-MH battery pack ...a screwdriver, that the safety catch is no more than 6 mm wide and 1 mm thick. INSTALLING/ REMOVING THE (OPTIONAL) RECHARGEABLE BATTERY PACK OR ALKALINE BATTERY CASE 1 Match the guides of the battery pack with an ambient temperature of -10°C/ +14°F and lower, operating time may be shortened. 7
User Manual
Page 12
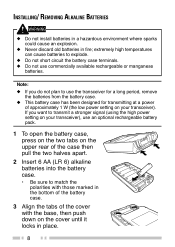
... signal (using the high power setting on your transceiver). INSTALLING/ REMOVING ALKALINE BATTERIES ◆ Do not install batteries in a hazardous environment where sparks could cause an explosion. ◆ Never discard old batteries in place. 8 extremely high temperatures can cause batteries to explode. ◆ Do not short circuit the battery case terminals. ◆ Do not use an optional rechargeable battery pack. 1 To open the battery...
... signal (using the high power setting on your transceiver). INSTALLING/ REMOVING ALKALINE BATTERIES ◆ Do not install batteries in a hazardous environment where sparks could cause an explosion. ◆ Never discard old batteries in place. 8 extremely high temperatures can cause batteries to explode. ◆ Do not short circuit the battery case terminals. ◆ Do not use an optional rechargeable battery pack. 1 To open the battery...
User Manual
Page 15
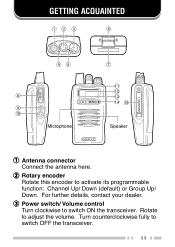
GETTING ACQUAINTED 12 3 6 45 8 9 10 Microphone 7 11 12 13 14 15 Speaker q Antenna connector Connect the antenna here. Rotate to activate its programmable function: Channel Up/ Down (default) or Group Up/ Down. For further details, contact your dealer. w Rotary encoder Rotate this encoder to adjust the volume. e Power switch/ Volume control Turn clockwise to switch OFF the transceiver. 11 Turn counterclockwise fully to switch ON the transceiver.
GETTING ACQUAINTED 12 3 6 45 8 9 10 Microphone 7 11 12 13 14 15 Speaker q Antenna connector Connect the antenna here. Rotate to activate its programmable function: Channel Up/ Down (default) or Group Up/ Down. For further details, contact your dealer. w Rotary encoder Rotate this encoder to adjust the volume. e Power switch/ Volume control Turn clockwise to switch OFF the transceiver. 11 Turn counterclockwise fully to switch ON the transceiver.

User Manual
Page 16
... LED flashes red during transmission and green while receiving a signal. The default setting of this switch, then speak into the microphone to release the battery pack. u Battery pack release latch Press this time. Replace or recharge the battery pack at any time after the LED has started to prevent accidentally pressing the battery pack release latch. This key has no default setting. If programmed by your dealer, when the battery pack power...
... LED flashes red during transmission and green while receiving a signal. The default setting of this switch, then speak into the microphone to release the battery pack. u Battery pack release latch Press this time. Replace or recharge the battery pack at any time after the LED has started to prevent accidentally pressing the battery pack release latch. This key has no default setting. If programmed by your dealer, when the battery pack power...
User Manual
Page 17
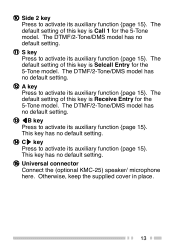
... 15}. The DTMF/2-Tone/DMS model has no default setting. !4 Cs key Press to activate its auxiliary function {page 15}. The default setting of this key is Call 1 for the 5-Tone model. The default setting of this key is Receive Entry for the 5-Tone model. Otherwise, keep the supplied cover in place. 13 The DTMF/2-Tone/DMS model has no default setting. !5 Universal connector Connect the (optional KMC-25) speaker/ microphone here.
... 15}. The DTMF/2-Tone/DMS model has no default setting. !4 Cs key Press to activate its auxiliary function {page 15}. The default setting of this key is Call 1 for the 5-Tone model. The default setting of this key is Receive Entry for the 5-Tone model. Otherwise, keep the supplied cover in place. 13 The DTMF/2-Tone/DMS model has no default setting. !5 Universal connector Connect the (optional KMC-25) speaker/ microphone here.

User Manual
Page 18
... when performing Scan. Appears when the key programmed as Monitor is used on this transceiver. The battery indicator ranges from full ( ) to display the approximate level of battery power remaining. Note: When using DMS. The left most segment is not used as various dealer programmable settings. Flashes when you receive a new message. This icon is used on this transceiver. Appears when the Priority Channel is not used for...
... when performing Scan. Appears when the key programmed as Monitor is used on this transceiver. The battery indicator ranges from full ( ) to display the approximate level of battery power remaining. Note: When using DMS. The left most segment is not used as various dealer programmable settings. Flashes when you receive a new message. This icon is used on this transceiver. Appears when the Priority Channel is not used for...

User Manual
Page 20
...Power Monitor Monitor Momentary None Operator Selectable Tone Queue Radio Password Receive Entry Scan Scan Delete/Add Selcall Entry Selcall List Selcall + Status Entry Selcall + Status List Shift Single Tone (1750 Hz) Single Tone (2135 Hz) Squelch Level Squelch Momentary Squelch Off Status Entry Status List Talk Around DTMF/2-Tone/ DMS Model... key for more than 1 second. 2 These functions can be programmed only on key w, the encoder. 3 This function can be programmed only on key t, the Auxiliary (orange) key, and on the programmable function key of the optional KMC-25 speaker/ microphone....
...Power Monitor Monitor Momentary None Operator Selectable Tone Queue Radio Password Receive Entry Scan Scan Delete/Add Selcall Entry Selcall List Selcall + Status Entry Selcall + Status List Shift Single Tone (1750 Hz) Single Tone (2135 Hz) Squelch Level Squelch Momentary Squelch Off Status Entry Status List Talk Around DTMF/2-Tone/ DMS Model... key for more than 1 second. 2 These functions can be programmed only on key w, the encoder. 3 This function can be programmed only on key t, the Auxiliary (orange) key, and on the programmable function key of the optional KMC-25 speaker/ microphone....
User Manual
Page 21
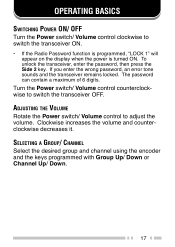
OPERATING BASICS SWITCHING POWER ON/ OFF Turn the Power switch/ Volume control clockwise to switch the transceiver OFF. The password can contain a maximum of 6 digits. Turn the Power switch/ Volume control counterclockwise to switch the transceiver ON. • If the Radio Password function is programmed, "LOCK 1" will appear on the display when the power is turned ON. SELECTING A GROUP/ CHANNEL Select the desired group and channel using the encoder and the keys programmed with Group Up/ Down or Channel Up/ Down...
OPERATING BASICS SWITCHING POWER ON/ OFF Turn the Power switch/ Volume control clockwise to switch the transceiver OFF. The password can contain a maximum of 6 digits. Turn the Power switch/ Volume control counterclockwise to switch the transceiver ON. • If the Radio Password function is programmed, "LOCK 1" will appear on the display when the power is turned ON. SELECTING A GROUP/ CHANNEL Select the desired group and channel using the encoder and the keys programmed with Group Up/ Down or Channel Up/ Down...

User Manual
Page 22
... best sound quality at the receiving station, hold the PTT switch and speak into the microphone. The default setting is to prevent any caller from your mouth. Your dealer can switch it becomes free. 3 Press and hold the microphone approximately 3 ~ 4 cm (1.5 inches) from using a channel for a period of the Time-out Timer is 60 seconds. 18 RECEIVING A CALL 1 Select the desired group and channel. (If the Scan...
... best sound quality at the receiving station, hold the PTT switch and speak into the microphone. The default setting is to prevent any caller from your mouth. Your dealer can switch it becomes free. 3 Press and hold the microphone approximately 3 ~ 4 cm (1.5 inches) from using a channel for a period of the Time-out Timer is 60 seconds. 18 RECEIVING A CALL 1 Select the desired group and channel. (If the Scan...
User Manual
Page 23
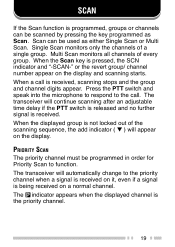
... SCAN The priority channel must be scanned by pressing the key programmed as either Single Scan or Multi Scan. SCAN If the Scan function is received, scanning stops and the group and channel digits appear. Single Scan monitors only the channels of every group. When the displayed group is received. The transceiver will continue scanning after an adjustable time delay if the PTT switch is released and no further signal is not locked...
... SCAN The priority channel must be scanned by pressing the key programmed as either Single Scan or Multi Scan. SCAN If the Scan function is received, scanning stops and the group and channel digits appear. Single Scan monitors only the channels of every group. When the displayed group is received. The transceiver will continue scanning after an adjustable time delay if the PTT switch is released and no further signal is not locked...

User Manual
Page 24
... is assigned as the new revert channel. SCAN REVERT You can be locked out of the scan sequence manually. The transceiver "talks back" on the current receive channel. • Priority: If your dealer has programmed a Priority channel, this channel is programmed with Scan Del/Add, each channel can select a revert channel using the Channel keys (or encoder). SCAN LOCKOUT If a programmable auxiliary key is the revert channel. The transceiver "talks back...
... is assigned as the new revert channel. SCAN REVERT You can be locked out of the scan sequence manually. The transceiver "talks back" on the current receive channel. • Priority: If your dealer has programmed a Priority channel, this channel is programmed with Scan Del/Add, each channel can select a revert channel using the Channel keys (or encoder). SCAN LOCKOUT If a programmable auxiliary key is the revert channel. The transceiver "talks back...

User Manual
Page 25
... sound. When making a call . After a correct 2-Tone signal is received. 21 Transpond does not function when you are called you will cancel the connection. If your dealer programmed Call Alert for 2-Tone Signalling, your signalling reset code. When you will automatically send an acknowledgment signal to the station that called as Monitor will be able to those set up in the transceiver. Squelch...
... sound. When making a call . After a correct 2-Tone signal is received. 21 Transpond does not function when you are called you will cancel the connection. If your dealer programmed Call Alert for 2-Tone Signalling, your signalling reset code. When you will automatically send an acknowledgment signal to the station that called as Monitor will be able to those set up in the transceiver. Squelch...

User Manual
Page 27
... on dealer programming. When you enter Selcall Mode after receiving a selcall, the transceiver does not enter Status Mode. 2 Depending on how your transceiver, some of which depend on your dealer programmed the transceiver, the transceiver may exit Selcall Mode automatically (as shown in the diagram above. • Press the PTT switch to change the transceiver mode as shown by KENWOOD Corporation.
... on dealer programming. When you enter Selcall Mode after receiving a selcall, the transceiver does not enter Status Mode. 2 Depending on how your transceiver, some of which depend on your dealer programmed the transceiver, the transceiver may exit Selcall Mode automatically (as shown in the diagram above. • Press the PTT switch to change the transceiver mode as shown by KENWOOD Corporation.
User Manual
Page 28
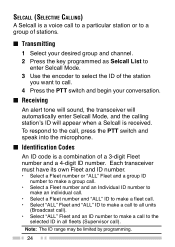
... channel. 2 Press the key programmed as Selcall List to enter Selcall Mode. 3 Use the encoder to select the ID of the station you want to call. 4 Press the PTT switch and begin your conversation. ■ Receiving An alert tone will sound, the transceiver will automatically enter Selcall Mode, and the calling station's ID will appear when a Selcall is a combination of a 3-digit Fleet number and a 4-digit...
... channel. 2 Press the key programmed as Selcall List to enter Selcall Mode. 3 Use the encoder to select the ID of the station you want to call. 4 Press the PTT switch and begin your conversation. ■ Receiving An alert tone will sound, the transceiver will automatically enter Selcall Mode, and the calling station's ID will appear when a Selcall is a combination of a 3-digit Fleet number and a 4-digit...

User Manual
Page 29
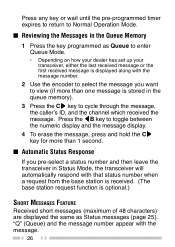
... ) lights when a message is received. If the queue memory is full, the oldest message will be erased when a new message is stored in the queue memory. STATUS MESSAGE You can send and receive 2-digit Status messages (10 ~ 79) which may be reviewed after ...power is turned OFF. ■ Transmitting 1 Select your desired group and channel. 2 Press the key programmed as Selcall + Status List to enter Selcall Mode. 3 Use the encoder to select the ID of 15 received messages can contain up to initiate the Status call. • "COMPLETE" is displayed when the call is received. • The display...
... ) lights when a message is received. If the queue memory is full, the oldest message will be erased when a new message is stored in the queue memory. STATUS MESSAGE You can send and receive 2-digit Status messages (10 ~ 79) which may be reviewed after ...power is turned OFF. ■ Transmitting 1 Select your desired group and channel. 2 Press the key programmed as Selcall + Status List to enter Selcall Mode. 3 Use the encoder to select the ID of 15 received messages can contain up to initiate the Status call. • "COMPLETE" is displayed when the call is received. • The display...
User Manual
Page 30
... message display. 4 To erase the message, press and hold the Cs key for more than one message is stored in the queue memory). 3 Press the Cs key to cycle through the message, the caller's ID, and the channel which received the message. Press any key or wait until the pre-programmed timer expires to return to Normal Operation Mode. ■ Reviewing...
... message display. 4 To erase the message, press and hold the Cs key for more than one message is stored in the queue memory). 3 Press the Cs key to cycle through the message, the caller's ID, and the channel which received the message. Press any key or wait until the pre-programmed timer expires to return to Normal Operation Mode. ■ Reviewing...


