Instruction Manual
Page 2
... iPod, Zune and USB device functions Cancel the Demonstration mode Listen to the audio via this unit Function Control Display Settings Illumination Color Selection Display Type Selection Text Display Selection Auxiliary Input Name Setting iPodl Zunel USB device... Accessory) control 28 Basic Operation Category and Channel Search Preset Memory Preset Tuning Channel Scan 15 Appendix 29 Accessories 32 Installation Procedure 33 16 Connecting Wires to Terminals 34 Installation 36 17 Installation for Hideaway Unit Troubleshooting Guide 40 Specifications 42 19 I 2 KOS-A300
... iPod, Zune and USB device functions Cancel the Demonstration mode Listen to the audio via this unit Function Control Display Settings Illumination Color Selection Display Type Selection Text Display Selection Auxiliary Input Name Setting iPodl Zunel USB device... Accessory) control 28 Basic Operation Category and Channel Search Preset Memory Preset Tuning Channel Scan 15 Appendix 29 Accessories 32 Installation Procedure 33 16 Connecting Wires to Terminals 34 Installation 36 17 Installation for Hideaway Unit Troubleshooting Guide 40 Specifications 42 19 I 2 KOS-A300
Instruction Manual
Page 3
...alcohol may scratch the surface or erase printed characters. • If you experience problems during installation, consult your Kenwood dealer. • When you purchase optional accessories, check with your Kenwood dealer to make sure that they work with your area. • Characters that conform to ISO 8859-1 ... cleaner, then wipe it with a clean soft dry cloth. ~ • Applying spray cleaner directly to explain more clearly how the controls are used. Wiping the faceplate with a hard cloth or using this unit is initially set on the display may affect its mechanical parts.
...alcohol may scratch the surface or erase printed characters. • If you experience problems during installation, consult your Kenwood dealer. • When you purchase optional accessories, check with your Kenwood dealer to make sure that they work with your area. • Characters that conform to ISO 8859-1 ... cleaner, then wipe it with a clean soft dry cloth. ~ • Applying spray cleaner directly to explain more clearly how the controls are used. Wiping the faceplate with a hard cloth or using this unit is initially set on the display may affect its mechanical parts.
Instruction Manual
Page 10
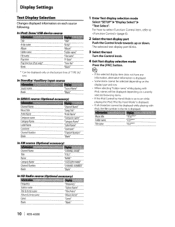
... _"TI.T:L:E NA- In HD Radio source (Optional accessory) Frequency "Frequency" Station name "Station Name" Title &Artist name "Title/Artist" Album &Artist name "Album/Artist" Genre - "Gen- re" - - - Blank "Blank" --'----- 10 I KOS-A300 Display Settings Text Display Selection Changes displayed information on the... Blank 1 Enter Text display selection mode > > Select "SETUP" "Display Select" "Text Select'~ For how to select Function Control item, refer to on the display type and row. • When selecting "Folder name" while playing with iPod, the file...
... _"TI.T:L:E NA- In HD Radio source (Optional accessory) Frequency "Frequency" Station name "Station Name" Title &Artist name "Title/Artist" Album &Artist name "Album/Artist" Genre - "Gen- re" - - - Blank "Blank" --'----- 10 I KOS-A300 Display Settings Text Display Selection Changes displayed information on the... Blank 1 Enter Text display selection mode > > Select "SETUP" "Display Select" "Text Select'~ For how to select Function Control item, refer to on the display type and row. • When selecting "Folder name" while playing with iPod, the file...
Instruction Manual
Page 17
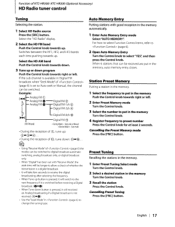
... entry closes. If the sub channel is available in Digital FM broadcast when "Seek Mode" of KTC-HR300/ KTC-HR200 (Optional Accessory) HD Radio tuner control Tuning Selecting the station. 1 Select HD Radio source Press the [SRC] button. Auto Memory Entry Putting stations with "Receive Mode';...is pressed, it will received an Analog broadcasting if a Digital broadcast is set with good reception in the memory Turn the Control knob. 3 Recall the station Press the Control knob. English I --------Digital FM @ (HD FM band) :Aura seek or Manual :Aura mode • During the...
... entry closes. If the sub channel is available in Digital FM broadcast when "Seek Mode" of KTC-HR300/ KTC-HR200 (Optional Accessory) HD Radio tuner control Tuning Selecting the station. 1 Select HD Radio source Press the [SRC] button. Auto Memory Entry Putting stations with "Receive Mode';...is pressed, it will received an Analog broadcasting if a Digital broadcast is set with good reception in the memory Turn the Control knob. 3 Recall the station Press the Control knob. English I --------Digital FM @ (HD FM band) :Aura seek or Manual :Aura mode • During the...

Instruction Manual
Page 18
... tag is transferred to the connected iPod. • The memory usage can be checked by selecting "MENU" > "Tag Memory" of (page 6). 18 I KOS-A300 When iPod is connected, the TAG information registered to this unit. The song's information will then be registered. The saved songs will be indicated on... while a tag is stored to your computer. "Tag Transfer" is indicated on this unit. Function of KTC-HR300/ KTC-HR200 (Optional Accessory) HD Radio tuner control Function of KTC-HR300 HD Radio Tagging (iTunes Tagging) Using an iTunes Tagging enabled HD Radio you only have to press the...
... tag is transferred to the connected iPod. • The memory usage can be checked by selecting "MENU" > "Tag Memory" of (page 6). 18 I KOS-A300 When iPod is connected, the TAG information registered to this unit. The song's information will then be registered. The saved songs will be indicated on... while a tag is stored to your computer. "Tag Transfer" is indicated on this unit. Function of KTC-HR300/ KTC-HR200 (Optional Accessory) HD Radio tuner control Function of KTC-HR300 HD Radio Tagging (iTunes Tagging) Using an iTunes Tagging enabled HD Radio you only have to press the...
Instruction Manual
Page 19
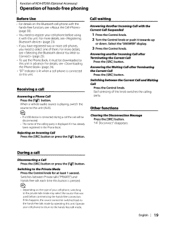
...the Current Call Suspended 1 Press the Control knob. 2 Turn the Control knob or push it has already been registered in advance. Receiving a call Disconnecting a Call Press the [SRCl button or press the [((~] button. Function of KCA-8T200 (Optional Accessory) Operation of hands-free phoning Before...• If a USB device is playing, switch the source to this unit in the Phone Book. Select the "ANSWER" display. 3 Press the Control knob. English I 19 When a vehicle audio source is connected during a call the call will be downloaded to this unit. For details, see (...
...the Current Call Suspended 1 Press the Control knob. 2 Turn the Control knob or push it has already been registered in advance. Receiving a call Disconnecting a Call Press the [SRCl button or press the [((~] button. Function of KCA-8T200 (Optional Accessory) Operation of hands-free phoning Before...• If a USB device is playing, switch the source to this unit in the Phone Book. Select the "ANSWER" display. 3 Press the Control knob. English I 19 When a vehicle audio source is connected during a call the call will be downloaded to this unit. For details, see (...
Instruction Manual
Page 20
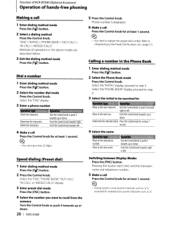
... the Phone Book mode Press the Control knob. Select the "DIAL" display. 3 Enter a phone number Select the characters Turn the Control knob or push it towards up or down . 20 I KOS-A300 Switching between name and telephone number. 5 Make a call Press the Control knob for at least 1 second....Speed dialing (Preset dial) 1 Enter dialing method mode Press the [Ui'l button. 2 Press the Control knob. Function of KCA-BT200 (Optional Accessory) Operation of hands-free phoning Making a call Press the Control knob for at least 1 second. ~ • During search, a non-accent character such as...
... the Phone Book mode Press the Control knob. Select the "DIAL" display. 3 Enter a phone number Select the characters Turn the Control knob or push it towards up or down . 20 I KOS-A300 Switching between name and telephone number. 5 Make a call Press the Control knob for at least 1 second....Speed dialing (Preset dial) 1 Enter dialing method mode Press the [Ui'l button. 2 Press the Control knob. Function of KCA-BT200 (Optional Accessory) Operation of hands-free phoning Making a call Press the Control knob for at least 1 second. ~ • During search, a non-accent character such as...
Instruction Manual
Page 22
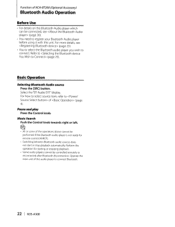
... towards right or left. ~ All or some of the operations above cannot be controlled remotely or reconnected after Bluetooth disconnection. For how to select source item, refer to connect Bluetooth. 22 I KOS-A300 Operate the main unit of the audio player to of (page 4). Refer to (page... if the Bluetooth audio player is not ready for remote control (AVRCP). Select the "BT Audio EXT" display. Switching between Bluetooth audio sources does not start or stop playback automatically. Function of KCA-BT200 (Optional Accessory) Bluetooth Audio Operation Before Use • For details on...
... towards right or left. ~ All or some of the operations above cannot be controlled remotely or reconnected after Bluetooth disconnection. For how to select source item, refer to connect Bluetooth. 22 I KOS-A300 Operate the main unit of the audio player to of (page 4). Refer to (page... if the Bluetooth audio player is not ready for remote control (AVRCP). Select the "BT Audio EXT" display. Switching between Bluetooth audio sources does not start or stop playback automatically. Function of KCA-BT200 (Optional Accessory) Bluetooth Audio Operation Before Use • For details on...
Instruction Manual
Page 23
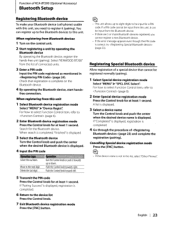
... eight digits to be input for a PIN code. Select "KENWOOD BT200" from this unit. If the error message appears even though the PIN code is displayed. A list is displayed. 3 Select a device name Turn the Control knob and push the center when the desired device name is ... Special Bluetooth device Allow registration of a special device that registration is completed. 6 Return to the next digit. Function of KCA-BT200 (Optional Accessory) Bluetooth Setup Registering Bluetooth device To make your Bluetooth device (cell-phone) usable with this unit • This unit allows up to five...
... eight digits to be input for a PIN code. Select "KENWOOD BT200" from this unit. If the error message appears even though the PIN code is displayed. A list is displayed. 3 Select a device name Turn the Control knob and push the center when the desired device name is ... Special Bluetooth device Allow registration of a special device that registration is completed. 6 Return to the next digit. Function of KCA-BT200 (Optional Accessory) Bluetooth Setup Registering Bluetooth device To make your Bluetooth device (cell-phone) usable with this unit • This unit allows up to five...
Instruction Manual
Page 24
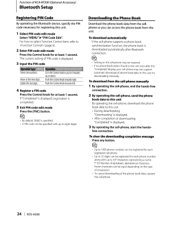
.... 4 Register a PIN code Press the Control knob for at least 1 second. To dear the downloading completion message Press any button. G-. ~ • Setting on the type of characters.) • To cancel downloading of the phone book data, operate the cell-phone. 24 I KOS-A300 Function of KCA-BT200 (Optional Accessory) Bluetooth Setup Registering PIN Code...
.... 4 Register a PIN code Press the Control knob for at least 1 second. To dear the downloading completion message Press any button. G-. ~ • Setting on the type of characters.) • To cancel downloading of the phone book data, operate the cell-phone. 24 I KOS-A300 Function of KCA-BT200 (Optional Accessory) Bluetooth Setup Registering PIN Code...
Instruction Manual
Page 26
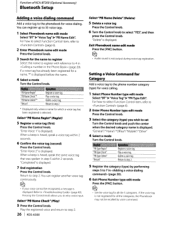
...to step 2. 26 I KOS-A300 Select liPS Name De/ete" (Delete) 5 Delete a voice tag Press the Control knob. 6 Turn the Control knob to select "YES'~ and then press the Control knob. "General"/ "Home"/ "Office"/ "Mobile"/ "Other" - - - - 4 Select a mode Turn the Control knob. Exit Phonebook name edit.... Pressing the Control knob allows you wish to set Turn the Control knob and push the center when the desired category name is not output during voice tag registration. "Enter Voice 1" is displayed. "Delete" is displayed. Function of KCA-BT200 (Optional Accessory) Bluetooth Setup ...
...to step 2. 26 I KOS-A300 Select liPS Name De/ete" (Delete) 5 Delete a voice tag Press the Control knob. 6 Turn the Control knob to select "YES'~ and then press the Control knob. "General"/ "Home"/ "Office"/ "Mobile"/ "Other" - - - - 4 Select a mode Turn the Control knob. Exit Phonebook name edit.... Pressing the Control knob allows you wish to set Turn the Control knob and push the center when the desired category name is not output during voice tag registration. "Enter Voice 1" is displayed. "Delete" is displayed. Function of KCA-BT200 (Optional Accessory) Bluetooth Setup ...
Instruction Manual
Page 28
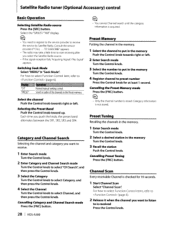
...Scan Every receivable Channel is checked for at least 1 second. "CH" "PRESET" Select the channel Push the Control knob towards right or left . Satellite Radio tuner (Optional Accessory) control Basic Operation Selecting Satellite Radio source Press the [SRC] button. Selecting the Preset Band Push the...select the Satellite Radio source. • If the signal reception fails, "Acquiring Aignal"I KOS-A300 Q ~ • You cannot Channel search until the category information is received Press the Control knob. Preset Tuning Recalling the channels in the memory. 1 Enter Search mode Turn the...
...Scan Every receivable Channel is checked for at least 1 second. "CH" "PRESET" Select the channel Push the Control knob towards right or left . Satellite Radio tuner (Optional Accessory) control Basic Operation Selecting Satellite Radio source Press the [SRC] button. Selecting the Preset Band Push the...select the Satellite Radio source. • If the signal reception fails, "Acquiring Aignal"I KOS-A300 Q ~ • You cannot Channel search until the category information is received Press the Control knob. Preset Tuning Recalling the channels in the memory. 1 Enter Search mode Turn the...
Instruction Manual
Page 29
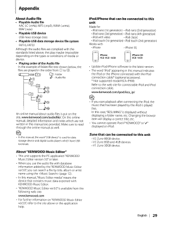
... Editor. • "KENWOOD Music Editor ver3.0" is used for connectable iPod and iPod connection cable. Refer to the site above , the play maybe impossible depending on the types or conditions of media or device. • Playing order of the Audio file In the example ...~ • In this online manual, detailed information and notes which have USB terminals. Zune that contains music data exported with the iPod connection cable* (optional accessory). * Not supported model KCA-iPSOO. Make sure to @. _-.---,USB (OJ) J>CD CJ :Folder .,p :Audio file OJ L-OJr-J>® GJ LJ>@ t=J>@...
... Editor. • "KENWOOD Music Editor ver3.0" is used for connectable iPod and iPod connection cable. Refer to the site above , the play maybe impossible depending on the types or conditions of media or device. • Playing order of the Audio file In the example ...~ • In this online manual, detailed information and notes which have USB terminals. Zune that contains music data exported with the iPod connection cable* (optional accessory). * Not supported model KCA-iPSOO. Make sure to @. _-.---,USB (OJ) J>CD CJ :Folder .,p :Audio file OJ L-OJr-J>® GJ LJ>@ t=J>@...
Instruction Manual
Page 30
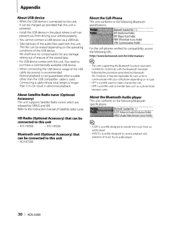
... playback. About Satellite Radio tuner (Optional Accessory) This unit supports Satellite Radio tuners which are released by an audio player. 30 I KOS-A300 However, it may be impossible for conformity... Bluetooth specifications: Bluetooth Standard Ver. 1.2 A2DP (Advanced Audio Distribution Profile) AVRCP AudiolVideo Remote Control Profile ~ ~ • A2DP is a profile designed to transfer the music from driving ... the Bluetooth Audio player This unit conforms to the following URL: http://www.kenwood.com/bt/information/ @2 • The units supporting the Bluetooth function have no...
... playback. About Satellite Radio tuner (Optional Accessory) This unit supports Satellite Radio tuners which are released by an audio player. 30 I KOS-A300 However, it may be impossible for conformity... Bluetooth specifications: Bluetooth Standard Ver. 1.2 A2DP (Advanced Audio Distribution Profile) AVRCP AudiolVideo Remote Control Profile ~ ~ • A2DP is a profile designed to transfer the music from driving ... the Bluetooth Audio player This unit conforms to the following URL: http://www.kenwood.com/bt/information/ @2 • The units supporting the Bluetooth function have no...
Instruction Manual
Page 34
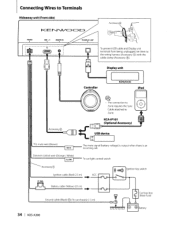
l=== To car light control switch ------ Accessory(D (7.SA) Ignition cable (Red) (2.5 m) ACC ,...----, "'-~I ~1--1:f-~--------lf------0-t:~-!--------D-----~ @;d) To prevent USB cable and Display unit terminals from being unplugged. o0 o Display unit Controller ( ) KENWOOD iPod D • The connection to Zune requires the Sync Cable attached to Terminals Hideaway unit (Front side) PlMIER • • USB 1/ F • REMllTlO IN II 0----------~ I -- ...
l=== To car light control switch ------ Accessory(D (7.SA) Ignition cable (Red) (2.5 m) ACC ,...----, "'-~I ~1--1:f-~--------lf------0-t:~-!--------D-----~ @;d) To prevent USB cable and Display unit terminals from being unplugged. o0 o Display unit Controller ( ) KENWOOD iPod D • The connection to Zune requires the Sync Cable attached to Terminals Hideaway unit (Front side) PlMIER • • USB 1/ F • REMllTlO IN II 0----------~ I -- ...
Instruction Manual
Page 35
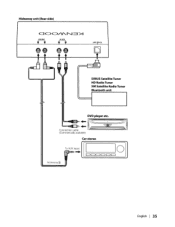
SIRIUS Satellite Tuner HD Radio Tuner XM Satellite Radio Tuner Bluetooth unit DVD player etc. ~::~f ~ Connection cable (Commercially available) Car stereo =;]1 Accessory@) English I ......---II~-t-t-- Hideaway unit (Rear side) • • ,l.I.l.0.3--N-I-1-, • • ,.N...lx--m--,-, @@ @@ I 35
SIRIUS Satellite Tuner HD Radio Tuner XM Satellite Radio Tuner Bluetooth unit DVD player etc. ~::~f ~ Connection cable (Commercially available) Car stereo =;]1 Accessory@) English I ......---II~-t-t-- Hideaway unit (Rear side) • • ,l.I.l.0.3--N-I-1-, • • ,.N...lx--m--,-, @@ @@ I 35
Instruction Manual
Page 36
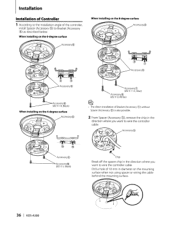
... wiring the cable behind the mounting surface. 36 I KOS-A300 Chip Break off the spacer chip in the direction where you want to Bracket (Accessory @) as described below. Accessory@ ~ ~""- Drill a hole of 10 mm in diameter on the 4-degree surface ~ .~ @) @) Accessory@ AcceSSOry@) (02 X 5, Black) ~ AccessoryCf) (02 X 11.5, Blue) Accessory@ (02 X 9, White) ~ ~ • The direct installation of Bracket...
... wiring the cable behind the mounting surface. 36 I KOS-A300 Chip Break off the spacer chip in the direction where you want to Bracket (Accessory @) as described below. Accessory@ ~ ~""- Drill a hole of 10 mm in diameter on the 4-degree surface ~ .~ @) @) Accessory@ AcceSSOry@) (02 X 5, Black) ~ AccessoryCf) (02 X 11.5, Blue) Accessory@ (02 X 9, White) ~ ~ • The direct installation of Bracket...
Instruction Manual
Page 37
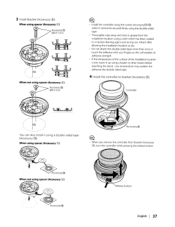
... the installation location using the double-sided tape. • Thoroughly wipe away and dust or grease from bracket (Accessory @), turn the controller while pressing the release button. Do not attach the double-sided tape more than once or touch the adhesive with your fingers as this will ...
... the installation location using the double-sided tape. • Thoroughly wipe away and dust or grease from bracket (Accessory @), turn the controller while pressing the release button. Do not attach the double-sided tape more than once or touch the adhesive with your fingers as this will ...
Instruction Manual
Page 38
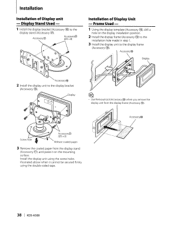
Install the display unit using the double-sided tape. 38 I KOS-A300 Frame Used - 1 Using the display template (Accessory @), drill a hole on the mounting surface. Q.. ~ • Use Removal tool (Accessory @) when you remove the display unit from the display stand (Accessory @), and paste it cannot be secured firmly using the screw holes illustrated above when it...
Install the display unit using the double-sided tape. 38 I KOS-A300 Frame Used - 1 Using the display template (Accessory @), drill a hole on the mounting surface. Q.. ~ • Use Removal tool (Accessory @) when you remove the display unit from the display stand (Accessory @), and paste it cannot be secured firmly using the screw holes illustrated above when it...
Instruction Manual
Page 39
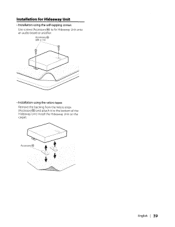
Installation for Hideaway Unit • Installation using the velcro tapes Remove the backing from the Velcro strips (Accessory@) and attach it to fix Hideaway Unit onto an audio board or another. English I 39 Install the Hideaway Unit on the carpet. Accessory@ (04 x 16) • Installation using the self-tapping screws Use screws (Accessory@) to the bottom of the Hideaway Unit.
Installation for Hideaway Unit • Installation using the velcro tapes Remove the backing from the Velcro strips (Accessory@) and attach it to fix Hideaway Unit onto an audio board or another. English I 39 Install the Hideaway Unit on the carpet. Accessory@ (04 x 16) • Installation using the self-tapping screws Use screws (Accessory@) to the bottom of the Hideaway Unit.


