

Instruction Manual
Page 2
...of explosion if replaced incorrectly. The remote control supplied with the antenna control wire connected (page 17). If the battery compartment does not close securely, stop using this product. CONTENTS BEFORE USE 2 BASICS 3 GETTING STARTED 4 1 Select the display language and cancel the demonstration 2 Set the clock and date 3 Set the initial settings RADIO 6 USB/ANDROID 8 AUX 9 AUDIO SETTINGS 10 DISPLAY SETTINGS 12 REFERENCES 12 Maintenance More information TROUBLESHOOTING 13 INSTALLATION/ CONNECTION 15 SPECIFICATIONS 18 BEFORE USE IMPORTANT •...
...of explosion if replaced incorrectly. The remote control supplied with the antenna control wire connected (page 17). If the battery compartment does not close securely, stop using this product. CONTENTS BEFORE USE 2 BASICS 3 GETTING STARTED 4 1 Select the display language and cancel the demonstration 2 Set the clock and date 3 Set the initial settings RADIO 6 USB/ANDROID 8 AUX 9 AUDIO SETTINGS 10 DISPLAY SETTINGS 12 REFERENCES 12 Maintenance More information TROUBLESHOOTING 13 INSTALLATION/ CONNECTION 15 SPECIFICATIONS 18 BEFORE USE IMPORTANT •...

Instruction Manual
Page 3
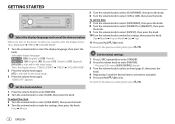
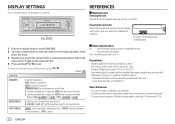
... DISP repeatedly. (Page 13) On the remote control Press and hold SRC to turn on the power Adjust the volume Select a source Change the display information How to reset Your preset adjustments will be erased except stored radio stations. * Not used How to cancel. Turn the volume knob. Press ATT during playback to attenuate the sound. • Press again to replace the battery Pull out the insulation sheet when using for the first time.
... DISP repeatedly. (Page 13) On the remote control Press and hold SRC to turn on the power Adjust the volume Select a source Change the display information How to reset Your preset adjustments will be erased except stored radio stations. * Not used How to cancel. Turn the volume knob. Press ATT during playback to attenuate the sound. • Press again to replace the battery Pull out the insulation sheet when using for the first time.
Instruction Manual
Page 4
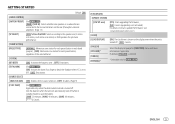
... enters [AUDIO CONTROL] directly. 3 Turn the volume knob to select an item (page 5), then press the knob. 4 Repeat step 3 until the desired item is selected or activated. 5 Press and hold to exit. GETTING STARTED 1 Select the display language and cancel the demonstration When you turn on the power (or after you reset the unit), the display shows: "SEL LANGUAGE" "PRESS" "VOLUME KNOB" 1 Turn the volume knob to select [CLOCK], then...
... enters [AUDIO CONTROL] directly. 3 Turn the volume knob to select an item (page 5), then press the knob. 4 Repeat step 3 until the desired item is selected or activated. 5 Press and hold to exit. GETTING STARTED 1 Select the display language and cancel the demonstration When you turn on the power (or after you reset the unit), the display shows: "SEL LANGUAGE" "PRESS" "VOLUME KNOB" 1 Turn the volume knob to select [CLOCK], then...
Instruction Manual
Page 5
... AUX in standby mode) to save the battery. [20M]: 20 minutes ; [40M]: 40 minutes ; [60M]: 60 minutes ; [- - -]: Cancels [F/W UPDATE] [UPDATE SYSTEM] [F/W UP xxxx] [YES]: Starts upgrading the firmware. ; [NO]: Cancels (upgrading is selected. * Selectable only for [FUNCTION] menu and music information if applicable. GETTING STARTED Default: [XX] [AUDIO CONTROL] [SWITCH PREOUT] (For ) [REAR]/[SUB-W]: Selects whether rear speakers or a subwoofer are connected to the line out terminals on the display even when the unit is turned...
... AUX in standby mode) to save the battery. [20M]: 20 minutes ; [40M]: 40 minutes ; [60M]: 60 minutes ; [- - -]: Cancels [F/W UPDATE] [UPDATE SYSTEM] [F/W UP xxxx] [YES]: Starts upgrading the firmware. ; [NO]: Cancels (upgrading is selected. * Selectable only for [FUNCTION] menu and music information if applicable. GETTING STARTED Default: [XX] [AUDIO CONTROL] [SWITCH PREOUT] (For ) [REAR]/[SUB-W]: Selects whether rear speakers or a subwoofer are connected to the line out terminals on the display even when the unit is turned...
Instruction Manual
Page 6
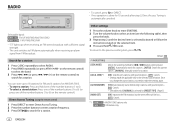
... instructions stated on the remote control) to FM alarm automatically when receiving an alarm signal from FM broadcast. Default: [XX] [TUNER SETTING] [SEEK MODE] [LOCAL SEEK]*1 Selects the searching method for S / T buttons when pressed. [AUTO1]: Automatically search for a station. ; [AUTO2]: Search for a preset station. ; [MANUAL]: Manually search for a station. [ON]: Searches only stations with sufficient signal strength. • The unit switches to search for a station. Once you change the source/station, you need...
... instructions stated on the remote control) to FM alarm automatically when receiving an alarm signal from FM broadcast. Default: [XX] [TUNER SETTING] [SEEK MODE] [LOCAL SEEK]*1 Selects the searching method for S / T buttons when pressed. [AUTO1]: Automatically search for a station. ; [AUTO2]: Search for a preset station. ; [MANUAL]: Manually search for a station. [ON]: Searches only stations with sufficient signal strength. • The unit switches to search for a station. Once you change the source/station, you need...

Instruction Manual
Page 7
... the knob. 2 Turn the volume knob to select the PTY language ([ENGLISH]/ [FRENCH]/[GERMAN]), then press the knob. 3 Press S / T to start searching. [CLOCK] [TIME SYNC] [ON]: Synchronizes the unit's time to the Radio Data System station time. ; [OFF]: Cancels. *2 : Default: [OFF] : Default: [ON] Available Program Type for the Program Type categorized under [SPEECH] or [MUSIC] if selected. • [MONO SET]/[NEWS SET]/[REGIONAL]/[AF SET]/[TI]/[PTY...
... the knob. 2 Turn the volume knob to select the PTY language ([ENGLISH]/ [FRENCH]/[GERMAN]), then press the knob. 3 Press S / T to start searching. [CLOCK] [TIME SYNC] [ON]: Synchronizes the unit's time to the Radio Data System station time. ; [OFF]: Cancels. *2 : Default: [OFF] : Default: [ON] Available Program Type for the Program Type categorized under [SPEECH] or [MUSIC] if selected. • [MONO SET]/[NEWS SET]/[REGIONAL]/[AF SET]/[TI]/[PTY...

Instruction Manual
Page 8
... player application installed in the Android device. *2 Do not leave the cable inside the car when not used. *3 Not applicable for ANDROID source. 8 ENGLISH USB input terminal USB CA-U1EX (max.: 500 mA) (optional accessory) ANDROID*1 USB cable*2 (commercially available) *1 You can control Android device using the remote control) 1 Press DIRECT. 2 Press the number buttons to enter a file number. 3 Press ENT IW to select [ALL RANDOM]. To Play back/pause Reverse/Fast-forward*3 Select...
... player application installed in the Android device. *2 Do not leave the cable inside the car when not used. *3 Not applicable for ANDROID source. 8 ENGLISH USB input terminal USB CA-U1EX (max.: 500 mA) (optional accessory) ANDROID*1 USB cable*2 (commercially available) *1 You can control Android device using the remote control) 1 Press DIRECT. 2 Press the number buttons to enter a file number. 3 Press ENT IW to select [ALL RANDOM]. To Play back/pause Reverse/Fast-forward*3 Select...

Instruction Manual
Page 9
... AUX] in USB source, press 5 repeatedly. Select music drive While in [SOURCE SELECT]. (Page 5) Start listening 1 Connect a portable audio player (commercially available). Set the AUX name While listening to a portable audio player connected to the unit... 1 Press the volume knob to enter [FUNCTION]. 2 Turn the volume knob to select [SYSTEM], then press the knob. 3 Turn the volume knob to select [AUX NAME SET], then press the knob. 4 Turn the volume knob to select an item, then press the knob. [AUX] (default)/[DVD...
... AUX] in USB source, press 5 repeatedly. Select music drive While in [SOURCE SELECT]. (Page 5) Start listening 1 Connect a portable audio player (commercially available). Set the AUX name While listening to a portable audio player connected to the unit... 1 Press the volume knob to enter [FUNCTION]. 2 Turn the volume knob to select [SYSTEM], then press the knob. 3 Turn the volume knob to select [AUX NAME SET], then press the knob. 4 Turn the volume knob to select an item, then press the knob. [AUX] (default)/[DVD...

Instruction Manual
Page 10
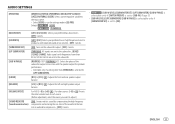
... source. (Before making an adjustment, select the source you want to adjust.) Default: : [+2]/[+1]/[+1] : [+8]/[+2]/[+3] [EQ PRO] Adjusts your own sound settings for each source. • The settings are stored to [USER] in [EQ PRO]. • [DRIVE EQ] is selected or activated. 4 Press and hold to exit. (or using the remote control) 1 Press AUD to enter [AUDIO CONTROL]. 2 Press J/K to the previous setting item, press . Other settings 1 Press AUD to enter [AUDIO CONTROL] directly. 2 Turn the volume knob to select...
... source. (Before making an adjustment, select the source you want to adjust.) Default: : [+2]/[+1]/[+1] : [+8]/[+2]/[+3] [EQ PRO] Adjusts your own sound settings for each source. • The settings are stored to [USER] in [EQ PRO]. • [DRIVE EQ] is selected or activated. 4 Press and hold to exit. (or using the remote control) 1 Press AUD to enter [AUDIO CONTROL]. 2 Press J/K to the previous setting item, press . Other settings 1 Press AUD to enter [AUDIO CONTROL] directly. 2 Turn the volume knob to select...
Instruction Manual
Page 11
... rear speaker output balance. [L15] to [ON]. Default: : [USER] : [POWERFUL] [BASS BOOST] [LOUDNESS] [SUBWOOFER SET] [LPF SUBWOOFER] [SUB-W PHASE] [FADER] [BALANCE] [VOLUME OFFSET] [SOUND RECNSTR] (Sound reconstruction) [LV1]/[LV2]/[LV3]: Selects your preferred bass boost level. ; [OFF]: Cancels. [LV1]/[LV2]: Selects your preferred low or high frequencies boost to produce a well-balanced sound at low volume. ; [OFF]: Cancels. [ON]: Turns on the subwoofer output. ; [OFF]: Cancels. [THROUGH]: All signals are sent to the subwoofer. ; [85HZ]/ [120HZ]/[160HZ]: Audio...
... rear speaker output balance. [L15] to [ON]. Default: : [USER] : [POWERFUL] [BASS BOOST] [LOUDNESS] [SUBWOOFER SET] [LPF SUBWOOFER] [SUB-W PHASE] [FADER] [BALANCE] [VOLUME OFFSET] [SOUND RECNSTR] (Sound reconstruction) [LV1]/[LV2]/[LV3]: Selects your preferred bass boost level. ; [OFF]: Cancels. [LV1]/[LV2]: Selects your preferred low or high frequencies boost to produce a well-balanced sound at low volume. ; [OFF]: Cancels. [ON]: Turns on the subwoofer output. ; [OFF]: Cancels. [THROUGH]: All signals are sent to the subwoofer. ; [85HZ]/ [120HZ]/[160HZ]: Audio...
Instruction Manual
Page 12
... connector Detach the faceplate and clean the connector gently with a cotton swab. To return to damage the connector. Latest firmware updates and latest compatible item list - Connector (on the reverse side of media or devices. • For detailed information and notes about the playable audio files, visit . Playable files • Playable audio file for brightness setting Maintenance Cleaning the unit Wipe off time. 1 Turn the volume...
... connector Detach the faceplate and clean the connector gently with a cotton swab. To return to damage the connector. Latest firmware updates and latest compatible item list - Connector (on the reverse side of media or devices. • For detailed information and notes about the playable audio files, visit . Playable files • Playable audio file for brightness setting Maintenance Cleaning the unit Wipe off time. 1 Turn the volume...
Instruction Manual
Page 13
... display language you press DISP, the display information changes. • If the information is determined by the order in which file name were recorded (USB). Check the [SOURCE SELECT] setting. (Page 5) Clean the connectors. (Page 12) Reset the unit. (Page 3) • This unit can only display uppercase letters, numbers, and a limited number of the speaker wires are not displayed. • Radio reception is not correct. "READING" keeps flashing. Turn the power...
... display language you press DISP, the display information changes. • If the information is determined by the order in which file name were recorded (USB). Check the [SOURCE SELECT] setting. (Page 5) Clean the connectors. (Page 12) Reset the unit. (Page 3) • This unit can only display uppercase letters, numbers, and a limited number of the speaker wires are not displayed. • Radio reception is not correct. "READING" keeps flashing. Turn the power...
Instruction Manual
Page 14
....) 14 ENGLISH "NO MUSIC"/"ANDROID ERROR" Remedy Make sure the media (USB) contain supported audio files. (Page 12) A copy-protected file is intermittent or sound skips. Connect a device (USB), and change the source to unit. (Page 13) • If USB connection does not work, connect the Android device through auxiliary input jack. • Reconnect the Android device. • If USB connection does not work, connect the Android device through auxiliary input jack. "NO DEVICE" or "READING" keeps flashing. Connect a device (USB) that contains playable...
....) 14 ENGLISH "NO MUSIC"/"ANDROID ERROR" Remedy Make sure the media (USB) contain supported audio files. (Page 12) A copy-protected file is intermittent or sound skips. Connect a device (USB), and change the source to unit. (Page 13) • If USB connection does not work, connect the Android device through auxiliary input jack. • Reconnect the Android device. • If USB connection does not work, connect the Android device through auxiliary input jack. "NO DEVICE" or "READING" keeps flashing. Connect a device (USB) that contains playable...

Instruction Manual
Page 15
..., leave wiring and mounting to your car. Consult the car audio dealer. • Install this unit in -dash mounting)" on and off by the ignition key. • Keep all cables away from the ignition switch, then disconnect the 2 Connect the wires properly. ENGLISH 15 on the car are working properly. • If the fuse blows, first make sure the wires are not touching car's chassis, then replace the old fuse with...
..., leave wiring and mounting to your car. Consult the car audio dealer. • Install this unit in -dash mounting)" on and off by the ignition key. • Keep all cables away from the ignition switch, then disconnect the 2 Connect the wires properly. ENGLISH 15 on the car are working properly. • If the fuse blows, first make sure the wires are not touching car's chassis, then replace the old fuse with...

Instruction Manual
Page 16
... the required wiring. (Page 17) Dashboard of your car Use only the specified screws. Bend the appropriate tabs to hold the sleeve firmly in the unit (on both sides) with the vehicle mounting bracket and secure the unit with screws (supplied). Using wrong screws might damage the unit. Hook on the illustration. INSTALLATION/CONNECTION Installing the unit (in-dash mounting) Installing the unit (without mounting sleeve) 1 Remove the mounting sleeve...
... the required wiring. (Page 17) Dashboard of your car Use only the specified screws. Bend the appropriate tabs to hold the sleeve firmly in the unit (on both sides) with the vehicle mounting bracket and secure the unit with screws (supplied). Using wrong screws might damage the unit. Hook on the illustration. INSTALLATION/CONNECTION Installing the unit (in-dash mounting) Installing the unit (without mounting sleeve) 1 Remove the mounting sleeve...
Instruction Manual
Page 17
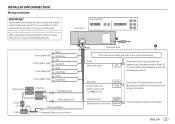
... the antenna control terminal in the vehicle To the steering wheel remote control adapter ENGLISH 17 INSTALLATION/CONNECTION Wiring connection IMPORTANT We recommend installing the unit with a commercially available custom wiring harness specific for your car and leave this job to professionals for your navigation manual) Blue/White (Power control wire/ Antenna control wire) (12 V 350 mA) Light blue/yellow (Steering remote control wire) To the power control terminal when using the optional power amplifier or to avoid damaging the unit. Consult your car audio dealer...
... the antenna control terminal in the vehicle To the steering wheel remote control adapter ENGLISH 17 INSTALLATION/CONNECTION Wiring connection IMPORTANT We recommend installing the unit with a commercially available custom wiring harness specific for your car and leave this job to professionals for your navigation manual) Blue/White (Power control wire/ Antenna control wire) (12 V 350 mA) Light blue/yellow (Steering remote control wire) To the power control terminal when using the optional power amplifier or to avoid damaging the unit. Consult your car audio dealer...

Instruction Manual
Page 19
... mV 30 kΩ Audio Maximum Output Power Full Bandwidth Power (at less than 1 % THD) Speaker Impedance Tone Action Preout Level/Load (USB) Preout Impedance 50 W × 4 22 W × 4 4 Ω - 8 Ω Bass 100 Hz ±8 dB Middle : 1.0 kHz ±8 dB : 2.5 kHz ±8 dB Treble 12.5 kHz ±8 dB 2 500 mV/10 kΩ load ≤ 600 Ω General Operating Voltage Installation Size (W ×...
... mV 30 kΩ Audio Maximum Output Power Full Bandwidth Power (at less than 1 % THD) Speaker Impedance Tone Action Preout Level/Load (USB) Preout Impedance 50 W × 4 22 W × 4 4 Ω - 8 Ω Bass 100 Hz ±8 dB Middle : 1.0 kHz ±8 dB : 2.5 kHz ±8 dB Treble 12.5 kHz ±8 dB 2 500 mV/10 kΩ load ≤ 600 Ω General Operating Voltage Installation Size (W ×...
Instruction Manual
Page 20
... Redistribution and use in source and binary forms, with or without specific prior written permission...DIRECT, INDIRECT, INCIDENTAL, SPECIAL, EXEMPLARY, OR CONSEQUENTIAL DAMAGES (INCLUDING, BUT NOT LIMITED TO, PROCUREMENT OF SUBSTITUTE GOODS OR SERVICES...source code must reproduce the above copyright notice, this list of its contributors may be used... to endorse or promote products derived from this list of conditions and the following disclaimer in the documentation and/or other countries. • Android is a trademark of Google LLC. (For ) For Turkey Bu ürün 28300 say...
... Redistribution and use in source and binary forms, with or without specific prior written permission...DIRECT, INDIRECT, INCIDENTAL, SPECIAL, EXEMPLARY, OR CONSEQUENTIAL DAMAGES (INCLUDING, BUT NOT LIMITED TO, PROCUREMENT OF SUBSTITUTE GOODS OR SERVICES...source code must reproduce the above copyright notice, this list of its contributors may be used... to endorse or promote products derived from this list of conditions and the following disclaimer in the documentation and/or other countries. • Android is a trademark of Google LLC. (For ) For Turkey Bu ürün 28300 say...
Instruction Manual
Page 30
...; ] [SUB-W PHASE SWITCH PREOUT SUB-W 5 SUB-W PHASE]/[LPF SUBWOOFER]/[SUB-W LEVEL SUBWOOFER SET ON ]/[EASY]/[POPS]/[ROCK]/[POWERFUL]/[TOP40]/[DRIVE EQ USER]/[NATURAL]/[JAZZ USER ].[EQ PRO [USER] : [POWERFUL] : ][PRESET EQ ] :[LV3]/[LV2]/[LV1 OFF ][BASS BOOST...
...; ] [SUB-W PHASE SWITCH PREOUT SUB-W 5 SUB-W PHASE]/[LPF SUBWOOFER]/[SUB-W LEVEL SUBWOOFER SET ON ]/[EASY]/[POPS]/[ROCK]/[POWERFUL]/[TOP40]/[DRIVE EQ USER]/[NATURAL]/[JAZZ USER ].[EQ PRO [USER] : [POWERFUL] : ][PRESET EQ ] :[LV3]/[LV2]/[LV1 OFF ][BASS BOOST...
Instruction Manual
Page 36
][F/W UPDATE ][UPDATE SYSTEM ] :[YES NO >.
][F/W UPDATE ][UPDATE SYSTEM ] :[YES NO >.


