Instruction Manual
Page 2
...6 About MP3 and WMA 7 General features 8 Power Selecting the Source Volume Attenuator System Q Audio Control Audio Setup Speaker Setting Switching Display Dimmer Control Theft Deterrent Faceplate TEL Mute Tuner features 12 Tuning Tuning Mode Station Preset Memory Auto Memory Entry Preset... Code Touch Sensor Tone Manual Clock Adjustment DSI (Disabled System Indicator) Supreme Setting CRSC (Clean Reception System Circuit) Receive mode Setting SIRIUS ID (ESN) display Auxiliary Input Display Setting Text Scroll CD Read Setting Demonstration mode Setting Basic Operations of remote control 24...
...6 About MP3 and WMA 7 General features 8 Power Selecting the Source Volume Attenuator System Q Audio Control Audio Setup Speaker Setting Switching Display Dimmer Control Theft Deterrent Faceplate TEL Mute Tuner features 12 Tuning Tuning Mode Station Preset Memory Auto Memory Entry Preset... Code Touch Sensor Tone Manual Clock Adjustment DSI (Disabled System Indicator) Supreme Setting CRSC (Clean Reception System Circuit) Receive mode Setting SIRIUS ID (ESN) display Auxiliary Input Display Setting Text Scroll CD Read Setting Demonstration mode Setting Basic Operations of remote control 24...
Instruction Manual
Page 8
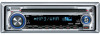
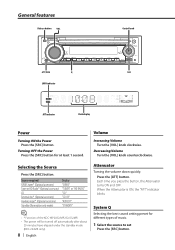
...the [VOL] knob clockwise. Decreasing Volume Turn the [VOL] knob counterclockwise. Press the [ATT] button. System Q Selecting the best sound setting preset for at least 1 second. Selecting the Source Press the [SRC] button. Turning OFF the Power Press the [SRC] button for different... press the button, the Attenuator turns ON and OFF. General features Release button VOL Control knob ATT/DIM Q SRC LOUD indicator ATT indicator Clock display Power Turning ON the Power Press the [SRC] button. Source required Display SIRIUS tuner* (Optional accessory) "SIRIUS" Tuner or HD ...
...the [VOL] knob clockwise. Decreasing Volume Turn the [VOL] knob counterclockwise. Press the [ATT] button. System Q Selecting the best sound setting preset for at least 1 second. Selecting the Source Press the [SRC] button. Turning OFF the Power Press the [SRC] button for different... press the button, the Attenuator turns ON and OFF. General features Release button VOL Control knob ATT/DIM Q SRC LOUD indicator ATT indicator Clock display Power Turning ON the Power Press the [SRC] button. Source required Display SIRIUS tuner* (Optional accessory) "SIRIUS" Tuner or HD ...
Instruction Manual
Page 10
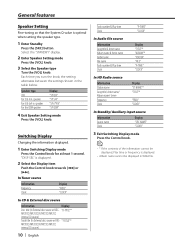
... the OEM speaker Display "SP OFF" "SP 5/4" "SP 6*9/6" "SP OEM" 4 Exit Speaker Setting mode Press the [VOL] knob. In Tuner source Information Frequency Clock Display "FREQ" "CLOCK" In CD & External disc source Information Display Disc title (In External disc source or KDC- Each... time you turn the knob, the setting alternates between the settings shown in . General features Speaker Setting Fine-tuning so that the...
... the OEM speaker Display "SP OFF" "SP 5/4" "SP 6*9/6" "SP OEM" 4 Exit Speaker Setting mode Press the [VOL] knob. In Tuner source Information Frequency Clock Display "FREQ" "CLOCK" In CD & External disc source Information Display Disc title (In External disc source or KDC- Each... time you turn the knob, the setting alternates between the settings shown in . General features Speaker Setting Fine-tuning so that the...

Instruction Manual
Page 19
...menu item Push the Control knob towards [FM] or [AM]. "MENU" is explained here. Select 1 of the chart is entered. (Normally the setting listed at least 1 second. The Menu system basic operation method is displayed. 2 Select the menu item Push the Control knob towards [4] or [¢... select "BEEP", each time you want to the basic operation method above are displayed, their setting content chart is the original setting.) Also, the explanation for at the top of them as the setting. functions. You can continue by step. Menu system MENU SRC Control knob Menu display Menu ...
...menu item Push the Control knob towards [FM] or [AM]. "MENU" is explained here. Select 1 of the chart is entered. (Normally the setting listed at least 1 second. The Menu system basic operation method is displayed. 2 Select the menu item Push the Control knob towards [4] or [¢... select "BEEP", each time you want to the basic operation method above are displayed, their setting content chart is the original setting.) Also, the explanation for at the top of them as the setting. functions. You can continue by step. Menu system MENU SRC Control knob Menu display Menu ...
Instruction Manual
Page 21
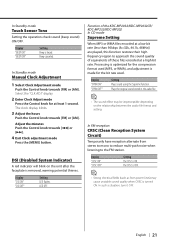
...on the relationship between the audio file format and setting. In Standby mode Touch Sensor Tone Setting the operation check sound (beep sound) ON/OFF. The clock display blinks. 3 Adjust the hours Push the Control knob towards [4] or [¢]. 4 Exit Clock adjustment mode Press the [MENU] button. In ...second. Select the "CLK ADJ" display. 2 Enter Clock Adjust mode Press the Control knob for the bit rate used. Display "CRSC ON" "CRSC OFF" Setting The CRSC is removed, warning potential thieves. Display "DSI ON" "DSI OFF" Setting LED flashes. Beep canceled. Function of the KDC-...
...on the relationship between the audio file format and setting. In Standby mode Touch Sensor Tone Setting the operation check sound (beep sound) ON/OFF. The clock display blinks. 3 Adjust the hours Push the Control knob towards [4] or [¢]. 4 Exit Clock adjustment mode Press the [MENU] button. In ...second. Select the "CLK ADJ" display. 2 Enter Clock Adjust mode Press the Control knob for the bit rate used. Display "CRSC ON" "CRSC OFF" Setting The CRSC is removed, warning potential thieves. Display "DSI ON" "DSI OFF" Setting LED flashes. Beep canceled. Function of the KDC-...


