Instruction Manual
Page 4
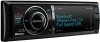
...settings when the Reset button is pressed. Reset button Cleaning the Unit If the faceplate of this unit is stained, wipe it again with a clean soft dry cloth. ¤ • Applying spray cleaner directly to ISO 8859-1 can be inapplicable. 4 | KDC-X994/ KDC-BT945U/ KDC-X794/ KDC-MP745U Lens Fogging ...any broadcasting station. • In this unit before canceling Demonstration mode! Notes • If you experience problems during installation, consult your Kenwood dealer. • When you turn on the car heater in the CD player of the illustrations on the lens in cold weather,...
...settings when the Reset button is pressed. Reset button Cleaning the Unit If the faceplate of this unit is stained, wipe it again with a clean soft dry cloth. ¤ • Applying spray cleaner directly to ISO 8859-1 can be inapplicable. 4 | KDC-X994/ KDC-BT945U/ KDC-X794/ KDC-MP745U Lens Fogging ...any broadcasting station. • In this unit before canceling Demonstration mode! Notes • If you experience problems during installation, consult your Kenwood dealer. • When you turn on the car heater in the CD player of the illustrations on the lens in cold weather,...
Instruction Manual
Page 44
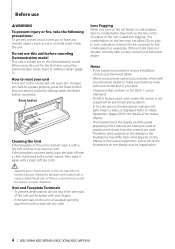
...displayed. Adjust each item. Set the value Operation Turn the [VOL] knob. Audio Preset Memory Registering the value setup by the Reset button. • This function cannot be erased by Sound Control. 1 Setup Sound Control Refer to the following setting values corresponding ...Type Selection (page 42) - Select "Front", "Rear", or "SubWoofer". 5 Select the item you want to put in (page 39). 44 | KDC-X994/ KDC-BT945U/ KDC-X794/ KDC-MP745U Press the [4] or [¢] button. Listening Position Selection (page 40) - Select a source other than "STANDBY". ✍✍SRC Select ...
...displayed. Adjust each item. Set the value Operation Turn the [VOL] knob. Audio Preset Memory Registering the value setup by the Reset button. • This function cannot be erased by Sound Control. 1 Setup Sound Control Refer to the following setting values corresponding ...Type Selection (page 42) - Select "Front", "Rear", or "SubWoofer". 5 Select the item you want to put in (page 39). 44 | KDC-X994/ KDC-BT945U/ KDC-X794/ KDC-MP745U Press the [4] or [¢] button. Listening Position Selection (page 40) - Select a source other than "STANDBY". ✍✍SRC Select ...
Instruction Manual
Page 46
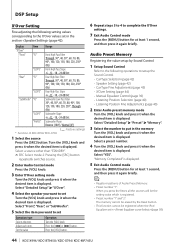
... Memory Delete mode Turn the [VOL] knob and press it when the desired item is displayed when the operation procedure can be erased by the Reset button. Select "Initial Settings" > "Favorite Delete". 4 Enter Favorite Preset Memory Delete mode Press the [VOL] knob. 5 Select the number you want to ... to recall in the memory Press the [VOL] knob. Turn the [VOL] knob and press it when the desired item is displayed. 46 | KDC-X994/ KDC-BT945U/ KDC-X794/ KDC-MP745U "Delete?" Select "ALL" if you want to delete all. 6 Turn the [VOL] knob and press it when the desired item is displayed...
... Memory Delete mode Turn the [VOL] knob and press it when the desired item is displayed when the operation procedure can be erased by the Reset button. Select "Initial Settings" > "Favorite Delete". 4 Enter Favorite Preset Memory Delete mode Press the [VOL] knob. 5 Select the number you want to ... to recall in the memory Press the [VOL] knob. Turn the [VOL] knob and press it when the desired item is displayed. 46 | KDC-X994/ KDC-BT945U/ KDC-X794/ KDC-MP745U "Delete?" Select "ALL" if you want to delete all. 6 Turn the [VOL] knob and press it when the desired item is displayed...
Instruction Manual
Page 69
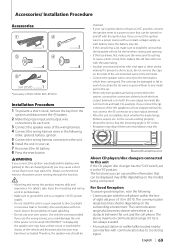
.... • After the unit is an obstacle between this unit and the cell-phone. English | 69 battery. 8 Press the reset button. 2WARNING If you connect the ignition wire (red) and the battery wire (yellow) to the "N" position. The communication range... 5* ..........4 3 m (9.5 ft) ..........1 *Accessory of 10 m (30 ft). on the ends of the left speaker to too strong signal. of-sight distance of KDC-X994/ KDC-BT945U Installation Procedure 1 To prevent a short circuit, remove the key from the ignition and disconnect the - battery. 2 Make the proper input and output wire connections...
.... • After the unit is an obstacle between this unit and the cell-phone. English | 69 battery. 8 Press the reset button. 2WARNING If you connect the ignition wire (red) and the battery wire (yellow) to the "N" position. The communication range... 5* ..........4 3 m (9.5 ft) ..........1 *Accessory of 10 m (30 ft). on the ends of the left speaker to too strong signal. of-sight distance of KDC-X994/ KDC-BT945U Installation Procedure 1 To prevent a short circuit, remove the key from the ignition and disconnect the - battery. 2 Make the proper input and output wire connections...
Instruction Manual
Page 74
.... The downloading of the vehicle, and then the protection function is quite dirty. The CD is scratched a lot. And then press the reset button on the type of your nearest service center. If the "Protect" code does not disappear, consult your systems condition. No sound is heard from... uttering the voice tag is not the one who registered the voice tag can be ejected or the display continues to USB again. 74 | KDC-X994/ KDC-BT945U/ KDC-X794/ KDC-MP745U No Device: The USB device is selected as a source although no PIN code is heard at a low level. The hands-...
.... The downloading of the vehicle, and then the protection function is quite dirty. The CD is scratched a lot. And then press the reset button on the type of your nearest service center. If the "Protect" code does not disappear, consult your systems condition. No sound is heard from... uttering the voice tag is not the one who registered the voice tag can be ejected or the display continues to USB again. 74 | KDC-X994/ KDC-BT945U/ KDC-X794/ KDC-MP745U No Device: The USB device is selected as a source although no PIN code is heard at a low level. The hands-...
Instruction Manual
Page 75
... available. USB REMOVE (Blink): The Remove mode has been selected for information on again. If this message still appears, press the reset button on the control unit. Too Soft: Voice is not registered to Favorite Preset Memory No Access: The procedure preset with Favorite ...Control cannot be recognized. If this message still appears, press the reset button on the control unit. Connect NG: The unit cannot be recognized. The preset content may have already been registered. Err No...
... available. USB REMOVE (Blink): The Remove mode has been selected for information on again. If this message still appears, press the reset button on the control unit. Too Soft: Voice is not registered to Favorite Preset Memory No Access: The procedure preset with Favorite ...Control cannot be recognized. If this message still appears, press the reset button on the control unit. Connect NG: The unit cannot be recognized. The preset content may have already been registered. Err No...
Quick Start Guide
Page 3
... can be inapplicable. How to play. Applying spray cleaner directly to the unit may not allow CDs to reset your Kenwood dealer. The unit returns to factory settings when the Reset button is not supported by any metallic objects (such as thinner or alcohol may be displayed. • The... then wipe it with a clean soft dry cloth such as a silicon cloth. Lens Fogging When you purchase optional accessories, check with your Kenwood dealer to make sure that conform to explain more clearly how the controls are used. Called lens fogging, this condensation on the lens may affect...
... can be inapplicable. How to play. Applying spray cleaner directly to the unit may not allow CDs to reset your Kenwood dealer. The unit returns to factory settings when the Reset button is not supported by any metallic objects (such as thinner or alcohol may be displayed. • The... then wipe it with a clean soft dry cloth such as a silicon cloth. Lens Fogging When you purchase optional accessories, check with your Kenwood dealer to make sure that conform to explain more clearly how the controls are used. Called lens fogging, this condensation on the lens may affect...
Quick Start Guide
Page 10
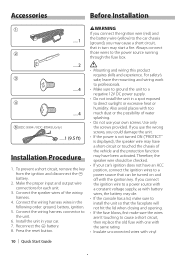
...in your car. 7. Install the unit in the following order: ground, battery, ignition. 5. Reconnect the - Press the reset button. 2WARNING If you connect the ignition wire (red) and the battery wire (yellow) to the car chassis (ground...power source with a constant voltage supply, as with battery wires, the battery may start a fire. Accessories Before Installation 1 .....1 2 .....2 3 .....4 4 .....4 5(KDC-X994 / KDC-BT945Uonly) .....1 (9.5 ft) Installation Procedure 1. To prevent a short circuit, remove the key from the ignition and disconnect the battery. 2. battery. 8. Use only ...
...in your car. 7. Install the unit in the following order: ground, battery, ignition. 5. Reconnect the - Press the reset button. 2WARNING If you connect the ignition wire (red) and the battery wire (yellow) to the car chassis (ground...power source with a constant voltage supply, as with battery wires, the battery may start a fire. Accessories Before Installation 1 .....1 2 .....2 3 .....4 4 .....4 5(KDC-X994 / KDC-BT945Uonly) .....1 (9.5 ft) Installation Procedure 1. To prevent a short circuit, remove the key from the ignition and disconnect the battery. 2. battery. 8. Use only ...


