Instruction Manual
Page 6
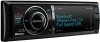
... names and functions 1 2 3 4 5 6 AUX 7 8 9 10 11 12 13 14 1 Release button To drop the faceplate down to the low microphone volume or noises in page 8 or later. 6 Microphone (KDC-X994/ KDC-BT945U) The microphone for details. For more details, see operations of each source described in the...this unit (press the button at least 1 second). 12 Display window 13 [FAV] button To recall a registered favorite item (press the button). KDC-X994/KDC-BT945U : Enters Play mode Menu (press the button at least 1 second). 5 [SEARCH MODE] button To enter Search mode (iPod), move between...
... names and functions 1 2 3 4 5 6 AUX 7 8 9 10 11 12 13 14 1 Release button To drop the faceplate down to the low microphone volume or noises in page 8 or later. 6 Microphone (KDC-X994/ KDC-BT945U) The microphone for details. For more details, see operations of each source described in the...this unit (press the button at least 1 second). 12 Display window 13 [FAV] button To recall a registered favorite item (press the button). KDC-X994/KDC-BT945U : Enters Play mode Menu (press the button at least 1 second). 5 [SEARCH MODE] button To enter Search mode (iPod), move between...
Instruction Manual
Page 17
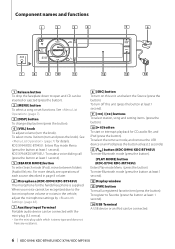
... Press the [38] button to from the disc being played now. Music CD/ Audio file Operation Release MENU VOL DISP SEARCH MODE SRC 4 38 ¢ /PLAY MODE Basic Operation Drop open the faceplate Press the Release button. ⁄ • Push the faceplate on the left side, and return it again briefly. Disc...
... Press the [38] button to from the disc being played now. Music CD/ Audio file Operation Release MENU VOL DISP SEARCH MODE SRC 4 38 ¢ /PLAY MODE Basic Operation Drop open the faceplate Press the Release button. ⁄ • Push the faceplate on the left side, and return it again briefly. Disc...

Instruction Manual
Page 34
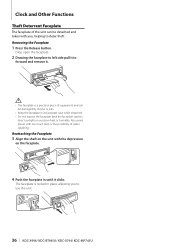
... it when the desired item is displayed. Press the [¢] button. 3. "English"/ "Français"/ "Español" 34 | KDC-X994/ KDC-BT945U/ KDC-X794/ KDC-MP745U Initial Settings You can adjust the clock and date. "Settings 1"/ "2" "Beep" Setting the operation check sound (beep sound) ON/OFF....can select the display language for at least 1 second, and then press it when the desired item is displayed. Clock and Other Functions Release MENU VOL SRC 4 ¢ Clock and Date Adjustment You can select following Initial Setting items. 1 Select the Standby Press the [...
... it when the desired item is displayed. Press the [¢] button. 3. "English"/ "Français"/ "Español" 34 | KDC-X994/ KDC-BT945U/ KDC-X794/ KDC-MP745U Initial Settings You can adjust the clock and date. "Settings 1"/ "2" "Beep" Setting the operation check sound (beep sound) ON/OFF....can select the display language for at least 1 second, and then press it when the desired item is displayed. Clock and Other Functions Release MENU VOL SRC 4 ¢ Clock and Date Adjustment You can select following Initial Setting items. 1 Select the Standby Press the [...
Instruction Manual
Page 36
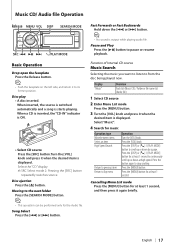
... while detached. • Do not expose the faceplate (and the faceplate case) to direct sunlight or excessive heat or humidity. Removing the Faceplate 1 Press the Release button. The faceplate is a precision piece of equipment and can be damaged by shocks or jolts. • Keep the faceplate in until it . ¤ •... splashing. Clock and Other Functions Theft Deterrent Faceplate The faceplate of the unit can be detached and taken with you to use the unit. 36 | KDC-X994/ KDC-BT945U/ KDC-X794/ KDC-MP745U
... while detached. • Do not expose the faceplate (and the faceplate case) to direct sunlight or excessive heat or humidity. Removing the Faceplate 1 Press the Release button. The faceplate is a precision piece of equipment and can be damaged by shocks or jolts. • Keep the faceplate in until it . ¤ •... splashing. Clock and Other Functions Theft Deterrent Faceplate The faceplate of the unit can be detached and taken with you to use the unit. 36 | KDC-X994/ KDC-BT945U/ KDC-X794/ KDC-MP745U
Instruction Manual
Page 57
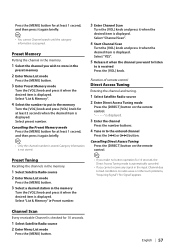
... Memory mode Turn the [VOL] knob and press it when the channel you wish to the entered channel Press the [4] or [¢] button. Select "YES". 5 Release it when the desired item is not stored. English | 57
... Memory mode Turn the [VOL] knob and press it when the channel you wish to the entered channel Press the [4] or [¢] button. Select "YES". 5 Release it when the desired item is not stored. English | 57
Instruction Manual
Page 63
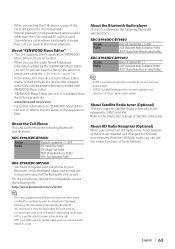
... use the audio file with database information added by the "KENWOOD Music Editor Lite ver1.0", you connect an HD Radio tuner, Tuner features of the unit are released by Bluetooth SIG. For the cell-phones verified for compatibility, access the following Bluetooth specifications: KDC-X994/KDC-BT945U Version Bluetooth Standard Ver. 2.1+EDR Profile HFP (Hands...
... use the audio file with database information added by the "KENWOOD Music Editor Lite ver1.0", you connect an HD Radio tuner, Tuner features of the unit are released by Bluetooth SIG. For the cell-phones verified for compatibility, access the following Bluetooth specifications: KDC-X994/KDC-BT945U Version Bluetooth Standard Ver. 2.1+EDR Profile HFP (Hands...
Instruction Manual
Page 72
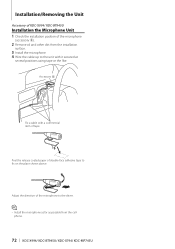
Installation/Removing the Unit Accessory of KDC-X994/ KDC-BT945U Installation the Microphone Unit 1 Check the installation position of the microphone to the driver. ⁄ • Install the microphone as far as possible from ... adhesive tape to fix on the place shown above. Adjust the direction of the microphone (accessory 5). 2 Remove oil and other dirt from the cellphone. 72 | KDC-X994/ KDC-BT945U/ KDC-X794/ KDC-MP745U Accessory 5 Fix a cable with it secured at several positions using tape or the like. Peel the release coated paper of tape.
Installation/Removing the Unit Accessory of KDC-X994/ KDC-BT945U Installation the Microphone Unit 1 Check the installation position of the microphone to the driver. ⁄ • Install the microphone as far as possible from ... adhesive tape to fix on the place shown above. Adjust the direction of the microphone (accessory 5). 2 Remove oil and other dirt from the cellphone. 72 | KDC-X994/ KDC-BT945U/ KDC-X794/ KDC-MP745U Accessory 5 Fix a cable with it secured at several positions using tape or the like. Peel the release coated paper of tape.

Quick Start Guide
Page 6
... return it to select a next folder. Selecting an Audio file folder Press the [SEARCH MODE] button to its former position. Playing Music (CD/USB/iPod) [Release] [MENU] [DISP] [VOL] [SEARCH MODE] KDC-X994 KDC-BT945U [SRC] [4] [38] [ ] [¢] USB Terminal KDC-X794 KDC-MP745U [PLAY MODE] Playing Disc Fast Forward or Fast Backward of Press the...
... return it to select a next folder. Selecting an Audio file folder Press the [SEARCH MODE] button to its former position. Playing Music (CD/USB/iPod) [Release] [MENU] [DISP] [VOL] [SEARCH MODE] KDC-X994 KDC-BT945U [SRC] [4] [38] [ ] [¢] USB Terminal KDC-X794 KDC-MP745U [PLAY MODE] Playing Disc Fast Forward or Fast Backward of Press the...

Quick Start Guide
Page 7
Select an item Press the [VOL] knob. Press the button again to scroll up or down by a page. Removing Disc Press the [Release] button and drop open the faceplate. High Speed Search Press the [DISP] or [ ] / [PLAY MODE] button to stop scrolling. Return to Top menu Press the [...
Select an item Press the [VOL] knob. Press the button again to scroll up or down by a page. Removing Disc Press the [Release] button and drop open the faceplate. High Speed Search Press the [DISP] or [ ] / [PLAY MODE] button to stop scrolling. Return to Top menu Press the [...
Quick Start Guide
Page 15
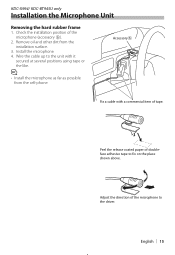
... the place shown above. Remove oil and other dirt from the cell-phone. Peel the release coated paper of tape. Wire the cable up to the unit with a commercial item of doubleface adhesive tape to the driver. KDC-X994/ KDC-BT945U only Installation the Microphone Unit Removing the hard rubber frame 1. Adjust the direction...
... the place shown above. Remove oil and other dirt from the cell-phone. Peel the release coated paper of tape. Wire the cable up to the unit with a commercial item of doubleface adhesive tape to the driver. KDC-X994/ KDC-BT945U only Installation the Microphone Unit Removing the hard rubber frame 1. Adjust the direction...

