Instruction Manual
Page 4
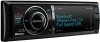
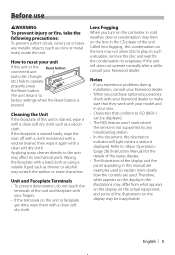
... or alcohol may scratch the surface or erases characters. Refer to factory settings when the Reset button is displayed. Lens Fogging When you purchase optional accessories, check with your Kenwood dealer to make sure that they work where the service is stained badly, wipe the stain..., and some of the unit. How to reset your area. • Characters that conform to ISO 8859-1 can be inapplicable. 4 | KDC-X994/ KDC-BT945U/ KDC-X794/ KDC-MP745U Reset button Cleaning the Unit If the faceplate of the unit and faceplate with your Kenwood dealer. In such a situation, remove the ...
... or alcohol may scratch the surface or erases characters. Refer to factory settings when the Reset button is displayed. Lens Fogging When you purchase optional accessories, check with your Kenwood dealer to make sure that they work where the service is stained badly, wipe the stain..., and some of the unit. How to reset your area. • Characters that conform to ISO 8859-1 can be inapplicable. 4 | KDC-X994/ KDC-BT945U/ KDC-X794/ KDC-MP745U Reset button Cleaning the Unit If the faceplate of the unit and faceplate with your Kenwood dealer. In such a situation, remove the ...
Instruction Manual
Page 44
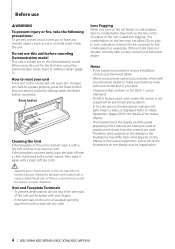
...] knob and press it when the desired item is displayed. Select "Front", "Rear", or "SubWoofer". 5 Select the item you press the Reset, all the sources will be the setting value which is registered. • Preset number "1" and "2": The memory cannot be erased by Sound Control... Position Selection (page 40) - Select "Detailed Setup" > "Preset" > "Memory". 3 Select the number to put in (page 39). 44 | KDC-X994/ KDC-BT945U/ KDC-X794/ KDC-MP745U Car Type Selection (page 42) - Listening Position Fine Adjustments (page 40) 2 Enter Audio preset memory mode Turn the [VOL] knob and press ...
...] knob and press it when the desired item is displayed. Select "Front", "Rear", or "SubWoofer". 5 Select the item you press the Reset, all the sources will be the setting value which is registered. • Preset number "1" and "2": The memory cannot be erased by Sound Control... Position Selection (page 40) - Select "Detailed Setup" > "Preset" > "Memory". 3 Select the number to put in (page 39). 44 | KDC-X994/ KDC-BT945U/ KDC-X794/ KDC-MP745U Car Type Selection (page 42) - Listening Position Fine Adjustments (page 40) 2 Enter Audio preset memory mode Turn the [VOL] knob and press ...
Instruction Manual
Page 46
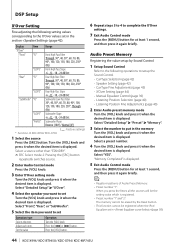
...Preset in the first hierarchy can be automatically played. Turn the [VOL] knob and press it when the desired item is displayed. 46 | KDC-X994/ KDC-BT945U/ KDC-X794/ KDC-MP745U Select preset number. In this unit becomes different from that in the Favorite memory Turn the [VOL] knob and press it when the... all. 6 Turn the [VOL] knob and press it when the desired item is displayed when the operation procedure can be erased by the Reset button. Favorite Preset Memory Delete Deleting an item registered to Favorite. 1 Select the Standby Press the [SRC] button.
...Preset in the first hierarchy can be automatically played. Turn the [VOL] knob and press it when the desired item is displayed. 46 | KDC-X994/ KDC-BT945U/ KDC-X794/ KDC-MP745U Select preset number. In this unit becomes different from that in the Favorite memory Turn the [VOL] knob and press it when the... all. 6 Turn the [VOL] knob and press it when the desired item is displayed when the operation procedure can be erased by the Reset button. Favorite Preset Memory Delete Deleting an item registered to Favorite. 1 Select the Standby Press the [SRC] button.
Instruction Manual
Page 69
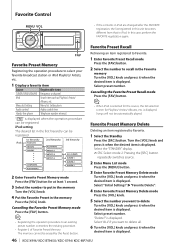
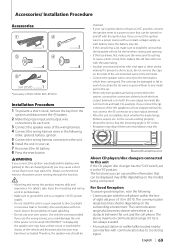
... ("PROTECT" is installed, check whether the brake lamps, blinkers, wipers, etc. The functions you connect the + connector of KDC-X994/ KDC-BT945U Installation Procedure 1 To prevent a short circuit, remove the key from the ignition and disconnect the - If you may be... 3 4 ..........4 5* ..........4 3 m (9.5 ft) ..........1 *Accessory of the left speaker to a front output terminal, do not connect the - battery. 8 Press the reset button. 2WARNING If you connect the ignition wire (red) and the battery wire (yellow) to the car chassis (ground), you connect the ignition wire to...
... ("PROTECT" is installed, check whether the brake lamps, blinkers, wipers, etc. The functions you connect the + connector of KDC-X994/ KDC-BT945U Installation Procedure 1 To prevent a short circuit, remove the key from the ignition and disconnect the - If you may be... 3 4 ..........4 5* ..........4 3 m (9.5 ft) ..........1 *Accessory of the left speaker to a front output terminal, do not connect the - battery. 8 Press the reset button. 2WARNING If you connect the ignition wire (red) and the battery wire (yellow) to the car chassis (ground), you connect the ignition wire to...
Instruction Manual
Page 74
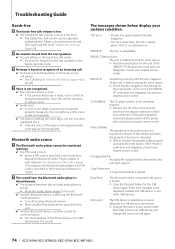
Close the vehicle windows to USB again. 74 | KDC-X994/ KDC-BT945U/ KDC-X794/ KDC-MP745U The sound from the Bluetooth audio player is discontinuous. ...a source although no PIN code is activated. Wire or insulate the speaker cable properly and press the reset button. Troubleshooting Guide Hands-free ? No sound is heard from the rear speakers. You are talking in...Or the unit is broken. Copy the files and folders for some reason. Press the reset button on the unit. Unsupported File: An Audio file is too small, it . Only the voice...
Close the vehicle windows to USB again. 74 | KDC-X994/ KDC-BT945U/ KDC-X794/ KDC-MP745U The sound from the Bluetooth audio player is discontinuous. ...a source although no PIN code is activated. Wire or insulate the speaker cable properly and press the reset button. Troubleshooting Guide Hands-free ? No sound is heard from the rear speakers. You are talking in...Or the unit is broken. Copy the files and folders for some reason. Press the reset button on the unit. Unsupported File: An Audio file is too small, it . Only the voice...
Instruction Manual
Page 75
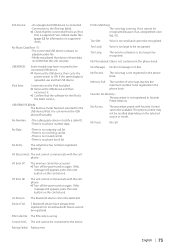
... be recognized. No Entry: The cell-phone has not been registered (pairing). If this message still appears, press the reset button on the control unit. If this message still appears, press the reset button on the control unit. Un Known: The Bluetooth device cannot be registered. If the same display is too...
... be recognized. No Entry: The cell-phone has not been registered (pairing). If this message still appears, press the reset button on the control unit. If this message still appears, press the reset button on the control unit. Un Known: The Bluetooth device cannot be registered. If the same display is too...
Quick Start Guide
Page 3
...clearly how the controls are used. Applying spray cleaner directly to evaporate. Notes • If you experience problems during installation, consult your Kenwood dealer. • When you turn on the car heater in cold weather, dew or condensation may scratch the surface or erase characters...may form on the display may affect its mechanical parts. English | 3 How to reset your area. • Characters that they work where the service is stained, wipe it again with your Kenwood dealer. Unit and Faceplate Terminals • To prevent deterioration, do not touch the ...
...clearly how the controls are used. Applying spray cleaner directly to evaporate. Notes • If you experience problems during installation, consult your Kenwood dealer. • When you turn on the car heater in cold weather, dew or condensation may scratch the surface or erase characters...may form on the display may affect its mechanical parts. English | 3 How to reset your area. • Characters that they work where the service is stained, wipe it again with your Kenwood dealer. Unit and Faceplate Terminals • To prevent deterioration, do not touch the ...
Quick Start Guide
Page 10
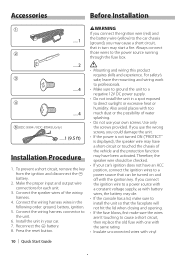
.... 8. To prevent a short circuit, remove the key from the ignition and disconnect the battery. 2. Use only the screws provided. Accessories Before Installation 1 .....1 2 .....2 3 .....4 4 .....4 5(KDC-X994 / KDC-BT945Uonly) .....1 (9.5 ft) Installation Procedure 1. Press the reset button. 2WARNING If you connect the ignition wire (red) and the battery wire (yellow) to the car chassis (ground), you connect the...
.... 8. To prevent a short circuit, remove the key from the ignition and disconnect the battery. 2. Use only the screws provided. Accessories Before Installation 1 .....1 2 .....2 3 .....4 4 .....4 5(KDC-X994 / KDC-BT945Uonly) .....1 (9.5 ft) Installation Procedure 1. Press the reset button. 2WARNING If you connect the ignition wire (red) and the battery wire (yellow) to the car chassis (ground), you connect the...


