
Instruction Manual
Page 2
CONTENTS Safety 3 Maintenance Preparation 4 How to attach/detach the faceplate How to reset your Bluetooth device with this unit (Pairing) Registering from Bluetooth devices (Pairing) Operation of Hands-Free Phoning 18 Making a Call Make a Voice Dialing Call Receiving a ...
CONTENTS Safety 3 Maintenance Preparation 4 How to attach/detach the faceplate How to reset your Bluetooth device with this unit (Pairing) Registering from Bluetooth devices (Pairing) Operation of Hands-Free Phoning 18 Making a Call Make a Voice Dialing Call Receiving a ...

Instruction Manual
Page 4
...incorrectly replaced. Replace only with your unit If this unit fails to operate properly, press the reset 1 button. 2 The unit returns to the factory settings when the reset button is pressed. 3 Reset button If the effectiveness of explosion if the battery is a precision component of the unit ... ready to use the remote controller for the first time, pull out the insulation sheet. If swallowed, contact a physician immediately. How to reset your fingers. Dispose of children and in hot places such as on the dashboard. ■■Lithium battery. CALIFORNIA, USA ONLY This product...
...incorrectly replaced. Replace only with your unit If this unit fails to operate properly, press the reset 1 button. 2 The unit returns to the factory settings when the reset button is pressed. 3 Reset button If the effectiveness of explosion if the battery is a precision component of the unit ... ready to use the remote controller for the first time, pull out the insulation sheet. If swallowed, contact a physician immediately. How to reset your fingers. Dispose of children and in hot places such as on the dashboard. ■■Lithium battery. CALIFORNIA, USA ONLY This product...

Instruction Manual
Page 5
... volume knob to select [CLOCK], then press to enter. 4 Turn the volume knob to select [CLOCK ADJUST], then press to update the firmware, see: www.kenwood.com/cs/ce/ English 5 Item Selectable setting (Preset: *) PRESET TYPE NORMAL *: Memorizes one station for each band (FM1/ FM2/ FM3/ AM). ; BUILT...hour flashes on how to enter. Getting Started Canceling the display demonstration The display demonstration is done for about 15 seconds or if you reset the unit), the display shows: [CANCEL DEMO] \ [PRESS] \ [VOLUME KNOB] 1 Press the volume knob. [YES] is selected as a music CD...
... volume knob to select [CLOCK], then press to enter. 4 Turn the volume knob to select [CLOCK ADJUST], then press to update the firmware, see: www.kenwood.com/cs/ce/ English 5 Item Selectable setting (Preset: *) PRESET TYPE NORMAL *: Memorizes one station for each band (FM1/ FM2/ FM3/ AM). ; BUILT...hour flashes on how to enter. Getting Started Canceling the display demonstration The display demonstration is done for about 15 seconds or if you reset the unit), the display shows: [CANCEL DEMO] \ [PRESS] \ [VOLUME KNOB] 1 Press the volume knob. [YES] is selected as a music CD...
Instruction Manual
Page 26
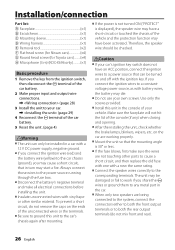
... Escutcheon 1) C Mounting sleeve 1) D Wiring harness 1) E Removal tool 2) F Flat head screw (for Nissan cars 4) G Round head screw (for Toyota cars 4) H Microphone (3 m) (KDC-X696 only)B 1) Basic procedure 1 Remove the key from the ignition switch, then disconnect the · terminal of the car battery. 2 Make proper input and output wire.... \ (page 28) 3 Install the unit to your car. \ (page 29) 4 Reconnect the · terminal of the car battery. 5 Reset the unit. (page 4) ¤Warning ■■The unit can be turned on and off with vinyl tape or other parts to cause a short...
... Escutcheon 1) C Mounting sleeve 1) D Wiring harness 1) E Removal tool 2) F Flat head screw (for Nissan cars 4) G Round head screw (for Toyota cars 4) H Microphone (3 m) (KDC-X696 only)B 1) Basic procedure 1 Remove the key from the ignition switch, then disconnect the · terminal of the car battery. 2 Make proper input and output wire.... \ (page 28) 3 Install the unit to your car. \ (page 29) 4 Reconnect the · terminal of the car battery. 5 Reset the unit. (page 4) ¤Warning ■■The unit can be turned on and off with vinyl tape or other parts to cause a short...
Instruction Manual
Page 30
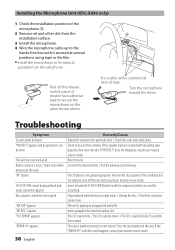
... the radio. The unit is sometimes interrupted. Insert a finalized CD-R/CD-RW (finalize with the component which you used for some reason. Press the reset button on rough roads. / Change the disc. / Check the cords and connections. CD-R/CD-RW cannot be played back and tracks cannot be heard...are covered with a commercial item of tape. Peel off the unit and consult your nearest service center. 30 English Installing the Microphone Unit (KDC-X696 only) 1 Check the installation position of the microphone H. 2 Remove oil and other dirt from the cell-phone. "ERROR 99" appears.
... the radio. The unit is sometimes interrupted. Insert a finalized CD-R/CD-RW (finalize with the component which you used for some reason. Press the reset button on rough roads. / Change the disc. / Check the cords and connections. CD-R/CD-RW cannot be played back and tracks cannot be heard...are covered with a commercial item of tape. Peel off the unit and consult your nearest service center. 30 English Installing the Microphone Unit (KDC-X696 only) 1 Check the installation position of the microphone H. 2 Remove oil and other dirt from the cell-phone. "ERROR 99" appears.
Instruction Manual
Page 31
...-phone. The calling party does not notify a caller ID. / There is not contained in "SONGS" category of an incoming No beep is the latest version. / Reset the iPod. There is no outgoing call list. / There is no incoming call list. / There is no missed call . (page 22) is played. Copy the...
...-phone. The calling party does not notify a caller ID. / There is not contained in "SONGS" category of an incoming No beep is the latest version. / Reset the iPod. There is no outgoing call list. / There is no incoming call list. / There is no missed call . (page 22) is played. Copy the...
Instruction Manual
Page 32
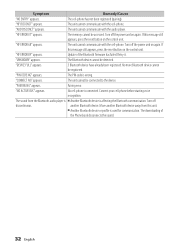
The unit cannot communicate with the cell-phone. If this message still appears, press the reset button on again. Turn off discontinuous. The PIN code is used for communication. Connect your cell-phone before starting voice recognition. Move .... another Bluetooth device away from the Bluetooth audio player is ■■Another Bluetooth device is connected. If this message still appears, press the reset button on again. "PIN CODE NG" appears. The downloading of the Bluetooth firmware has failed. Symptom Remedy/Cause "NO ENTRY" appears. The ...
The unit cannot communicate with the cell-phone. If this message still appears, press the reset button on again. Turn off discontinuous. The PIN code is used for communication. Connect your cell-phone before starting voice recognition. Move .... another Bluetooth device away from the Bluetooth audio player is ■■Another Bluetooth device is connected. If this message still appears, press the reset button on again. "PIN CODE NG" appears. The downloading of the Bluetooth firmware has failed. Symptom Remedy/Cause "NO ENTRY" appears. The ...


