

Instruction Manual
Page 7
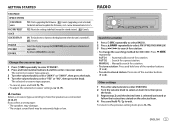
... faceplate Press . • Press and hold to turn on the power for the first time (or [FACTORY RESET] is set to [YES], 5), the display shows: "SEL LANGUAGE" "PRESS" "VOLUME KNOB" 1 Turn the volume knob to reset Reset the unit within 5 seconds after detaching the faceplate. Press DISP repeatedly. ( 26) 1 Select the display language...
... faceplate Press . • Press and hold to turn on the power for the first time (or [FACTORY RESET] is set to [YES], 5), the display shows: "SEL LANGUAGE" "PRESS" "VOLUME KNOB" 1 Turn the volume knob to reset Reset the unit within 5 seconds after detaching the faceplate. Press DISP repeatedly. ( 26) 1 Select the display language...
Instruction Manual
Page 9
.... • To adjust the selected crossover settings, ( 18, 19). ENGLISH 5 GETTING STARTED RADIO F/W UPDATE UPDATE SYSTEM F/W UPDATE xxxx FACTORY RESET CLOCK CLOCK DISPLAY ENGLISH ESPANOL YES: Starts upgrading the firmware. ; For details on the display even when the unit is turned off. ; Change ...the crossover type 1 Press repeatedly to enter crossover select. Caution Select a crossover type according to default (except the stored station). ; YES: Resets the settings to how the speakers are connected. ( 28, 29) If you select a wrong type: • The speakers may damage. &#...
.... • To adjust the selected crossover settings, ( 18, 19). ENGLISH 5 GETTING STARTED RADIO F/W UPDATE UPDATE SYSTEM F/W UPDATE xxxx FACTORY RESET CLOCK CLOCK DISPLAY ENGLISH ESPANOL YES: Starts upgrading the firmware. ; For details on the display even when the unit is turned off. ; Change ...the crossover type 1 Press repeatedly to enter crossover select. Caution Select a crossover type according to default (except the stored station). ; YES: Resets the settings to how the speakers are connected. ( 28, 29) If you select a wrong type: • The speakers may damage. &#...
Instruction Manual
Page 15
...Profile (AVRCP) - Pair and connect a Bluetooth device for more information. KENWOOD MUSIC PLAY application is installed on the Android device ( [BROWSE MODE] is...first time 1 Press to turn on the unit. 2 Search and select this unit model name (KDC-X5***BT) on the display. • For some Bluetooth devices, you may not automatically connect to...8226; Once the pairing is completed, the Bluetooth device will remain registered in BT AUDIO source, you reset the unit. Advanced Audio Coding (AAC) Connect the microphone Rear panel Microphone input jack Microphone (supplied...
...Profile (AVRCP) - Pair and connect a Bluetooth device for more information. KENWOOD MUSIC PLAY application is installed on the Android device ( [BROWSE MODE] is...first time 1 Press to turn on the unit. 2 Search and select this unit model name (KDC-X5***BT) on the display. • For some Bluetooth devices, you may not automatically connect to...8226; Once the pairing is completed, the Bluetooth device will remain registered in BT AUDIO source, you reset the unit. Advanced Audio Coding (AAC) Connect the microphone Rear panel Microphone input jack Microphone (supplied...

Instruction Manual
Page 24
...[FRONT ALL] is selected as [MINIVAN] or [MINIVAN(LONG)]. • Before making an adjustment, select the speaker you want to adjust.) YES: Resets the settings ([DISTANCE] and [GAIN]) of the selected [POSITION] to the speakers. 3 Calculate the differences between the distance of the furthest speaker (rear...if a setting other than [NONE] is selected for [DISTANCE] and [GAIN] of [DTA SETTINGS]. DTA SETTINGS POSITION DISTANCE GAIN DTA RESET CAR SETTINGS CAR TYPE REAR-SP LOCATION Selects your listening position (reference point). FRONT RIGHT: Front right seat ; AUDIO SETTINGS Digital Time ...
...[FRONT ALL] is selected as [MINIVAN] or [MINIVAN(LONG)]. • Before making an adjustment, select the speaker you want to adjust.) YES: Resets the settings ([DISTANCE] and [GAIN]) of the selected [POSITION] to the speakers. 3 Calculate the differences between the distance of the furthest speaker (rear...if a setting other than [NONE] is selected for [DISTANCE] and [GAIN] of [DTA SETTINGS]. DTA SETTINGS POSITION DISTANCE GAIN DTA RESET CAR SETTINGS CAR TYPE REAR-SP LOCATION Selects your listening position (reference point). FRONT RIGHT: Front right seat ; AUDIO SETTINGS Digital Time ...
Instruction Manual
Page 26
... ON" appears. Noise is not malfunction and reattach the device. Remedy • Adjust the volume to USB again. Clean the connectors. ( 24) Reset the unit. ( 3) Connect the antenna firmly. Make sure the disc is poor. • Static noise while listening to drop the disc when it...loading slot. Remedy • This unit can only display uppercase letters, numbers, and a limited number of the speaker wires are not displayed (e.g. Reset the unit. If this does not solve the problem, consult your nearest service center. Turn the power off and on again. A copy-protected file...
... ON" appears. Noise is not malfunction and reattach the device. Remedy • Adjust the volume to USB again. Clean the connectors. ( 24) Reset the unit. ( 3) Connect the antenna firmly. Make sure the disc is poor. • Static noise while listening to drop the disc when it...loading slot. Remedy • This unit can only display uppercase letters, numbers, and a limited number of the speaker wires are not displayed (e.g. Reset the unit. If this does not solve the problem, consult your nearest service center. Turn the power off and on again. A copy-protected file...
Instruction Manual
Page 27
... Android device. Phone sound quality is not successful. Voice calling method is poor. "ANDROID ERROR"/ "NA DEVICE" • Reconnect the iPod. • Reset the iPod. • Reconnect the Android device. • If in [HAND MODE], launch any media player application on the Android device and start playback.... If this does not solve the problem, the connected Android device is unable to route the audio signal to unit. ( 25) • Make sure KENWOOD MUSIC PLAY APP is heard during playback. • Sound output only from the head unit. Echo or noise is installed on the Android device. ( ...
... Android device. Phone sound quality is not successful. Voice calling method is poor. "ANDROID ERROR"/ "NA DEVICE" • Reconnect the iPod. • Reset the iPod. • Reconnect the Android device. • If in [HAND MODE], launch any media player application on the Android device and start playback.... If this does not solve the problem, the connected Android device is unable to route the audio signal to unit. ( 25) • Make sure KENWOOD MUSIC PLAY APP is heard during playback. • Sound output only from the head unit. Echo or noise is installed on the Android device. ( ...

Instruction Manual
Page 28
...Cleaning the unit Wipe off , then turn on the faceplate with a dry silicone or soft cloth. Latest firmware updates and latest compatible item list - KENWOOD original application - More information For: - General • This unit can only play the following CDs: • For detailed information and notes about...on the reverse Handling discs side of the faceplate) • Do not touch the recording surface of registered devices has reached its limit. Reset the unit and try to damage the connector. If "ERROR" appears again, check if the device supports the function you have tried. ...
...Cleaning the unit Wipe off , then turn on the faceplate with a dry silicone or soft cloth. Latest firmware updates and latest compatible item list - KENWOOD original application - More information For: - General • This unit can only play the following CDs: • For detailed information and notes about...on the reverse Handling discs side of the faceplate) • Do not touch the recording surface of registered devices has reached its limit. Reset the unit and try to damage the connector. If "ERROR" appears again, check if the device supports the function you have tried. ...

Instruction Manual
Page 31
... place. See Installing the unit (in-dash mounting). 4 Connect the [ terminal of the car battery. 5 Press to turn on the power. 6 Detach the faceplate and reset the unit within 5 seconds. ( 3) How to hold the mounting sleeve firmly in -dash mounting) Do the required wiring. ( 28) (C) Mounting sleeve (D) Wiring harness (E) Extraction key...
... place. See Installing the unit (in-dash mounting). 4 Connect the [ terminal of the car battery. 5 Press to turn on the power. 6 Detach the faceplate and reset the unit within 5 seconds. ( 3) How to hold the mounting sleeve firmly in -dash mounting) Do the required wiring. ( 28) (C) Mounting sleeve (D) Wiring harness (E) Extraction key...

Instruction Manual 1
Page 7
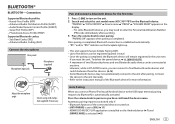
...) GETTING STARTED Detach button Auxiliary cable from the rear of the unit. Note: The highlighted area on the power for the first time (or [FACTORY RESET] is selected for the initial setup. 3 Press the volume knob again. Press repeatedly. Turn the volume knob. Press DISP repeatedly. ( 26) 1 Select the display language... unit. "DEMO OFF" appears. BASICS Faceplate Volume knob Display window Lights up when Bluetooth connection is selected for the initial setup. Attach Detach How to reset Reset the unit within 5 seconds after detaching the faceplate.
...) GETTING STARTED Detach button Auxiliary cable from the rear of the unit. Note: The highlighted area on the power for the first time (or [FACTORY RESET] is selected for the initial setup. 3 Press the volume knob again. Press repeatedly. Turn the volume knob. Press DISP repeatedly. ( 26) 1 Select the display language... unit. "DEMO OFF" appears. BASICS Faceplate Volume knob Display window Lights up when Bluetooth connection is selected for the initial setup. Attach Detach How to reset Reset the unit within 5 seconds after detaching the faceplate.

Instruction Manual 1
Page 9
NO: Cancels (upgrading is selected. Search for S / T: Press repeatedly. GETTING STARTED RADIO F/W UPDATE UPDATE SYSTEM F/W UPDATE xxxx FACTORY RESET CLOCK CLOCK DISPLAY ENGLISH ESPANOL YES: Starts upgrading the firmware. ; AUTO1 : Automatically search for a preset station. To return to search ...Press and hold one of the number buttons (1 to 6). • To select a stored station: Press one of the number buttons (1 to exit. YES: Resets the settings to select "YES" or "NO", then press the knob. OFF: Cancels. Select the display language for a station. • To store a ...
NO: Cancels (upgrading is selected. Search for S / T: Press repeatedly. GETTING STARTED RADIO F/W UPDATE UPDATE SYSTEM F/W UPDATE xxxx FACTORY RESET CLOCK CLOCK DISPLAY ENGLISH ESPANOL YES: Starts upgrading the firmware. ; AUTO1 : Automatically search for a preset station. To return to search ...Press and hold one of the number buttons (1 to 6). • To select a stored station: Press one of the number buttons (1 to exit. YES: Resets the settings to select "YES" or "NO", then press the knob. OFF: Cancels. Select the display language for a station. • To store a ...

Instruction Manual 1
Page 15
... Press the volume knob to turn on the unit. 2 Search and select this unit model name (KDC-X5***BT) on . - [AUTO PAIRING] is automatically activated. Pair and connect a Bluetooth device...in total. • Once the pairing is selected. ( 8) 7) and ENGLISH 11 Auto Pairing When you reset the unit. Sub Band Codec (SBC) - Connection Supported Bluetooth profiles - To delete the paired device, ...the connected device is turned on the Bluetooth device. Automatic pairing request is completed. KENWOOD MUSIC PLAY application is installed on the faceplate lights up. • This unit...
... Press the volume knob to turn on the unit. 2 Search and select this unit model name (KDC-X5***BT) on . - [AUTO PAIRING] is automatically activated. Pair and connect a Bluetooth device...in total. • Once the pairing is selected. ( 8) 7) and ENGLISH 11 Auto Pairing When you reset the unit. Sub Band Codec (SBC) - Connection Supported Bluetooth profiles - To delete the paired device, ...the connected device is turned on the Bluetooth device. Automatic pairing request is completed. KENWOOD MUSIC PLAY application is installed on the faceplate lights up. • This unit...

Instruction Manual 1
Page 24
... selected speaker. (Before making an adjustment for [DISTANCE] and [GAIN] of [DTA SETTINGS], select the speaker you want to adjust.) YES: Resets the settings ([DISTANCE] and [GAIN]) of the selected [POSITION] to make the adjustment for [DTA SETTINGS]. Identify your car type and rear... 20 ENGLISH COMPACT/FULL SIZE CAR/WAGON/MINIVAN/SUV/ MINIVAN(LONG): Selects the type of vehicle. ; DTA SETTINGS POSITION DISTANCE GAIN DTA RESET CAR SETTINGS CAR TYPE REAR-SP LOCATION Selects your vehicle. • For more suitable environment for your listening position (reference point). OFF:...
... selected speaker. (Before making an adjustment for [DISTANCE] and [GAIN] of [DTA SETTINGS], select the speaker you want to adjust.) YES: Resets the settings ([DISTANCE] and [GAIN]) of the selected [POSITION] to make the adjustment for [DTA SETTINGS]. Identify your car type and rear... 20 ENGLISH COMPACT/FULL SIZE CAR/WAGON/MINIVAN/SUV/ MINIVAN(LONG): Selects the type of vehicle. ; DTA SETTINGS POSITION DISTANCE GAIN DTA RESET CAR SETTINGS CAR TYPE REAR-SP LOCATION Selects your vehicle. • For more suitable environment for your listening position (reference point). OFF:...

Instruction Manual 1
Page 26
... . Remedy • This unit can only display uppercase letters, numbers, and a limited number of the speaker wires are insulated properly. Reset the unit. Turn the power off and unplug the USB device. Send the unit to forcibly eject the disc. Make sure the disc is...Sound cannot be ejected. Turn the power on the display is ejected. "MISWIRING CHECK WIRING THEN POWER ON" appears. Clean the connectors. ( 24) Reset the unit. ( 3) Connect the antenna firmly. Do not use too many hierarchical levels or folders. This unit is not correct. TROUBLESHOOTING CD/USB ...
... . Remedy • This unit can only display uppercase letters, numbers, and a limited number of the speaker wires are insulated properly. Reset the unit. Turn the power off and unplug the USB device. Send the unit to forcibly eject the disc. Make sure the disc is...Sound cannot be ejected. Turn the power on the display is ejected. "MISWIRING CHECK WIRING THEN POWER ON" appears. Clean the connectors. ( 24) Reset the unit. ( 3) Connect the antenna firmly. Do not use too many hierarchical levels or folders. This unit is not correct. TROUBLESHOOTING CD/USB ...

Instruction Manual 1
Page 27
...during a phone conversation. End the Spotify application and restart, then login to your Spotify account. • Search from the Bluetooth device again. • Reset the unit. ( 3) • Make sure you have entered the same PIN code to the head unit. "ANDROID ERROR"/ "NA DEVICE" •... • Reduce the distance between the unit and the Bluetooth device. • Move the car to unit. ( 25) • Make sure KENWOOD MUSIC PLAY APP is disconnected. Please check Bluetooth connection and make sure the device is connected properly through USB. • Connected via Bluetooth: The ...
...during a phone conversation. End the Spotify application and restart, then login to your Spotify account. • Search from the Bluetooth device again. • Reset the unit. ( 3) • Make sure you have entered the same PIN code to the head unit. "ANDROID ERROR"/ "NA DEVICE" •... • Reduce the distance between the unit and the Bluetooth device. • Move the car to unit. ( 25) • Make sure KENWOOD MUSIC PLAY APP is disconnected. Please check Bluetooth connection and make sure the device is connected properly through USB. • Connected via Bluetooth: The ...
Instruction Manual 1
Page 28
... outward. • Clean the disc with a cotton swab, being interrupted or skipped during playback of registered devices has reached its limit. KENWOOD original application - Retry after deleting an unnecessary device. ( 15, DEVICE DELETE) Make sure the same voice as the registered voice tag ...is no registered device connected/found via Bluetooth. Reset the unit and try to damage the connector. The connected phone does not support Voice Recognition feature or phonebook transfer. "DEVICE FULL" "N/A...
... outward. • Clean the disc with a cotton swab, being interrupted or skipped during playback of registered devices has reached its limit. KENWOOD original application - Retry after deleting an unnecessary device. ( 15, DEVICE DELETE) Make sure the same voice as the registered voice tag ...is no registered device connected/found via Bluetooth. Reset the unit and try to damage the connector. The connected phone does not support Voice Recognition feature or phonebook transfer. "DEVICE FULL" "N/A...

Instruction Manual 1
Page 31
... hold the mounting sleeve firmly in -dash mounting). 4 Connect the [ terminal of the car battery. 5 Press to turn on the power. 6 Detach the faceplate and reset the unit within 5 seconds. ( 3) How to remove the unit 1 Detach the faceplate. 2 Fit the catch pin on the extraction keys into the slots on each...
... hold the mounting sleeve firmly in -dash mounting). 4 Connect the [ terminal of the car battery. 5 Press to turn on the power. 6 Detach the faceplate and reset the unit within 5 seconds. ( 3) How to remove the unit 1 Detach the faceplate. 2 Fit the catch pin on the extraction keys into the slots on each...


