Instruction Manual
Page 2
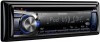
CONTENTS Safety 3 Maintenance Preparation 4 How to attach/detach the faceplate How to reset your unit How to prepare the remote controller (RC-405) Getting Started 5 Canceling the display demonstration Setting the demonstration mode Adjusting the clock Initial settings ...
CONTENTS Safety 3 Maintenance Preparation 4 How to attach/detach the faceplate How to reset your unit How to prepare the remote controller (RC-405) Getting Started 5 Canceling the display demonstration Setting the demonstration mode Adjusting the clock Initial settings ...

Instruction Manual
Page 4
.... ■ Lithium battery. Replace only with your unit If this unit fails to operate properly, press the reset 1 button. 2 The unit returns to factory settings when the reset button is incorrectly replaced. Dispose of the remote controller decreases, replace the battery. 2 4 3 1 ¤...This product contains a CR Coin Cell Lithium Battery which contains Perchlorate Material - Danger of explosion if the battery is pressed. 3 Reset button If the effectiveness of used batteries promptly. Insulation sheet ■ Do not expose the faceplate to direct sunlight, excessive heat...
.... ■ Lithium battery. Replace only with your unit If this unit fails to operate properly, press the reset 1 button. 2 The unit returns to factory settings when the reset button is incorrectly replaced. Dispose of the remote controller decreases, replace the battery. 2 4 3 1 ¤...This product contains a CR Coin Cell Lithium Battery which contains Perchlorate Material - Danger of explosion if the battery is pressed. 3 Reset button If the effectiveness of used batteries promptly. Insulation sheet ■ Do not expose the faceplate to direct sunlight, excessive heat...
Instruction Manual
Page 5
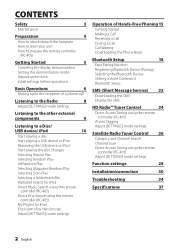
... volume knob to select [INITIAL SET], then press to enter. 4 Turn the volume knob to make a selection, then press to update the firmware, see: www.kenwood.com/cs/ce/ English 5 See table below for optimum performance. SP SELECT OFF */ 5/4/ 6 × 9/6/ OEM: Selects the speaker size for selection. 5 Hold... turn on the power (or after you cancel it. If [ON] is selected, display demonstration starts if no operation is always turned on unless you reset the unit), the display shows: [CANCEL DEMO] \ [PRESS] \ [VOLUME KNOB] 1 Press the volume knob. [YES] is selected as the initial setup. 2 ...
... volume knob to select [INITIAL SET], then press to enter. 4 Turn the volume knob to make a selection, then press to update the firmware, see: www.kenwood.com/cs/ce/ English 5 See table below for optimum performance. SP SELECT OFF */ 5/4/ 6 × 9/6/ OEM: Selects the speaker size for selection. 5 Hold... turn on the power (or after you cancel it. If [ON] is selected, display demonstration starts if no operation is always turned on unless you reset the unit), the display shows: [CANCEL DEMO] \ [PRESS] \ [VOLUME KNOB] 1 Press the volume knob. [YES] is selected as the initial setup. 2 ...
Instruction Manual
Page 30
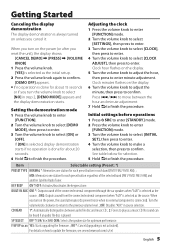
... 1) C Mounting sleeve 1) D Wiring harness 1) E Removal tool 2) F Flat head screw (for Nissan cars 4) G Round head screw (for Toyota cars 4) H Microphone (3 m) (KDC-X695 only 1) Basic procedure 1 Remove the key from the ignition switch, then disconnect the · terminal of the car battery. 2 Make proper input and output... wire connections. \ (page 32) 3 Install the unit to your car. \ (page 33) 4 Reconnect the · terminal of the car battery. 5 Reset the unit. (page 4) Warning ■ The unit can only be installed in a car with a 12 V DC power supply, negative ground. ■ If...
... 1) C Mounting sleeve 1) D Wiring harness 1) E Removal tool 2) F Flat head screw (for Nissan cars 4) G Round head screw (for Toyota cars 4) H Microphone (3 m) (KDC-X695 only 1) Basic procedure 1 Remove the key from the ignition switch, then disconnect the · terminal of the car battery. 2 Make proper input and output... wire connections. \ (page 32) 3 Install the unit to your car. \ (page 33) 4 Reconnect the · terminal of the car battery. 5 Reset the unit. (page 4) Warning ■ The unit can only be installed in a car with a 12 V DC power supply, negative ground. ■ If...
Instruction Manual
Page 34
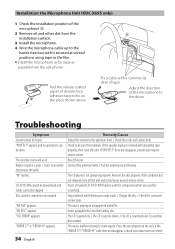
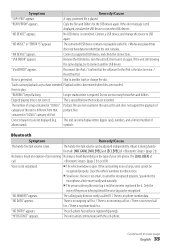
...flashes. Disc sound is not operating properly. "ERROR 77" or "ERROR 99" appears. Reinsert the disc properly. Reset the unit. Try another disc instead. Press the reset button on rough roads. / Change the disc. / Check the cords and connections. Troubleshooting Symptom Sound cannot be done...of the microphone to the hands-free box with insulating tape properly, then reset the unit. Insert a finalized CD-R/CD-RW (finalize with a commercial item of tape. Installation the Microphone Unit (KDC-X695 only) 1 Check the installation position of the microphone H. 2 Remove ...
...flashes. Disc sound is not operating properly. "ERROR 77" or "ERROR 99" appears. Reinsert the disc properly. Reset the unit. Try another disc instead. Press the reset button on rough roads. / Change the disc. / Check the cords and connections. Troubleshooting Symptom Sound cannot be done...of the microphone to the hands-free box with insulating tape properly, then reset the unit. Insert a finalized CD-R/CD-RW (finalize with a commercial item of tape. Installation the Microphone Unit (KDC-X695 only) 1 Check the installation position of the microphone H. 2 Remove ...
Instruction Manual
Page 35
... ENTRY" appears. "NO DEVICE" appears. Speak into the microphone a little more loudly and naturally. ■ The person uttering the voice tag is the latest version. / Reset the iPod. Connect a USB device, and change the source to another USB device. A copy-protected file is played.
... ENTRY" appears. "NO DEVICE" appears. Speak into the microphone a little more loudly and naturally. ■ The person uttering the voice tag is the latest version. / Reset the iPod. Connect a USB device, and change the source to another USB device. A copy-protected file is played.

Instruction Manual
Page 36
...LONG" appears. "NO MESSAGE" appears. No call. Move another Bluetooth device. "NO ACCESS" appears. If this message still appears, press the reset button on the control unit. The Bluetooth device cannot be registered. The preset content may not be registered in the phone book. Voice is ... selected band or source. 36 English The word or utterance is connected. "iPod FULL" appears. If this message still appears, press the reset button on the control unit. "TOO SOFT" appears. The voice tag is FULL. The iPod memory is not registered in In Box. ...
...LONG" appears. "NO MESSAGE" appears. No call. Move another Bluetooth device. "NO ACCESS" appears. If this message still appears, press the reset button on the control unit. The Bluetooth device cannot be registered. The preset content may not be registered in the phone book. Voice is ... selected band or source. 36 English The word or utterance is connected. "iPod FULL" appears. If this message still appears, press the reset button on the control unit. "TOO SOFT" appears. The voice tag is FULL. The iPod memory is not registered in In Box. ...


