Instruction Manual
Page 2
... Bluetooth device Displaying the Firmware Version Adding a voice dialing command Setting a Voice Command for Category 20 SMS (Short Message Service) Downloading the SMS Satellite Radio tuner (Optional Accessory) control 41 Basic Operation Category and Channel Search Preset Memory Preset Tuning Channel Scan Direct Access Tuning Basic Operations of remote control 43 Appendix 45 24 Accessories/ Installation Procedure 50 Connecting Wires to Terminals 51 Installation/Removing the Unit 52 25 Troubleshooting Guide 54 Specifications 57 2 | KDC-X993/ KDC-HD942U/ KDC-X693/ KDC...
... Bluetooth device Displaying the Firmware Version Adding a voice dialing command Setting a Voice Command for Category 20 SMS (Short Message Service) Downloading the SMS Satellite Radio tuner (Optional Accessory) control 41 Basic Operation Category and Channel Search Preset Memory Preset Tuning Channel Scan Direct Access Tuning Basic Operations of remote control 43 Appendix 45 24 Accessories/ Installation Procedure 50 Connecting Wires to Terminals 51 Installation/Removing the Unit 52 25 Troubleshooting Guide 54 Specifications 57 2 | KDC-X993/ KDC-HD942U/ KDC-X693/ KDC...
Instruction Manual
Page 3
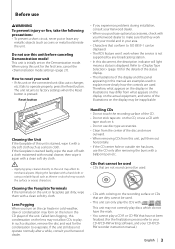
... again with . If the faceplate is displayed. CDs that cannot be used • CDs that are not round cannot be used to factory settings when the Reset button is pressed. The unit returns to explain more clearly how the controls are dirty cannot be used. • CDs with coloring on the car heater in the CD player of this unit or the connected unit (disc auto changer, etc.) fails to...
... again with . If the faceplate is displayed. CDs that cannot be used • CDs that are not round cannot be used to factory settings when the Reset button is pressed. The unit returns to explain more clearly how the controls are dirty cannot be used. • CDs with coloring on the car heater in the CD player of this unit or the connected unit (disc auto changer, etc.) fails to...
Instruction Manual
Page 4
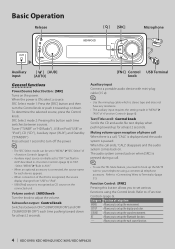
... the sound environment. Muting volume upon reception of the iPod is connected, the source name for each source function. 4 | KDC-X993/ KDC-HD942U/ KDC-X693/ KDC-MP642U SRC Select mode 1: Press the [SRC] button and then turn off the power. ⁄ • The SRC Select mode can be set in "MENU" > "SRC Select" of setup item MENU Allows you to set up for at least 2 seconds. Auxiliary input Connect a portable audio device with mini-plug cable (3.5 ø). ⁄ • Use the mini-plug cable which is stereo...
... the sound environment. Muting volume upon reception of the iPod is connected, the source name for each source function. 4 | KDC-X993/ KDC-HD942U/ KDC-X693/ KDC-MP642U SRC Select mode 1: Press the [SRC] button and then turn off the power. ⁄ • The SRC Select mode can be set in "MENU" > "SRC Select" of setup item MENU Allows you to set up for at least 2 seconds. Auxiliary input Connect a portable audio device with mini-plug cable (3.5 ø). ⁄ • Use the mini-plug cable which is stereo...
Instruction Manual
Page 5
.... Tuning mode select: [AUTO] • For KDC-HD942U/ KDC-X693/ KDC-MP642U: Switches as follows each time this button is pressed. • For KDC-X993: Switches as follows each time this button is ON. Manual "Seek Mode : Manual" Normal manual tuning control. Disc play each time this button for details. When a CD is inserted, the "CD-IN" indicator is displayed. Disc ejection: [0] ⁄ • You can eject the disc for the hands free phone is pressed for a station. Attempt to (page 34). Preset station "Seek Mode...
.... Tuning mode select: [AUTO] • For KDC-HD942U/ KDC-X693/ KDC-MP642U: Switches as follows each time this button is pressed. • For KDC-X993: Switches as follows each time this button is ON. Manual "Seek Mode : Manual" Normal manual tuning control. Disc play each time this button for details. When a CD is inserted, the "CD-IN" indicator is displayed. Disc ejection: [0] ⁄ • You can eject the disc for the hands free phone is pressed for a station. Attempt to (page 34). Preset station "Seek Mode...
Instruction Manual
Page 6
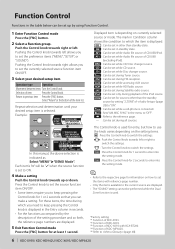
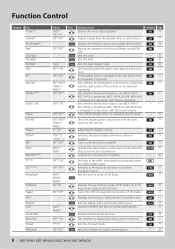
... set while Audio file source of CD/USB (excluding iPod). : Can be set while CD/ Disc changer source. : Can be set while CD source. : Can be set while Disc changer source. : Can be set during Tuner source. : Can be set during FM reception. : Can be set while accessing AUX source. : Can be set while HD Radio source. : Can be set during Satellite radio source. : Can be set only during playback of the setting procedure and so forth, the reference page numbers are displayed. 5 Exit Function Control mode...
... set while Audio file source of CD/USB (excluding iPod). : Can be set while CD/ Disc changer source. : Can be set while CD source. : Can be set while Disc changer source. : Can be set during Tuner source. : Can be set during FM reception. : Can be set while accessing AUX source. : Can be set while HD Radio source. : Can be set during Satellite radio source. : Can be set only during playback of the setting procedure and so forth, the reference page numbers are displayed. 5 Exit Function Control mode...
Instruction Manual
Page 8
... HD Radio. * "DIGITAL"/ 1 sec. KDC-X693) or brightness (KDC-HD942U/ KDC-MP642U) is poor. reception is changed in conjunction with the light * / "MNAL1" / switch of AUX input sound when the * Dual Zone function is turned on /off the display when no operation is dimmed "MNAL2" constantly. clock. Sets the display when switched to display AUX during source selection. 12 -- 34 - Sets whether to AUX source. "Auto"*/ "Manual" - Display the firmware version and update the firmware. 38 "OFF"/ "ON"* Setting the operation check sound...
... HD Radio. * "DIGITAL"/ 1 sec. KDC-X693) or brightness (KDC-HD942U/ KDC-MP642U) is poor. reception is changed in conjunction with the light * / "MNAL1" / switch of AUX input sound when the * Dual Zone function is turned on /off the display when no operation is dimmed "MNAL2" constantly. clock. Sets the display when switched to display AUX during source selection. 12 -- 34 - Sets whether to AUX source. "Auto"*/ "Manual" - Display the firmware version and update the firmware. 38 "OFF"/ "ON"* Setting the operation check sound...
Instruction Manual
Page 9
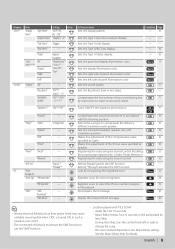
... change the song. "DTA" - Registering the value setup by road noises to select the Phone number category 39 in two steps. - "BT" "Voice - Registers voice to make vocal sound clearer. Compensates the low volume or bass sound being lost * by Sound Control. "Supreme+" "ON"*/"OFF" Turns ON/OFF the Supreme plus function. * "Position" - Makes fine adjustment of the compensation value 30 specified at 30 Speaker. "Memory" - Music...
... change the song. "DTA" - Registering the value setup by road noises to select the Phone number category 39 in two steps. - "BT" "Voice - Registers voice to make vocal sound clearer. Compensates the low volume or bass sound being lost * by Sound Control. "Supreme+" "ON"*/"OFF" Turns ON/OFF the Supreme plus function. * "Position" - Makes fine adjustment of the compensation value 30 specified at 30 Speaker. "Memory" - Music...
Instruction Manual
Page 12
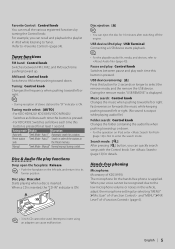
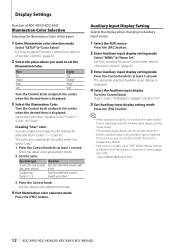
... Auxiliary input display setting mode Press the Control knob for at least 1 second. Enter the detail color adjustment mode. 2. Auxiliary Input Display Setting Selects the display when changing to adjust. "AUX"/ "DVD"/ "PORTABLE"/ "GAME"/ "VIDEO"/ "TV" 5 Exit Auxiliary input display setting mode Press the [FNC] button. ⁄ • When operation stops for at that time is used. Select the color from "Color1" - Operation type Operation To select the color to Auxiliary input source. 1 Select the AUX source Press the [SRC] button. 2 Enter Auxiliary input display setting mode Select...
... Auxiliary input display setting mode Press the Control knob for at least 1 second. Enter the detail color adjustment mode. 2. Auxiliary Input Display Setting Selects the display when changing to adjust. "AUX"/ "DVD"/ "PORTABLE"/ "GAME"/ "VIDEO"/ "TV" 5 Exit Auxiliary input display setting mode Press the [FNC] button. ⁄ • When operation stops for at that time is used. Select the color from "Color1" - Operation type Operation To select the color to Auxiliary input source. 1 Select the AUX source Press the [SRC] button. 2 Enter Auxiliary input display setting mode Select...
Instruction Manual
Page 26
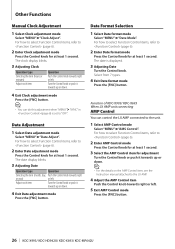
... 1 second. Function of KDC-X993/ KDC-X693 When LX AMP unit connecting AMP Control You can do this adjustment when "MENU" > "SYNC" in (page 6) is displayed. 3 Adjusting Date Turn the Control knob. The clock display blinks. 3 Adjusting Clock Operation type Selecting the item (hours or minutes) Adjust each item Turn the Control knob or push it towards up or down . 4 Exit Date adjustment mode Press the [FNC] button. For how to select Function Control items, refer to the unit. 1 Select AMP Control mode Select "MENU" > "AMS Control".
... 1 second. Function of KDC-X993/ KDC-X693 When LX AMP unit connecting AMP Control You can do this adjustment when "MENU" > "SYNC" in (page 6) is displayed. 3 Adjusting Date Turn the Control knob. The clock display blinks. 3 Adjusting Clock Operation type Selecting the item (hours or minutes) Adjust each item Turn the Control knob or push it towards up or down . 4 Exit Date adjustment mode Press the [FNC] button. For how to select Function Control items, refer to the unit. 1 Select AMP Control mode Select "MENU" > "AMS Control".

Instruction Manual
Page 28
...Item Display Range Rear volume "REAR VOLUME" 0 - 35 Subwoofer level "SUBWOOFER LEVEL" -15 - +15 Balance "BALANCE" Left 15 - Adjust the volume of sub source by [SRC] button. - Audio Adjustments Audio Control You can set Sound system , such as a difference from the basic volume. • Dual Zone System Main source and sub source (Auxiliary input) output Front channel and Rear channel separately. - Select Main source by "ZONE2" of Front channel by (page 28) or [5]/[∞] button on sub source. 1 Select the source to adjust Press the [SRC] button. 2 Enter Audio Setup mode Press...
...Item Display Range Rear volume "REAR VOLUME" 0 - 35 Subwoofer level "SUBWOOFER LEVEL" -15 - +15 Balance "BALANCE" Left 15 - Adjust the volume of sub source by [SRC] button. - Audio Adjustments Audio Control You can set Sound system , such as a difference from the basic volume. • Dual Zone System Main source and sub source (Auxiliary input) output Front channel and Rear channel separately. - Select Main source by "ZONE2" of Front channel by (page 28) or [5]/[∞] button on sub source. 1 Select the source to adjust Press the [SRC] button. 2 Enter Audio Setup mode Press...
Instruction Manual
Page 29
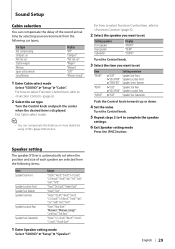
... select mode Select "SOUND" > "Setup" > "Cabin". Exit Cabin select mode. ⁄ • You can compensate the delay of each speaker are selected from the following items; For how to select Function Control item, refer to (page 6). 2 Select the speaker you want to set Setting speaker Front speaker Rear speaker Subwoofer Display "FRONT" "REAR" "SUB W" Turn the Control knob. 3 Select the item you want to set when the position and size of the sound arrival time by using (page 30) function. English | 29 Speaker setting...
... select mode Select "SOUND" > "Setup" > "Cabin". Exit Cabin select mode. ⁄ • You can compensate the delay of each speaker are selected from the following items; For how to select Function Control item, refer to (page 6). 2 Select the speaker you want to set Setting speaker Front speaker Rear speaker Subwoofer Display "FRONT" "REAR" "SUB W" Turn the Control knob. 3 Select the item you want to set when the position and size of the sound arrival time by using (page 30) function. English | 29 Speaker setting...
Instruction Manual
Page 30
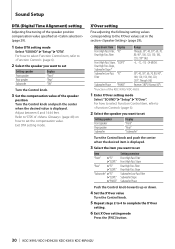
... set Setting speaker Front speaker Rear speaker Subwoofer Display "Front" "Rear" "Subwoofer" Turn the Control knob and push the center when the desired item is displayed. 3 Select the item you want to complete the X'Over setting. 6 Exit X'Over setting mode Press the [FNC] button. 30 | KDC-X993/ KDC-HD942U/ KDC-X693/ KDC-MP642U For how to select Function Control item, refer to (page 6). 2 Select the speaker you want to set in the section (page 29); Sound Setup DTA (Digital Time Alignment) setting Adjusting fine tuning...
... set Setting speaker Front speaker Rear speaker Subwoofer Display "Front" "Rear" "Subwoofer" Turn the Control knob and push the center when the desired item is displayed. 3 Select the item you want to complete the X'Over setting. 6 Exit X'Over setting mode Press the [FNC] button. 30 | KDC-X993/ KDC-HD942U/ KDC-X693/ KDC-MP642U For how to select Function Control item, refer to (page 6). 2 Select the speaker you want to set in the section (page 29); Sound Setup DTA (Digital Time Alignment) setting Adjusting fine tuning...
Instruction Manual
Page 36
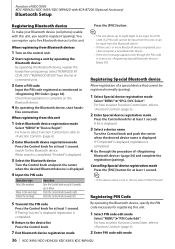
... unit. 1 Select PIN code edit mode Select "MENU" > "PIN Code Edit". A list is displayed. 3 Select a device name Turn the Control knob and push the center when the desired device name is displayed. 4 Input the PIN code Operation type Select the numbers. For how to select Function Control item, refer to the next digit. If "Completed" is displayed, registration is completed. 4 Go through the procedure of KDC-X993 KDC-HD942U/ KDC-X693/ KDC-MP642U with KCA-BT200 (Optional Accessory) Bluetooth Setup Registering Bluetooth device To make your Bluetooth device...
... unit. 1 Select PIN code edit mode Select "MENU" > "PIN Code Edit". A list is displayed. 3 Select a device name Turn the Control knob and push the center when the desired device name is displayed. 4 Input the PIN code Operation type Select the numbers. For how to select Function Control item, refer to the next digit. If "Completed" is displayed, registration is completed. 4 Go through the procedure of KDC-X993 KDC-HD942U/ KDC-X693/ KDC-MP642U with KCA-BT200 (Optional Accessory) Bluetooth Setup Registering Bluetooth device To make your Bluetooth device...

Instruction Manual
Page 37
... the Control knob towards left . '✱(name)' or '-(name)' is found in the unit even after Bluetooth connection. ⁄ • Setting on the cell-phone may be registered for each registered cell-phone. • Up to 50* characters representing a name. (* 50: Number of phone book data. Audio player Select "MENU" > "Audio Selection". To download automatically If the cell-phone supports a phone book synchronization function, the phone book is displayed. 3 Input the PIN code Operation type Select the numbers. "-": The selected Bluetooth device is on...
... the Control knob towards left . '✱(name)' or '-(name)' is found in the unit even after Bluetooth connection. ⁄ • Setting on the cell-phone may be registered for each registered cell-phone. • Up to 50* characters representing a name. (* 50: Number of phone book data. Audio player Select "MENU" > "Audio Selection". To download automatically If the cell-phone supports a phone book synchronization function, the phone book is displayed. 3 Input the PIN code Operation type Select the numbers. "-": The selected Bluetooth device is on...
Instruction Manual
Page 45
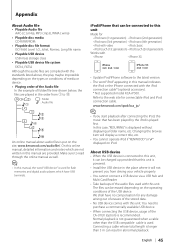
... • Playable disc file format ISO 9660 Level 1/2, Joliet, Romeo, Long file name. • Playable USB device USB mass storage class • Playable USB device file system FAT16, FAT32 Although the audio files are complied with the standards listed above, the play maybe impossible depending on the types or conditions of media or device. • Playing order of the Audio file In...
... • Playable disc file format ISO 9660 Level 1/2, Joliet, Romeo, Long file name. • Playable USB device USB mass storage class • Playable USB device file system FAT16, FAT32 Although the audio files are complied with the standards listed above, the play maybe impossible depending on the types or conditions of media or device. • Playing order of the Audio file In...
Instruction Manual
Page 50
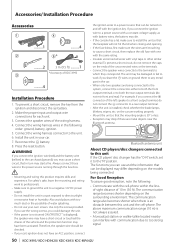
Make the proper input and output wire connections for each unit. 3. Always connect those wires to the power source running through the fuse box. ¤ • Mounting and wiring this unit If the CD player/ disc changer has the "O-N" switch, set it to the "N" position. For safety's sake, leave the mounting and wiring work if you could damage the unit. • If the power is not turned ON ("PROTECT" is installed, check whether the brake lamps, blinkers, wipers...
Make the proper input and output wire connections for each unit. 3. Always connect those wires to the power source running through the fuse box. ¤ • Mounting and wiring this unit If the CD player/ disc changer has the "O-N" switch, set it to the "N" position. For safety's sake, leave the mounting and wiring work if you could damage the unit. • If the power is not turned ON ("PROTECT" is installed, check whether the brake lamps, blinkers, wipers...

Instruction Manual
Page 51
...) Car fuse box ACC Battery wire (Yellow) Ground wire (Black) · (To car chassis) Ignition key switch Car fuse box (Main fuse) - Connecting Wires to Terminals To USB device USB connector (1m) ⁄ Do not remove the cap when you need to an exclusive remote adapter (not supplied) matches your navigation manual. The connector will cause the unit to its power control terminal. Depending on what antenna you are made, do not use the USB cable. CONT TEL mute wire (Brown) MUTE Dimmer control wire...
...) Car fuse box ACC Battery wire (Yellow) Ground wire (Black) · (To car chassis) Ignition key switch Car fuse box (Main fuse) - Connecting Wires to Terminals To USB device USB connector (1m) ⁄ Do not remove the cap when you need to an exclusive remote adapter (not supplied) matches your navigation manual. The connector will cause the unit to its power control terminal. Depending on what antenna you are made, do not use the USB cable. CONT TEL mute wire (Brown) MUTE Dimmer control wire...
Instruction Manual
Page 54
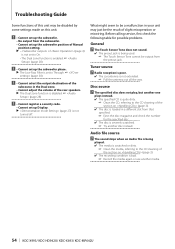
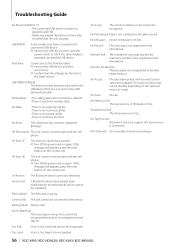
Troubleshooting Guide Some functions of this unit may be disabled by some settings made on this unit. ! • Cannot set up the subwoofer. • No output from the subwoofer. • Cannot set up the subwoofer position of Manual position setting. ▲ • of (page 4) is not set to On. • The Dual zone function is enabled. ☞ (page 28) ! • Cannot set up the subwoofer phase. ▲ The Low Pass Filter is set to Through. ☞
Troubleshooting Guide Some functions of this unit may be disabled by some settings made on this unit. ! • Cannot set up the subwoofer. • No output from the subwoofer. • Cannot set up the subwoofer position of Manual position setting. ▲ • of (page 4) is not set to On. • The Dual zone function is enabled. ☞ (page 28) ! • Cannot set up the subwoofer phase. ▲ The Low Pass Filter is set to Through. ☞
Instruction Manual
Page 55
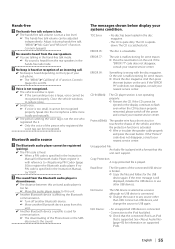
... properly. ERROR 05: The disc is large, voice cannot be recognized properly. Or the unit is malfunctioning for Bluetooth Audio Player, register it . ☞ Only the voice of the Phone book or the SMS disconnects the sound. Protect (Blink): The speaker wire has a short-circuit or touches the chassis of the connected USB device is activated. ➪ Wire or insulate the speaker cable properly and press the reset button. Read Error: The...
... properly. ERROR 05: The disc is large, voice cannot be recognized properly. Or the unit is malfunctioning for Bluetooth Audio Player, register it . ☞ Only the voice of the Phone book or the SMS disconnects the sound. Protect (Blink): The speaker wire has a short-circuit or touches the chassis of the connected USB device is activated. ➪ Wire or insulate the speaker cable properly and press the reset button. Read Error: The...
Instruction Manual
Page 56
... no phone book list. If this message still appears, press the reset button on the control unit. Device Full: 5 Bluetooth device have occurred to the connected USB device. ➪ Remove the USB device, then cycle the power switch to be recognized. Pairing Failed: Pairing error. HD Memory Full: The tag memory of voice tags reaches the maximum number to ON. Un Known: The Bluetooth device cannot be available. No Tag Function: iPod which does not support the tag memory is...
... no phone book list. If this message still appears, press the reset button on the control unit. Device Full: 5 Bluetooth device have occurred to the connected USB device. ➪ Remove the USB device, then cycle the power switch to be recognized. Pairing Failed: Pairing error. HD Memory Full: The tag memory of voice tags reaches the maximum number to ON. Un Known: The Bluetooth device cannot be available. No Tag Function: iPod which does not support the tag memory is...


