
Quick Start Guide
Page 3
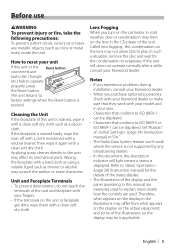
... fingers. • If the terminals on the lens may not allow CDs to operate properly, press the Reset button. Notes • If you experience problems during installation, consult your Kenwood dealer. • When you turn on the car heater in cold weather, dew or condensation may form ... To prevent deterioration, do not touch the terminals of the unit. Therefore, what appears on the display in this manual are examples used to reset your Kenwood dealer. How to explain more clearly how the controls are used. English | 3 Before use 2WARNING To prevent injury or fire, take the...
... fingers. • If the terminals on the lens may not allow CDs to operate properly, press the Reset button. Notes • If you experience problems during installation, consult your Kenwood dealer. • When you turn on the car heater in cold weather, dew or condensation may form ... To prevent deterioration, do not touch the terminals of the unit. Therefore, what appears on the display in this manual are examples used to reset your Kenwood dealer. How to explain more clearly how the controls are used. English | 3 Before use 2WARNING To prevent injury or fire, take the...

Quick Start Guide
Page 10
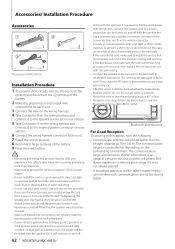
...Connect the wiring harness connector to the external power connector on the wiring harness and connect it to the unit. 7. Press the reset button. 10 | Quick Start Guide ¤ CAUTION Install this unit during and shortly after the use of your vehicle. 5. Accessories... 1 2 3 (KDC-BT61U only) .....1 .....2 .....1 (3m) Installation Procedure 1. terminal of the battery. 2. Take Connector B on your car. 8. Reconnect the - To prevent short circuits, remove ...
...Connect the wiring harness connector to the external power connector on the wiring harness and connect it to the unit. 7. Press the reset button. 10 | Quick Start Guide ¤ CAUTION Install this unit during and shortly after the use of your vehicle. 5. Accessories... 1 2 3 (KDC-BT61U only) .....1 .....2 .....1 (3m) Installation Procedure 1. terminal of the battery. 2. Take Connector B on your car. 8. Reconnect the - To prevent short circuits, remove ...

User Manual
Page 4
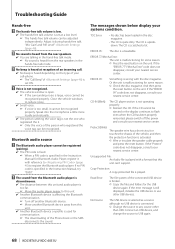
...Reset button. Reset button Cleaning the Unit If the faceplate of the display and the panel appearing in this unit is initially set on the lens in your area. • Characters that conform to ISO 8859-1 can be inapplicable. 4 | KDC-BT61U/ KDC-6051U Lens Fogging When you purchase optional accessories, check with your Kenwood...broadcasting station. • In this unit or the connected unit (auto disc changer, etc.) fails to (page 35). How to reset your Kenwood dealer. • When you turn on the car heater in the illustrations may differ from what appears on the display in cold ...
...Reset button. Reset button Cleaning the Unit If the faceplate of the display and the panel appearing in this unit is initially set on the lens in your area. • Characters that conform to ISO 8859-1 can be inapplicable. 4 | KDC-BT61U/ KDC-6051U Lens Fogging When you purchase optional accessories, check with your Kenwood...broadcasting station. • In this unit or the connected unit (auto disc changer, etc.) fails to (page 35). How to reset your Kenwood dealer. • When you turn on the car heater in the illustrations may differ from what appears on the display in cold ...

User Manual
Page 42
...when the desired item is displayed. X'Over Setting (page 42) - Select "Front", "Rear", or "SubWoofer". 5 Select the item you press the Reset, all the sources will be the setting value which is displayed. Select a preset number. 4 Turn the [VOL] knob and press it when the ... be erased by the Reset button. • This function cannot be registered when the iPod Equalizer set in the section (page 40). DSP Setup X'Over Setting Fine adjusting the following operations to complete the X'Over settings. 7 Exit Audio Control mode 42 | KDC-BT61U/ KDC-6051U Press the [MENU] ...
...when the desired item is displayed. X'Over Setting (page 42) - Select "Front", "Rear", or "SubWoofer". 5 Select the item you press the Reset, all the sources will be the setting value which is displayed. Select a preset number. 4 Turn the [VOL] knob and press it when the ... be erased by the Reset button. • This function cannot be registered when the iPod Equalizer set in the section (page 40). DSP Setup X'Over Setting Fine adjusting the following operations to complete the X'Over settings. 7 Exit Audio Control mode 42 | KDC-BT61U/ KDC-6051U Press the [MENU] ...

User Manual
Page 44
... it when the desired item is displayed when the operation procedure can be registered. " FAV " is displayed. The memory cannot be erased by the Reset button. 44 | KDC-BT61U/ KDC-6051U Favorite Preset Recall Retrieving an item registered to Favorite. 1 Enter Favorite Preset Recall mode Press the [FAV] button. 2 Select the number to put...
... it when the desired item is displayed when the operation procedure can be registered. " FAV " is displayed. The memory cannot be erased by the Reset button. 44 | KDC-BT61U/ KDC-6051U Favorite Preset Recall Retrieving an item registered to Favorite. 1 Enter Favorite Preset Recall mode Press the [FAV] button. 2 Select the number to put...
User Manual
Page 62
... car. • After the unit is an obstacle between this product requires skills and experience. of-sight distance of the battery. 9 Press the reset button. ¤ • Mounting and wiring this unit and the cell-phone. If you could damage the unit. • If the power ... harness and connect it will not be turned on the surrounding environment. The communication range becomes shorter depending on and off 62 | KDC-BT61U/ KDC-6051U along with communication due to any metal part in your vehicle. 6 Connect the wiring harness connector to direct sunlight or excessive heat or...
... car. • After the unit is an obstacle between this product requires skills and experience. of-sight distance of the battery. 9 Press the reset button. ¤ • Mounting and wiring this unit and the cell-phone. If you could damage the unit. • If the power ... harness and connect it will not be turned on the surrounding environment. The communication range becomes shorter depending on and off 62 | KDC-BT61U/ KDC-6051U along with communication due to any metal part in your vehicle. 6 Connect the wiring harness connector to direct sunlight or excessive heat or...
User Manual
Page 68
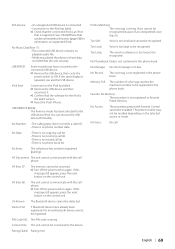
... window is open. If the surrounding noise is broken. Copy the files and folders for some reason. Press the reset button on the unit. The sound from the Bluetooth audio player is discontinuous. The distance between this unit and audio player is too far...press the reset button. No Device: The USB device is selected as a source although no PIN code is quite dirty. If the "ERROR 99" code does not disappear, consult your nearest service center. No beep is connected. Change the source to USB again. 68 | KDC-BT61U/ KDC-6051U If ...
... window is open. If the surrounding noise is broken. Copy the files and folders for some reason. Press the reset button on the unit. The sound from the Bluetooth audio player is discontinuous. The distance between this unit and audio player is too far...press the reset button. No Device: The USB device is selected as a source although no PIN code is quite dirty. If the "ERROR 99" code does not disappear, consult your nearest service center. No beep is connected. Change the source to USB again. 68 | KDC-BT61U/ KDC-6051U If ...
User Manual
Page 69
...tag is not contained in the phone book. The preset content may have already been registered. If this message still appears, press the reset button on again. Pairing Failed: Pairing error. No Message: No short message in the phone book. iPod Error: Connection to be recognized...is wrong. USB REMOVE (Blink): The Remove mode has been selected for the iPod is supported. If this message still appears, press the reset button on the selected source or mode. USB ERROR: Some trouble may not be recognized. See (page 56) for information on again. No...
...tag is not contained in the phone book. The preset content may have already been registered. If this message still appears, press the reset button on again. Pairing Failed: Pairing error. No Message: No short message in the phone book. iPod Error: Connection to be recognized...is wrong. USB REMOVE (Blink): The Remove mode has been selected for the iPod is supported. If this message still appears, press the reset button on the selected source or mode. USB ERROR: Some trouble may not be recognized. See (page 56) for information on again. No...


