

Instruction Manual
Page 30
... C Mounting sleeve 1) D Wiring harness 1) E Removal tool 2) F Flat head screw (for Nissan cars 4) G Round head screw (for Toyota cars 4) H Microphone (3 m) (KDC-X695 only 1) Basic procedure 1 Remove the key from the ignition switch, then disconnect the · terminal of the car battery. 2 Make proper input and output wire connections. \ (page 32)... unit. (page 4) Warning ■ The unit can be damaged or fail to work if you connect the ignition wire (red) and the battery wire (yellow) to which they correspond. on the car are working properly. ■ Mount the unit so that the ...
... C Mounting sleeve 1) D Wiring harness 1) E Removal tool 2) F Flat head screw (for Nissan cars 4) G Round head screw (for Toyota cars 4) H Microphone (3 m) (KDC-X695 only 1) Basic procedure 1 Remove the key from the ignition switch, then disconnect the · terminal of the car battery. 2 Make proper input and output wire connections. \ (page 32)... unit. (page 4) Warning ■ The unit can be damaged or fail to work if you connect the ignition wire (red) and the battery wire (yellow) to which they correspond. on the car are working properly. ■ Mount the unit so that the ...
Instruction Manual
Page 32
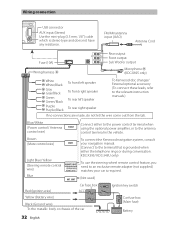
... Blue/Yellow (Steering remote control wire) Blue MUTE REMOTE CONT STEERING WHEEL REMOTE INPUT ANT. KDC-X395/ KDC-348U only) To use the steering wheel remote control feature, you need to an exclusive remote adapter (not supplied) matches your navigation manual...Antenna Cord Fuse (10A) Wiring harness D Rear output R L Front output Sub Woofer output Microphone H (KDC-X695 only) White White/Black Gray Gray/Black Green Green/Black Purple Purple/Black To front left speaker To front right speaker To rear left speaker To rear right speaker To Kenwood disc changer/ External optional ...
... Blue/Yellow (Steering remote control wire) Blue MUTE REMOTE CONT STEERING WHEEL REMOTE INPUT ANT. KDC-X395/ KDC-348U only) To use the steering wheel remote control feature, you need to an exclusive remote adapter (not supplied) matches your navigation manual...Antenna Cord Fuse (10A) Wiring harness D Rear output R L Front output Sub Woofer output Microphone H (KDC-X695 only) White White/Black Gray Gray/Black Green Green/Black Purple Purple/Black To front left speaker To front right speaker To rear left speaker To rear right speaker To Kenwood disc changer/ External optional ...

Instruction Manual
Page 33
... pin on the removal tools E into the holes on both sides) with the vehicle mounting bracket and secure the unit with the supplied screws. Other wiring connection has been completed earlier. (page 32) 2 1 B A 2 Before attaching, make sure the direction of the escutcheon is correct. (Wider hooks on the bottom... from the unit. 2 Align the holes in place. E B 12 A E C 3 English 33 F ø5mm 8mm MAX. Installing the unit 1 3 Connect the wiring harness to hold the mounting sleeve firmly in the unit (on both sides of your car C 4 5 B Bend the appropriate tabs to the C unit.
... pin on the removal tools E into the holes on both sides) with the vehicle mounting bracket and secure the unit with the supplied screws. Other wiring connection has been completed earlier. (page 32) 2 1 B A 2 Before attaching, make sure the direction of the escutcheon is correct. (Wider hooks on the bottom... from the unit. 2 Align the holes in place. E B 12 A E C 3 English 33 F ø5mm 8mm MAX. Installing the unit 1 3 Connect the wiring harness to hold the mounting sleeve firmly in the unit (on both sides of your car C 4 5 B Bend the appropriate tabs to the C unit.


