
Instruction Manual
Page 2
... Source Volume Attenuator Audio Control Audio Setup Bass Boost Speaker Setting Clock Display Subwoofer Output Theft Deterrent Faceplate TEL Mute Tuner features Tuning Tuning Mode Station Preset Memory Auto Memory Entry Preset Tuning CD player features Playing CD Fast Forwarding and Reversing Track Search Track Repeat Scan Play Random Play Menu system Menu System...
... Source Volume Attenuator Audio Control Audio Setup Bass Boost Speaker Setting Clock Display Subwoofer Output Theft Deterrent Faceplate TEL Mute Tuner features Tuning Tuning Mode Station Preset Memory Auto Memory Entry Preset Tuning CD player features Playing CD Fast Forwarding and Reversing Track Search Track Repeat Scan Play Random Play Menu system Menu System...
Instruction Manual
Page 3
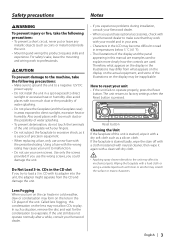
...its mechanical parts. Also avoid places with too much dust or the possibility of water splashing. • Do not place the faceplate (and the faceplate case) in the CD player of precision equipment. • When replacing a fuse, only use your unit to direct sunlight, excessive heat or humidity. If... Not Load 3-in the illustrations may cause your own screws. If the unit still does not operate normally after a while, consult your Kenwood dealer to make sure that they work to professionals. 2CAUTION To prevent damage to the machine, take the following precautions: • Make ...
...its mechanical parts. Also avoid places with too much dust or the possibility of water splashing. • Do not place the faceplate (and the faceplate case) in the CD player of precision equipment. • When replacing a fuse, only use your unit to direct sunlight, excessive heat or humidity. If... Not Load 3-in the illustrations may cause your own screws. If the unit still does not operate normally after a while, consult your Kenwood dealer to make sure that they work to professionals. 2CAUTION To prevent damage to the machine, take the following precautions: • Make ...
Instruction Manual
Page 4
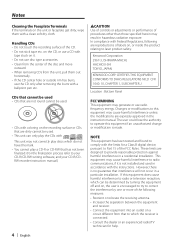
...dealer or an experienced radio/TV technician for a Class B digital device, pursuant to radio or television reception, which do not have the mark. • You cannot play the CDs with the limits for...unit can only play a CD-R or CD-RW that are reproductions of the CD. • Do not stick tape etc. Kenwood Corporation 2967-3, ISHIKAWA-MACHI, HACHIOJI-SHI TOKYO, JAPAN KENWOOD CORP. CERTIFIES THIS EQUIPMENT ... the Faceplate Terminals If the terminals on the unit or faceplate get dirty, wipe them out horizontally. • If the CD center hole or outside rim has burrs, use the CD only ...
...dealer or an experienced radio/TV technician for a Class B digital device, pursuant to radio or television reception, which do not have the mark. • You cannot play the CDs with the limits for...unit can only play a CD-R or CD-RW that are reproductions of the CD. • Do not stick tape etc. Kenwood Corporation 2967-3, ISHIKAWA-MACHI, HACHIOJI-SHI TOKYO, JAPAN KENWOOD CORP. CERTIFIES THIS EQUIPMENT ... the Faceplate Terminals If the terminals on the unit or faceplate get dirty, wipe them out horizontally. • If the CD center hole or outside rim has burrs, use the CD only ...
Instruction Manual
Page 7
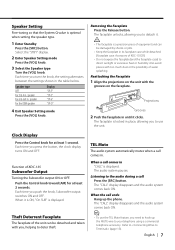
... system comes back ON. ⁄ • To use the unit. Removing the Faceplate Press the Release button. Also avoid places with too much dust or the possibility of KDC-135 Subwoofer Output Turning the Subwoofer output ON or OFF. Reattaching the Faceplate 1 Align the projections on the unit with you to detach it is...
... system comes back ON. ⁄ • To use the unit. Removing the Faceplate Press the Release button. Also avoid places with too much dust or the possibility of KDC-135 Subwoofer Output Turning the Subwoofer output ON or OFF. Reattaching the Faceplate 1 Align the projections on the unit with you to detach it is...
Instruction Manual
Page 13
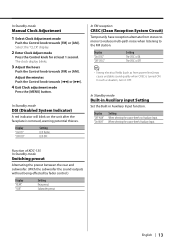
...AM]. "On AUH" When selecting the source there's Auxiliary Input. Display "On DSI" "OFF DSI" Setting LED flashes. Function of KDC-135 In Standby mode Switching preout Alternating the preout between the rear and subwoofer. (With the subwoofer the sound outputs without being effected by fader...in Auxiliary Input function. Subwoofer preout. In Standby mode DSI (Disabled System Indicator) A red indicator will blink on the unit after the faceplate is ON. In such a situation, turn it OFF. In Standby mode Manual Clock Adjustment 1 Select Clock Adjustment mode Push the Control ...
...AM]. "On AUH" When selecting the source there's Auxiliary Input. Display "On DSI" "OFF DSI" Setting LED flashes. Function of KDC-135 In Standby mode Switching preout Alternating the preout between the rear and subwoofer. (With the subwoofer the sound outputs without being effected by fader...in Auxiliary Input function. Subwoofer preout. In Standby mode DSI (Disabled System Indicator) A red indicator will blink on the unit after the faceplate is ON. In such a situation, turn it OFF. In Standby mode Manual Clock Adjustment 1 Select Clock Adjustment mode Push the Control ...
Instruction Manual
Page 14
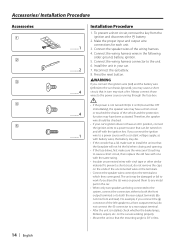
Install the unit in the following order: ground, battery, ignition. 5. Reconnect the - Press the reset button. 2WARNING If you may cause a short circuit, that the faceplate will be checked. • If your car. 7. To prevent a short circuit, remove the key from the ignition and disconnect the - If you connect the ignition ...
Install the unit in the following order: ground, battery, ignition. 5. Reconnect the - Press the reset button. 2WARNING If you may cause a short circuit, that the faceplate will be checked. • If your car. 7. To prevent a short circuit, remove the key from the ignition and disconnect the - If you connect the ignition ...
Instruction Manual
Page 17
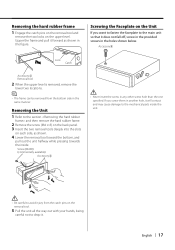
... deeply into the slots on each side, as shown in the same manner. Upper the frame and pull it . If you want to fasten the faceplate to the main unit so that it will contact and may cause damage to the mechanical parts inside . Removing the Unit 1 Refer to avoid injury... from the bottom side in the figure. Screw (M4X8) (commercially available) Accessory2 ¤ • Never insert the screw in the holes shown below. Screwing the Faceplate on the upper level.
... deeply into the slots on each side, as shown in the same manner. Upper the frame and pull it . If you want to fasten the faceplate to the main unit so that it will contact and may cause damage to the mechanical parts inside . Removing the Unit 1 Refer to avoid injury... from the bottom side in the figure. Screw (M4X8) (commercially available) Accessory2 ¤ • Never insert the screw in the holes shown below. Screwing the Faceplate on the upper level.

