
Instruction Manual
Page 1
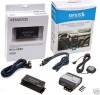
Familiarity with installation and operation procedures will help you call upon your Kenwood dealer for information or service on the back of Sirius Satellite Radio Inc. Take the ...KCA-SR50 SIRIUS INTERFACE BOX FOR CONNECTING KENWOOD HEAD UNITS TO SIRIUS RECEIVERS INSTRUCTION MANUAL BOITIER D'INTERFACE SIRIUS POUR BRANCHEMENT D'UNITES PRINCIPALES KENWOOD AU RECEPTEURS SIRIUS MODE D'EMPLOI CAJA DE INTERFACE SIRIUS PARA CONECTAR UNIDADES KENWOOD A RECEPTORES SIRIUS MANUAL DE INSTRUCCIONES Kenwood Corporation SIRIUS" c0l'#oJecL © 2007 Sirius Satellite Radio Inc. "SIRIUS:' the SIRIUS...
Familiarity with installation and operation procedures will help you call upon your Kenwood dealer for information or service on the back of Sirius Satellite Radio Inc. Take the ...KCA-SR50 SIRIUS INTERFACE BOX FOR CONNECTING KENWOOD HEAD UNITS TO SIRIUS RECEIVERS INSTRUCTION MANUAL BOITIER D'INTERFACE SIRIUS POUR BRANCHEMENT D'UNITES PRINCIPALES KENWOOD AU RECEPTEURS SIRIUS MODE D'EMPLOI CAJA DE INTERFACE SIRIUS PARA CONECTAR UNIDADES KENWOOD A RECEPTORES SIRIUS MANUAL DE INSTRUCCIONES Kenwood Corporation SIRIUS" c0l'#oJecL © 2007 Sirius Satellite Radio Inc. "SIRIUS:' the SIRIUS...
Instruction Manual
Page 2
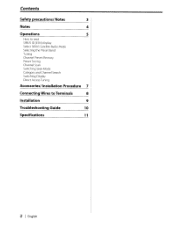
Contents Safety precautions/ Notes 3 Notes 4 Operations 5 How to read SIRIUS ID [ESN] display Select SIRIUS Satellite Rddio Mode Selecting the Preset Band Tuning Channel Preset Memory Preset Tuning Channel Scan Switching Seek Mode Category and Channel Search Switching Display Direct Access Tuning Accessories/Installation Procedure 7 Connecting Wires to Terminals 8 Installation 9 Troubleshooting Guide 10 Specifications 11 2 I English
Contents Safety precautions/ Notes 3 Notes 4 Operations 5 How to read SIRIUS ID [ESN] display Select SIRIUS Satellite Rddio Mode Selecting the Preset Band Tuning Channel Preset Memory Preset Tuning Channel Scan Switching Seek Mode Category and Channel Search Switching Display Direct Access Tuning Accessories/Installation Procedure 7 Connecting Wires to Terminals 8 Installation 9 Troubleshooting Guide 10 Specifications 11 2 I English

Instruction Manual
Page 3
... open the top or bottom covers of water splashing. • Use only the screws provided or specified for installation. If that does not solve the problem, consult your Kenwood dealer. • If the unit does not seem to receive after approximately 15 seconds. I English 3 Safety... fuel tank, brake tube, wirin~J harnesses, etc. If you use wrong screws, you experience problems during installation, consult your Kenwood dealer. • When the reset button is pressed, the SIRIUS satellite radio becomes ready to be working right, try pressing the reset button on the other side.
... open the top or bottom covers of water splashing. • Use only the screws provided or specified for installation. If that does not solve the problem, consult your Kenwood dealer. • If the unit does not seem to receive after approximately 15 seconds. I English 3 Safety... fuel tank, brake tube, wirin~J harnesses, etc. If you use wrong screws, you experience problems during installation, consult your Kenwood dealer. • When the reset button is pressed, the SIRIUS satellite radio becomes ready to be working right, try pressing the reset button on the other side.

Instruction Manual
Page 7
...and connectors by mobile parts. English I 7 Install the unit in your Kenwood dealer. Otherwise wire disconnection or other trouble may result. Connect the SIRIUS interface box and the control unit using the provided SIRIUS connection wire. 3. Insulate unconnected wires with vinyl... are securely made by inserting jacks until they lock completely. If your car is not prepared for each unit. 4. After the unit is turned ON. Accessories/ Installation Procedure Accessories L_-------l' L 2 L_~..41 Installation Procedure 1. Make sure that the antenna wire and other...
...and connectors by mobile parts. English I 7 Install the unit in your Kenwood dealer. Otherwise wire disconnection or other trouble may result. Connect the SIRIUS interface box and the control unit using the provided SIRIUS connection wire. 3. Insulate unconnected wires with vinyl... are securely made by inserting jacks until they lock completely. If your car is not prepared for each unit. 4. After the unit is turned ON. Accessories/ Installation Procedure Accessories L_-------l' L 2 L_~..41 Installation Procedure 1. Make sure that the antenna wire and other...

Instruction Manual
Page 9
... screws should be used for mounting. (Attachment with velcro strips, although easy, can come off with driving. thickness: 15 mm or more I English 9 Installation using the velcro tapes Installation using the self-tapping screws Accessory@ (04 x 12 mm) & Please do not place objects on the other side, and be careful not to... unit should be securely fastened at a location that the gas tank, break pipe, wire harness, or other part is not located on top of it. Installation & Install the unit in the chassis, check that will not interfere with a shock) Board etc. When...
... screws should be used for mounting. (Attachment with velcro strips, although easy, can come off with driving. thickness: 15 mm or more I English 9 Installation using the velcro tapes Installation using the self-tapping screws Accessory@ (04 x 12 mm) & Please do not place objects on the other side, and be careful not to... unit should be securely fastened at a location that the gas tank, break pipe, wire harness, or other part is not located on top of it. Installation & Install the unit in the chassis, check that will not interfere with a shock) Board etc. When...

Instruction Manual
Page 11
Specifications Specifications subject to change without notice. General Operating voltage (11 - 16V allowable) : 14.4 V Current consumption : 420 mA Installation Size (W x H x D) : 127 x 35 x 52 mm 5 x 1-3/8 x 2-1/16 inch Weight : 0.17 kg (0.37 Ibs) English I 11
Specifications Specifications subject to change without notice. General Operating voltage (11 - 16V allowable) : 14.4 V Current consumption : 420 mA Installation Size (W x H x D) : 127 x 35 x 52 mm 5 x 1-3/8 x 2-1/16 inch Weight : 0.17 kg (0.37 Ibs) English I 11


