
Quick Start Guide
Page 1
B59-2041-00/00 (KW) Familiarity with installation and operation procedures will help you call upon your Kenwood dealer for information or service on the warranty card, and in the space provided below. For your Kenwood product at www.Kenwoodusa.com © 2010 Kenwood Corporation All Rights Reserved. Model DNX9980HD Serial number US Residents Only...
B59-2041-00/00 (KW) Familiarity with installation and operation procedures will help you call upon your Kenwood dealer for information or service on the warranty card, and in the space provided below. For your Kenwood product at www.Kenwoodusa.com © 2010 Kenwood Corporation All Rights Reserved. Model DNX9980HD Serial number US Residents Only...
Quick Start Guide
Page 2
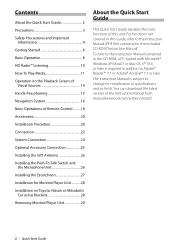
... Escutcheon 27 Installation for Monitor/Player Unit............28 Installation on Toyota, Nissan or Mitsubishi Car using Brackets 28 Removing Monitor/Player Unit 29 About the Quick Start Guide This Quick Start Guide explains the basic functions of this Guide, refer to change for modification of the Instruction Manual from manual.kenwood.com/edition...
... Escutcheon 27 Installation for Monitor/Player Unit............28 Installation on Toyota, Nissan or Mitsubishi Car using Brackets 28 Removing Monitor/Player Unit 29 About the Quick Start Guide This Quick Start Guide explains the basic functions of this Guide, refer to change for modification of the Instruction Manual from manual.kenwood.com/edition...
Quick Start Guide
Page 3
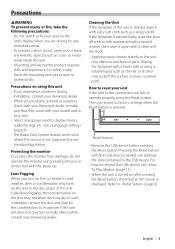
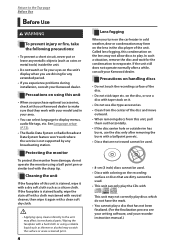
.... Called lens fogging, this condensation on using this unit • If you experience problems during installation, consult your Kenwood dealer. • When you purchase optional accessories, check with your Kenwood dealer to make sure that they work with a dry soft cloth such as a silicon cloth. If the unit still ... SETUP screen is stained, wipe it again with a hard cloth or using a ball point pen or similar tool with the USB device installed can damage the data contained in the disc player of this product requires skills and experience. Cleaning the Unit If the faceplate of the ...
.... Called lens fogging, this condensation on using this unit • If you experience problems during installation, consult your Kenwood dealer. • When you purchase optional accessories, check with your Kenwood dealer to make sure that they work with a dry soft cloth such as a silicon cloth. If the unit still ... SETUP screen is stained, wipe it again with a hard cloth or using a ball point pen or similar tool with the USB device installed can damage the data contained in the disc player of this product requires skills and experience. Cleaning the Unit If the faceplate of the ...
Quick Start Guide
Page 17
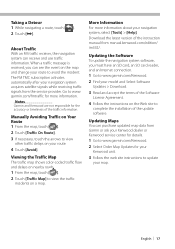
...receiving traffic signals from Gamin or ask your Kenwood dealer or Kenwood service center for details. 1 Go to www.garmin.com/Kenwood. 2 Select Order Map Updates for your Kenwood unit. 3 Follow the web site instructions to complete the installation of the update software. Go to view... the latest version of the traffic information. Manually Avoiding Traffic on your navigation system, select [Tools] > [Help]. Notes Garmin and Kenwood are not responsible for more information about your route. 4 Touch [Avoid]. More Information For more information. Updating the Software To update the...
...receiving traffic signals from Gamin or ask your Kenwood dealer or Kenwood service center for details. 1 Go to www.garmin.com/Kenwood. 2 Select Order Map Updates for your Kenwood unit. 3 Follow the web site instructions to complete the installation of the update software. Go to view... the latest version of the traffic information. Manually Avoiding Traffic on your navigation system, select [Tools] > [Help]. Notes Garmin and Kenwood are not responsible for more information about your route. 4 Touch [Avoid]. More Information For more information. Updating the Software To update the...
Quick Start Guide
Page 18
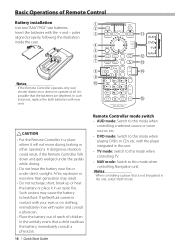
... a selected source or tuner source, etc. • DVD mode: Switch to this mode when playing DVDs or CDs etc. Basic Operations of Remote Control Battery installation 1 Use two "AAA"/"R03"-size batteries. 2 Insert the batteries with water and consult a physician. • Place the battery out of reach of children. AUD U DVD...
... a selected source or tuner source, etc. • DVD mode: Switch to this mode when playing DVDs or CDs etc. Basic Operations of Remote Control Battery installation 1 Use two "AAA"/"R03"-size batteries. 2 Insert the batteries with water and consult a physician. • Place the battery out of reach of children. AUD U DVD...
Quick Start Guide
Page 20
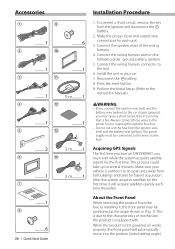
... your car. 7. Always connect those wires to the wires via the fuse. After the system acquires satellites for fastest acquisition. Accessories 1 9 ..........1 ..........6 2 0 ..........1 ..........1 3 ! ..........1 5 m..........1 4 @ ..........1 ..........1 5 # ..........2 3 m..........1 6 $ ..........1 7 3 m..........1 ..........1 8 ..........6 20 | Quick Start Guide Installation Procedure 1. Connect the wiring harness connector to several minutes. The power supply must wait while the system acquires satellite signals for each time thereafter. This...
... your car. 7. Always connect those wires to the wires via the fuse. After the system acquires satellites for fastest acquisition. Accessories 1 9 ..........1 ..........6 2 0 ..........1 ..........1 3 ! ..........1 5 m..........1 4 @ ..........1 ..........1 5 # ..........2 3 m..........1 6 $ ..........1 7 3 m..........1 ..........1 8 ..........6 20 | Quick Start Guide Installation Procedure 1. Connect the wiring harness connector to several minutes. The power supply must wait while the system acquires satellite signals for each time thereafter. This...
Quick Start Guide
Page 21
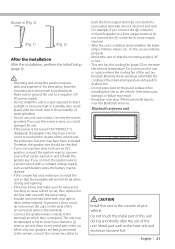
... or humidity. Use only the screws provided. Therefore, the speaker wire should be drained. • If the console has a lid, make sure to install the unit so that the faceplate will inhibit the cooling of your vehicle. For example, if you connect the + connector of water splashing. • ... the internal temperature. on the car are blocked. If you could damage the unit. • If the power is not turned ON ("PROTECT" is installed, check whether the brake lamps, blinkers, wipers, etc. To prevent a short circuit, do not mix front and rear). Blocking these openings will not ...
... or humidity. Use only the screws provided. Therefore, the speaker wire should be drained. • If the console has a lid, make sure to install the unit so that the faceplate will inhibit the cooling of your vehicle. For example, if you connect the + connector of water splashing. • ... the internal temperature. on the car are blocked. If you could damage the unit. • If the power is not turned ON ("PROTECT" is installed, check whether the brake lamps, blinkers, wipers, etc. To prevent a short circuit, do not mix front and rear). Blocking these openings will not ...
Quick Start Guide
Page 22
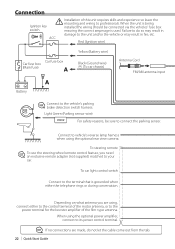
... so may result in damage to the vehicle's parking brake detection switch harness. When the unit is being installed the wiring should be sure to the terminal that is used. Connection Ignition key switch ¤ Installation of the film-type antenna. To car light control switch Connect to connect the parking sensor.
... so may result in damage to the vehicle's parking brake detection switch harness. When the unit is being installed the wiring should be sure to the terminal that is used. Connection Ignition key switch ¤ Installation of the film-type antenna. To car light control switch Connect to connect the parking sensor.
Quick Start Guide
Page 26
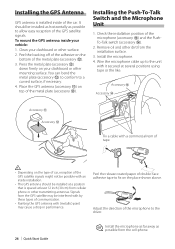
...the release coated paper of double-face adhesive tape to the unit with (metallic) paint may be installed as horizontally as possible from the installation surface. 3. Installing the GPS Antenna GPS antenna is spaced at several positions using tape or the like. You can bend...conform to allow easy reception of the microphone (accessory #) and the PushTo-Talk switch (accessory $). 2. Remove oil and other transmitting antennas. Installing the Push-To-Talk Switch and the Microphone Unit 1. Press the metal plate (accessory @) down firmly on top of the metal plate (...
...the release coated paper of double-face adhesive tape to the unit with (metallic) paint may be installed as horizontally as possible from the installation surface. 3. Installing the GPS Antenna GPS antenna is spaced at several positions using tape or the like. You can bend...conform to allow easy reception of the microphone (accessory #) and the PushTo-Talk switch (accessory $). 2. Remove oil and other transmitting antennas. Installing the Push-To-Talk Switch and the Microphone Unit 1. Press the metal plate (accessory @) down firmly on top of the metal plate (...
Quick Start Guide
Page 27
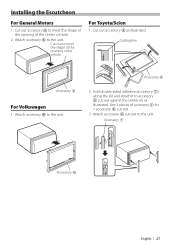
... 6 to accessory 6 cut -out to the unit. Use 2 pieces of the center console. 2. Accessory 7 Accessory 0 English | 27 For Toyota/Scion 1. Cutting line Accessory 6 For Volkswagen 1. Installing the Escutcheon For General Motors 1.
... 6 to accessory 6 cut -out to the unit. Use 2 pieces of the center console. 2. Accessory 7 Accessory 0 English | 27 For Toyota/Scion 1. Cutting line Accessory 6 For Volkswagen 1. Installing the Escutcheon For General Motors 1.
Quick Start Guide
Page 28
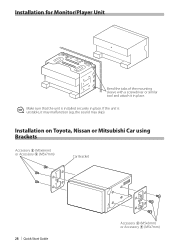
If the unit is installed securely in place. Installation for Monitor/Player Unit Bend the tabs of the mounting sleeve with a screwdriver or similar tool and attach it in place. ⁄ Make sure that the unit is unstable, it may malfunction (eg, the sound may skip). Installation on Toyota, Nissan or Mitsubishi Car using Brackets Accessory 8 (M5x6mm) or Accessory 9 (M5x7mm) Car Bracket 28 | Quick Start Guide Accessory 8 (M5x6mm) or Accessory 9 (M5x7mm)
If the unit is installed securely in place. Installation for Monitor/Player Unit Bend the tabs of the mounting sleeve with a screwdriver or similar tool and attach it in place. ⁄ Make sure that the unit is unstable, it may malfunction (eg, the sound may skip). Installation on Toyota, Nissan or Mitsubishi Car using Brackets Accessory 8 (M5x6mm) or Accessory 9 (M5x7mm) Car Bracket 28 | Quick Start Guide Accessory 8 (M5x6mm) or Accessory 9 (M5x7mm)

Quick Start Guide
Page 31
... Location : Bottom Panel CALIFORNIA, USA ONLY This product contains a CR Coin Cell Lithium Battery which the receiver is not installed and used in accordance with the instructions. special handling may cause harmful interference to radio communications, if it is connected. ...SHI TOKYO, JAPAN KENWOOD CORP. FCC WARNING This equipment may cause harmful interference unless the modifications are expressly approved in the instruction manual. NOTE This equipment has been tested and found to provide reasonable protection against harmful interference in a particular installation. The term ...
... Location : Bottom Panel CALIFORNIA, USA ONLY This product contains a CR Coin Cell Lithium Battery which the receiver is not installed and used in accordance with the instructions. special handling may cause harmful interference to radio communications, if it is connected. ...SHI TOKYO, JAPAN KENWOOD CORP. FCC WARNING This equipment may cause harmful interference unless the modifications are expressly approved in the instruction manual. NOTE This equipment has been tested and found to provide reasonable protection against harmful interference in a particular installation. The term ...
dnx9980hd (pdf)
Page 4
...from renting or leasing the Data or the Garmin products containing the Data to rent out such products. 4 GPS Navigation Instruction Manual INSTALLING, COPYING, OR OTHERWISE USING THIS PRODUCT INDICATES YOUR ACKNOWLEDGMENT THAT YOU HAVE READ THIS LICENSE AND AGREE TO ITS TERMS. IF ... your "), on the one hand, and Garmin and its subsidiaries ("Garmin"). End-User License Agreements Software License Agreement BY USING THE DNX9980HD / DNX7180 / DNX6980 / DNX6180 / DNX6040EX / DNX5180, YOU AGREE TO BE BOUND BY THE TERMS AND CONDITIONS OF THE FOLLOWING SOFTWARE LICENSE AGREEMENT. You...
...from renting or leasing the Data or the Garmin products containing the Data to rent out such products. 4 GPS Navigation Instruction Manual INSTALLING, COPYING, OR OTHERWISE USING THIS PRODUCT INDICATES YOUR ACKNOWLEDGMENT THAT YOU HAVE READ THIS LICENSE AND AGREE TO ITS TERMS. IF ... your "), on the one hand, and Garmin and its subsidiaries ("Garmin"). End-User License Agreements Software License Agreement BY USING THE DNX9980HD / DNX7180 / DNX6980 / DNX6180 / DNX6040EX / DNX5180, YOU AGREE TO BE BOUND BY THE TERMS AND CONDITIONS OF THE FOLLOWING SOFTWARE LICENSE AGREEMENT. You...
dnx9980hd (pdf)
Page 28
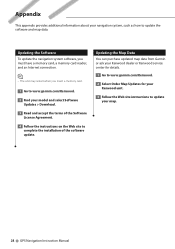
... card reader, and an Internet connection. ⁄ • The unit may restart when you insert a memory card. 1 Go to www.garmin.com/Kenwood. 2 Find your map. 28 GPS Navigation Instruction Manual Updating the Map Data You can purchase updated map data from Garmin or ask your...Updates for your Kenwood unit. 3 Follow the Web site instructions to update your model and select Software Updates > Download. 3 Read and accept the terms of the software update. Appendix This appendix provides additional information about your navigation system, such as how to complete the installation of the ...
... card reader, and an Internet connection. ⁄ • The unit may restart when you insert a memory card. 1 Go to www.garmin.com/Kenwood. 2 Find your map. 28 GPS Navigation Instruction Manual Updating the Map Data You can purchase updated map data from Garmin or ask your...Updates for your Kenwood unit. 3 Follow the Web site instructions to update your model and select Software Updates > Download. 3 Read and accept the terms of the software update. Appendix This appendix provides additional information about your navigation system, such as how to complete the installation of the ...
dnx9980hd (pdf)
Page 29
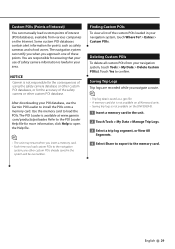
... while you navigate a route. ⁄ • Trip log data is saved as safety cameras and school zones. Deleting Custom POIs To delete all Kenwood units. • Saving trip logs is lawful in your navigation system, touch Tools > My Data > Delete Custom POI(s). NOTICE Garmin is available at... www.garmin .com/products/poiloader. Some custom POI databases contain alert information for ensuring that your use the Garmin POI Loader to install the POIs onto a memory card. click Help to open the Help file. ⁄ • The unit may restart when you insert a memory card...
... while you navigate a route. ⁄ • Trip log data is saved as safety cameras and school zones. Deleting Custom POIs To delete all Kenwood units. • Saving trip logs is lawful in your navigation system, touch Tools > My Data > Delete Custom POI(s). NOTICE Garmin is available at... www.garmin .com/products/poiloader. Some custom POI databases contain alert information for ensuring that your use the Garmin POI Loader to install the POIs onto a memory card. click Help to open the Help file. ⁄ • The unit may restart when you insert a memory card...
dnx7180 (pdf)
Page 1
... whenever you obtain the best performance from your Kenwood product at www.Kenwoodusa.com © 2010 Kenwood Corporation All Rights Reserved. 11DNXMid_IM324_Ref_K_En_00 (K/K2/R) Model DNX7180/ DNX7480BT/ DNX6980/ DNX6180/ DNX6040EX/ DNX6480BT/ ...DNX5180 Serial number US Residence Only Register Online Register your new GPS Navigation System. Refer to check the latest edition and the modified pages. Familiarity with installation...
... whenever you obtain the best performance from your Kenwood product at www.Kenwoodusa.com © 2010 Kenwood Corporation All Rights Reserved. 11DNXMid_IM324_Ref_K_En_00 (K/K2/R) Model DNX7180/ DNX7480BT/ DNX6980/ DNX6180/ DNX6040EX/ DNX6480BT/ ...DNX5180 Serial number US Residence Only Register Online Register your new GPS Navigation System. Refer to check the latest edition and the modified pages. Familiarity with installation...
dnx7180 (pdf)
Page 3
... Audio 81 Setting Audio 81 Controlling General Audio 84 Equalizer Control 85 Zone Control 87 Space Enhancer 88 Listening Position 88 Remote Controller 90 Battery Installation 90 Functions Of The Remote Controller Buttons 91 2
... Audio 81 Setting Audio 81 Controlling General Audio 84 Equalizer Control 85 Zone Control 87 Space Enhancer 88 Listening Position 88 Remote Controller 90 Battery Installation 90 Functions Of The Remote Controller Buttons 91 2
dnx7180 (pdf)
Page 5
... to make sure that they work where the service is not supported by any extended period. • If you experience problems during installation, consult your Kenwood dealer. Called lens fogging, this condensation on using this unit, pull them out horizontally. • If the disc center hole or outside rim ...stuck on it with a dry soft cloth such as a silicon cloth. on the disc, or use the disc only after a while, consult your Kenwood dealer. This unit may not allow discs to display menus, audio file tags, etc. Return to the Top page Before Use Before Use 2 WARNING ...
... to make sure that they work where the service is not supported by any extended period. • If you experience problems during installation, consult your Kenwood dealer. Called lens fogging, this condensation on using this unit, pull them out horizontally. • If the disc center hole or outside rim ...stuck on it with a dry soft cloth such as a silicon cloth. on the disc, or use the disc only after a while, consult your Kenwood dealer. This unit may not allow discs to display menus, audio file tags, etc. Return to the Top page Before Use Before Use 2 WARNING ...
dnx7180 (pdf)
Page 11
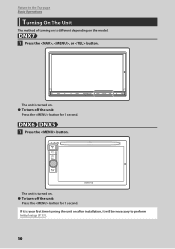
If it is your first time turning the unit on the model. 1 Press the , , or button. The unit is turned on . ●●To turn off the unit: Press the button for 1 second. 1 Press the button. The unit is turned on . ●●To turn off the unit: Press the button for 1 second. Return to the Top page Basic Operations Turning On The Unit The method of turning on is different depending on after installation, it will be necessary to perform Initial setup (P.11). 10
If it is your first time turning the unit on the model. 1 Press the , , or button. The unit is turned on . ●●To turn off the unit: Press the button for 1 second. 1 Press the button. The unit is turned on . ●●To turn off the unit: Press the button for 1 second. Return to the Top page Basic Operations Turning On The Unit The method of turning on is different depending on after installation, it will be necessary to perform Initial setup (P.11). 10
dnx7180 (pdf)
Page 41
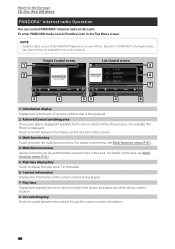
To enter PANDORA mode, touch [Pandora] icon in the Apple iTunes App Store to find and install the most current version.) Simple Control screen 1 2 List Control screen 2 6 7 3 4 53 4 8 1 Information display Displays text information of current contents that is being played. 7... key Touch to switch between the Simple Control and List Control screen. 3 Multi function key Touch to switch the multi function menu. NOTE • Install the latest version of the PANDORA® application on the menu, see Multi function menu (P.41). 4 Multi function menu Various functions can control PANDORA...
To enter PANDORA mode, touch [Pandora] icon in the Apple iTunes App Store to find and install the most current version.) Simple Control screen 1 2 List Control screen 2 6 7 3 4 53 4 8 1 Information display Displays text information of current contents that is being played. 7... key Touch to switch between the Simple Control and List Control screen. 3 Multi function key Touch to switch the multi function menu. NOTE • Install the latest version of the PANDORA® application on the menu, see Multi function menu (P.41). 4 Multi function menu Various functions can control PANDORA...


