Instruction Manual
Page 4
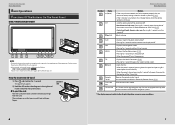
... different from the actual panels. • In this feature by Remote Sensor (P.79). Labelled side 0 6 Return to the Top page Basic Operations Number Name 1 fi (Reset) 2 ATT 3 ∞, 5 (Vol) 4 AUD 5 NAV 6 MENU 7 TEL 8 0 (Eject) 9 Remote Sensor 10 Disc insert slot 11 SD card slot Motion • If ...the unit or the connected unit fails to operate properly, the unit returns to factory settings when this button is pressed (P.107). • If the SI function is turned on, this guide are examples used to provide clear...
... different from the actual panels. • In this feature by Remote Sensor (P.79). Labelled side 0 6 Return to the Top page Basic Operations Number Name 1 fi (Reset) 2 ATT 3 ∞, 5 (Vol) 4 AUD 5 NAV 6 MENU 7 TEL 8 0 (Eject) 9 Remote Sensor 10 Disc insert slot 11 SD card slot Motion • If ...the unit or the connected unit fails to operate properly, the unit returns to factory settings when this button is pressed (P.107). • If the SI function is turned on, this guide are examples used to provide clear...
Instruction Manual
Page 5
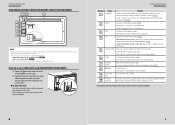
... from the card. Return to the Top page Basic Operations Number Name 1 fi (Reset) Motion • If the unit or the connected unit fails to operate properly, the ... display. 7 Remote Sensor Receives the remote control signal. Return to the Top page Basic Operations DNX6990HD/DNX6190HD/DNX6490BT/DNX5190/DNX5060EX 178 9 2 3 DNX6490BT 4 5 6 10 DNX6990HD DNX6490BT NOTE • The.... • Pressing for 1 second ejects the disc forcibly. 9 Disc insert slot A slot to factory settings when this button is pressed (P.107). • If the SI function is turned on, this...
... from the card. Return to the Top page Basic Operations Number Name 1 fi (Reset) Motion • If the unit or the connected unit fails to operate properly, the ... display. 7 Remote Sensor Receives the remote control signal. Return to the Top page Basic Operations DNX6990HD/DNX6190HD/DNX6490BT/DNX5190/DNX5060EX 178 9 2 3 DNX6490BT 4 5 6 10 DNX6990HD DNX6490BT NOTE • The.... • Pressing for 1 second ejects the disc forcibly. 9 Disc insert slot A slot to factory settings when this button is pressed (P.107). • If the SI function is turned on, this...
Instruction Manual
Page 54
... then reconnect it. • The unit does not support the iPod. Confirm that the connected SiriusXM tuner is connected to operate properly, reset the unit. 1 Press the button. See Connectable iPod/iPhone (P.110). Check Antenna No antenna is connected. No Signal No SiriusXM radio ...The communication error has occurred due to the Top page Troubleshooting Error Message Cause USB Device The connected USB device is connected to factory settings. Subscription The SiriusXM subscription has been Updated - Check that an antenna is the latest version. The unit returns to the ...
... then reconnect it. • The unit does not support the iPod. Confirm that the connected SiriusXM tuner is connected to operate properly, reset the unit. 1 Press the button. See Connectable iPod/iPhone (P.110). Check Antenna No antenna is connected. No Signal No SiriusXM radio ...The communication error has occurred due to the Top page Troubleshooting Error Message Cause USB Device The connected USB device is connected to factory settings. Subscription The SiriusXM subscription has been Updated - Check that an antenna is the latest version. The unit returns to the ...
Quick Start Guide
Page 4
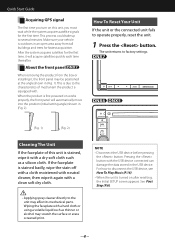
...it will automatically move into the position (initial setting angle) shown in the USB device. This process could take up to operate properly, reset the unit. 1 Press the button. Make sure your vehicle is turned on works properly, the front panel will acquire satellites quickly each time...faceplate is equipped with. Pressing the button with a dry soft cloth such as thinner or alcohol may affect its mechanical parts. This is due to factory settings. (Fig. 1) (Fig. 2) Cleaning The Unit If the faceplate of mechanism the product is stained badly, wipe the stain off with ...
...it will automatically move into the position (initial setting angle) shown in the USB device. This process could take up to operate properly, reset the unit. 1 Press the button. Make sure your vehicle is turned on works properly, the front panel will acquire satellites quickly each time...faceplate is equipped with. Pressing the button with a dry soft cloth such as thinner or alcohol may affect its mechanical parts. This is due to factory settings. (Fig. 1) (Fig. 2) Cleaning The Unit If the faceplate of mechanism the product is stained badly, wipe the stain off with ...
Quick Start Guide
Page 9
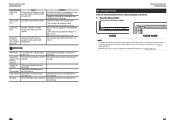
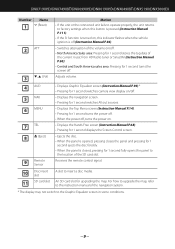
... switch to the Graphic Equalizer screen in some conditions. 9 DNX7190HD/DNX7490BT/DNX6990HD/DNX6190HD/DNX6490BT/DNX5190/DNX5060EX Number Name 1 fi (Reset) 2 ATT 3 ∞, 5 (Vol) Motion • If the unit or the connected unit fails to operate properly, the unit returns to factory settings when this button is pressed (Instruction Manual P.111). • If the...
... switch to the Graphic Equalizer screen in some conditions. 9 DNX7190HD/DNX7490BT/DNX6990HD/DNX6190HD/DNX6490BT/DNX5190/DNX5060EX Number Name 1 fi (Reset) 2 ATT 3 ∞, 5 (Vol) Motion • If the unit or the connected unit fails to operate properly, the unit returns to factory settings when this button is pressed (Instruction Manual P.111). • If the...

Quick Start Guide
Page 11
DNX7190HD/DNX7490BT/DNX6990HD/DNX6190HD/DNX6490BT/DNX5190/DNX5060EX Number Name 1 fi (Reset) Motion • If the unit or the connected unit fails to operate properly, the unit returns to factory settings when this button is pressed (Instruction Manual P.111). • If the SI function is off (Instruction Manual P.84). 2 MENU • Displays the Top Menu...
DNX7190HD/DNX7490BT/DNX6990HD/DNX6190HD/DNX6490BT/DNX5190/DNX5060EX Number Name 1 fi (Reset) Motion • If the unit or the connected unit fails to operate properly, the unit returns to factory settings when this button is pressed (Instruction Manual P.111). • If the SI function is off (Instruction Manual P.84). 2 MENU • Displays the Top Menu...


