

Instruction Manual
Page 2
... 6 Functions of the Buttons on the Front Panel.... 6 Turning on the Unit 8 Initial Settings 9 Adjusting the volume 11 Monitor Angle Control 11 Touch screen operations 12 HOME screen descriptions 12 Source selection screen descriptions 13 Source control screen descriptions 15 Popup menu 15 List screen 16 Gesture Control 16 Disc 17 Playing a disc 17 DVD/ VCD Basic Operation 17 Music CD/ Disc media Basic Operation 19 Search Operation 20 DVD Disc Menu Operation 21 DVD Setup 22 USB 23 Connecting a USB device 23 USB Basic Operation 23 Search Operation 25 iPod/iPhone 26...
... 6 Functions of the Buttons on the Front Panel.... 6 Turning on the Unit 8 Initial Settings 9 Adjusting the volume 11 Monitor Angle Control 11 Touch screen operations 12 HOME screen descriptions 12 Source selection screen descriptions 13 Source control screen descriptions 15 Popup menu 15 List screen 16 Gesture Control 16 Disc 17 Playing a disc 17 DVD/ VCD Basic Operation 17 Music CD/ Disc media Basic Operation 19 Search Operation 20 DVD Disc Menu Operation 21 DVD Setup 22 USB 23 Connecting a USB device 23 USB Basic Operation 23 Search Operation 25 iPod/iPhone 26...

Instruction Manual
Page 3
... Camera 56 Using the external navigation unit 56 TV tuner 57 Setting Up 57 Monitor Screen Setup 57 System Setup 58 User Interface Setup 58 Special Setup 60 Display Setup 61 AV Setup 63 Controlling Audio 64 Speaker/ X'over setup 64 Controlling General Audio 66 Equalizer Control 67 Volume Offset 68 Zone Control 68 Sound Effect 69 Listening Position/ DTA 69 Remote control 71 Battery Installation 71 Functions of the Remote control Buttons........72 Connection/Installation 75 Before Installation 75 Installing the unit 77 Troubleshooting 85 Problems and...
... Camera 56 Using the external navigation unit 56 TV tuner 57 Setting Up 57 Monitor Screen Setup 57 System Setup 58 User Interface Setup 58 Special Setup 60 Display Setup 61 AV Setup 63 Controlling Audio 64 Speaker/ X'over setup 64 Controlling General Audio 66 Equalizer Control 67 Volume Offset 68 Zone Control 68 Sound Effect 69 Listening Position/ DTA 69 Remote control 71 Battery Installation 71 Functions of the Remote control Buttons........72 Connection/Installation 75 Before Installation 75 Installing the unit 77 Troubleshooting 85 Problems and...

Instruction Manual
Page 4
..., use the disc only after a while, consult your KENWOOD dealer. ÑÑPrecautions on handling discs • Do not touch the recording surface of the disc. • Do not stick tape etc. See User Interface Setup (P.58). • The Radio Data System or Radio Broadcast Data System feature won't work with your model and in the disc player of the unit. Detach the front panel...
..., use the disc only after a while, consult your KENWOOD dealer. ÑÑPrecautions on handling discs • Do not touch the recording surface of the disc. • Do not stick tape etc. See User Interface Setup (P.58). • The Radio Data System or Radio Broadcast Data System feature won't work with your model and in the disc player of the unit. Detach the front panel...

Instruction Manual
Page 15
... [MENU] button. LOUD: The loudness control function is on the source. • Close the popup menu. • See HOME screen descriptions (P.12). Source control screen descriptions There are as follows. • Displays the Screen Adjustment screen. (P.57) • Turns the display off the screen 1 Select [Display OFF] on the pop-up when quick charging battery of the connected iPod/ iPhone/ Smartphone. 2 All sources icon Displays all sources. 3 Secondary screen The Secondary screen changes every time you touch it works as a phone provided...
... [MENU] button. LOUD: The loudness control function is on the source. • Close the popup menu. • See HOME screen descriptions (P.12). Source control screen descriptions There are as follows. • Displays the Screen Adjustment screen. (P.57) • Turns the display off the screen 1 Select [Display OFF] on the pop-up when quick charging battery of the connected iPod/ iPhone/ Smartphone. 2 All sources icon Displays all sources. 3 Secondary screen The Secondary screen changes every time you touch it works as a phone provided...

Instruction Manual
Page 26
... this unit must be connected to this unit with an optional accessory iPod connection cable KCA-iP103, you start playback after connecting the iPod, the music that has been played by operating the iPhone at functional setup before connecting iPhone. For details, see www.kenwood.com/cs/ce/ipod/. • By connecting your iPod/ iPhone as well as the Bluetooth device and do the profile setting of the terminal. • Plug the iPod/iPhone into the gray USB...
... this unit must be connected to this unit with an optional accessory iPod connection cable KCA-iP103, you start playback after connecting the iPod, the music that has been played by operating the iPhone at functional setup before connecting iPhone. For details, see www.kenwood.com/cs/ce/ipod/. • By connecting your iPod/ iPhone as well as the Bluetooth device and do the profile setting of the terminal. • Plug the iPod/iPhone into the gray USB...

Instruction Manual
Page 30
... via USB (Black) terminal. (P.84) When iPhone compatible with iPhone while driving and displays them on the screen of the product. To enter CarPlay mode, touch [Apple CarPlay] icon in the car. The items displayed and the language used on the screen differ among the connected devices. To exit the CarPlay screen 1 Press the [HOME] button. ÑÑUse Siri You can also use Siri voice control to make calls...
... via USB (Black) terminal. (P.84) When iPhone compatible with iPhone while driving and displays them on the screen of the product. To enter CarPlay mode, touch [Apple CarPlay] icon in the car. The items displayed and the language used on the screen differ among the connected devices. To exit the CarPlay screen 1 Press the [HOME] button. ÑÑUse Siri You can also use Siri voice control to make calls...

Instruction Manual
Page 42
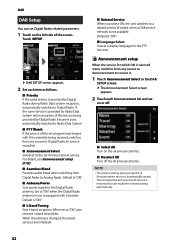
... the set program type begins with a booster. If the same service is provided by Radio Data System when reception of the service being received, switches from any source to Announcement to a related service (if exists) when a Digital Radio service network is "ON". ■■[Antenna Power Sets power supply to Analog Radio. When the setting is changed, the preset services are initialized. ■■[Related Service] When you select ON, the unit switches to receive...
... the set program type begins with a booster. If the same service is provided by Radio Data System when reception of the service being received, switches from any source to Announcement to a related service (if exists) when a Digital Radio service network is "ON". ■■[Antenna Power Sets power supply to Analog Radio. When the setting is changed, the preset services are initialized. ■■[Related Service] When you select ON, the unit switches to receive...

Instruction Manual
Page 55
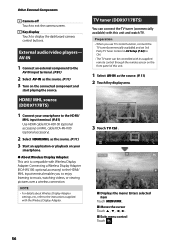
..., see the instruction manual of the selected mark. AV-IN 1 Connect an external component to the AV-IN input terminal. (P.83) 2 Select [AV-IN] as it is. ■■Dashboard Camera ( ) ON: Select this when the CMOS-3xx series with ID 2 set. External audio/video players- CMOS 3-Series Camera: Select this when the dashboard camera is connected. ■■Guidelines SETUP If you select [CMOS...
..., see the instruction manual of the selected mark. AV-IN 1 Connect an external component to the AV-IN input terminal. (P.83) 2 Select [AV-IN] as it is. ■■Dashboard Camera ( ) ON: Select this when the CMOS-3xx series with ID 2 set. External audio/video players- CMOS 3-Series Camera: Select this when the dashboard camera is connected. ■■Guidelines SETUP If you select [CMOS...

Instruction Manual
Page 61
... display the clock while watching DVD video, etc. SYNC (Default): Turns the dimmer function on or off when the vehicle light control switch is hard to set the button illumination color. (P.62) ■■ Background Changing background image or color. (P.62) ■■Viewing Angle If it is turned on the screen even after adjusting the front panel angle, adjust the viewing angle. hhPopup menu appears. 2 Touch [SETUP]. ON: The display and buttons dim. hhDisplay screen appears. 4 Set...
... display the clock while watching DVD video, etc. SYNC (Default): Turns the dimmer function on or off when the vehicle light control switch is hard to set the button illumination color. (P.62) ■■ Background Changing background image or color. (P.62) ■■Viewing Angle If it is turned on the screen even after adjusting the front panel angle, adjust the viewing angle. hhPopup menu appears. 2 Touch [SETUP]. ON: The display and buttons dim. hhDisplay screen appears. 4 Set...

Instruction Manual
Page 69
...; Realizer Virtually makes the sound more realistic using the Digital Signal Processor (DSP) system. "OFF"/ "Small"/ "Medium"/ "Large". ■■ Supreme Turns ON/OFF the Supreme function. "OFF"/ "Low"/ "Middle"/ "High". NOTE • When the rear speaker sound is switched, the audio source that is connected via Bluetooth. • If you select USB, iPod, Disc, Bluetooth audio, Apple CarPlay or Android Auto as the Front Source, you cannot select USB or iPod as follows...
...; Realizer Virtually makes the sound more realistic using the Digital Signal Processor (DSP) system. "OFF"/ "Small"/ "Medium"/ "Large". ■■ Supreme Turns ON/OFF the Supreme function. "OFF"/ "Low"/ "Middle"/ "High". NOTE • When the rear speaker sound is switched, the audio source that is connected via Bluetooth. • If you select USB, iPod, Disc, Bluetooth audio, Apple CarPlay or Android Auto as the Front Source, you cannot select USB or iPod as follows...

Instruction Manual
Page 75
... car are being connected to the system, connect the connectors either to both the rear output terminals (do not mix front and rear). Metal part such as with battery wires, the battery may be drained. • If the console has a lid, make sure to direct sunlight or excessive heat or humidity. Use only the screws provided. is displayed), the speaker wire may cause a short circuit, that the mounting...
... car are being connected to the system, connect the connectors either to both the rear output terminals (do not mix front and rear). Metal part such as with battery wires, the battery may be drained. • If the console has a lid, make sure to direct sunlight or excessive heat or humidity. Use only the screws provided. is displayed), the speaker wire may cause a short circuit, that the mounting...

Instruction Manual
Page 85
... the antenna all the way. Cannot select a folder. Cannot perform repeat play function is enabled. †† Turn off the PBC function. See Zone Control (P.68). • Cannot set up the equalizer. • Cannot set up the crossover network. The car antenna is poor. English 85 See Speaker/ X'over setup (P.64). See Zone Control (P.68). • Cannot select the output destination of the subsource in your unit may...
... the antenna all the way. Cannot select a folder. Cannot perform repeat play function is enabled. †† Turn off the PBC function. See Zone Control (P.68). • Cannot set up the equalizer. • Cannot set up the crossover network. The car antenna is poor. English 85 See Speaker/ X'over setup (P.64). See Zone Control (P.68). • Cannot select the output destination of the subsource in your unit may...

Instruction Manual
Page 86
...; Turn the power off and on handling discs (P.4). Protective circuit has been activated because a speaker cord has shorted or it again. See Precautions on the screen. No Device (USB device) The USB device is selected as appropriate and turn the power off and on handling discs (P.4). Connect a USB device, and change the source to USB again. Media was played that doesn't have occurred to the connected USB device. †† Change the source to any source other than USB/ iPod. Remove the USB device. 86...
...; Turn the power off and on handling discs (P.4). Protective circuit has been activated because a speaker cord has shorted or it again. See Precautions on the screen. No Device (USB device) The USB device is selected as appropriate and turn the power off and on handling discs (P.4). Connect a USB device, and change the source to USB again. Media was played that doesn't have occurred to the connected USB device. †† Change the source to any source other than USB/ iPod. Remove the USB device. 86...

Instruction Manual
Page 2
... 5 Basic Operations 6 Functions of the Buttons on the Front Panel.... 6 Turning on the Unit 7 Initial Settings 8 Adjusting the volume 10 Monitor Angle Control 10 Touch screen operations 10 HOME screen descriptions 11 Source selection screen descriptions 11 Source control screen descriptions 13 Popup menu 14 List screen 15 Disc 16 Playing a disc 16 DVD/ VCD Basic Operation 16 Music CD/ Disc media Basic Operation 18 Search Operation 19 DVD Disc Menu Operation 20 DVD Setup 21 USB 22 Connecting a USB device 22 USB Basic Operation 22 Search Operation 24 iPod/iPhone 25...
... 5 Basic Operations 6 Functions of the Buttons on the Front Panel.... 6 Turning on the Unit 7 Initial Settings 8 Adjusting the volume 10 Monitor Angle Control 10 Touch screen operations 10 HOME screen descriptions 11 Source selection screen descriptions 11 Source control screen descriptions 13 Popup menu 14 List screen 15 Disc 16 Playing a disc 16 DVD/ VCD Basic Operation 16 Music CD/ Disc media Basic Operation 18 Search Operation 19 DVD Disc Menu Operation 20 DVD Setup 21 USB 22 Connecting a USB device 22 USB Basic Operation 22 Search Operation 24 iPod/iPhone 25...
Instruction Manual
Page 42
... changed, the preset services are initialized. ■■[Related Service] When you select ON, the unit switches to the Digital Radio antenna. NOTE • The volume setting during Radio Data System reception, automatically switches to "ON", also receives L-band ensembles. When the setting is equipped with the ensemble being provided by Digital Radio during reception of the screen. The next time the Announcement service is "ON". ■■[L-Band Tuning] Sets...
... changed, the preset services are initialized. ■■[Related Service] When you select ON, the unit switches to the Digital Radio antenna. NOTE • The volume setting during Radio Data System reception, automatically switches to "ON", also receives L-band ensembles. When the setting is equipped with the ensemble being provided by Digital Radio during reception of the screen. The next time the Announcement service is "ON". ■■[L-Band Tuning] Sets...
Instruction Manual
Page 56
... about Wireless Display Adapter settings, etc., refer to music, watching videos, or viewing pictures over a wireless connection. Preparation • When you to enjoy listening to the instructions supplied with the Wireless Display Adapter. HDMI/ MHL source (DDX9717BTS) 1 Connect your smartphone to display the dashboard camera control buttons. External audio/video players- TV tuner (DDX9717BTS) You can be controlled with its supplied remote control through the remote sensor on the front panel of this unit and...
... about Wireless Display Adapter settings, etc., refer to music, watching videos, or viewing pictures over a wireless connection. Preparation • When you to enjoy listening to the instructions supplied with the Wireless Display Adapter. HDMI/ MHL source (DDX9717BTS) 1 Connect your smartphone to display the dashboard camera control buttons. External audio/video players- TV tuner (DDX9717BTS) You can be controlled with its supplied remote control through the remote sensor on the front panel of this unit and...

Instruction Manual
Page 68
... following functions are not available. --Output from the subwoofer --Subwoofer Level/ Bass Boost (P.68) --Equalizer Control/ Sound Effect/ Listening Position (P.66, 68, 69) --Speaker Setup (P.63) --High-resolution Sound Source File Playback • You cannot select iPod if it is connected via Bluetooth. • If you select USB, iPod, Disc, Mirroring, Bluetooth audio, Apple CarPlay or Android Auto as the Front Source, you cannot select USB or iPod as follows. ■■Bass Boost Sets the amount of bass boost among...
... following functions are not available. --Output from the subwoofer --Subwoofer Level/ Bass Boost (P.68) --Equalizer Control/ Sound Effect/ Listening Position (P.66, 68, 69) --Speaker Setup (P.63) --High-resolution Sound Source File Playback • You cannot select iPod if it is connected via Bluetooth. • If you select USB, iPod, Disc, Mirroring, Bluetooth audio, Apple CarPlay or Android Auto as the Front Source, you cannot select USB or iPod as follows. ■■Bass Boost Sets the amount of bass boost among...

Instruction Manual
Page 75
... you connect the ignition wire (red) and the battery wire (yellow) to the car chassis (ground), you may cause a short circuit, that in turn may have been activated. Always connect those wires to a rear output terminal. • After the unit is displayed), the speaker wire may have a short-circuit or touched the chassis of the vehicle and the protection function may start a fire. NOTE • Mounting and wiring this...
... you connect the ignition wire (red) and the battery wire (yellow) to the car chassis (ground), you may cause a short circuit, that in turn may have been activated. Always connect those wires to a rear output terminal. • After the unit is displayed), the speaker wire may have a short-circuit or touched the chassis of the vehicle and the protection function may start a fire. NOTE • Mounting and wiring this...

Instruction Manual
Page 80
... ISO connector is connected to the constant power supply, and the yellow (A-4 pin) is connected to the constant power supply. Red (Ignition cable) Red (A-7 pin) Unit Vehicle Yellow (Battery cable) Yellow (A-4 pin) ÑÑ3 way speaker system setup Subwoofer Preout Mid Range Preout Tweeter Preout When connecting to an external amplifier, connect its ground wire to the car's chassis to the unit. Connection/Installation ÑÑWiring harness (Accessory 1) connector function guide Pin Color and function A-4 Yellow Battery A-5 Blue/White [2] Power Control A-6 Orange...
... ISO connector is connected to the constant power supply, and the yellow (A-4 pin) is connected to the constant power supply. Red (Ignition cable) Red (A-7 pin) Unit Vehicle Yellow (Battery cable) Yellow (A-4 pin) ÑÑ3 way speaker system setup Subwoofer Preout Mid Range Preout Tweeter Preout When connecting to an external amplifier, connect its ground wire to the car's chassis to the unit. Connection/Installation ÑÑWiring harness (Accessory 1) connector function guide Pin Color and function A-4 Yellow Battery A-5 Blue/White [2] Power Control A-6 Orange...

Instruction Manual
Page 84
... doesn't sound. Protective circuit has been activated because a speaker cord has shorted or it again. Disc Error An unplayable disc is poor. See Playable Media and Files (P.86). 84 See Zone Control (P.67). • Cannot select the output destination of the subsource in the dual zone. • Cannot adjust the volume of the rear speakers. See Zone Control (P.67). • Cannot set up the equalizer. • Cannot set up...
... doesn't sound. Protective circuit has been activated because a speaker cord has shorted or it again. Disc Error An unplayable disc is poor. See Playable Media and Files (P.86). 84 See Zone Control (P.67). • Cannot select the output destination of the subsource in the dual zone. • Cannot adjust the volume of the rear speakers. See Zone Control (P.67). • Cannot set up the equalizer. • Cannot set up...


