Instruction Manual
Page 2
...items 50 Memorizing/recalling the settings 54 Locking the settings 54 Adjusting the touch position 54 BLUETOOTH OPERATIONS (Only for DDX790/DDX770/DDX7070BT/ DDX470/DDX4070BT) Information for using Bluetooth® devices 55 Bluetooth operations 55 Connecting Bluetooth devices 56 ...Operations from the remote controller 67 REFERENCE Maintenance 71 More about this unit 72 Troubleshooting 74 Accessories/Installation Procedure 79 Connecting Wires to Terminals...... 81 Connecting a USB device/iPod/ iPhone 82 Connecting Other Products........... 83 Installing/Removing the Unit........ 84 ...
...items 50 Memorizing/recalling the settings 54 Locking the settings 54 Adjusting the touch position 54 BLUETOOTH OPERATIONS (Only for DDX790/DDX770/DDX7070BT/ DDX470/DDX4070BT) Information for using Bluetooth® devices 55 Bluetooth operations 55 Connecting Bluetooth devices 56 ...Operations from the remote controller 67 REFERENCE Maintenance 71 More about this unit 72 Troubleshooting 74 Accessories/Installation Procedure 79 Connecting Wires to Terminals...... 81 Connecting a USB device/iPod/ iPhone 82 Connecting Other Products........... 83 Installing/Removing the Unit........ 84 ...
Instruction Manual
Page 3
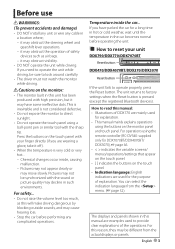
... the car for a long time in hot or cold weather, wait until the temperature in a location where; - Cautions on the touch panel with your unit DDX790/DDX770/DDX7070BT Reset button DDX470/DDX4070BT/DDX370/DDX3070 Reset button If the unit fails to factory settings when the Reset button is pressed (except the.... This is inevitable and is very cold or very hot... - Before use WARNINGS: (To prevent accidents and damage) • DO NOT install any unit or wire any cable in the car becomes normal before performing any complicated operations.
... the car for a long time in hot or cold weather, wait until the temperature in a location where; - Cautions on the touch panel with your unit DDX790/DDX770/DDX7070BT Reset button DDX470/DDX4070BT/DDX370/DDX3070 Reset button If the unit fails to factory settings when the Reset button is pressed (except the.... This is inevitable and is very cold or very hot... - Before use WARNINGS: (To prevent accidents and damage) • DO NOT install any unit or wire any cable in the car becomes normal before performing any complicated operations.
Instruction Manual
Page 39
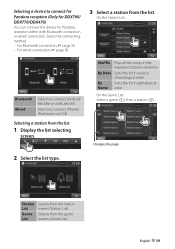
.... On the Genre List: Select a genre (1), then a station (2). On the Station List: Bluetooth Wired Selects to connect for Pandora reception (Only for DDX790/ DDX770/DDX470) You can connect the device for Pandora reception either with Bluetooth connection or wired connection. English 39 Select the connecting method. • For Bluetooth connection, ☞ page 56...
.... On the Genre List: Select a genre (1), then a station (2). On the Station List: Bluetooth Wired Selects to connect for Pandora reception (Only for DDX790/ DDX770/DDX470) You can connect the device for Pandora reception either with Bluetooth connection or wired connection. English 39 Select the connecting method. • For Bluetooth connection, ☞ page 56...

Instruction Manual
Page 74
..." No phonebook data is contained in to the instructions supplied with the adapters used for DDX790/DDX770/DDX7070BT/DDX470/DDX4070BT) Message Remedy/Cause "No BT Dongle" The Bluetooth adapter (KS-UBT1) is compatible with the car chassis. Wire or insulate the speaker cord as the instructions supplied with the external components). "Panel...
..." No phonebook data is contained in to the instructions supplied with the adapters used for DDX790/DDX770/DDX7070BT/DDX470/DDX4070BT) Message Remedy/Cause "No BT Dongle" The Bluetooth adapter (KS-UBT1) is compatible with the car chassis. Wire or insulate the speaker cord as the instructions supplied with the external components). "Panel...
Instruction Manual
Page 79
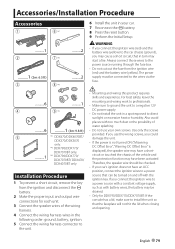
... 8 *2 ..........2 ..........6 ..........1 4 9 *3 ..........6 ..........1 (3m: 9.8 ft) 5 *1 DDX470/DDX4070BT/ DDX370/DDX3070 only. *2 DDX790/DDX770/ DDX7070BT only. ..........1 *3 DDX790/DDX770/ DDX7070BT/ DDX470/ DDX4070BT only. WARNING • If you connect the ignition wire (red) and the battery wire (yellow) to a power source that can be turned on and off with the ignition key. If...ignition and disconnect the · battery. 2 Make the proper input and output wire connections for DDX790/DDX770/DDX7070BT: If the console has a lid, make sure to install the unit so that ...
... 8 *2 ..........2 ..........6 ..........1 4 9 *3 ..........6 ..........1 (3m: 9.8 ft) 5 *1 DDX470/DDX4070BT/ DDX370/DDX3070 only. *2 DDX790/DDX770/ DDX7070BT only. ..........1 *3 DDX790/DDX770/ DDX7070BT/ DDX470/ DDX4070BT only. WARNING • If you connect the ignition wire (red) and the battery wire (yellow) to a power source that can be turned on and off with the ignition key. If...ignition and disconnect the · battery. 2 Make the proper input and output wire connections for DDX790/DDX770/DDX7070BT: If the console has a lid, make sure to install the unit so that ...
Instruction Manual
Page 80
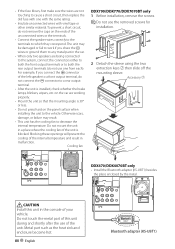
...the unit. For example, if you share the · wires or ground them to any metal part in the console of the unconnected wires or the terminals. • Connect the speaker wires correctly to the terminals to the vehicle. Cooling fan DDX790/DDX770/DDX7070BT only 1 Before installation, remove the screws. ... press hard on the panel surface when installing the unit to which they correspond. • If the fuse blows, first make sure the wires are not touching to cause a short circuit, then replace the old fuse with vinyl tape or other similar material. Accessory 7 DDX470/DDX4070BT ...
...the unit. For example, if you share the · wires or ground them to any metal part in the console of the unconnected wires or the terminals. • Connect the speaker wires correctly to the terminals to the vehicle. Cooling fan DDX790/DDX770/DDX7070BT only 1 Before installation, remove the screws. ... press hard on the panel surface when installing the unit to which they correspond. • If the fuse blows, first make sure the wires are not touching to cause a short circuit, then replace the old fuse with vinyl tape or other similar material. Accessory 7 DDX470/DDX4070BT ...
Instruction Manual
Page 81
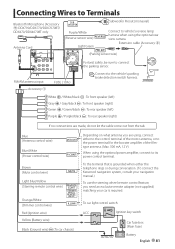
... switch Car fuse box (Main fuse) Battery English 81 Connecting Wires to Terminals Bluetooth Microphone (Accessory 9) DDX790/DDX770/DDX7070BT/ DDX470/DDX4070BT only Antenna Cord Subwoofer Preout (monaural) Purple/White (Reverse sensor wire) Light Green Connect to vehicle's reverse lamp harness when using the...; : To rear speaker (right) If no connections are using, connect either the telephone rings or during conversation. (To connect the Kenwood navigation system, consult your navigation manual.) To use the steering wheel remote control feature, you are made, do not let the cable ...
... switch Car fuse box (Main fuse) Battery English 81 Connecting Wires to Terminals Bluetooth Microphone (Accessory 9) DDX790/DDX770/DDX7070BT/ DDX470/DDX4070BT only Antenna Cord Subwoofer Preout (monaural) Purple/White (Reverse sensor wire) Light Green Connect to vehicle's reverse lamp harness when using the...; : To rear speaker (right) If no connections are using, connect either the telephone rings or during conversation. (To connect the Kenwood navigation system, consult your navigation manual.) To use the steering wheel remote control feature, you are made, do not let the cable ...
Instruction Manual
Page 85
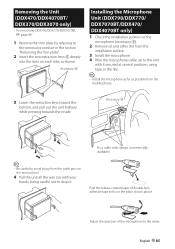
... the driver. Accessory 6 Installing the Microphone Unit (DDX790/DDX770/ DDX7070BT/DDX470/ DDX4070BT only) 1 Check the installation position of the microphone (accessory 9). 2 Remove oil and other dirt from the installation surface. 3 Install the microphone. 4 Wire the microphone cable up to the unit with your ...double-face adhesive tape to fix on the place shown above. Removing the Unit (DDX470/DDX4070BT/ DDX370/DDX3070 only) • For removing DDX790/DDX770/DDX7070BT, ☞ page 80. 1 Remove the trim plate by referring to the removal procedure in the section "Removing the Trim...
... the driver. Accessory 6 Installing the Microphone Unit (DDX790/DDX770/ DDX7070BT/DDX470/ DDX4070BT only) 1 Check the installation position of the microphone (accessory 9). 2 Remove oil and other dirt from the installation surface. 3 Install the microphone. 4 Wire the microphone cable up to the unit with your ...double-face adhesive tape to fix on the place shown above. Removing the Unit (DDX470/DDX4070BT/ DDX370/DDX3070 only) • For removing DDX790/DDX770/DDX7070BT, ☞ page 80. 1 Remove the trim plate by referring to the removal procedure in the section "Removing the Trim...


