
Instruction Manual
Page 2
... REMOTE CONTROLLER Overview 63 Operations from the remote controller 64 REFERENCE Maintenance 68 More about this unit 69 Troubleshooting 71 Accessories/Installation Procedure 76 Connecting Wires to Terminals...78 Connecting a USB device/iPod/ iPhone 79 Connecting Other Products........80 Installing/Removing the Unit.....81 Specifications 83 KS-UBT1 (USB Bluetooth Adapter...
... REMOTE CONTROLLER Overview 63 Operations from the remote controller 64 REFERENCE Maintenance 68 More about this unit 69 Troubleshooting 71 Accessories/Installation Procedure 76 Connecting Wires to Terminals...78 Connecting a USB device/iPod/ iPhone 79 Connecting Other Products........80 Installing/Removing the Unit.....81 Specifications 83 KS-UBT1 (USB Bluetooth Adapter...
Instruction Manual
Page 3
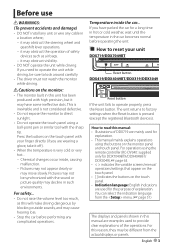
... using the buttons on the monitor: • The monitor built in this unit has been produced with your unit DDX719/DDX7049BT Reset button DDX419/DDX4049BT/DDX319/DDX3049 Reset button If the unit fails to provide clear explanations of safety devices such as this manual are mainly used to operate properly, press... is inevitable and is pressed (except the registered Bluetooth devices). Before use WARNINGS: (To prevent accidents and damage) • DO NOT install any unit or wire any cable in the car becomes normal before performing any complicated operations.
... using the buttons on the monitor: • The monitor built in this unit has been produced with your unit DDX719/DDX7049BT Reset button DDX419/DDX4049BT/DDX319/DDX3049 Reset button If the unit fails to provide clear explanations of safety devices such as this manual are mainly used to operate properly, press... is inevitable and is pressed (except the registered Bluetooth devices). Before use WARNINGS: (To prevent accidents and damage) • DO NOT install any unit or wire any cable in the car becomes normal before performing any complicated operations.
Instruction Manual
Page 71
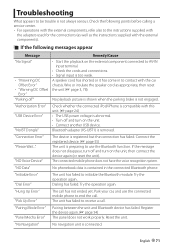
Bluetooth adapter (KS-UBT1) is registered but the connection has failed. "NO Voice Device" The device is removed. English 71 Wire or insulate the speaker cord as the instructions supplied with this unit. (☞ page 24) • The USB power voltage is abnormal. • Turn off " ...
Bluetooth adapter (KS-UBT1) is registered but the connection has failed. "NO Voice Device" The device is removed. English 71 Wire or insulate the speaker cord as the instructions supplied with this unit. (☞ page 24) • The USB power voltage is abnormal. • Turn off " ...

Instruction Manual
Page 76
... same rating. 76 DDX719/DDX7049BT/DDX419/DDX4049BT/DDX319/DDX3049 If you use the wrong screws, you connect the ignition wire to the wires via the fuse. For best safety, leave the mounting and wiring work to professionals. • Make sure ...", "Warning DC Offset Error" is displayed), the speaker wire may be drained. • If the console has a lid, make sure the wires aren't touching to the instruction manual. ..........6 ..........1 4 9*3 ..........6 ..........1 (3m: 9.8 ft) 5 *1 DDX419/DDX4049BT/ DDX319/DDX3049 only. *2 DDX719/DDX7049BT only. ..........1 *3 DDX719/...
... same rating. 76 DDX719/DDX7049BT/DDX419/DDX4049BT/DDX319/DDX3049 If you use the wrong screws, you connect the ignition wire to the wires via the fuse. For best safety, leave the mounting and wiring work to professionals. • Make sure ...", "Warning DC Offset Error" is displayed), the speaker wire may be drained. • If the console has a lid, make sure the wires aren't touching to the instruction manual. ..........6 ..........1 4 9*3 ..........6 ..........1 (3m: 9.8 ft) 5 *1 DDX419/DDX4049BT/ DDX319/DDX3049 only. *2 DDX719/DDX7049BT only. ..........1 *3 DDX719/...
Instruction Manual
Page 77
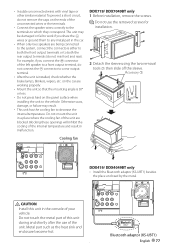
...removed screws for installation. 2 Detach the sleeve using the two removal tools 7 then slide off the sleeve. For example, if you share the wires or ground them to which they correspond. Metal part such as the heat sink and enclosure become hot. . Bluetooth adaptor (KS-UBT1) English ...77 • Insulate unconnected wires with vinyl tape or other similar material. To prevent a short circuit, do not connect the - on the ends of the internal temperature and ...
...removed screws for installation. 2 Detach the sleeve using the two removal tools 7 then slide off the sleeve. For example, if you share the wires or ground them to which they correspond. Metal part such as the heat sink and enclosure become hot. . Bluetooth adaptor (KS-UBT1) English ...77 • Insulate unconnected wires with vinyl tape or other similar material. To prevent a short circuit, do not connect the - on the ends of the internal temperature and ...
Instruction Manual
Page 78
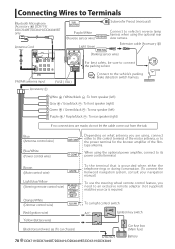
... fuse) 78 DDX719/DDX7049BT/DDX419/DDX4049BT/DDX319/DDX3049 Battery Blue (Antenna control wire) Blue/White (Power control wire) Depending on what antenna you need to an exclusive remote adapter (not supplied) matches your car is grounded when either the telephone rings or during conversation. (To connect the Kenwood navigation system, consult your navigation manual...
... fuse) 78 DDX719/DDX7049BT/DDX419/DDX4049BT/DDX319/DDX3049 Battery Blue (Antenna control wire) Blue/White (Power control wire) Depending on what antenna you need to an exclusive remote adapter (not supplied) matches your car is grounded when either the telephone rings or during conversation. (To connect the Kenwood navigation system, consult your navigation manual...
Instruction Manual
Page 82
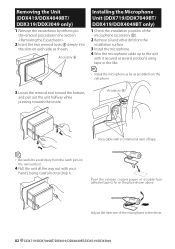
... to avoid injury from the catch pins on the removal tool. 4 Pull the unit all the way out with it . Removing the Unit (DDX419/DDX4049BT/ DDX319/DDX3049 only) 1 Remove the escutcheon by referring to the removal procedure in the section . 2 Insert the two removal tools 6 deeply into the slots on... each side, as possible from the installation surface. 3 Install the microphone. 4 Wire the microphone cable up to the unit with your hands, being careful not to drop it secured at several positions using tape or the like...
... to avoid injury from the catch pins on the removal tool. 4 Pull the unit all the way out with it . Removing the Unit (DDX419/DDX4049BT/ DDX319/DDX3049 only) 1 Remove the escutcheon by referring to the removal procedure in the section . 2 Insert the two removal tools 6 deeply into the slots on... each side, as possible from the installation surface. 3 Install the microphone. 4 Wire the microphone cable up to the unit with your hands, being careful not to drop it secured at several positions using tape or the like...


