
Instruction Manual
Page 2
... BLUETOOTH OPERATIONS (Only for DDX719/DDX7049BT/DDX419/ DDX4049BT) Information for using Bluetooth® devices 53 Bluetooth operations 53 Connecting Bluetooth devices 54 Using the Bluetooth mobile phone 56 Using the Bluetooth audio player 61 Bluetooth device settings 61 USING ... 64 REFERENCE Maintenance 68 More about this unit 69 Troubleshooting 71 Accessories/Installation Procedure 76 Connecting Wires to Terminals...78 Connecting a USB device/iPod/ iPhone 79 Connecting Other Products........80 Installing/Removing the Unit.....81 Specifications 83 KS-UBT1 (USB Bluetooth Adapter...
... BLUETOOTH OPERATIONS (Only for DDX719/DDX7049BT/DDX419/ DDX4049BT) Information for using Bluetooth® devices 53 Bluetooth operations 53 Connecting Bluetooth devices 54 Using the Bluetooth mobile phone 56 Using the Bluetooth audio player 61 Bluetooth device settings 61 USING ... 64 REFERENCE Maintenance 68 More about this unit 69 Troubleshooting 71 Accessories/Installation Procedure 76 Connecting Wires to Terminals...78 Connecting a USB device/iPod/ iPhone 79 Connecting Other Products........80 Installing/Removing the Unit.....81 Specifications 83 KS-UBT1 (USB Bluetooth Adapter...
Instruction Manual
Page 4
... has been tested and found to comply with the limits for help. DDX719X/DDX419/DDX319: CAUTION Use of controls or adjustments or performance of procedures other than those specified ...herein may cause harmful interference unless the modifications are reproductions of the FCC Rules. JVC KENWOOD Corporation 2967-3, ISHIKAWA-MACHI, HACHIOJI-SHI, TOKYO, JAPAN THIS PRODUCT COMPLIES WITH DHHS RULES...relocate the receiving antenna. • Increase the separation between the equipment and receiver. • Connect the equipment into an outlet on , or inside the product relating to the chassis/case ...
... has been tested and found to comply with the limits for help. DDX719X/DDX419/DDX319: CAUTION Use of controls or adjustments or performance of procedures other than those specified ...herein may cause harmful interference unless the modifications are reproductions of the FCC Rules. JVC KENWOOD Corporation 2967-3, ISHIKAWA-MACHI, HACHIOJI-SHI, TOKYO, JAPAN THIS PRODUCT COMPLIES WITH DHHS RULES...relocate the receiving antenna. • Increase the separation between the equipment and receiver. • Connect the equipment into an outlet on , or inside the product relating to the chassis/case ...
Instruction Manual
Page 5
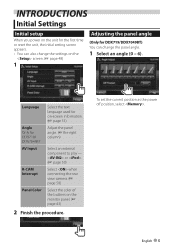
...) Angle Only for DDX719/DDX7049BT) You can also change the panel angle. 1 Select an angle (0 - 6). or . (☞ page 50) R-CAM Interrupt Panel Color Select when connecting the rear view camera. (☞ page 50) Select the color of the buttons on the screen. (☞ page 48) 1 Adjusting the panel angle (Only for...
...) Angle Only for DDX719/DDX7049BT) You can also change the panel angle. 1 Select an angle (0 - 6). or . (☞ page 50) R-CAM Interrupt Panel Color Select when connecting the rear view camera. (☞ page 50) Select the color of the buttons on the screen. (☞ page 48) 1 Adjusting the panel angle (Only for...
Instruction Manual
Page 6
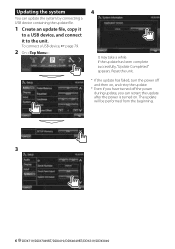
... you can update the system by connecting a USB device containing the update file. 1 Create an update file, copy it to a USB device, and connect it to the unit. The update will be performed from the beginning. 3 6 DDX719/DDX7049BT/DDX419/DDX4049BT/DDX319/DDX3049 If the update has been ...complete successfully, "Update Completed" appears. To connect a USB device, ☞ page 79. 2 On : 4 It may take a while. Updating the system You can restart ...
... you can update the system by connecting a USB device containing the update file. 1 Create an update file, copy it to a USB device, and connect it to the unit. The update will be performed from the beginning. 3 6 DDX719/DDX7049BT/DDX419/DDX4049BT/DDX319/DDX3049 If the update has been ...complete successfully, "Update Completed" appears. To connect a USB device, ☞ page 79. 2 On : 4 It may take a while. Updating the system You can restart ...
Instruction Manual
Page 10
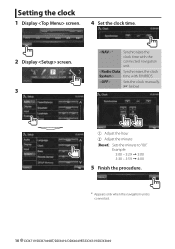
Setting the clock 1 Display screen. 4 Set the clock time. 2 Display screen. 3 * Synchronizes the clock time with FM RBDS. Sets the clock manually. (☞ below) 1 Adjust the hour 2 Adjust the minute [Reset]: Sets the minute to "00." time with the connected navigation unit. Example: 3:00 - 3:29 = 3:00 3:30 - 3:59 = 4:00 5 Finish the procedure. * Appears only when the navigation unit is connected. 10 DDX719/DDX7049BT/DDX419/DDX4049BT/DDX319/DDX3049
Setting the clock 1 Display screen. 4 Set the clock time. 2 Display screen. 3 * Synchronizes the clock time with FM RBDS. Sets the clock manually. (☞ below) 1 Adjust the hour 2 Adjust the minute [Reset]: Sets the minute to "00." time with the connected navigation unit. Example: 3:00 - 3:29 = 3:00 3:30 - 3:59 = 4:00 5 Finish the procedure. * Appears only when the navigation unit is connected. 10 DDX719/DDX7049BT/DDX419/DDX4049BT/DDX319/DDX3049

Instruction Manual
Page 13
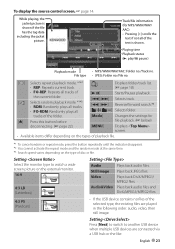
.../iPhone. Displays the phone control screen. Plays a Bluetooth audio player. When no navigation unit is connected. Switches to the radio broadcast. Plays files on . (☞ page 50) *6 Only for DDX719/DDX419/DDX319. Switches to an external component connected to be displayed in this area. (☞ page 49) *2 Switches between the previous and next...
.../iPhone. Displays the phone control screen. Plays a Bluetooth audio player. When no navigation unit is connected. Switches to the radio broadcast. Plays files on . (☞ page 50) *6 Only for DDX719/DDX419/DDX319. Switches to an external component connected to be displayed in this area. (☞ page 49) *2 Switches between the previous and next...

Instruction Manual
Page 22
...Press [0], then disconnect the USB device after "No Device" appears. to the unit. • You cannot connect a computer or portable HDD to the device. 22 DDX719/DDX7049BT/DDX419/DDX4049BT/DDX319/DDX3049 Cautions: • This unit may not play JPEG/DivX/MPEG1/ MPEG2/MP3/WMA/WAV/AAC files stored... in a USB mass storage class device. • This unit can connect a USB mass storage class device such as a USB...
...Press [0], then disconnect the USB device after "No Device" appears. to the unit. • You cannot connect a computer or portable HDD to the device. 22 DDX719/DDX7049BT/DDX419/DDX4049BT/DDX319/DDX3049 Cautions: • This unit may not play JPEG/DivX/MPEG1/ MPEG2/MP3/WMA/WAV/AAC files stored... in a USB mass storage class device. • This unit can connect a USB mass storage class device such as a USB...
Instruction Manual
Page 23
While playing, the jacket picture is shown if the file has the tag data including the jacket picture. Track/file information (for MP3/WMA/WAV/ AAC) • Pressing [ To display the source control screen, ☞ page 14.
While playing, the jacket picture is shown if the file has the tag data including the jacket picture. Track/file information (for MP3/WMA/WAV/ AAC) • Pressing [ To display the source control screen, ☞ page 14.
Instruction Manual
Page 24
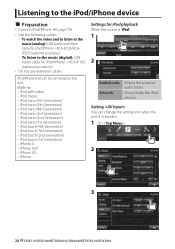
... iPod touch (2nd Generation) - Shows/hides the iPod artwork. iPod nano (5th Generation) - iPod nano (1st Generation) - Setting You can be connected to the music (digital): USB Audio cable for iPod/iPhone-KCA-iP102 (optional accessory) • Do not use extension cables. iPod classic - iPod ...the speed of audio books. iPhone Settings for iPod playback When the source is in standby. 1 On : 2 3 24 DDX719/DDX7049BT/DDX419/DDX4049BT/DDX319/DDX3049 iPhone 3G - iPod touch (3rd Generation) - To listen to this unit: Made for - iPhone 4 - To watch the video and to...
... iPod touch (2nd Generation) - Shows/hides the iPod artwork. iPod nano (5th Generation) - iPod nano (1st Generation) - Setting You can be connected to the music (digital): USB Audio cable for iPod/iPhone-KCA-iP102 (optional accessory) • Do not use extension cables. iPod classic - iPod ...the speed of audio books. iPhone Settings for iPod playback When the source is in standby. 1 On : 2 3 24 DDX719/DDX7049BT/DDX419/DDX4049BT/DDX319/DDX3049 iPhone 3G - iPod touch (3rd Generation) - To listen to this unit: Made for - iPhone 4 - To watch the video and to...
Instruction Manual
Page 28
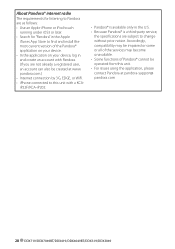
... account can also be impaired or some or all of the services may be created at pandora-support@ pandora.com 28 DDX719/DDX7049BT/DDX419/DDX4049BT/DDX319/DDX3049 pandora.com.) • Internet connection by 3G, EDGE, or WiFi. • iPhone...
... account can also be impaired or some or all of the services may be created at pandora-support@ pandora.com 28 DDX719/DDX7049BT/DDX419/DDX4049BT/DDX319/DDX3049 pandora.com.) • Internet connection by 3G, EDGE, or WiFi. • iPhone...
Instruction Manual
Page 33
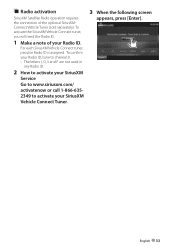
... to activate your SiriusXM Service Go to www.siriusxm.com/ activatenow or call 1-866-6352349 to activate your Radio ID. To activate the SiriusXM Vehicle Connect tuner, you will need the Radio ID. 1 Make a note of the optional SiriusXMConnect Vehicle Tuner (sold separately). Radio activation SiriusXM Satellite Radio operation requires the...
... to activate your SiriusXM Service Go to www.siriusxm.com/ activatenow or call 1-866-6352349 to activate your Radio ID. To activate the SiriusXM Vehicle Connect tuner, you will need the Radio ID. 1 Make a note of the optional SiriusXMConnect Vehicle Tuner (sold separately). Radio activation SiriusXM Satellite Radio operation requires the...
Instruction Manual
Page 39
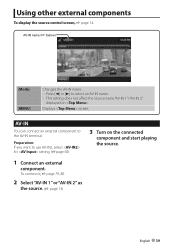
... source control screen, ☞ page 14. Preparation: If you want to use AV-IN2, select for setting. (☞page 50) 3 Turn on . Displays screen. To connect it, ☞ page 79, 80. 2 Select "AV-IN 1" or "AV-IN 2" as the source. (☞ page 13) English 39 AV-IN You can... to select an AV-IN name. • This setting does not affect the source name "AV-IN 1"/ "AV-IN 2" displayed on the connected component and start playing the source. 1 Connect an external component. AV-IN name (☞ below) [Mode] [MENU] Changes the AV-IN name. • Press [2] or [3] to the AV-IN...
... source control screen, ☞ page 14. Preparation: If you want to use AV-IN2, select for setting. (☞page 50) 3 Turn on . Displays screen. To connect it, ☞ page 79, 80. 2 Select "AV-IN 1" or "AV-IN 2" as the source. (☞ page 13) English 39 AV-IN You can... to select an AV-IN name. • This setting does not affect the source name "AV-IN 1"/ "AV-IN 2" displayed on the connected component and start playing the source. 1 Connect an external component. AV-IN name (☞ below) [Mode] [MENU] Changes the AV-IN name. • Press [2] or [3] to the AV-IN...
Instruction Manual
Page 40
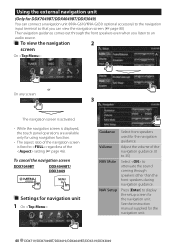
...aspect ratio of the navigation screen is displayed, the touch panel operations are available only for the navigation unit. 40 DDX719/DDX7049BT/DDX419/DDX4049BT/DDX319/DDX3049 Adjust the volume of the setting (☞ page 46). To view the navigation 2 screen On : or On any screen: ... speakers other than the front speakers during navigation guidance. Press [Enter] to display the setup screen for DDX7049BT/DDX4049BT/DDX3049) You can connect a navigation unit (KNA-G610/KNA-G630: optional accessory) to an audio source. Using the external navigation unit (Only for the navigation...
...aspect ratio of the navigation screen is displayed, the touch panel operations are available only for the navigation unit. 40 DDX719/DDX7049BT/DDX419/DDX4049BT/DDX319/DDX3049 Adjust the volume of the setting (☞ page 46). To view the navigation 2 screen On : or On any screen: ... speakers other than the front speakers during navigation guidance. Press [Enter] to display the setup screen for DDX7049BT/DDX4049BT/DDX3049) You can connect a navigation unit (KNA-G610/KNA-G630: optional accessory) to an audio source. Using the external navigation unit (Only for the navigation...
Instruction Manual
Page 44
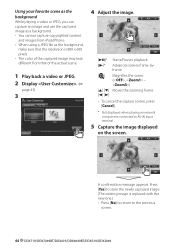
.... (, - ) [5] [∞] Moves the zooming frame. [2] [3] • To cancel the capture screen, press [Cancel]. * Not displayed when playing an external component connected to the previous screen. 44 DDX719/DDX7049BT/DDX419/DDX4049BT/DDX319/DDX3049 Using your favorite scene as the background While playing a video or JPEG, you can capture an image and use the...
.... (, - ) [5] [∞] Moves the zooming frame. [2] [3] • To cancel the capture screen, press [Cancel]. * Not displayed when playing an external component connected to the previous screen. 44 DDX719/DDX7049BT/DDX419/DDX4049BT/DDX319/DDX3049 Using your favorite scene as the background While playing a video or JPEG, you can capture an image and use the...
Instruction Manual
Page 47
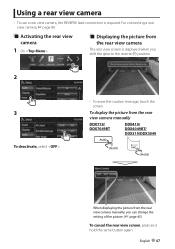
For connecting a rear view camera, ☞ page 80. English 47 To display the picture from the rear view camera manually DDX719/ DDX7049BT DDX419/ DDX4049BT/ DDX319/DDX3049 (Hold) (Hold) When displaying the picture from the rear view camera The rear view screen is required. Activating the rear view... . • To erase the caution message, touch the screen. Using a rear view camera • To use a rear view camera, the REVERSE lead connection is displayed when you can change the setting of the picture. (☞ page 45) To cancel the rear view screen, press and hold the same...
For connecting a rear view camera, ☞ page 80. English 47 To display the picture from the rear view camera manually DDX719/ DDX7049BT DDX419/ DDX4049BT/ DDX319/DDX3049 (Hold) (Hold) When displaying the picture from the rear view camera The rear view screen is required. Activating the rear view... . • To erase the caution message, touch the screen. Using a rear view camera • To use a rear view camera, the REVERSE lead connection is displayed when you can change the setting of the picture. (☞ page 45) To cancel the rear view screen, press and hold the same...

Instruction Manual
Page 48
...; page 42) Volume Offset Adjust and store the auto-adjustment volume level for each source. (For discs, the adjustment is stored for each of the connected speaker. ♦ Standard/Narrow/Middle/Wide 48 DDX719/DDX7049BT/DDX419/DDX4049BT/DDX319/DDX3049 The LOUD indicator lights up.
...; page 42) Volume Offset Adjust and store the auto-adjustment volume level for each source. (For discs, the adjustment is stored for each of the connected speaker. ♦ Standard/Narrow/Middle/Wide 48 DDX719/DDX7049BT/DDX419/DDX4049BT/DDX319/DDX3049 The LOUD indicator lights up.

Instruction Manual
Page 49
... Dimmer ♦ Auto ♦ ON ♦ OFF ♦ NAV : Dims the screen and button illumination when you turn on the headlights. • The ILLUMI lead connection is played back. : Cancels. User Customize Change the display design (background and panel color). (☞ page 43) OSD Clock ♦ ON ♦ OFF : Displays the... clock while a video source is required. (☞ page 78) : Activates dimmer. : Cancels. : Activates or deactivates dimmer according to the day/night display setting of the connected navigation unit.
... Dimmer ♦ Auto ♦ ON ♦ OFF ♦ NAV : Dims the screen and button illumination when you turn on the headlights. • The ILLUMI lead connection is played back. : Cancels. User Customize Change the display design (background and panel color). (☞ page 43) OSD Clock ♦ ON ♦ OFF : Displays the... clock while a video source is required. (☞ page 78) : Activates dimmer. : Cancels. : Activates or deactivates dimmer according to the day/night display setting of the connected navigation unit.
Instruction Manual
Page 50
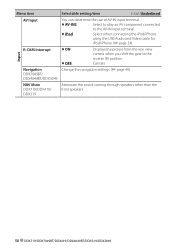
... other than the front speakers. 50 DDX719/DDX7049BT/DDX419/DDX4049BT/DDX319/DDX3049 Menu item Selectable setting/item Initial: Underlined AV Input You can determine the use of AV-IN input terminal. ♦ AV-IN2 : Select to play an AV component connected to the AV-IN input terminal. ♦ iPod : ...Select when connecting the iPod/iPhone using the USB Audio and Video cable for iPod/iPhone. (☞ page 24) Input R-CAM ...
... other than the front speakers. 50 DDX719/DDX7049BT/DDX419/DDX4049BT/DDX319/DDX3049 Menu item Selectable setting/item Initial: Underlined AV Input You can determine the use of AV-IN input terminal. ♦ AV-IN2 : Select to play an AV component connected to the AV-IN input terminal. ♦ iPod : ...Select when connecting the iPod/iPhone using the USB Audio and Video cable for iPod/iPhone. (☞ page 24) Input R-CAM ...
Instruction Manual
Page 53
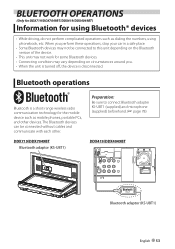
...devices • While driving, do not perform complicated operations such as mobile phones, portable PCs, and other . The Bluetooth devices can be connected to connect Bluetooth adapter KS-UBT1 (supplied) and microphone (supplied) beforehand. (☞ page 78) DDX719/DDX7049BT Bluetooth adaptor (KS-UBT1) DDX419/DDX4049BT... depending on the Bluetooth version of the device. • This unit may not work for some Bluetooth devices. • Connecting condition may vary depending on circumstances around you perform these operations, stop your car in a safe place. • Some Bluetooth devices ...
...devices • While driving, do not perform complicated operations such as mobile phones, portable PCs, and other . The Bluetooth devices can be connected to connect Bluetooth adapter KS-UBT1 (supplied) and microphone (supplied) beforehand. (☞ page 78) DDX719/DDX7049BT Bluetooth adaptor (KS-UBT1) DDX419/DDX4049BT... depending on the Bluetooth version of the device. • This unit may not work for some Bluetooth devices. • Connecting condition may vary depending on circumstances around you perform these operations, stop your car in a safe place. • Some Bluetooth devices ...
Instruction Manual
Page 54
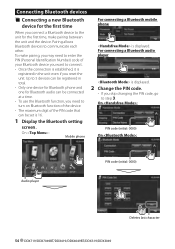
...16. 1 Display the Bluetooth setting screen. Up to 5 devices can be registered in the unit even if you reset the unit. For connecting a Bluetooth audio player is displayed. 2 Change the PIN code. • If you skip changing the PIN code, go to turn on... to step 3. Connecting Bluetooth devices Connecting a new Bluetooth device for the first time When you connect a Bluetooth device to communicate each other. On : PIN code (initial: 0000) On : Audio player PIN code (initial: 0000) Deletes last character 54 DDX719/DDX7049BT/DDX419/DDX4049BT/DDX319/DDX3049 Pairing allows Bluetooth...
...16. 1 Display the Bluetooth setting screen. Up to 5 devices can be registered in the unit even if you reset the unit. For connecting a Bluetooth audio player is displayed. 2 Change the PIN code. • If you skip changing the PIN code, go to turn on... to step 3. Connecting Bluetooth devices Connecting a new Bluetooth device for the first time When you connect a Bluetooth device to communicate each other. On : PIN code (initial: 0000) On : Audio player PIN code (initial: 0000) Deletes last character 54 DDX719/DDX7049BT/DDX419/DDX4049BT/DDX319/DDX3049 Pairing allows Bluetooth...


