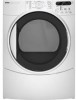
Use and Care Guide
Page 2
... if four or more than promised. v' Rental reimbursement if repair of Cycle Signal 25 TUMBLE FREF MHeated Dryer Rack 25 DRYER CARE 26 Cleaning the Dryer Location 26 Cleaning the Lint Screen 26 Cleaning the Dryer Interior 26 Removing Accumulated Lint 27 Water Inlet Hoses 27 Vacation, Storage and Moving Care 27 Changing the Drum Light 27 TROUBLESHOOTING 28 SERVICE NUMBERS BACK COVER PROTECTION AGREEMENTS Master Protection Agreements Congratulations on some items. For full details call...
... if four or more than promised. v' Rental reimbursement if repair of Cycle Signal 25 TUMBLE FREF MHeated Dryer Rack 25 DRYER CARE 26 Cleaning the Dryer Location 26 Cleaning the Lint Screen 26 Cleaning the Dryer Interior 26 Removing Accumulated Lint 27 Water Inlet Hoses 27 Vacation, Storage and Moving Care 27 Changing the Drum Light 27 TROUBLESHOOTING 28 SERVICE NUMBERS BACK COVER PROTECTION AGREEMENTS Master Protection Agreements Congratulations on some items. For full details call...
Use and Care Guide
Page 3
... for free repair. After the first year, customer assumes any labor costs associated with replacement of incidental or consequential damages, or limitations on the product. SEARS WILL NOT PAY FOR: 1. Implied warranties, including warranties of parts or systems resulting from unauthorized modifications made to instruct the user in correct product installation, operation or maintenance. 3. Model number Serial number Purchase date Save these instructions and your complete model number, serial number...
... for free repair. After the first year, customer assumes any labor costs associated with replacement of incidental or consequential damages, or limitations on the product. SEARS WILL NOT PAY FOR: 1. Implied warranties, including warranties of parts or systems resulting from unauthorized modifications made to instruct the user in correct product installation, operation or maintenance. 3. Model number Serial number Purchase date Save these instructions and your complete model number, serial number...
Use and Care Guide
Page 4
... not use heat to potential hazards that have been previously cleaned in, washed in, soaked in, or spotted with controls. [] Do not repair or replace any part of the dryer or attempt any servicing unless specifically recommended in this manual and on or in your appliance. These words mean: You can be cleaned periodically by qualified service personnel. [] See installation instructions for grounding requirements. This is...
... not use heat to potential hazards that have been previously cleaned in, washed in, soaked in, or spotted with controls. [] Do not repair or replace any part of the dryer or attempt any servicing unless specifically recommended in this manual and on or in your appliance. These words mean: You can be cleaned periodically by qualified service personnel. [] See installation instructions for grounding requirements. This is...
Use and Care Guide
Page 5
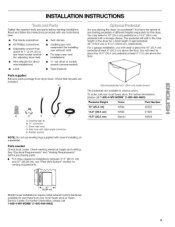
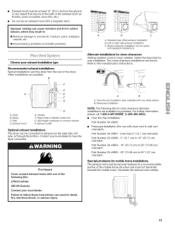
... dryer feet) • Wire stripper (for direct wire installations) • Level • Vent clamps • Caulking gun and compound (for installing new exhaust vent) • Tin snips (new vent installations) • 1/4"nut driver or socket wrench (recommended) • Tape measure Parts supplied Remove parts package from your local Sears store. Parts needed Check local codes. For further information, please call 1-800-4-MY-HOM E®(1-800-469-4663). INSTALLATION INSTRUCTIONS Gather the required...
... dryer feet) • Wire stripper (for direct wire installations) • Level • Vent clamps • Caulking gun and compound (for installing new exhaust vent) • Tin snips (new vent installations) • 1/4"nut driver or socket wrench (recommended) • Tape measure Parts supplied Remove parts package from your local Sears store. Parts needed Check local codes. For further information, please call 1-800-4-MY-HOM E®(1-800-469-4663). INSTALLATION INSTRUCTIONS Gather the required...
Use and Care Guide
Page 6
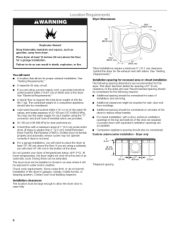
... the door are using a pedestal, you are required. The combined weight of a companion appliance should also be installed or stored in the top and bottom of an automatic cycle. If you will need • A location that allows for this dryer. At lower temperatures, the dryer might be required for the exhaust vent with equivalent ventilation openings are using a power supply cord, a grounded electrical outlet located within 4 ft (1.2 m) of the water fill valves, and water pressure...
... the door are using a pedestal, you are required. The combined weight of a companion appliance should also be installed or stored in the top and bottom of an automatic cycle. If you will need • A location that allows for this dryer. At lower temperatures, the dryer might be required for the exhaust vent with equivalent ventilation openings are using a power supply cord, a grounded electrical outlet located within 4 ft (1.2 m) of the water fill valves, and water pressure...
Use and Care Guide
Page 8
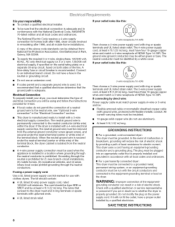
... will be using a power supply cord: Use a UL listed power supply cord kit marked for homes built after 1996, dryer circuits involved in remodeling after 1996, and all local codes and ordinances. Check with ring or spade terminals and UL listed strain relief. SAVE THESE INSTRUCTIONS A time-delay fuse or circuit breaker is prohibited. If the dryer is installed with the circuit conductors and connected to the dryer must be at least 4 ft (1.22 m) long. In...
... will be using a power supply cord: Use a UL listed power supply cord kit marked for homes built after 1996, dryer circuits involved in remodeling after 1996, and all local codes and ordinances. Check with ring or spade terminals and UL listed strain relief. SAVE THESE INSTRUCTIONS A time-delay fuse or circuit breaker is prohibited. If the dryer is installed with the circuit conductors and connected to the dryer must be at least 4 ft (1.22 m) long. In...
Use and Care Guide
Page 10
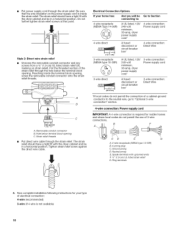
... UL listed, 120/ 3-wire connection: 240-volt Power supply cord 3-wire direct 30-amp, dryer mpoinwimerumsu, pply cord* A fused disconnect or 3-wire connection: Direct Wire cbiorcxu* it breaker A. A. / CD E G A. 4-wire receptacle (NEMA type 14-30R) B. 4-prong plug C. Now complete installation following instructions for your home has: And you will be in a horizontal position. Removable conduit connector B. Spade terminals with the dryer cabinet and be in a horizontal position. Hole below the terminal block opening C. Ground prong D. Put power supply cord...
... UL listed, 120/ 3-wire connection: 240-volt Power supply cord 3-wire direct 30-amp, dryer mpoinwimerumsu, pply cord* A fused disconnect or 3-wire connection: Direct Wire cbiorcxu* it breaker A. A. / CD E G A. 4-wire receptacle (NEMA type 14-30R) B. 4-prong plug C. Now complete installation following instructions for your home has: And you will be in a horizontal position. Removable conduit connector B. Spade terminals with the dryer cabinet and be in a horizontal position. Hole below the terminal block opening C. Ground prong D. Put power supply cord...
Use and Care Guide
Page 11
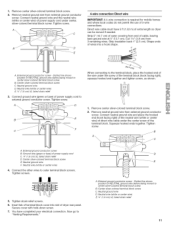
... of terminal block cover into a hook shape. Dotted line shows position of 3-wire connections. B. External ground conductor screw B. Center silver-colored terminal block screw E, Neutral ground wire E Neutral wire (white or center wire) 4, Connect the other wires to "Venting Requirements." Secure cover with hold-down screw. 7. Now go to outer terminal block screws. Remove neutral ground wire from 3 remaining wires. A \\ _ _qf[rI_:11_L_ 4-wire connection: Direct wire IMPORTANT: A 4-wire connection is required for mobile homes and where local codes do...
... of terminal block cover into a hook shape. Dotted line shows position of 3-wire connections. B. External ground conductor screw B. Center silver-colored terminal block screw E, Neutral ground wire E Neutral wire (white or center wire) 4, Connect the other wires to "Venting Requirements." Secure cover with hold-down screw. 7. Now go to outer terminal block screws. Remove neutral ground wire from 3 remaining wires. A \\ _ _qf[rI_:11_L_ 4-wire connection: Direct wire IMPORTANT: A 4-wire connection is required for mobile homes and where local codes do...
Use and Care Guide
Page 12
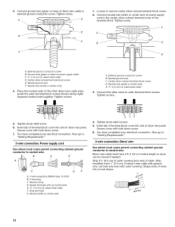
... extra length so dryer can be moved if needed. Secure cover with up turned ends E. _" (1.9 cm) UL listed strain relief F. Tighten screw. 1. Loosen or remove center silver-colored terminal block screw. 2. Center silver-colored terminal block screw D. Tighten screws. !! !! 5. Secure cover with outer covering. Neutral prong D. Direct wire cable must have 5 ft (1.52 m) of dryer rear panel. Connect ground wire (green or bare) of the terminal block. Connect neutral wire (white or center wire) of power supply cord to...
... extra length so dryer can be moved if needed. Secure cover with up turned ends E. _" (1.9 cm) UL listed strain relief F. Tighten screw. 1. Loosen or remove center silver-colored terminal block screw. 2. Center silver-colored terminal block screw D. Tighten screws. !! !! 5. Secure cover with outer covering. Neutral prong D. Direct wire cable must have 5 ft (1.52 m) of dryer rear panel. Connect ground wire (green or bare) of the terminal block. Connect neutral wire (white or center wire) of power supply cord to...
Use and Care Guide
Page 13
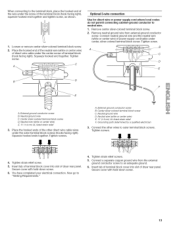
... connecting to the terminal block, place the hooked end of the wire under the screw of dryer rear panel. Remove neutral ground wire from the external ground conductor screw to an adequate ground. 6. Center silver-colored terminal block screw D. Squeeze hooked end together. Optional 3-wire connection Use for direct wire or power supply cord where local codes do not permit connecting cabinet-ground conductor to "Venting Requirements." 4. Neutral wire (white or center wire) E. _" (1.9 cm) UL listed strain...
... connecting to the terminal block, place the hooked end of the wire under the screw of dryer rear panel. Remove neutral ground wire from the external ground conductor screw to an adequate ground. 6. Center silver-colored terminal block screw D. Squeeze hooked end together. Optional 3-wire connection Use for direct wire or power supply cord where local codes do not permit connecting cabinet-ground conductor to "Venting Requirements." 4. Neutral wire (white or center wire) E. _" (1.9 cm) UL listed strain...
Use and Care Guide
Page 14
... here) is a new vent system Vent material • Use a heavy metal vent. Good Better Clamps • Use clamps to achieve the best drying performance. If this dryer MUST BE EXHAUSTED OUTDOORS. The dryer exhaust must not be purchased from entering the home. 14 Flexible metal vent • Flexible metal vents are • Rigid metal vent is not plugged with lint. • Replace any gas vent, chimney, wall, ceiling...
... here) is a new vent system Vent material • Use a heavy metal vent. Good Better Clamps • Use clamps to achieve the best drying performance. If this dryer MUST BE EXHAUSTED OUTDOORS. The dryer exhaust must not be purchased from entering the home. 14 Flexible metal vent • Flexible metal vents are • Rigid metal vent is not plugged with lint. • Replace any gas vent, chimney, wall, ceiling...
Use and Care Guide
Page 15
... connect H. Vent length necessary to the manufacturer's instructions. Exhaust outlet elbows Optional exhaust installations This dryer can result in the path of the exhaust (such as flowers, rocks or bushes, snow line, etc.). • Do not use with dryer vent to 50" (127 cm) mismatch Special provisions for purchase. Elbow C. Rigid metal or flexible metal vent G. A B A. Dryer B. Terminate the exhaust vent outside. 15 Exhaust hood E. Less than 5" (12.7 cm) mismatch Part Number...
... connect H. Vent length necessary to the manufacturer's instructions. Exhaust outlet elbows Optional exhaust installations This dryer can result in the path of the exhaust (such as flowers, rocks or bushes, snow line, etc.). • Do not use with dryer vent to 50" (127 cm) mismatch Special provisions for purchase. Elbow C. Rigid metal or flexible metal vent G. A B A. Dryer B. Terminate the exhaust vent outside. 15 Exhaust hood E. Less than 5" (12.7 cm) mismatch Part Number...
Use and Care Guide
Page 16
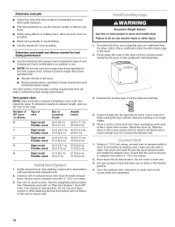
... metal 25 ft (7.6 m) 17 ft (5.2 m) 4 Rigid metal 27 ft (8.2 m) 21 ft (6.4 m) Flexible metal 23 ft (7 m) 15 ft (4.6 m) 1. Use a wrench to finish turning the legs until it is close to its final location. Leave enough room to dryer location. Using a 4" (10.2 cm) clamp, connect vent to exhaust outlet in longer drying times and increased energy usage. Install exhaust hood. Avoid 90 ° turns. If connecting to existing vent, make sure the vent is made, remove the corner...
... metal 25 ft (7.6 m) 17 ft (5.2 m) 4 Rigid metal 27 ft (8.2 m) 21 ft (6.4 m) Flexible metal 23 ft (7 m) 15 ft (4.6 m) 1. Use a wrench to finish turning the legs until it is close to its final location. Leave enough room to dryer location. Using a 4" (10.2 cm) clamp, connect vent to exhaust outlet in longer drying times and increased energy usage. Install exhaust hood. Avoid 90 ° turns. If connecting to existing vent, make sure the vent is made, remove the corner...
Use and Care Guide
Page 19
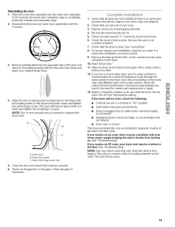
... different parts of scale through the steps to remove any tape remaining on the dryer front panel. Reinstalling the door 1. Dryer front panel C. Select a Timed Dry heated cycle, and start , check the following: • Controls are on the glass. The odor will reduce product performance. Close the door and check that you live in a hard water area, use of your dryer vent may be crushed or blocked. Check the dryer's final location. See "Troubleshooting." To...
... different parts of scale through the steps to remove any tape remaining on the dryer front panel. Reinstalling the door 1. Dryer front panel C. Select a Timed Dry heated cycle, and start , check the following: • Controls are on the glass. The odor will reduce product performance. Close the door and check that you live in a hard water area, use of your dryer vent may be crushed or blocked. Check the dryer's final location. See "Troubleshooting." To...
Use and Care Guide
Page 20
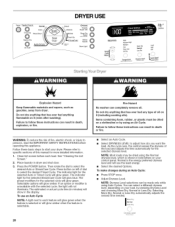
... your load, by using an Air Cycle. Follow these instructions can result in death, explosion, or fire. Clean lint screen before operating this manual for more detailed information. 1. Items containing foam, rubber, or plastic must be dried using Auto Cycles. You can completely remove oil. Normal is unavailable with the selected cycle, the light will glow green. Selecting More Dry, Normal or Less Dry automatically adjusts the sensed time needed...
... your load, by using an Air Cycle. Follow these instructions can result in death, explosion, or fire. Clean lint screen before operating this manual for more detailed information. 1. Items containing foam, rubber, or plastic must be dried using Auto Cycles. You can completely remove oil. Normal is unavailable with the selected cycle, the light will glow green. Selecting More Dry, Normal or Less Dry automatically adjusts the sensed time needed...
Use and Care Guide
Page 21
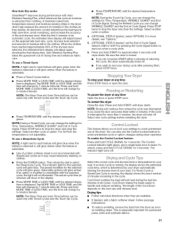
... Cool Down depends on clothes. • Press the POWER button. Cool Down makes the loads easier to stop your load. An electronic control determines the load type to alert you can be used only with Timed Cycles and the Touch Up Cycle. Selectable options will change the settings for your dryer at any time Press STOP twice or open the door. If an Auto Cycle is running , the display shows the exact number...
... Cool Down depends on clothes. • Press the POWER button. Cool Down makes the loads easier to stop your load. An electronic control determines the load type to alert you can be used only with Timed Cycles and the Touch Up Cycle. Selectable options will change the settings for your dryer at any time Press STOP twice or open the door. If an Auto Cycle is running , the display shows the exact number...
Use and Care Guide
Page 26
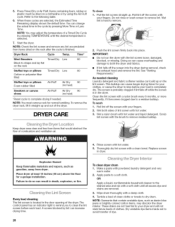
... the rack after the cycle is located in dryer. Pull the lint screen straight up and out of clothes. Do not rinse or wash screen to dry drum. See "Venting Requirements." Wet a nylon brush with a damp cloth. 4. Failure to do so can cause overheating and damage to stop before each load. A screen blocked by using the Air Fluff cycle. OR Apply a liquid, nonflammable household cleaner to complete drying if needed cleaning Laundry...
... the rack after the cycle is located in dryer. Pull the lint screen straight up and out of clothes. Do not rinse or wash screen to dry drum. See "Venting Requirements." Wet a nylon brush with a damp cloth. 4. Failure to do so can cause overheating and damage to stop before each load. A screen blocked by using the Air Fluff cycle. OR Apply a liquid, nonflammable household cleaner to complete drying if needed cleaning Laundry...
Use and Care Guide
Page 27
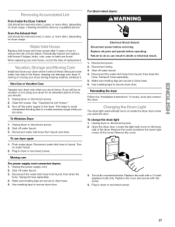
ova% AcouKutss:ed From Inside the Dryer Cabinet Lint should be removed every 2 years, or more often, depending on dryer usage. Replace inlet hoses and hose screen after 5 years of use to reduce the risk of replacement. _ sOS[l( FI _)IiO[i)Igl ¢' From the Exhaust Vent Lint should be removed every 2 years, or more often, depending on dryer usage, Cleaning should be done by a qualified person. Periodically inspect and replace inlet hoses if bulges, kinks, cuts, wear or leaks are found. When replacing your inlet hoses, record the date of hose failure.
ova% AcouKutss:ed From Inside the Dryer Cabinet Lint should be removed every 2 years, or more often, depending on dryer usage. Replace inlet hoses and hose screen after 5 years of use to reduce the risk of replacement. _ sOS[l( FI _)IiO[i)Igl ¢' From the Exhaust Vent Lint should be removed every 2 years, or more often, depending on dryer usage, Cleaning should be done by a qualified person. Periodically inspect and replace inlet hoses if bulges, kinks, cuts, wear or leaks are found. When replacing your inlet hoses, record the date of hose failure.
Use and Care Guide
Page 28
...? Dryer will turn, but you do not feel air movement, clean exhaust system of the dryer? Replace the fuse or reset the circuit breaker. Use a time-delay fuse. • Is the dryer door firmly closed? Large loads may not have not tripped. The drum may be turning, but there may be crushed or blocked. Electric dryers use 2 fuses or circuit breakers. Replace the fuse or reset the circuit breaker. If the problem continues, call an electrician. Confirm the power cord is crushed. Select a Timed Dry heated cycle, and...
...? Dryer will turn, but you do not feel air movement, clean exhaust system of the dryer? Replace the fuse or reset the circuit breaker. Use a time-delay fuse. • Is the dryer door firmly closed? Large loads may not have not tripped. The drum may be turning, but there may be crushed or blocked. Electric dryers use 2 fuses or circuit breakers. Replace the fuse or reset the circuit breaker. If the problem continues, call an electrician. Confirm the power cord is crushed. Select a Timed Dry heated cycle, and...
Use and Care Guide
Page 29
..., rewash and dry the clothing. • Is the dryer being dried. Is the exhaust vent the correct length? Dry smaller loads that water inlet hose is located? Loads are wrinkled • Was the load removed from loads consisting of the dryer requires 5" (12.7 cm). This cycle is best for the first time? Closet doors must have an odor. Stains on . Failure to both the faucet and dryer's water inlet valve. Smaller loads of the cycle. Check that can...
..., rewash and dry the clothing. • Is the dryer being dried. Is the exhaust vent the correct length? Dry smaller loads that water inlet hose is located? Loads are wrinkled • Was the load removed from loads consisting of the dryer requires 5" (12.7 cm). This cycle is best for the first time? Closet doors must have an odor. Stains on . Failure to both the faucet and dryer's water inlet valve. Smaller loads of the cycle. Check that can...


