Use and Care Guide
Page 5
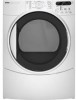
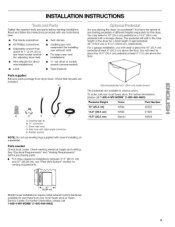
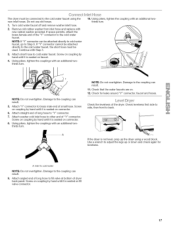
...and follow the instructions provided with a storage drawer. A B C D E A. For a garage installation, you placing the dryer on a pedestal. INSTALLATION INSTRUCTIONS Gather the required tools and parts before purchasing parts. • For close-clearance installations between 31.5"...require metal exhaust system hardware available for venting requirements. Rubber washer connector NOTE: Do not use leveling legs supplied with right-angle E. Parts needed Check local codes. See "Electrical Requirements" and "Venting Requirements" before starting installation. To ...
...and follow the instructions provided with a storage drawer. A B C D E A. For a garage installation, you placing the dryer on a pedestal. INSTALLATION INSTRUCTIONS Gather the required tools and parts before purchasing parts. • For close-clearance installations between 31.5"...require metal exhaust system hardware available for venting requirements. Rubber washer connector NOTE: Do not use leveling legs supplied with right-angle E. Parts needed Check local codes. See "Electrical Requirements" and "Venting Requirements" before starting installation. To ...
Use and Care Guide
Page 6
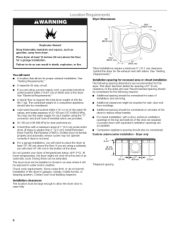
... a power supply cord, a grounded electrical outlet located within 4 ft (1.2 m) of the water fill valves, and water pressure of 20-100 psi (137.9-689,6 kPa). Cold water faucets located within 2 ft (61 cm) of either side of the dryer. This dryer has been tested for wall, door ...vent with a maximum slope of 200 Ibs (90.7 kg). See "Electrical Requirements." • A sturdy floor to reduce noise transfer. Contact your washer using a pedestal, you will need • A location that allows for this dryer. Installation clearances The location must not be required for spacing of 0"...
... a power supply cord, a grounded electrical outlet located within 4 ft (1.2 m) of the water fill valves, and water pressure of 20-100 psi (137.9-689,6 kPa). Cold water faucets located within 2 ft (61 cm) of either side of the dryer. This dryer has been tested for wall, door ...vent with a maximum slope of 200 Ibs (90.7 kg). See "Electrical Requirements." • A sturdy floor to reduce noise transfer. Contact your washer using a pedestal, you will need • A location that allows for this dryer. Installation clearances The location must not be required for spacing of 0"...
Use and Care Guide
Page 7
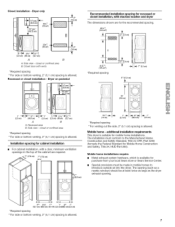
L41 (35.6cm) (4381ic0nm?2*) r.,l | 18" rain.* (7.6 cm) f 24in2, . (15c5r2n) h"q ax''-- Closet installation - Dryer only Lt 1-1,4m.
L41 (35.6cm) (4381ic0nm?2*) r.,l | 18" rain.* (7.6 cm) f 24in2, . (15c5r2n) h"q ax''-- Closet installation - Dryer only Lt 1-1,4m.
Use and Care Guide
Page 17
... water faucet, go to Step 6. Remove old rubber washer from inlet hose and replace with Step 3. 3. Continue with new rubber washer provided. Using pliers, tighten the coupling with an additional twothirds turn. Damage to brass male end of dryer back panel. Attach "Y" connector to the coupling can ... that the water faucets are on fill valve connector. 17 Damage to the coupling can result. 5. Turn cold water faucet off and remove washer inlet hose. 2. Using pliers, tighten the couplings with an additional twothirds turn . NOTE: Do not overtighten. Check the levelness of the ...
... water faucet, go to Step 6. Remove old rubber washer from inlet hose and replace with Step 3. 3. Continue with new rubber washer provided. Using pliers, tighten the coupling with an additional twothirds turn. Damage to brass male end of dryer back panel. Attach "Y" connector to the coupling can ... that the water faucets are on fill valve connector. 17 Damage to the coupling can result. 5. Turn cold water faucet off and remove washer inlet hose. 2. Using pliers, tighten the couplings with an additional twothirds turn . NOTE: Do not overtighten. Check the levelness of the ...
Use and Care Guide
Page 20
...Auto Cycle. • Select DRYNESS LEVEL to follow these instructions can completely remove oil. Do not dry anything flammable on left of fire, electric shock, or injury to persons, read the IMPORTANT SAFETY INSTRUCTIONS before each feature will glow green when the feature is selected or will show in... dryer and shut door. 3. NOTE: Most loads may be made only while using the Normal dryness level, which is selectable. 2O Fire Hazard No washer can result in death, explosion, or fire. Normal is unavailable with ...
...Auto Cycle. • Select DRYNESS LEVEL to follow these instructions can completely remove oil. Do not dry anything flammable on left of fire, electric shock, or injury to persons, read the IMPORTANT SAFETY INSTRUCTIONS before each feature will glow green when the feature is selected or will show in... dryer and shut door. 3. NOTE: Most loads may be made only while using the Normal dryness level, which is selectable. 2O Fire Hazard No washer can result in death, explosion, or fire. Normal is unavailable with ...