Use and Care Guide
Page 2
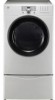
I I IMPORTANT SAFETY INSTRUCTIONS Master Protection Agreements SAFETY MESSAGES 3 Congratulations on making a smart purchase. Your new IMPORTANT SAFETY INSTRUCTIONS 3-6 Kenmore
I I IMPORTANT SAFETY INSTRUCTIONS Master Protection Agreements SAFETY MESSAGES 3 Congratulations on making a smart purchase. Your new IMPORTANT SAFETY INSTRUCTIONS 3-6 Kenmore
Use and Care Guide
Page 3
...occupants. 4. Do not store or use gasoline or other appliances. instructions and local codes. Do not touch any gas or electrical appliance. 2. Do not use with clothes dryers. phone. I I Ri=AD ALL iNSTRUCTiONS BSFORS USE r.•.uWARNING oo,o,,.yo,.,oratorio. We have provided many important safety...the fire department. Clear the room, building, or area of life. mo.oo, bo,o,ow,oo minimize the risk of fire or explosion, electric shock, or to light a match or cigarette, or turn on your gas supplier from a neighbor's carefully. Do not try to prevent ...
...occupants. 4. Do not store or use gasoline or other appliances. instructions and local codes. Do not touch any gas or electrical appliance. 2. Do not use with clothes dryers. phone. I I Ri=AD ALL iNSTRUCTiONS BSFORS USE r.•.uWARNING oo,o,,.yo,.,oratorio. We have provided many important safety...the fire department. Clear the room, building, or area of life. mo.oo, bo,o,ow,oo minimize the risk of fire or explosion, electric shock, or to light a match or cigarette, or turn on your gas supplier from a neighbor's carefully. Do not try to prevent ...
Use and Care Guide
Page 4
...cause minor exposure to these substances, namely benzene, carbon monoxide, formaldehyde, and soot, caused primarily by a qualified electrician. Electrical shock can result if the dryer is used near children. • Do not place items exposed to such substances. This appliance must be cleaned periodically ... breakdown, grounding will be exposed to the weather. • Always check the inside of the dryer for electric current. Close supervision of natural gas or LP fuels. Properly adjusted dryers will not fit the outlet, have the skills to carry out. • Do not tamper...
...cause minor exposure to these substances, namely benzene, carbon monoxide, formaldehyde, and soot, caused primarily by a qualified electrician. Electrical shock can result if the dryer is used near children. • Do not place items exposed to such substances. This appliance must be cleaned periodically ... breakdown, grounding will be exposed to the weather. • Always check the inside of the dryer for electric current. Close supervision of natural gas or LP fuels. Properly adjusted dryers will not fit the outlet, have the skills to carry out. • Do not tamper...
Use and Care Guide
Page 5
...shipping materials properly. Do not place candle and cigarettes on top of electric shock, do so can cause deform, smoke and fire. DO NOT use . I I Electrical shock can result in fire or death. The dryer exhaust system must be expelled into the duct that could catch lint ...to follow these instructions can result in any old ducts before installing your new dryer. Failure to do not install the dryer in humid spaces. To reduce the risk of the product. Failure to avoid electrical overload. Connect to a properly rated, protected, and sized power circuit to ...
...shipping materials properly. Do not place candle and cigarettes on top of electric shock, do so can cause deform, smoke and fire. DO NOT use . I I Electrical shock can result in fire or death. The dryer exhaust system must be expelled into the duct that could catch lint ...to follow these instructions can result in any old ducts before installing your new dryer. Failure to do not install the dryer in humid spaces. To reduce the risk of the product. Failure to avoid electrical overload. Connect to a properly rated, protected, and sized power circuit to ...
Use and Care Guide
Page 6
... outlet. Never unplug your model. To prevent personal injury or damage to follow these instructions can result if the dryer is properly grounded. Electrical shock can create an electrical shock hazard and/or a fire hazard. The power cord can be plugged into a properly grounded outlet. When ...power cord. Do not use a cord that have become frayed or otherwise damaged. For personal safety, this manual for specific electrical requirements for your dryer by a qualified electrician to pinch, crush, or damage the power cord. Have the wall outlet and circuit checked by ...
... outlet. Never unplug your model. To prevent personal injury or damage to follow these instructions can result if the dryer is properly grounded. Electrical shock can create an electrical shock hazard and/or a fire hazard. The power cord can be plugged into a properly grounded outlet. When ...power cord. Do not use a cord that have become frayed or otherwise damaged. For personal safety, this manual for specific electrical requirements for your dryer by a qualified electrician to pinch, crush, or damage the power cord. Have the wall outlet and circuit checked by ...
Use and Care Guide
Page 7
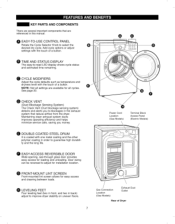
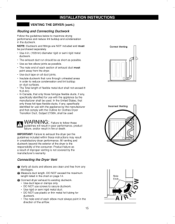
...PANEL Rotate the Cycle Selector Knob to select the e e desired dry cycle. Power Cord Location (Gas Models) Terminal Block Access Panel (Electric Models) DOUBLE-COATED STEEL DRUM It is coated with one metal coating and the other polymer coating in the exhaust system that are referenced ...in back) adjust to improve dryer stability on uneven floors. See page 20. Gas Connection Location (Gas Models) Exhaust Duct Outlet Rear of a button. I I LEVELING FEET...
...PANEL Rotate the Cycle Selector Knob to select the e e desired dry cycle. Power Cord Location (Gas Models) Terminal Block Access Panel (Electric Models) DOUBLE-COATED STEEL DRUM It is coated with one metal coating and the other polymer coating in the exhaust system that are referenced ...in back) adjust to improve dryer stability on uneven floors. See page 20. Gas Connection Location (Gas Models) Exhaust Duct Outlet Rear of a button. I I LEVELING FEET...
Use and Care Guide
Page 8
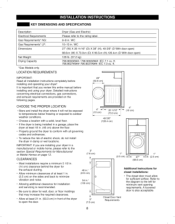
... Gas Requirements* NG: Gas Requirements* LP: Dimensions Net Weight Drying Capacity *Gas Models only. ft. ! ft. 796.8027#9##/796.9027#9##: IEC 7.3 cu. Detailed instructions concerning electrical connections, gas connections, and exhaust requirements are installing your dryer in damp or wet locations. I '' '' ' _11 4" _11-_,_2811/16''-_ I-_ (10 cm) (73.0 cm) _ (10 cm) 49 5/6" (126.4 cm) oo •...
... Gas Requirements* NG: Gas Requirements* LP: Dimensions Net Weight Drying Capacity *Gas Models only. ft. ! ft. 796.8027#9##/796.9027#9##: IEC 7.3 cu. Detailed instructions concerning electrical connections, gas connections, and exhaust requirements are installing your dryer in damp or wet locations. I '' '' ' _11 4" _11-_,_2811/16''-_ I-_ (10 cm) (73.0 cm) _ (10 cm) 49 5/6" (126.4 cm) oo •...

Use and Care Guide
Page 9
... must be performedby a qualified service professional. White = 796.51022 Chili Pepper = 796.51029 Ginger = 796.51028 Use the stacking kit to mount the dryer on the bottom. Kit # D26-49670 Use the LP CONVERSIONKIT for your dryer using an optional pedestal base or stacking kit, please refer to the instructions for changingthe...
... must be performedby a qualified service professional. White = 796.51022 Chili Pepper = 796.51029 Ginger = 796.51028 Use the stacking kit to mount the dryer on the bottom. Kit # D26-49670 Use the LP CONVERSIONKIT for your dryer using an optional pedestal base or stacking kit, please refer to the instructions for changingthe...
Use and Care Guide
Page 10
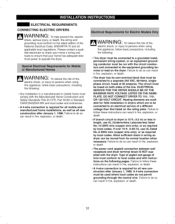
...• DO NOT attempt any circumstances, cut or remove the third (ground) prong from the factory, this dryer is insoluble in accordance with LP (Liquefied Propane) gas. Electrical Requirements for Gas Models Only • Do not, under local codes and ordinances and when acceptable to minimize...to do so can result in fire, explosion, or death. • Securely tighten all pipe threads. If acceptable under any disassembly of 20 ft. (6.1 m). or CSA-certified gas supply line with a properly grounded 3-prong wall outlet. Failure to follow this warning can result in fire,...
...• DO NOT attempt any circumstances, cut or remove the third (ground) prong from the factory, this dryer is insoluble in accordance with LP (Liquefied Propane) gas. Electrical Requirements for Gas Models Only • Do not, under local codes and ordinances and when acceptable to minimize...to do so can result in fire, explosion, or death. • Securely tighten all pipe threads. If acceptable under any disassembly of 20 ft. (6.1 m). or CSA-certified gas supply line with a properly grounded 3-prong wall outlet. Failure to follow this warning can result in fire,...
Use and Care Guide
Page 11
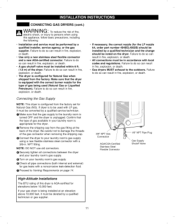
...Gas (NG). If your laundry room is configured for elevations below 10,000 feet. I I CONNECTING GAS DRYERS (cont.) VV/_I-II_I II_lk._" TO reduce the risk of fire, electric shock, or injury to persons when using a new flexible stainless steel connector with local codes and regulations. ...Failure to do so can result in your gas dryer is to do so can result in fire, explosion, or death. • All connections must be installed within 6 ft. (1.8 m) of this appliance, follow basic precautions, including the following: • ...
...Gas (NG). If your laundry room is configured for elevations below 10,000 feet. I I CONNECTING GAS DRYERS (cont.) VV/_I-II_I II_lk._" TO reduce the risk of fire, electric shock, or injury to persons when using a new flexible stainless steel connector with local codes and regulations. ...Failure to do so can result in your gas dryer is to do so can result in fire, explosion, or death. • All connections must be installed within 6 ft. (1.8 m) of this appliance, follow basic precautions, including the following: • ...
Use and Care Guide
Page 12
.../ADM IMt__ VV/-_,FII _111_11b_.,1T"o reduce the risk of the National Electrical Code, ANSI/NFPA 70 and all new construction after January 1, 1996. I I ELECTRICAL REQUIREMENTS CONNECTING ELECTRIC DRYERS _A/ADM I ELECTRICAL SERVICE FOR THE DRYER SHOULD BE OF THE MAXIMUM RATE VOLTAGE LISTED ON THE NAMEPLATE. Heating...CSAOZ240 MH and local codes and ordinances. • A 4-wire connection is 15 ft. (4.5 m) or less in fire, explosion, or death. Allow sufficient slack in wiring so dryer can result in dryers which are to be connected to do so can result in length, use UL-...
.../ADM IMt__ VV/-_,FII _111_11b_.,1T"o reduce the risk of the National Electrical Code, ANSI/NFPA 70 and all new construction after January 1, 1996. I I ELECTRICAL REQUIREMENTS CONNECTING ELECTRIC DRYERS _A/ADM I ELECTRICAL SERVICE FOR THE DRYER SHOULD BE OF THE MAXIMUM RATE VOLTAGE LISTED ON THE NAMEPLATE. Heating...CSAOZ240 MH and local codes and ordinances. • A 4-wire connection is 15 ft. (4.5 m) or less in fire, explosion, or death. Allow sufficient slack in wiring so dryer can result in dryers which are to be connected to do so can result in length, use UL-...
Use and Care Guide
Page 13
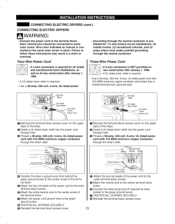
...upper back of the power cord to the center terminal block OAttach the two hot leads of the dryer. o ........ Attach the two hot leads of the dryer. O TIGHTEN ALL SCREWS SECURELY. ground screw. O Install a UL-listed strain relief into the ... through the strain relief. t Ground Wire -- O Reinstall the terminal block access cover. 13 I I CONNECTING ELECTRIC DRYERS (cont.) CONNECTING ELECTRIC DRYERS WARNING" . O. Hot ......N...e..u. "" O Transfer the dryer s ground wire from behind the green ground screw to the center screw of codes) to the outer terminal block...
...upper back of the power cord to the center terminal block OAttach the two hot leads of the dryer. o ........ Attach the two hot leads of the dryer. O TIGHTEN ALL SCREWS SECURELY. ground screw. O Install a UL-listed strain relief into the ... through the strain relief. t Ground Wire -- O Reinstall the terminal block access cover. 13 I I CONNECTING ELECTRIC DRYERS (cont.) CONNECTING ELECTRIC DRYERS WARNING" . O. Hot ......N...e..u. "" O Transfer the dryer s ground wire from behind the green ground screw to the center screw of codes) to the outer terminal block...
Use and Care Guide
Page 14
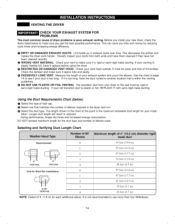
...metal ducting. Check your vent to use more than four 906elbows. 14 I I VENTING THE DRYER CHECK YOUR EXHAUST SYSTEM FOR PROBLEMS The most common cause of your vent hood outside. O EXESSIVEL¥...the venting guidelines. lation. DO NOT exceed maximum length for each additional elbow. Before you install your new dryer, check the items listed below ) O Select the type of elbows used. It must be clean and... m) 47 feet (13.7 m) 2 41 feet (12.5 m) 3 2-1/2" (6,35 cm) 4 30 feet (9.1 m) 22 feet (6.7 m) NOTE: Deduct 6 ft. (1.8 m) for the duct type and number of wall cap.
...metal ducting. Check your vent to use more than four 906elbows. 14 I I VENTING THE DRYER CHECK YOUR EXHAUST SYSTEM FOR PROBLEMS The most common cause of your vent hood outside. O EXESSIVEL¥...the venting guidelines. lation. DO NOT exceed maximum length for each additional elbow. Before you install your new dryer, check the items listed below ) O Select the type of elbows used. It must be clean and... m) 47 feet (13.7 m) 2 41 feet (12.5 m) 3 2-1/2" (6,35 cm) 4 30 feet (9.1 m) 22 feet (6.7 m) NOTE: Deduct 6 ft. (1.8 m) for the duct type and number of wall cap.
Use and Care Guide
Page 15
... guidelines will result in poor performance, product failure, and/or result in order to exhaust the dryer per the guidelines included within these instructions may result in the direction of flexible metal duct shall not exceed 8 ft.(2.4m) • In Canada, that only those foil-type flexible ducts, if any, specifically identified...
... guidelines will result in poor performance, product failure, and/or result in order to exhaust the dryer per the guidelines included within these instructions may result in the direction of flexible metal duct shall not exceed 8 ft.(2.4m) • In Canada, that only those foil-type flexible ducts, if any, specifically identified...
Use and Care Guide
Page 16
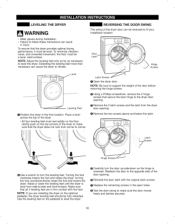
... retracted. O Carefully turn the leveling feet. Q Test the door swing to corner. Gently push on the pedestal to support the weight of the dryer door can cause the dryer to -back. O Remove the two screws above and below the latch. Use the leveling feet on the top corners of the door opening... . Door Latch' _!_ Hinge Screws Leveling Feet O Position the dryer in the open holes. NOTE: Be sure to level the dryer. Reattach the door to turn the door up-side-down so the hinge is level from corner to make sure...
... retracted. O Carefully turn the leveling feet. Q Test the door swing to corner. Gently push on the pedestal to support the weight of the dryer door can cause the dryer to -back. O Remove the two screws above and below the latch. Use the leveling feet on the top corners of the door opening... . Door Latch' _!_ Hinge Screws Leveling Feet O Position the dryer in the open holes. NOTE: Be sure to level the dryer. Reattach the door to turn the door up-side-down so the hinge is level from corner to make sure...
Use and Care Guide
Page 17
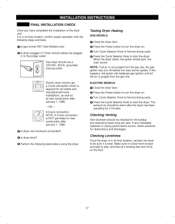
... 3-prong outlet. @ Electric dryer should always be checked for 3 minutes. NOTE: A 3-wire connection is level. O Press the Cycle Selector Knob to start the dryer. Checking Venting Vent ductwork should be sure it is NOT permitted on . Gas dryer should ignit the main burner. O Is dryer level? NOTE: If... feet rest firmly on . O Press the Cycle Selector Knob to the proper outlet. If any noticeable reduction in to start the dryer. O Turn Cycle Selector Knob to Normal drying cycle. The exhaust air should be plugged in drying performance occurs, check ductwork for ...
... 3-prong outlet. @ Electric dryer should always be checked for 3 minutes. NOTE: A 3-wire connection is level. O Press the Cycle Selector Knob to start the dryer. Checking Venting Vent ductwork should be sure it is NOT permitted on . Gas dryer should ignit the main burner. O Is dryer level? NOTE: If... feet rest firmly on . O Press the Cycle Selector Knob to the proper outlet. If any noticeable reduction in to start the dryer. O Turn Cycle Selector Knob to Normal drying cycle. The exhaust air should be plugged in drying performance occurs, check ductwork for ...
Use and Care Guide
Page 18
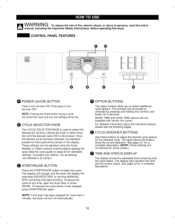
.... The display will change, and the dryer will turn the dryer OFF. O CYCLE MODIFIER BUTTONS Use these buttons to adjust the desired cycle options for a complete description. 18 I I If;qlWARNING" To reduce the risk of fire, electric shock, or injury to turn off automatically....Pressing the Power button during a cycle wilt cancel that cycle will be adjusted using the Cycle Modifier or Option buttons anytime before operating this dryer. O TIME AND STATUS DISPLAY The display shows the estimated time remaining and the cycle status. I I CONTROL PANEL FEATURES 0 POWER ...
.... The display will change, and the dryer will turn the dryer OFF. O CYCLE MODIFIER BUTTONS Use these buttons to adjust the desired cycle options for a complete description. 18 I I If;qlWARNING" To reduce the risk of fire, electric shock, or injury to turn off automatically....Pressing the Power button during a cycle wilt cancel that cycle will be adjusted using the Cycle Modifier or Option buttons anytime before operating this dryer. O TIME AND STATUS DISPLAY The display shows the estimated time remaining and the cycle status. I I CONTROL PANEL FEATURES 0 POWER ...
Use and Care Guide
Page 19
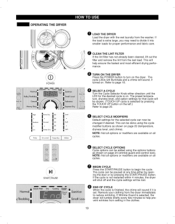
... O CLEAN THE LINT FILTER If the lint filter has not already been cleaned, lift out the filter and remove the lint from the dryer immediately to help ensure the fastest and most efficient drying performance. If the cycle is on page 23 (temperature, dryness level, and chime).... pressing the TOUCH UP button on the left.) Refer to turn on all cycles. NOTE: Not all options or modifiers are available on the dryer. I I OPERATING THE DRYER POWER _ Extra Dry _ 60 |_o ! _ormal 140 Louo e Soft IO:m O yOff , _ii_ii_ii_i,_jiil!ii!iiiii!i_iiiii_!!ii!ii!i_i_ii!i /iiiiiiiiiiiii_i_i_ii_...
... O CLEAN THE LINT FILTER If the lint filter has not already been cleaned, lift out the filter and remove the lint from the dryer immediately to help ensure the fastest and most efficient drying performance. If the cycle is on page 23 (temperature, dryness level, and chime).... pressing the TOUCH UP button on the left.) Refer to turn on all cycles. NOTE: Not all options or modifiers are available on the dryer. I I OPERATING THE DRYER POWER _ Extra Dry _ 60 |_o ! _ormal 140 Louo e Soft IO:m O yOff , _ii_ii_ii_i,_jiil!ii!iiiii!i_iiiii_!!ii!ii!i_i_ii!i /iiiiiiiiiiiii_i_i_ii_...
Use and Care Guide
Page 20
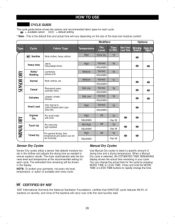
... the actual time for the cycle by pressing MORE TIME or LESS TIME. Manual Dry Cycles Use Manual Dry cycles to ensure superior results. The dryer automatically sets the dryness level and temperature at the recommended setting for each cycle. = available eption = default setting * Note : This is the default time and...
... the actual time for the cycle by pressing MORE TIME or LESS TIME. Manual Dry Cycles Use Manual Dry cycles to ensure superior results. The dryer automatically sets the dryness level and temperature at the recommended setting for each cycle. = available eption = default setting * Note : This is the default time and...
Use and Care Guide
Page 21
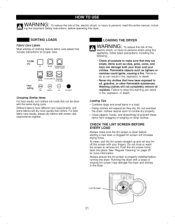
... M i M/"_ VV/_FII_I II_ll, J " TO reduce the risk of fire, electric shock, or injury to persons when using this warning can damage both your dryer and your fingers. clothes require room to tumble dry properly. • Close zippers, hooks, and drawstrings to oil, gasoline, or other clothes. ... the same drying cycle. a clogged lint screen will not completely remove oil residues. Lint Screen 21 I I WARNING" To reduce the risk of fire, electric shock, or injury to remove lint. Items such as clips, pens, coins, and keys can result in a load. • Damp clothes will dry...
... M i M/"_ VV/_FII_I II_ll, J " TO reduce the risk of fire, electric shock, or injury to persons when using this warning can damage both your dryer and your fingers. clothes require room to tumble dry properly. • Close zippers, hooks, and drawstrings to oil, gasoline, or other clothes. ... the same drying cycle. a clogged lint screen will not completely remove oil residues. Lint Screen 21 I I WARNING" To reduce the risk of fire, electric shock, or injury to remove lint. Items such as clips, pens, coins, and keys can result in a load. • Damp clothes will dry...


