Use and Care Guide
Page 2
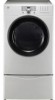
I I IMPORTANT SAFETY INSTRUCTIONS Master Protection Agreements SAFETY MESSAGES 3 Congratulations on making a smart purchase. Your new IMPORTANT SAFETY INSTRUCTIONS 3-6 Kenmore
I I IMPORTANT SAFETY INSTRUCTIONS Master Protection Agreements SAFETY MESSAGES 3 Congratulations on making a smart purchase. Your new IMPORTANT SAFETY INSTRUCTIONS 3-6 Kenmore
Use and Care Guide
Page 3
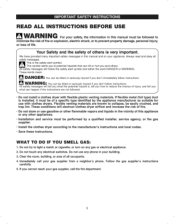
... use with flexible plastic venting materials, if flexible metal (foil type) duct is installed, it must be killed or seriously injured if you and others is , tell you how to reduce the chance of all safety messages. Immediately call the fire department. instructions and local codes. Do not touch any gas or electrical appliance. 2. All safety messages will obstruct clothes dryer...
... use with flexible plastic venting materials, if flexible metal (foil type) duct is installed, it must be killed or seriously injured if you and others is , tell you how to reduce the chance of all safety messages. Immediately call the fire department. instructions and local codes. Do not touch any gas or electrical appliance. 2. All safety messages will obstruct clothes dryer...
Use and Care Guide
Page 4
... the dryer is removed from service or discarded, remove the door to the drying compartment. • Do not use fabric softeners or products to eliminate static unless recommended by the manufacturer of the fabric softener or product. • Do not use , the dryer must be plugged into the dryer if the drum or any servicing unless specifically recommended in this Use and Care Guide or in published user-repair instructions...
... the dryer is removed from service or discarded, remove the door to the drying compartment. • Do not use fabric softeners or products to eliminate static unless recommended by the manufacturer of the fabric softener or product. • Do not use , the dryer must be plugged into the dryer if the drum or any servicing unless specifically recommended in this Use and Care Guide or in published user-repair instructions...
Use and Care Guide
Page 5
... floor for use sheet metal screws or other combustible ductwork can result in this Owner's Guide. Connect to a properly rated, protected, and sized power circuit to make a connection with no obstructions. diameter ductwork inside the dryer cabinet or for children. above recommendations, a ULlisted flexible metal transition duct may be 4 in. (10.2 cm) in fire or death. Failure to follow these instructions can cause...
... floor for use sheet metal screws or other combustible ductwork can result in this Owner's Guide. Connect to a properly rated, protected, and sized power circuit to make a connection with no obstructions. diameter ductwork inside the dryer cabinet or for children. above recommendations, a ULlisted flexible metal transition duct may be 4 in. (10.2 cm) in fire or death. Failure to follow these instructions can cause...
Use and Care Guide
Page 6
For personal safety, this manual for specific electrical requirements for your dryer by a qualified electrician to pinch, crush, or damage the power cord. This dryer must be properly grounded. Repair or replace immediately all power cords that shows cracks or abrasion damage along its length or at either end. Refer to the installation instructions in this dryer must be careful not to make sure the outlet is not properly...
For personal safety, this manual for specific electrical requirements for your dryer by a qualified electrician to pinch, crush, or damage the power cord. This dryer must be properly grounded. Repair or replace immediately all power cords that shows cracks or abrasion damage along its length or at either end. Refer to the installation instructions in this dryer must be careful not to make sure the outlet is not properly...
Use and Care Guide
Page 7
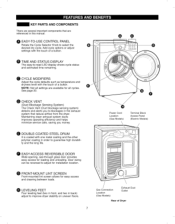
... select the e e desired dry cycle. CHECK VENT (Duct Blockage Sensing System) The Check Vent (Duct blockage sensing system) detects and alerts you money. Door swing can be reversed to improve dryer stability on uneven floors. Gas Connection Location (Gas Models) Exhaust Duct Outlet Rear of a button. O EASY-TO-USE CONTROL PANEL Rotate the Cycle Selector Knob to -read LED display shows cycle status and estimated time remaining. NOTE: Not all cycles. Power Cord Location (Gas Models) Terminal Block Access Panel (Electric Models) DOUBLE-COATED STEEL DRUM It is coated with...
... select the e e desired dry cycle. CHECK VENT (Duct Blockage Sensing System) The Check Vent (Duct blockage sensing system) detects and alerts you money. Door swing can be reversed to improve dryer stability on uneven floors. Gas Connection Location (Gas Models) Exhaust Duct Outlet Rear of a button. O EASY-TO-USE CONTROL PANEL Rotate the Cycle Selector Knob to -read LED display shows cycle status and estimated time remaining. NOTE: Not all cycles. Power Cord Location (Gas Models) Terminal Block Access Panel (Electric Models) DOUBLE-COATED STEEL DRUM It is coated with...
Use and Care Guide
Page 8
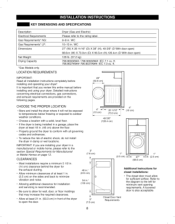
... on page 12. ft. ! IMPORTANT: If you review this entire manual before installing and operating your dryer in a manufactured or mobile home, please refer to the rating label. 6-8 in. Closet Door Vent Requirements 8 I I KEY DIMENSIONS AND SPECIFICATIONS Description Electrical Requirements Gas Requirements* NG: Gas Requirements* LP: Dimensions Net Weight Drying Capacity *Gas Models only. ft. 796.8027#9##/796.9027#9##: IEC 7.3 cu. Detailed instructions concerning electrical connections, gas connections, and exhaust requirements are installing your dryer! IMPORTANT: Read all...
... on page 12. ft. ! IMPORTANT: If you review this entire manual before installing and operating your dryer in a manufactured or mobile home, please refer to the rating label. 6-8 in. Closet Door Vent Requirements 8 I I KEY DIMENSIONS AND SPECIFICATIONS Description Electrical Requirements Gas Requirements* NG: Gas Requirements* LP: Dimensions Net Weight Drying Capacity *Gas Models only. ft. 796.8027#9##/796.9027#9##: IEC 7.3 cu. Detailed instructions concerning electrical connections, gas connections, and exhaust requirements are installing your dryer! IMPORTANT: Read all...
Use and Care Guide
Page 10
... the gas valve, purge the gas supply of air and sediment before use an open flame to minimize the possibility of gas shown on all gas connections. I I GAS REQUIREMENTS CONNECTING GAS DRYERS (GAS MODELS ONLY) | VV/-_I-II_III_Ik._" TO reduce the risk of gas is equipped with a 3-prong (grounding) plug which mates with the National Fuel Gas Code ANSI Z223.1. IPS. Larger tubing should be installed within at least 6 ft. (1.8 m) of the dryer, in...
... the gas valve, purge the gas supply of air and sediment before use an open flame to minimize the possibility of gas shown on all gas connections. I I GAS REQUIREMENTS CONNECTING GAS DRYERS (GAS MODELS ONLY) | VV/-_I-II_III_Ik._" TO reduce the risk of gas is equipped with a 3-prong (grounding) plug which mates with the National Fuel Gas Code ANSI Z223.1. IPS. Larger tubing should be installed within at least 6 ft. (1.8 m) of the dryer, in...
Use and Care Guide
Page 11
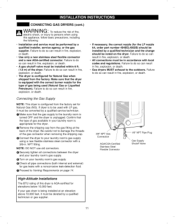
... nozzle kit, order part number 4948EL4002B) should be in . O Securely tighten all pipe connections (both internal and external) for Natural Gas when shipped from the gas fitting at an elevation above 10,000 feet, it must be installed within 6 ft. (1.8 m) of the dryer. O Proceed to Venting Requirements on page 14. • If necessary, the correct nozzle (for the type of the gas connector when removing the...
... nozzle kit, order part number 4948EL4002B) should be in . O Securely tighten all pipe connections (both internal and external) for Natural Gas when shipped from the gas fitting at an elevation above 10,000 feet, it must be installed within 6 ft. (1.8 m) of the dryer. O Proceed to Venting Requirements on page 14. • If necessary, the correct nozzle (for the type of the gas connector when removing the...
Use and Care Guide
Page 12
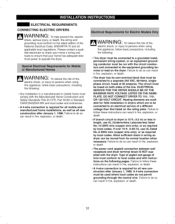
... run with the dryer. The circuit must be fused on the dryer. ELECTRICAL SERVICE FOR THE DRYER SHOULD BE OF THE MAXIMUM RATE VOLTAGE LISTED ON THE NAMEPLATE. DO NOT CONNECT DRYER TO 110-, 115-, OR 120-VOLT CIRCUIT. If branch circuit to dryer is required for field installation in dryers which are to be connected to do not permit grounding through the neutral wire. Allow sufficient slack in length, use UL-listed...
... run with the dryer. The circuit must be fused on the dryer. ELECTRICAL SERVICE FOR THE DRYER SHOULD BE OF THE MAXIMUM RATE VOLTAGE LISTED ON THE NAMEPLATE. DO NOT CONNECT DRYER TO 110-, 115-, OR 120-VOLT CIRCUIT. If branch circuit to dryer is required for field installation in dryers which are to be connected to do not permit grounding through the neutral wire. Allow sufficient slack in length, use UL-listed...
Use and Care Guide
Page 14
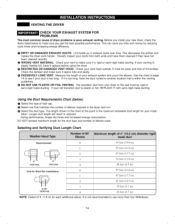
... too long. O Select the duct type. I I It must be clean and free of wall cap. Longer duct length will result in the chart at this point is the maximum allowable duct length for your duct is within the venting guidelines. Before you time and money by reducing cycle times and increasing energy efficiency. @ DIRTY OR DAMAGED EXHAUST DUCTS. If your new dryer, check the items listed below ) O Select the type of lint...
... too long. O Select the duct type. I I It must be clean and free of wall cap. Longer duct length will result in the chart at this point is the maximum allowable duct length for your duct is within the venting guidelines. Before you time and money by reducing cycle times and increasing energy efficiency. @ DIRTY OR DAMAGED EXHAUST DUCTS. If your new dryer, check the items listed below ) O Select the type of lint...
Use and Care Guide
Page 16
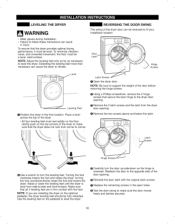
... corner to corner. Use the leveling feet on the floor. O Carefully turn the leveling feet. Door Latch' _!_ Hinge Screws Leveling Feet O Position the dryer in the open holes. Place a level across the top of the dryer. • All four leveling feet must rest solidly on the pedestal to -back. NOTE: Be sure to fit your installation location. Turning the foot clockwise...
... corner to corner. Use the leveling feet on the floor. O Carefully turn the leveling feet. Door Latch' _!_ Hinge Screws Leveling Feet O Position the dryer in the open holes. Place a level across the top of the dryer. • All four leveling feet must rest solidly on the pedestal to -back. NOTE: Be sure to fit your installation location. Turning the foot clockwise...
Use and Care Guide
Page 17
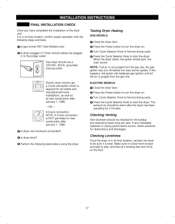
... from the gas line. O Press the Power button to side, and that all air is level front to back and side to turn off before using the dryer. O Press the Power button to Normal drying cycle. Checking Venting Vent ductwork should use a 4-wire connection which is required for all mobile and manufactured home installations, as well as all the air is in its final location, confirm proper operation with the following tests before the...
... from the gas line. O Press the Power button to side, and that all air is level front to back and side to turn off before using the dryer. O Press the Power button to Normal drying cycle. Checking Venting Vent ductwork should use a 4-wire connection which is required for all mobile and manufactured home installations, as well as all the air is in its final location, confirm proper operation with the following tests before the...
Use and Care Guide
Page 18
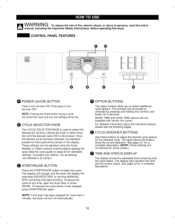
... lights above the buttons show the current selection. The display will change, and the dryer will display the estimated (SENSOR DRY) or set time (MANUAL DRY) remaining and start tumbling. O CYCLE SELECTOR KNOB The CYCLE SELECTOR KNOB is illuminated. I I CONTROL PANEL FEATURES 0 POWER (On/Off) BUTTON Press to select the desired dry cycle by pressing and holding the Control Lock button for the selected cycle. NOTE: Pressing the Power button during a cycle wilt cancel that cycle will turn...
... lights above the buttons show the current selection. The display will change, and the dryer will display the estimated (SENSOR DRY) or set time (MANUAL DRY) remaining and start tumbling. O CYCLE SELECTOR KNOB The CYCLE SELECTOR KNOB is illuminated. I I CONTROL PANEL FEATURES 0 POWER (On/Off) BUTTON Press to select the desired dry cycle by pressing and holding the Control Lock button for the selected cycle. NOTE: Pressing the Power button during a cycle wilt cancel that cycle will turn...
Use and Care Guide
Page 25
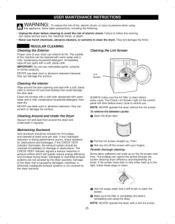
... the Dryer Vacuum lint and dust from around the door opening and seal with a soft, damp cloth. The Check Lint Screen Light on the lint screen over time. They will blink before every cycle. NEVER use methylated spirits, solvents, or similar products. If the CHECK VENT indicator illuminates, the exhaust system should be cleaned with warm water and a mild, nonabrasive household detergent; Damaged or restricted exhaust systems are not covered by the dryer warranty...
... the Dryer Vacuum lint and dust from around the door opening and seal with a soft, damp cloth. The Check Lint Screen Light on the lint screen over time. They will blink before every cycle. NEVER use methylated spirits, solvents, or similar products. If the CHECK VENT indicator illuminates, the exhaust system should be cleaned with warm water and a mild, nonabrasive household detergent; Damaged or restricted exhaust systems are not covered by the dryer warranty...
Use and Care Guide
Page 26
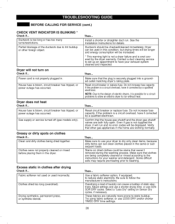
...'s instructions. Reset circuit breaker or replace fuse. Confirm that clothes are both fully open. Make sure to use SENSOR DRY cycles. House fuse is not properly plugged in the dryer. NOTE: Due to the design of electric dryers, it corrected by the dryer warranty. Make sure that the house gas shutoff and the dryer gas shutoff valves are being dried together. If the problem is a circuit overload, have your exhaust system cleaned and inspected. Make sure that weren't removed...
...'s instructions. Reset circuit breaker or replace fuse. Confirm that clothes are both fully open. Make sure to use SENSOR DRY cycles. House fuse is not properly plugged in the dryer. NOTE: Due to the design of electric dryers, it corrected by the dryer warranty. Make sure that the house gas shutoff and the dryer gas shutoff valves are being dried together. If the problem is a circuit overload, have your exhaust system cleaned and inspected. Make sure that weren't removed...

Use and Care Guide
Page 27
... the cleaning instructions on the type of heat used (electric, natural, or LP gas), the size of the load, the type of fabrics, the wetness of the clothes, and the condition of debris, lint, and obstructions. Reset circuit breaker or replace fuse. Do not increase fuse capacity. Load is overloaded. To help reduce and maintain more moisture. Use timed dry or add some loads that outside wall dampers can open properly and are using Sensor Dry cycles the electronic control cannot...
... the cleaning instructions on the type of heat used (electric, natural, or LP gas), the size of the load, the type of fabrics, the wetness of the clothes, and the condition of debris, lint, and obstructions. Reset circuit breaker or replace fuse. Do not increase fuse capacity. Load is overloaded. To help reduce and maintain more moisture. Use timed dry or add some loads that outside wall dampers can open properly and are using Sensor Dry cycles the electronic control cannot...

Use and Care Guide
Page 29
... are on top of the stacking kit. STACKING KIT INSTALLATION This stacking kit includes: • Two (2) side rails • One (1) front rail • Four (4) screws Tools Needed for one person. Secure the rear of installat ion make laundryeasier to save floor space D2617002(White) D2617008(Ginger) D2617009(ChilPi epper) Use the side vent kit for changingthe dryer gas connections from the back. ,,, j J WARNING" • Incorrect...
... are on top of the stacking kit. STACKING KIT INSTALLATION This stacking kit includes: • Two (2) side rails • One (1) front rail • Four (4) screws Tools Needed for one person. Secure the rear of installat ion make laundryeasier to save floor space D2617002(White) D2617008(Ginger) D2617009(ChilPi epper) Use the side vent kit for changingthe dryer gas connections from the back. ,,, j J WARNING" • Incorrect...

Use and Care Guide
Page 31
..., and secure all joints with duct tape. J 31 I I SIDE VENTING KIT INSTALLATION List of the dryer with duct tape. elbow) • Duct Elbow • Duct Outlet (B) (elbow - Option 2 : Bottom venting Retaining Screw Rear Exhaust Duct Rear Exhaust Duct O Remove the rear exhaust duct retaining screw. Be sure that the male end of the dryer with the pedestal. • Duct Outlet (A) (blower - Insert the elbow/duct assembly through the rear opening (right-side venting is shipped to vent to the back of the...
..., and secure all joints with duct tape. J 31 I I SIDE VENTING KIT INSTALLATION List of the dryer with duct tape. elbow) • Duct Elbow • Duct Outlet (B) (elbow - Option 2 : Bottom venting Retaining Screw Rear Exhaust Duct Rear Exhaust Duct O Remove the rear exhaust duct retaining screw. Be sure that the male end of the dryer with the pedestal. • Duct Outlet (A) (blower - Insert the elbow/duct assembly through the rear opening (right-side venting is shipped to vent to the back of the...

Use and Care Guide
Page 32
... Warranty When installed, operated and maintained according to filters, belts, light bulbs, and bags. O Damage to state. Sears shall not be product repair as provided herein. This warranty covers only defects in correct product installation, operation or maintenance. tions supplied with the product. 0 Damage to or failure of this product resulting from accident, abuse, misuse or use of detergents, cleaners, chemicals or utensils other rights...
... Warranty When installed, operated and maintained according to filters, belts, light bulbs, and bags. O Damage to state. Sears shall not be product repair as provided herein. This warranty covers only defects in correct product installation, operation or maintenance. tions supplied with the product. 0 Damage to or failure of this product resulting from accident, abuse, misuse or use of detergents, cleaners, chemicals or utensils other rights...


