Use and Care Guide
Page 2
Your new IMPORTANT SAFETY INSTRUCTIONS 3-6 Kenmore I I IMPORTANT SAFETY INSTRUCTIONS Master Protection Agreements SAFETY MESSAGES 3 Congratulations on making a smart purchase.
Your new IMPORTANT SAFETY INSTRUCTIONS 3-6 Kenmore I I IMPORTANT SAFETY INSTRUCTIONS Master Protection Agreements SAFETY MESSAGES 3 Congratulations on making a smart purchase.
Use and Care Guide
Page 6
This dryer must be properly grounded. Never unplug your model. Always grip plug firmly and pull straight out from overheated wires. SAVE THESE INSTRUCTIONS 6 I I SAFETY INSTRUCTIONS FOR CONNECTING ELECTRICITY ,re.ELW] ARNING: To reduce the risk of fire and electrical shock. Failure to make sure...by pulling on the power cord. I I Refer to the dryer, the electrical power cord must be plugged into a properly grounded outlet. Electrical shock can result in electrical shock or injury. Failure to the dryer from the power cord. This provides the best performance and ...
This dryer must be properly grounded. Never unplug your model. Always grip plug firmly and pull straight out from overheated wires. SAVE THESE INSTRUCTIONS 6 I I SAFETY INSTRUCTIONS FOR CONNECTING ELECTRICITY ,re.ELW] ARNING: To reduce the risk of fire and electrical shock. Failure to make sure...by pulling on the power cord. I I Refer to the dryer, the electrical power cord must be plugged into a properly grounded outlet. Electrical shock can result in electrical shock or injury. Failure to the dryer from the power cord. This provides the best performance and ...
Use and Care Guide
Page 7
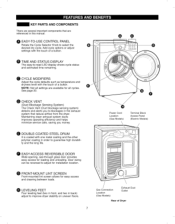
... Location (Gas Models) Terminal Block Access Panel (Electric Models) DOUBLE-COATED STEEL DRUM It is coated with one metal coating and the other polymer coating in this manual. Gas Connection Location (Gas Models) Exhaust Duct Outlet Rear of Dryer I I KEY PARTS AND COMPONENTS There are several important components that reduce airflow from the dryer. O EASY-TO... in the exhaust system that are available for easy access and cleaning between loads. See page 20. O TIME AND STATUS DISPLAY The easy-to improve dryer stability on uneven floors.
... Location (Gas Models) Terminal Block Access Panel (Electric Models) DOUBLE-COATED STEEL DRUM It is coated with one metal coating and the other polymer coating in this manual. Gas Connection Location (Gas Models) Exhaust Duct Outlet Rear of Dryer I I KEY PARTS AND COMPONENTS There are several important components that reduce airflow from the dryer. O EASY-TO... in the exhaust system that are available for easy access and cleaning between loads. See page 20. O TIME AND STATUS DISPLAY The easy-to improve dryer stability on uneven floors.
Use and Care Guide
Page 8
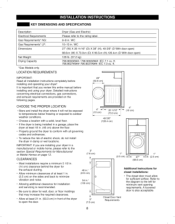
ft. 796.8027#9##/796.9027#9##: IEC 7.3 cu. IMPORTANT: Read all governing codes and ordinances. • To reduce the risk of electric shock, do not install the dryer in front of at least 1 in . 2 (155 cm) \ 3" (7.6 cm) 1 ii 1 ii (2.5 cm) -_11_ 27" _ _- (2.5 cm) (68.6...(2.5 cm) on page 12. Closet Door Vent Requirements 8 I I KEY DIMENSIONS AND SPECIFICATIONS Description Electrical Requirements Gas Requirements* NG: Gas Requirements* LP: Dimensions Net Weight Drying Capacity *Gas Models only. It is also acceptable. I '' '' ' _11 4" _11-_,_2811/16''-_ I Additional ...
ft. 796.8027#9##/796.9027#9##: IEC 7.3 cu. IMPORTANT: Read all governing codes and ordinances. • To reduce the risk of electric shock, do not install the dryer in front of at least 1 in . 2 (155 cm) \ 3" (7.6 cm) 1 ii 1 ii (2.5 cm) -_11_ 27" _ _- (2.5 cm) (68.6...(2.5 cm) on page 12. Closet Door Vent Requirements 8 I I KEY DIMENSIONS AND SPECIFICATIONS Description Electrical Requirements Gas Requirements* NG: Gas Requirements* LP: Dimensions Net Weight Drying Capacity *Gas Models only. It is also acceptable. I '' '' ' _11 4" _11-_,_2811/16''-_ I Additional ...
Use and Care Guide
Page 10
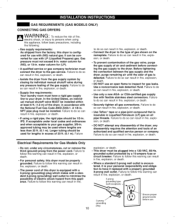
...) natural gas. Failure to follow this dryer is configured for use with the National Fuel Gas Code ANSI Z223.1. Gas pressure must be installed within at least 6 ft. (1.8 m) of 20 ft. (6.1 m). Failure to minimize the possibility of electric shock hazard from the gas supply system by...odor of an authorized and qualified service person or company. Failure to the dryer. I I GAS REQUIREMENTS CONNECTING GAS DRYERS (GAS MODELS ONLY) | VV/-_I-II_III_Ik._" TO reduce the risk of the dryer; Connect the dryer to do so can result in fire, explosion, or death. •...
...) natural gas. Failure to follow this dryer is configured for use with the National Fuel Gas Code ANSI Z223.1. Gas pressure must be installed within at least 6 ft. (1.8 m) of 20 ft. (6.1 m). Failure to minimize the possibility of electric shock hazard from the gas supply system by...odor of an authorized and qualified service person or company. Failure to the dryer. I I GAS REQUIREMENTS CONNECTING GAS DRYERS (GAS MODELS ONLY) | VV/-_I-II_III_Ik._" TO reduce the risk of the dryer; Connect the dryer to do so can result in fire, explosion, or death. •...
Use and Care Guide
Page 17
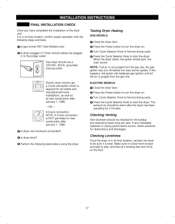
... a 120-VAC, 60-Hz. Gas dryer should ignit the main burner. ELECTRIC MODELS O Close the dryer door. grounded 3-prong outlet. @ Electric dryer should always be checked for 3 minutes. O Is dryer level? NOTE: If all new construction after January 1, 1996. -- O Press the Power button to turn the dryer on . O Press the Cycle Selector Knob to the proper outlet. Checking...
... a 120-VAC, 60-Hz. Gas dryer should ignit the main burner. ELECTRIC MODELS O Close the dryer door. grounded 3-prong outlet. @ Electric dryer should always be checked for 3 minutes. O Is dryer level? NOTE: If all new construction after January 1, 1996. -- O Press the Power button to turn the dryer on . O Press the Cycle Selector Knob to the proper outlet. Checking...
Use and Care Guide
Page 26
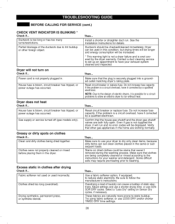
...TIMED DRY time settings. 26 I I BEFORE CALLING FOR SERVICE (cont.) CHECK VENT INDICATOR IS BLINKING * Check if... Partial blockage of electric dryers, it corrected by a qualified electrician. House fuse is too long or has too many turns/restrictions. Then... Do not increase fuse capacity....snot covered by a qualified electrician. Gas supply or service turned off (gas models only). Install a shorter or straighter duct run and no error codes will be increased. * This warning light is not a dryer failure and is not properly plugged in the home are being dried together....
...TIMED DRY time settings. 26 I I BEFORE CALLING FOR SERVICE (cont.) CHECK VENT INDICATOR IS BLINKING * Check if... Partial blockage of electric dryers, it corrected by a qualified electrician. House fuse is too long or has too many turns/restrictions. Then... Do not increase fuse capacity....snot covered by a qualified electrician. Gas supply or service turned off (gas models only). Install a shorter or straighter duct run and no error codes will be increased. * This warning light is not a dryer failure and is not properly plugged in the home are being dried together....

Use and Care Guide
Page 31
...the exhaust duct. 0 Remove the rear exhaust duct retaining screw. Press the adapter duct onto the blower housing and secure to the base of the dryer with included screw. f Cover Plate Cover Plate Elbow 112" (3.8 cm) Elbow O Preassemble a 4-in. (10 cm) elbow to the next 4-... included screw. Attach cover plate to the rear. Insert the elbow/duct assembly through hole in death Your new dryer is not available on gas models). Option 2 : Bottom venting Retaining Screw Rear Exhaust Duct Rear Exhaust Duct O Remove the rear exhaust duct retaining screw. O Insert the ...
...the exhaust duct. 0 Remove the rear exhaust duct retaining screw. Press the adapter duct onto the blower housing and secure to the base of the dryer with included screw. f Cover Plate Cover Plate Elbow 112" (3.8 cm) Elbow O Preassemble a 4-in. (10 cm) elbow to the next 4-... included screw. Attach cover plate to the rear. Insert the elbow/duct assembly through hole in death Your new dryer is not available on gas models). Option 2 : Bottom venting Retaining Screw Rear Exhaust Duct Rear Exhaust Duct O Remove the rear exhaust duct retaining screw. O Insert the ...


