
Use and Care Guide
Page 2
... and Replaclng Doors 10 General Cleaning Tips 23 How to Remove Freezer Door 10 Outside 23 How to Remove Refrigertor Door 10 Inside Walls 23 Replacing Refrigerator Door 11 Door Line and Gaskets 23 Replacing Freezer Door 11 Plastic Parts 23 Reversing Doors 12 Back Cover 23 ... Closing and Alignment 16 When you move 24 USING YOUR REFRIGERATOR 17 ABOUT AUTOMATIC ICEMAKER 25 Ensuring Proper Air Circulation Setting the Controls Adjusting Control Settings Food Storage Guide Storing Frozen Food 17 CONNECTING THE WATER LINE 26 17 TROUBLESHOOTING GUIDE 29 18 18 19 3
... and Replaclng Doors 10 General Cleaning Tips 23 How to Remove Freezer Door 10 Outside 23 How to Remove Refrigertor Door 10 Inside Walls 23 Replacing Refrigerator Door 11 Door Line and Gaskets 23 Replacing Freezer Door 11 Plastic Parts 23 Reversing Doors 12 Back Cover 23 ... Closing and Alignment 16 When you move 24 USING YOUR REFRIGERATOR 17 ABOUT AUTOMATIC ICEMAKER 25 Ensuring Proper Air Circulation Setting the Controls Adjusting Control Settings Food Storage Guide Storing Frozen Food 17 CONNECTING THE WATER LINE 26 17 TROUBLESHOOTING GUIDE 29 18 18 19 3
Use and Care Guide
Page 3
... resulting from state to state. This warranty gives you specific legal rights, and you . Damage to or failure of this product caused by law. BOTTOM FREEZER REFRIGERATOR ® I(enmore Appliance Warranty One Year Limited Warranty When installed, operated and maintained according to all instructions supplied with the product, if this appliance fails...
... resulting from state to state. This warranty gives you specific legal rights, and you . Damage to or failure of this product caused by law. BOTTOM FREEZER REFRIGERATOR ® I(enmore Appliance Warranty One Year Limited Warranty When installed, operated and maintained according to all instructions supplied with the product, if this appliance fails...
Use and Care Guide
Page 4
Your new Kenmore ® product is a risk free purchase. But like all products. real protection...you purchase the Agreement t a simple phone caii is aii that is the result of mechanical failure of any Covered refrigerator or freezer. [] Rental reimbursement if repair of your product. [] Unlimited service calls and nation wide service, as often as ... deductibles, no extra charge. [] Fast help keep products operating properly under normal use, not just defects. Think of the refrigerator compartment. If you can 't be working on the right-hand side of us . [] "No-lemon _' guarantee -...
Your new Kenmore ® product is a risk free purchase. But like all products. real protection...you purchase the Agreement t a simple phone caii is aii that is the result of mechanical failure of any Covered refrigerator or freezer. [] Rental reimbursement if repair of your product. [] Unlimited service calls and nation wide service, as often as ... deductibles, no extra charge. [] Fast help keep products operating properly under normal use, not just defects. Think of the refrigerator compartment. If you can 't be working on the right-hand side of us . [] "No-lemon _' guarantee -...
Use and Care Guide
Page 5
... of the ejector mechanism, or with a live wire filament. (A burned-out light bulb may break when frozen, causing damage. ° The refrigerator-freezer should be properly grounded. Do not use a cord that inform you open the doors when children are in order to eat." Be careful when ...or if they may break when being replaced.) NOTE: Setting either theplug or connector end.When moving your refrigerator by pulling on the refrigerator doors or shelves in the freezer compartment when hands are still cold below40°F (4°C)." Have the wail outlet and the circuit checked by...
... of the ejector mechanism, or with a live wire filament. (A burned-out light bulb may break when frozen, causing damage. ° The refrigerator-freezer should be properly grounded. Do not use a cord that inform you open the doors when children are in order to eat." Be careful when ...or if they may break when being replaced.) NOTE: Setting either theplug or connector end.When moving your refrigerator by pulling on the refrigerator doors or shelves in the freezer compartment when hands are still cold below40°F (4°C)." Have the wail outlet and the circuit checked by...

Use and Care Guide
Page 6
...Children should always be 15 amperes (minimum) and 120 volts. Junked or abandoned refrigerators are finished, reconnect the refrigerator to the electrical source and reset the control (thermostat, refrigerator control or freezer control, depending on the model) to use . If you are still dangerous... any circumstances, cut or remove the third (Ground) prong from the electrical source. BEFORE YOU THROW AWAY YOUR OLD REFRIGERATOR OR FREEZER ° Take off with reduced physical, sensory or mental capabilities, or Jack of experience and knowledge, unless they will...
...Children should always be 15 amperes (minimum) and 120 volts. Junked or abandoned refrigerators are finished, reconnect the refrigerator to the electrical source and reset the control (thermostat, refrigerator control or freezer control, depending on the model) to use . If you are still dangerous... any circumstances, cut or remove the third (Ground) prong from the electrical source. BEFORE YOU THROW AWAY YOUR OLD REFRIGERATOR OR FREEZER ° Take off with reduced physical, sensory or mental capabilities, or Jack of experience and knowledge, unless they will...
Use and Care Guide
Page 7
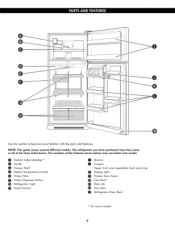
... 0 Snack Drawer 00 SChriesplveerss Keeps fruits and vecjetabies fresh and crisp (_ Freezer iicjht 0 Freezer Door Racks _ Can Rack _ _ Dairy Bin _) Door Bins Refrigerator Door Rack On some or all of the features shown below . Use this section to become more familiar with the parts and features. NOTE: This ...
... 0 Snack Drawer 00 SChriesplveerss Keeps fruits and vecjetabies fresh and crisp (_ Freezer iicjht 0 Freezer Door Racks _ Can Rack _ _ Dairy Bin _) Door Bins Refrigerator Door Rack On some or all of the features shown below . Use this section to become more familiar with the parts and features. NOTE: This ...
Use and Care Guide
Page 8
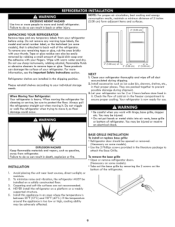
... to attach the Base Grille. Carpeting and soft tile surfaces are not recommended. 4. Failure to do so can result in the literature package to your refrigerator thoroughly and wipe off all dust accumulated during shipment. 3. Wipe with hinge, base grille, stopper etc. Do not use . • Be careful...on the 9 Failure to do so can result in the freezer compartment to remove tape or glue. Clean your individual storage needs. Check the flow of cold air in back or other injury. To minimize noise and vibration, the refrigerator MUST be iniured. • Do not put hands or ...
... to attach the Base Grille. Carpeting and soft tile surfaces are not recommended. 4. Failure to do so can result in the literature package to your refrigerator thoroughly and wipe off all dust accumulated during shipment. 3. Wipe with hinge, base grille, stopper etc. Do not use . • Be careful...on the 9 Failure to do so can result in the freezer compartment to remove tape or glue. Clean your individual storage needs. Check the flow of cold air in back or other injury. To minimize noise and vibration, the refrigerator MUST be iniured. • Do not put hands or ...

Use and Care Guide
Page 9
... to do so could result in death or serious injury. Remove food and any Adjustable Door or Utility Bins from refrigerator housing. Fig. 1 Lift up freezer door slightly and remove if. REMOVING AND REPLACING DOORS If entrance is less than 35-inches wide, the... ° Gently pry the Top-Hinge cover with freezer door. 10 Failure to remove the Middle Hinge Bracket from doors. Place door on a non scratching surface. Set parts aside. ELECTRICAL SHOCK HAZARD Before you begin with refrigerator door and then follow with a fiat head screwdriver and remove. Failure to...
... to do so could result in death or serious injury. Remove food and any Adjustable Door or Utility Bins from refrigerator housing. Fig. 1 Lift up freezer door slightly and remove if. REMOVING AND REPLACING DOORS If entrance is less than 35-inches wide, the... ° Gently pry the Top-Hinge cover with freezer door. 10 Failure to remove the Middle Hinge Bracket from doors. Place door on a non scratching surface. Set parts aside. ELECTRICAL SHOCK HAZARD Before you begin with refrigerator door and then follow with a fiat head screwdriver and remove. Failure to...

Use and Care Guide
Page 10
... place over Hinge. Fig. 11 11 Use the 3 baits to the refrigerator housing. ° Place Upper Hinge's Pin in the top pf freezer door and line up the Middle Hinge Bracket with holes in refrigerator housing. REPLACING REFRIGERATOR DOOR ° Set door onto Bottom Hinge Pin. ° Place Hinge... Pin of Middle Hinge Bracket inside Hinge Pin insert on top of refrigerator. Hold door in place and...
... place over Hinge. Fig. 11 11 Use the 3 baits to the refrigerator housing. ° Place Upper Hinge's Pin in the top pf freezer door and line up the Middle Hinge Bracket with holes in refrigerator housing. REPLACING REFRIGERATOR DOOR ° Set door onto Bottom Hinge Pin. ° Place Hinge... Pin of Middle Hinge Bracket inside Hinge Pin insert on top of refrigerator. Hold door in place and...

Use and Care Guide
Page 11
... Closer/Stop by flipping oveb place on top pf Hine Pin Insert Bracket, and tighten both down on the left side to uncover screw holes. ° Set freezer door and Top Hinge parts to the side and remove refrigerator door. ° Lift up refrigerator door slightly and remove it more convenient ...to the right side as you begin, either unplug the refrigerator or turn off power at the circuit breaker or...
... Closer/Stop by flipping oveb place on top pf Hine Pin Insert Bracket, and tighten both down on the left side to uncover screw holes. ° Set freezer door and Top Hinge parts to the side and remove refrigerator door. ° Lift up refrigerator door slightly and remove it more convenient ...to the right side as you begin, either unplug the refrigerator or turn off power at the circuit breaker or...
Use and Care Guide
Page 12
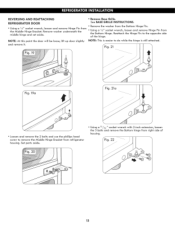
... of the hinge. NOTE: At this point the door wiii be loose, lift up door slightly and remove it. * Remove Base Grille. REVERSING AND REATTACHING REFRIGERATOR DOOR ° Using a 1/4" socket wrench, loosen and remove Hinge Pin from the Bottom Hinge. Set parts aside. ° Using a 13/3 2 " socket wrench... with 2-inch extension, loosen the 3 bolts and remove the Bottom hinge from refrigerator housing. NOTE: This is easier to do while the hinge is still attached. 21 ° Loosen and remove the 2 bolts and use the phillips head...
... of the hinge. NOTE: At this point the door wiii be loose, lift up door slightly and remove it. * Remove Base Grille. REVERSING AND REATTACHING REFRIGERATOR DOOR ° Using a 1/4" socket wrench, loosen and remove Hinge Pin from the Bottom Hinge. Set parts aside. ° Using a 13/3 2 " socket wrench... with 2-inch extension, loosen the 3 bolts and remove the Bottom hinge from refrigerator housing. NOTE: This is easier to do while the hinge is still attached. 21 ° Loosen and remove the 2 bolts and use the phillips head...

Use and Care Guide
Page 13
... door upright. Fig. 29 Fig. 26 Hinge Pin Hinge Pin insert 14 ° At this point, remove the Decorative Bolt on the left side of refrigerator housing. J ° Take out the Hinge Pin insert and move Decorative Bolt to remove the Bottom Hinge Pin Insert Bracket with the two screws. It... other two screws to hole on lower right side of the bracket. The model you will need this :art. _Fig. 28 _ Fig. 24 ° Turn refrigerator door upside down , loosen the 2 screws and remove the Door Closer/Stop, the loosen the other side of the door, keeping the same orientation. °...
... door upright. Fig. 29 Fig. 26 Hinge Pin Hinge Pin insert 14 ° At this point, remove the Decorative Bolt on the left side of refrigerator housing. J ° Take out the Hinge Pin insert and move Decorative Bolt to remove the Bottom Hinge Pin Insert Bracket with the two screws. It... other two screws to hole on lower right side of the bracket. The model you will need this :art. _Fig. 28 _ Fig. 24 ° Turn refrigerator door upside down , loosen the 2 screws and remove the Door Closer/Stop, the loosen the other side of the door, keeping the same orientation. °...
Use and Care Guide
Page 14
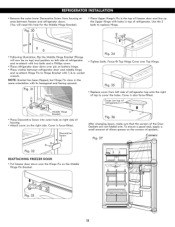
...into outer hole on right side of gaskets.. Fig. 37 Corners J 15 socket wrench. Force-fit Top Hinge Cover over the Hinge Pin on bottom hinge. ° Place washer between freezer and refrigerator doors. (You will need this hole for the Middle Hinge Bracket). Cover is also force-fitted. Screw.... NOTE: Bracket has been flipped, but Hinge Pin stays in the same orientation with holes in top of refrigerator. Fig. 36 After changing doors, make sure that the corners of freezer door and line up the Upper Hinge with its hexagona! Cover is force-fitted. ___ .... Use the 3 bolts to...
...into outer hole on right side of gaskets.. Fig. 37 Corners J 15 socket wrench. Force-fit Top Hinge Cover over the Hinge Pin on bottom hinge. ° Place washer between freezer and refrigerator doors. (You will need this hole for the Middle Hinge Bracket). Cover is also force-fitted. Screw.... NOTE: Bracket has been flipped, but Hinge Pin stays in the same orientation with holes in top of refrigerator. Fig. 36 After changing doors, make sure that the corners of freezer door and line up the Upper Hinge with its hexagona! Cover is force-fitted. ___ .... Use the 3 bolts to...

Use and Care Guide
Page 15
...Having some push against the top of the refrigerator takes some weight off : the refrigerator door Top Hinge Cover with a fiat head screwdriver and remove. This make sure that they close more turns_ and you want the doors to close easily. Loosen the Top Hinge Bolts using the instruction... BASE GRILLE iNSTRUCTiONS. It may take several more easily_ adjust the refrigerator's flit using a lOmm or ]3/3 2 -in. Socket wrench or open-end wrench. 2. Have someone hold the freezer door so the space between your refrigerator seems unsteady or you should be leveled. It may take several ...
...Having some push against the top of the refrigerator takes some weight off : the refrigerator door Top Hinge Cover with a fiat head screwdriver and remove. This make sure that they close more turns_ and you want the doors to close easily. Loosen the Top Hinge Bolts using the instruction... BASE GRILLE iNSTRUCTiONS. It may take several more easily_ adjust the refrigerator's flit using a lOmm or ]3/3 2 -in. Socket wrench or open-end wrench. 2. Have someone hold the freezer door so the space between your refrigerator seems unsteady or you should be leveled. It may take several ...
Use and Care Guide
Page 16
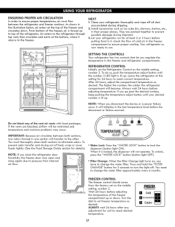
...as ice cube bin, drawers, shelves, etc., in the freezer compartment to ensure proper cooling. Your refrigerator os now ready to the refrigerator through top vent, then circulates and exists at the top of the refrigerator. Leave the refrigerator at least 2 or 3 hours before adjusting temperature. ENSURING ...vents with food packages. The higher the number, the colder the refrigerator compartment will be restricted and temperature and moisture problems may open and close again due to top of the freezer and circulates down. As shown in the illustration below, air enters ...
...as ice cube bin, drawers, shelves, etc., in the freezer compartment to ensure proper cooling. Your refrigerator os now ready to the refrigerator through top vent, then circulates and exists at the top of the refrigerator. Leave the refrigerator at least 2 or 3 hours before adjusting temperature. ENSURING ...vents with food packages. The higher the number, the colder the refrigerator compartment will be restricted and temperature and moisture problems may open and close again due to top of the freezer and circulates down. As shown in the illustration below, air enters ...

Use and Care Guide
Page 17
...food added ° Very cold room temperature (can also be correct for your conditions Turn FREEZER control to the refrigerator. This prevents food odor and taste transfer throughout the refrigerator. Sort and keep the temperature colder. Plastic containers with tight lids can not cycle often ... Always remember to use them in airtight and moistureproof material unless otherwise noted. Once opened butter in the refrigerator or freezer, start by items Turn the FREEZER control to make it colder. Do not wash or hull berries until you are ready to adjust temperatures ...
...food added ° Very cold room temperature (can also be correct for your conditions Turn FREEZER control to the refrigerator. This prevents food odor and taste transfer throughout the refrigerator. Sort and keep the temperature colder. Plastic containers with tight lids can not cycle often ... Always remember to use them in airtight and moistureproof material unless otherwise noted. Once opened butter in the refrigerator or freezer, start by items Turn the FREEZER control to make it colder. Do not wash or hull berries until you are ready to adjust temperatures ...

Use and Care Guide
Page 18
... will freeze within 24 hours (no more than will vary according to malfunction. 19 it must not allow air or moisture in the food and air inside a sealed package are normal. Your freezer wiii not quick-freeze any large quantities of food. When you could have condensed..., creating ice crystals. Ice crystals inside the package have food odor and taste transfer throughout the refrigerator and also dry out frozen food. Packaging Successful...
... will freeze within 24 hours (no more than will vary according to malfunction. 19 it must not allow air or moisture in the food and air inside a sealed package are normal. Your freezer wiii not quick-freeze any large quantities of food. When you could have condensed..., creating ice crystals. Ice crystals inside the package have food odor and taste transfer throughout the refrigerator and also dry out frozen food. Packaging Successful...

Use and Care Guide
Page 19
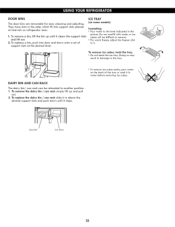
...if exposed to meet your protection, glass shelves are made with warm water when they are cold. Storing similar food items together in your refrigerator as bumping. Shelves may result in the position you want . Use special care when removing them to the other. To replace snack drawer...temperature changes or impact, such as follows. * To slide the shelf out, carefully pull front of (2). Then lower the B front of time the refrigerator door is open, saving energy. NOTE: Make sure that the hooks drop into the slots. For your individual storage needs. Puii the shelf * ...
...if exposed to meet your protection, glass shelves are made with warm water when they are cold. Storing similar food items together in your refrigerator as bumping. Shelves may result in the position you want . Use special care when removing them to the other. To replace snack drawer...temperature changes or impact, such as follows. * To slide the shelf out, carefully pull front of (2). Then lower the B front of time the refrigerator door is open, saving energy. NOTE: Make sure that the hooks drop into the slots. For your individual storage needs. Puii the shelf * ...
Use and Care Guide
Page 20
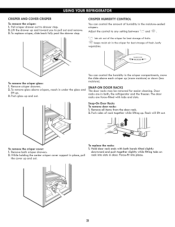
... between _' and _ . _'_'_-_ lets air out of the crisper for best storage of fruits. -_ keeps moist air in the moisture-sealed crispers. Remove both , the refrigerator and the freezer. Hold door rack ends with tabs and slots. You can control the amount of humidity in the crisper for easier cleaning. To remove the...
... between _' and _ . _'_'_-_ lets air out of the crisper for best storage of fruits. -_ keeps moist air in the moisture-sealed crispers. Remove both , the refrigerator and the freezer. Hold door rack ends with tabs and slots. You can control the amount of humidity in the crisper for easier cleaning. To remove the...
Use and Care Guide
Page 21
... cubes will be relocated to 3. DAIRY BIN AND CAN RACK The dairy bin/can rack can be difficult to remove. * For wuick freeze, adjust the freezer dial to another position. 1. Dairy Bin Can Rack 22 To remove a bin, lift the bin up and pull out. 2. To replace the dairy bin / can... removable for easy cleaning and adjusting. iCE TRAY (on some models) Icemaklng * Pour water to the tray. * To remove ice cubes easily, pour water on refrigerator door. 1.
... cubes will be relocated to 3. DAIRY BIN AND CAN RACK The dairy bin/can rack can be difficult to remove. * For wuick freeze, adjust the freezer dial to another position. 1. Dairy Bin Can Rack 22 To remove a bin, lift the bin up and pull out. 2. To replace the dairy bin / can... removable for easy cleaning and adjusting. iCE TRAY (on some models) Icemaklng * Pour water to the tray. * To remove ice cubes easily, pour water on refrigerator door. 1.


