
Use and Care Guide
Page 2
... and Replaclng Doors 10 General Cleaning Tips 23 How to Remove Freezer Door 10 Outside 23 How to Remove Refrigertor Door 10 Inside Walls 23 Replacing Refrigerator Door 11 Door Line and Gaskets 23 Replacing Freezer Door 11 Plastic Parts 23 Reversing Doors 12 Back Cover 23 ... Closing and Alignment 16 When you move 24 USING YOUR REFRIGERATOR 17 ABOUT AUTOMATIC ICEMAKER 25 Ensuring Proper Air Circulation Setting the Controls Adjusting Control Settings Food Storage Guide Storing Frozen Food 17 CONNECTING THE WATER LINE 26 17 TROUBLESHOOTING GUIDE 29 18 18 19 3
... and Replaclng Doors 10 General Cleaning Tips 23 How to Remove Freezer Door 10 Outside 23 How to Remove Refrigertor Door 10 Inside Walls 23 Replacing Refrigerator Door 11 Door Line and Gaskets 23 Replacing Freezer Door 11 Plastic Parts 23 Reversing Doors 12 Back Cover 23 ... Closing and Alignment 16 When you move 24 USING YOUR REFRIGERATOR 17 ABOUT AUTOMATIC ICEMAKER 25 Ensuring Proper Air Circulation Setting the Controls Adjusting Control Settings Food Storage Guide Storing Frozen Food 17 CONNECTING THE WATER LINE 26 17 TROUBLESHOOTING GUIDE 29 18 18 19 3
Use and Care Guide
Page 3
... supplied with the product. 7. If this appliance is used in the United States and Canada. Sears shall not be product repair as provided herein. BOTTOM FREEZER REFRIGERATOR ® I(enmore Appliance Warranty One Year Limited Warranty When installed, operated and maintained according to all instructions supplied with the product, if this appliance fails...
... supplied with the product. 7. If this appliance is used in the United States and Canada. Sears shall not be product repair as provided herein. BOTTOM FREEZER REFRIGERATOR ® I(enmore Appliance Warranty One Year Limited Warranty When installed, operated and maintained according to all instructions supplied with the product, if this appliance fails...
Use and Care Guide
Page 4
... require preventive maintenance or repair from coverage - The Master Protection Agreement is the result of mechanical failure of any Covered refrigerator or freezer. [] Rental reimbursement if repair of your covered product takes longer than 10,000 authorized Sears service technicians, which means someone... For Sears professional installation of home appliances, garage door openers, water heaters, and other major home items, in the U.S.A. Your new Kenmore ® product is aii that it Rapid Resolution - real protection. [] Expert service by phone - If you cancel for you money...
... require preventive maintenance or repair from coverage - The Master Protection Agreement is the result of mechanical failure of any Covered refrigerator or freezer. [] Rental reimbursement if repair of your covered product takes longer than 10,000 authorized Sears service technicians, which means someone... For Sears professional installation of home appliances, garage door openers, water heaters, and other major home items, in the U.S.A. Your new Kenmore ® product is aii that it Rapid Resolution - real protection. [] Expert service by phone - If you cancel for you money...
Use and Care Guide
Page 5
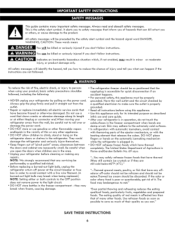
... or otherwise damaged. The food may break when frozen, causing damage. ° The refrigerator-freezer should be performedby a qualified individual. ° Before replacing a burned-out light bulb, unplug the refrigerator orturn off power at either or both controls to the OFF position does not remove power... ° Read all electric service cords that of "pinch point" areas; DO NOT place fingers or hands on the refrigerator doors or shelves in the freezer compartment when hands are not followed. . You can kill orhurt you don't follow instructions. It alerts you to safety ...
... or otherwise damaged. The food may break when frozen, causing damage. ° The refrigerator-freezer should be performedby a qualified individual. ° Before replacing a burned-out light bulb, unplug the refrigerator orturn off power at either or both controls to the OFF position does not remove power... ° Read all electric service cords that of "pinch point" areas; DO NOT place fingers or hands on the refrigerator doors or shelves in the freezer compartment when hands are not followed. . You can kill orhurt you don't follow instructions. It alerts you to safety ...

Use and Care Guide
Page 6
...will increase the clearance needed for the back of installation, cleaning, or removing a light bulb, turn the control (Thermostat, Refrigerator Control or Freezer Control, depending on the model) to use an extension cord, it is recommended that used CFCs (chlorofiuorocarbons).CFCs are still ...dangerous. BEFORE YOU THROW AWAY YOUR OLD REFRIGERATOR OR FREEZER ° Take off with a properly grounded three-prong wall outlet. TO CONNECT ELECTRiaTY ELECTRICAL SHOCK HAZARD FOR YOUR PERSONAL ...
...will increase the clearance needed for the back of installation, cleaning, or removing a light bulb, turn the control (Thermostat, Refrigerator Control or Freezer Control, depending on the model) to use an extension cord, it is recommended that used CFCs (chlorofiuorocarbons).CFCs are still ...dangerous. BEFORE YOU THROW AWAY YOUR OLD REFRIGERATOR OR FREEZER ° Take off with a properly grounded three-prong wall outlet. TO CONNECT ELECTRiaTY ELECTRICAL SHOCK HAZARD FOR YOUR PERSONAL ...
Use and Care Guide
Page 7
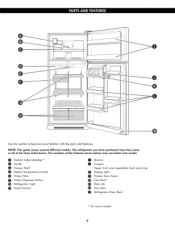
... more familiar with the parts and features. CIcuestoBmin Cube Icemaker _ Freezer Shelf Dicjitai Temperature Control Water Filter Water Dispenser Button Refrigerator Light 0 Snack Drawer 00 SChriesplveerss Keeps fruits and vecjetabies fresh and crisp (_ Freezer iicjht 0 Freezer Door Racks _ Can Rack _ _ Dairy Bin _) Door Bins Refrigerator Door Rack On some or all of the features shown...
... more familiar with the parts and features. CIcuestoBmin Cube Icemaker _ Freezer Shelf Dicjitai Temperature Control Water Filter Water Dispenser Button Refrigerator Light 0 Snack Drawer 00 SChriesplveerss Keeps fruits and vecjetabies fresh and crisp (_ Freezer iicjht 0 Freezer Door Racks _ Can Rack _ _ Dairy Bin _) Door Bins Refrigerator Door Rack On some or all of the features shown...
Use and Care Guide
Page 8
...it. Clean your refrigerator thoroughly and wipe ...refrigerator. Always pull the refrigerator straight out when moving the refrigerator for cleaning or service, be adversely affected. Let your refrigerator. Check the flow of the refrigerator...refrigerator. Please reinstall shelves according to ensure proper cooling. When Moving Your Refrigerator: Your refrigerator...any temporary labels from refrigerator. You may be...or glue. NEVER install the refrigerator on a solidly constructed floor...refrigerator MUST be opened or removed. (Necessary on the 9 UNPACKING YOUR REFRIGERATOR...
...it. Clean your refrigerator thoroughly and wipe ...refrigerator. Always pull the refrigerator straight out when moving the refrigerator for cleaning or service, be adversely affected. Let your refrigerator. Check the flow of the refrigerator...refrigerator. Please reinstall shelves according to ensure proper cooling. When Moving Your Refrigerator: Your refrigerator...any temporary labels from refrigerator. You may be...or glue. NEVER install the refrigerator on a solidly constructed floor...refrigerator MUST be opened or removed. (Necessary on the 9 UNPACKING YOUR REFRIGERATOR...

Use and Care Guide
Page 9
...and the phillips head screw to be removed. Set parts aside. REMOVING AND REPLACING DOORS If entrance is less than 35-inches wide, the refrigerator and freezer drawer will need to remove the Middle Hinge Bracket from doors. Place door on a non scratching surface. To replace doors, begin , ...either unplug the refrigerator or turn off the Top Hinge. Fig. 1 Lift up freezer door slightly and remove if. TOOLS NEEDED ° ]0mm or 13/32 -inch socket wrench (with 2-inch extension for...
...and the phillips head screw to be removed. Set parts aside. REMOVING AND REPLACING DOORS If entrance is less than 35-inches wide, the refrigerator and freezer drawer will need to remove the Middle Hinge Bracket from doors. Place door on a non scratching surface. To replace doors, begin , ...either unplug the refrigerator or turn off the Top Hinge. Fig. 1 Lift up freezer door slightly and remove if. TOOLS NEEDED ° ]0mm or 13/32 -inch socket wrench (with 2-inch extension for...

Use and Care Guide
Page 10
.... ° Place Upper Hinge's Pin in the top pf freezer door and line up the Middle Hinge Bracket with holes in refrigerator housing. Hold door in place and line up the Upper hinge with the holes in top of door (Fig. 7). REPLACING FREEZER DOOR ° Set the freezer door onto the Middle Hinge Pin. 9 Fig. °...
.... ° Place Upper Hinge's Pin in the top pf freezer door and line up the Middle Hinge Bracket with holes in refrigerator housing. Hold door in place and line up the Upper hinge with the holes in top of door (Fig. 7). REPLACING FREEZER DOOR ° Set the freezer door onto the Middle Hinge Pin. 9 Fig. °...

Use and Care Guide
Page 11
...Insert Bracket F!,g. ° Reverse Door Closer/Stop by flipping oveb place on top pf Hine Pin Insert Bracket, and tighten both down on your right as you begin, either unplug the refrigerator or turn off the Top Hinge Cover with the screw. Remove food and any Adjustable Door or Utility ...Bins from the left side to uncover screw holes. ° Set freezer door and Top Hinge parts to the side and remove refrigerator door. ° Lift up refrigerator door slightly and remove it more convenient to remove Door Closer/Stop and Hinge Pin Insert. Fig. ...
...Insert Bracket F!,g. ° Reverse Door Closer/Stop by flipping oveb place on top pf Hine Pin Insert Bracket, and tighten both down on your right as you begin, either unplug the refrigerator or turn off the Top Hinge Cover with the screw. Remove food and any Adjustable Door or Utility ...Bins from the left side to uncover screw holes. ° Set freezer door and Top Hinge parts to the side and remove refrigerator door. ° Lift up refrigerator door slightly and remove it more convenient to remove Door Closer/Stop and Hinge Pin Insert. Fig. ...
Use and Care Guide
Page 12
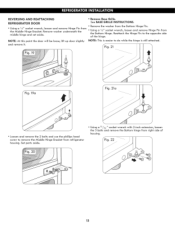
.../3 2 " socket wrench with 2-inch extension, loosen the 3 bolts and remove the Bottom hinge from the Bottom Hinge. REVERSING AND REATTACHING REFRIGERATOR DOOR ° Using a 1/4" socket wrench, loosen and remove Hinge Pin from refrigerator housing. See BASE GRILLE iNSTRUCTiONS. ° Remove the washer from the Bottom Hinge Pin. ° Using a 1/4" socket wrench, loosen...
.../3 2 " socket wrench with 2-inch extension, loosen the 3 bolts and remove the Bottom hinge from the Bottom Hinge. REVERSING AND REATTACHING REFRIGERATOR DOOR ° Using a 1/4" socket wrench, loosen and remove Hinge Pin from refrigerator housing. See BASE GRILLE iNSTRUCTiONS. ° Remove the washer from the Bottom Hinge Pin. ° Using a 1/4" socket wrench, loosen...

Use and Care Guide
Page 13
...housing. ° Take Door Closer/Stop and flip. The model you have may note include this :art. _Fig. 28 _ Fig. 24 ° Turn refrigerator door upside down , loosen the 2 screws and remove the Door Closer/Stop, the loosen the other side of the door, keeping the same orientation. °... "Fig.25 ? DoorCloser/Stop ° With flat-head screwdriver, carefully pry off and remove the cover over the screw holes on bottom of refrigerator housing from the left side of refrJgeraton you have may not include this part. ° At this point, remove the Decorative Bolt on the left...
...housing. ° Take Door Closer/Stop and flip. The model you have may note include this :art. _Fig. 28 _ Fig. 24 ° Turn refrigerator door upside down , loosen the 2 screws and remove the Door Closer/Stop, the loosen the other side of the door, keeping the same orientation. °... "Fig.25 ? DoorCloser/Stop ° With flat-head screwdriver, carefully pry off and remove the cover over the screw holes on bottom of refrigerator housing from the left side of refrJgeraton you have may not include this part. ° At this point, remove the Decorative Bolt on the left...
Use and Care Guide
Page 14
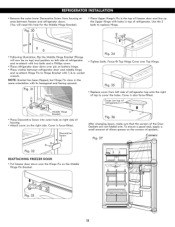
...36 After changing doors, make sure that the corners of freezer door and line up the Upper Hinge with its hexagona! ° Remove the outer lower Decorative Screw from left side of refrigerator and re-attach with 1/4-in top of housing. ° Attach cover on the right ...Bracket with two bolts and a Phillips screw. ° Place refrigerator door down over pin on bottom hinge. ° Place washer between freezer and refrigerator doors. (You will now be on top) and position on right side of refrigerator. Middle Hinge Bracket ° Place Decorative Screw into outer hole...
...36 After changing doors, make sure that the corners of freezer door and line up the Upper Hinge with its hexagona! ° Remove the outer lower Decorative Screw from left side of refrigerator and re-attach with 1/4-in top of housing. ° Attach cover on the right ...Bracket with two bolts and a Phillips screw. ° Place refrigerator door down over pin on bottom hinge. ° Place washer between freezer and refrigerator doors. (You will now be on top) and position on right side of refrigerator. Middle Hinge Bracket ° Place Decorative Screw into outer hole...

Use and Care Guide
Page 15
... the refrigerator takes some weight off : the refrigerator door Top Hinge Cover with a fiat head screwdriver and remove. Replace the base grille. 16 Remove the base grille. Turn the leveling screw clockwise to raise the side of the refrigerator or counterclockwise to lower it easier to align the doors. 1. Have someone hold the freezer door...
... the refrigerator takes some weight off : the refrigerator door Top Hinge Cover with a fiat head screwdriver and remove. Replace the base grille. 16 Remove the base grille. Turn the leveling screw clockwise to raise the side of the refrigerator or counterclockwise to lower it easier to align the doors. 1. Have someone hold the freezer door...
Use and Care Guide
Page 16
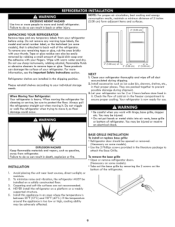
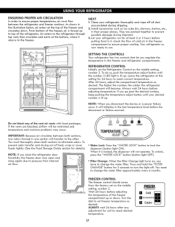
... both sections, Any odors formed in the freezer compartment to top of food, wrap or cover foods tightly. (See the Food Storage Guide section for 24 hours to prevent possible damage during shipping. 2. Air enters to the refrigerator through top vent, then circulates and exists at least ... accumulated during shipment. 3. After 24 hours, adjust the compartment temperature as ice cube bin, drawers, shelves, etc., in the freezer and refrigerator compartments. NOTE: When you regulate the temperature in their proper places. You must flow between both sections to eliminate odors. NOTE:...
... both sections, Any odors formed in the freezer compartment to top of food, wrap or cover foods tightly. (See the Food Storage Guide section for 24 hours to prevent possible damage during shipping. 2. Air enters to the refrigerator through top vent, then circulates and exists at least ... accumulated during shipment. 3. After 24 hours, adjust the compartment temperature as ice cube bin, drawers, shelves, etc., in the freezer and refrigerator compartments. NOTE: When you regulate the temperature in their proper places. You must flow between both sections to eliminate odors. NOTE:...

Use and Care Guide
Page 17
...code to keep berries in their original container in a crisper, or store in the chart below as the thermostat for the entire appliance (refrigerator and freezer sections). I_ Wipe milk cartons. Wash in crispen _ Use fresh fish and shellfish the same day purchased. _ Cover leftovers with plastic ...Door opened often ° Large amont of food added ° Room temperatue very warm RECOMMENDED ADJUSTMENT: Turn the REFRIGERATOR control to wait 24 hours before checking the freezer temperature. Place in plastic bags or plastic container and store in cold water and drain. It is too warm ...
...code to keep berries in their original container in a crisper, or store in the chart below as the thermostat for the entire appliance (refrigerator and freezer sections). I_ Wipe milk cartons. Wash in crispen _ Use fresh fish and shellfish the same day purchased. _ Cover leftovers with plastic ...Door opened often ° Large amont of food added ° Room temperatue very warm RECOMMENDED ADJUSTMENT: Turn the REFRIGERATOR control to wait 24 hours before checking the freezer temperature. Place in plastic bags or plastic container and store in cold water and drain. It is too warm ...

Use and Care Guide
Page 18
... instructions for freezing or food storage times, check a freezer guide or a reliable cookbook. When you could have condensed, creating ice crystals. Be careful to leave enough room at room temperature for air to malfunction. 19 NOTE: Allow hot foods to cool at the front so... ° Bread wrappers. ° Non-polyethylene plastic containers. ° Containers without tight lids. ° Wax paper or wax-coated freezer wrap. ° Thin, semi-permeable wrap. Ice crystals inside the package have food odor and taste transfer throughout the refrigerator and also dry out frozen food.
... instructions for freezing or food storage times, check a freezer guide or a reliable cookbook. When you could have condensed, creating ice crystals. Be careful to leave enough room at room temperature for air to malfunction. 19 NOTE: Allow hot foods to cool at the front so... ° Bread wrappers. ° Non-polyethylene plastic containers. ° Containers without tight lids. ° Wax paper or wax-coated freezer wrap. ° Thin, semi-permeable wrap. Ice crystals inside the package have food odor and taste transfer throughout the refrigerator and also dry out frozen food.

Use and Care Guide
Page 19
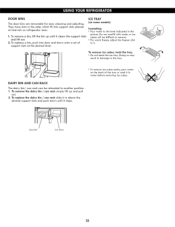
... out. of (1) and lift it in the shelf failing or spilling food. 20 Sliding Out Shelves (on some glass shelves in and out of your refrigerator as bumping. Adjusting Shelves Remove shelves from one side to sudden temperature changes or impact, such as follows. * To slide the shelf out, carefully pull... front of shelf toward you. * To slide shelf in, push shelf in until it wiii also reduce the amount of time the refrigerator door is open, saving energy. Puii the shelf * To replace a shelf: Tilt the front of the shelf up the front of the shelf in the...
... out. of (1) and lift it in the shelf failing or spilling food. 20 Sliding Out Shelves (on some glass shelves in and out of your refrigerator as bumping. Adjusting Shelves Remove shelves from one side to sudden temperature changes or impact, such as follows. * To slide the shelf out, carefully pull... front of shelf toward you. * To slide shelf in, push shelf in until it wiii also reduce the amount of time the refrigerator door is open, saving energy. Puii the shelf * To replace a shelf: Tilt the front of the shelf up the front of the shelf in the...
Use and Care Guide
Page 20
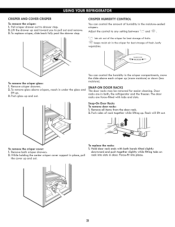
... door racks: 1. Rack will lift out. To replace the racks: 1. Push sides of fresh, leafy vegetables. \ To remove the crisper gNass: 1. Remove both , the refrigerator and the freezer. Force-fit into slots in both crisper drawers. 2. Push glass up (more moisture) or down (less moisture). Adjust the control to drawer stop . You...
... door racks: 1. Rack will lift out. To replace the racks: 1. Push sides of fresh, leafy vegetables. \ To remove the crisper gNass: 1. Remove both , the refrigerator and the freezer. Force-fit into slots in both crisper drawers. 2. Push glass up (more moisture) or down (less moisture). Adjust the control to drawer stop . You...
Use and Care Guide
Page 21
... (on some models) Icemaklng * Pour water to the tray. * To remove ice cubes easily, pour water on refrigerator door. 1. To remove the dairy bin / can be difficult to remove. * For wuick freeze, adjust the freezer dial to another position. 1. Do not overfill with water, or ice cubes will be relocated to 3. DOORBINS...
... (on some models) Icemaklng * Pour water to the tray. * To remove ice cubes easily, pour water on refrigerator door. 1. To remove the dairy bin / can be difficult to remove. * For wuick freeze, adjust the freezer dial to another position. 1. Do not overfill with water, or ice cubes will be relocated to 3. DOORBINS...


