Use and Care Guide
Page 1
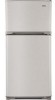
® TOP FREEZER REFRIGERATOR CONGELADOR SUPERIOR REFRIGERADOR CONGI_LATEUR SUPI_RIEUR REFRIGI_RATEUR Models / Modelos / ModUles 795.6997_, 795.7997_, 795.6937_, 795.7937_, 795.6991 795.7991 795.6929_ 795.7929_ = color number, n_mero de color, num_ro de couleur m Z _3 r" m cn z m Z_ O r=, =11 Z m MFL61920622 Printed in Mexico Sears Brands Management Corporation, Hoffman Estates, IL 60179 www.sears.com
® TOP FREEZER REFRIGERATOR CONGELADOR SUPERIOR REFRIGERADOR CONGI_LATEUR SUPI_RIEUR REFRIGI_RATEUR Models / Modelos / ModUles 795.6997_, 795.7997_, 795.6937_, 795.7937_, 795.6991 795.7991 795.6929_ 795.7929_ = color number, n_mero de color, num_ro de couleur m Z _3 r" m cn z m Z_ O r=, =11 Z m MFL61920622 Printed in Mexico Sears Brands Management Corporation, Hoffman Estates, IL 60179 www.sears.com
Use and Care Guide
Page 2
...instructions 5-6 Grounding Requirements 6 Parts and Features 7 Refrigerator installation Unpacking Your Refrigerator Installation Base Grill Removing and Replacing Doors Reversing Doors Leveling and Door Closing/ Door Alignment 8-15 8 8 8 9-10 10-15 15 Using Your Refrigerator Ensuring Proper Air Circulation Setting the Controls Adjusting Control... Settings Food Storage Guide Storing Frozen Food Refrigerator Shelves Snack Drawer Crisper and Crisper Cover 16-21 16 16 17 17 18 19-21 19 2O Crisper Humidity Control Door Racks Door Bins Dairy Bin/Can ...
...instructions 5-6 Grounding Requirements 6 Parts and Features 7 Refrigerator installation Unpacking Your Refrigerator Installation Base Grill Removing and Replacing Doors Reversing Doors Leveling and Door Closing/ Door Alignment 8-15 8 8 8 9-10 10-15 15 Using Your Refrigerator Ensuring Proper Air Circulation Setting the Controls Adjusting Control... Settings Food Storage Guide Storing Frozen Food Refrigerator Shelves Snack Drawer Crisper and Crisper Cover 16-21 16 16 17 17 18 19-21 19 2O Crisper Humidity Control Door Racks Door Bins Dairy Bin/Can ...
Use and Care Guide
Page 3
... duration of implied warranties of imptied warranties; limitation of purchase. This warranty gives you specific legal rights, and you may not apply to you. TOP FREEZER REFRIGERATOR ® Kenmore Appliance Warranty lone Year Limited Warranty When installed, operated and maintained according to all instructions supplied with the product, if this appliance fails due to...
... duration of implied warranties of imptied warranties; limitation of purchase. This warranty gives you specific legal rights, and you may not apply to you. TOP FREEZER REFRIGERATOR ® Kenmore Appliance Warranty lone Year Limited Warranty When installed, operated and maintained according to all instructions supplied with the product, if this appliance fails due to...
Use and Care Guide
Page 4
... 10,000 authorized Sears service technicians, which means someone you can call is the result of mechanical failure of any covered refrigerator or freezer. [] Rental reimbursement if repair of your covered product takes longer than promised. []18% discount off the regular price of...covered repair service and related installed parts. Some limitations and exclusions apply. call 1-800-827-6655. *Coverage in the U.S.A. Your new Kenmor# _ product is a risk free purchase. Master Protection Agreements Congratulations on some items. For full details call Sears Canada at your Master...
... 10,000 authorized Sears service technicians, which means someone you can call is the result of mechanical failure of any covered refrigerator or freezer. [] Rental reimbursement if repair of your covered product takes longer than promised. []18% discount off the regular price of...covered repair service and related installed parts. Some limitations and exclusions apply. call 1-800-827-6655. *Coverage in the U.S.A. Your new Kenmor# _ product is a risk free purchase. Master Protection Agreements Congratulations on some items. For full details call Sears Canada at your Master...
Use and Care Guide
Page 5
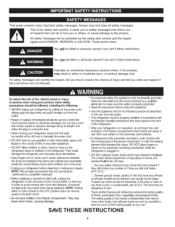
... are in the freezer compartment - NOTE: We strongly recommend that were taped to the extremely cold surfaces. ° In refrigerators with automatic icemakers, avoid contact with the moving your refrigerator before using your refrigerator by a qualified individual...8226; DO NOT refreeze frozen foods which have any other flammable vapors and liquids in the refrigerator.They could damage the refrigerator and seriously injure themselves. - Imnadyicartesultaninimmminionrenotlry mhoadzearardteousinjusriytu, aotrionprowdhuiccth,daifmnaogt eavoonidlye.d, All safety messages will be...
... are in the freezer compartment - NOTE: We strongly recommend that were taped to the extremely cold surfaces. ° In refrigerators with automatic icemakers, avoid contact with the moving your refrigerator before using your refrigerator by a qualified individual...8226; DO NOT refreeze frozen foods which have any other flammable vapors and liquids in the refrigerator.They could damage the refrigerator and seriously injure themselves. - Imnadyicartesultaninimmminionrenotlry mhoadzearardteousinjusriytu, aotrionprowdhuiccth,daifmnaogt eavoonidlye.d, All safety messages will be...
Use and Care Guide
Page 6
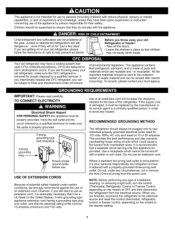
...grounding type wall receptacle 3-prong grounding plug _Ensure proper _] ground exists /_// before use. To recycle, please contact your old Refrigerator or freezer: • Take off with the appliance. USE OF EXTENSION CORDS Because of potential safety hazards under certain conditions, we ... power cord. IMPORTANT: Please read carefully. However, if you are finished, reconnect the refrigerator to the electrical source and reset the control (thermostat, refrigerator control or freezer control, depending on the model) to harm stratospheric ozone. Use of an extension cord will...
...grounding type wall receptacle 3-prong grounding plug _Ensure proper _] ground exists /_// before use. To recycle, please contact your old Refrigerator or freezer: • Take off with the appliance. USE OF EXTENSION CORDS Because of potential safety hazards under certain conditions, we ... power cord. IMPORTANT: Please read carefully. However, if you are finished, reconnect the refrigerator to the electrical source and reset the control (thermostat, refrigerator control or freezer control, depending on the model) to harm stratospheric ozone. Use of an extension cord will...
Use and Care Guide
Page 7
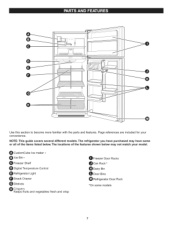
...with the parts and features. The refrigerator you have some models NOTE: This guide covers several different models. Page references are included for your model. O CustomCube Ice maker * O Ice Bin * Freezer Shelf _ Digital Temperature Control Refrigerator Light _t Snack Drawer Shelves Crispers ...Keeps fruits and vegetables fresh and crisp OFreezer Door Racks OCan Rack* ODairy Bin O Door Bins Refrigerator Door Rack *On some or all of the features ...
...with the parts and features. The refrigerator you have some models NOTE: This guide covers several different models. Page references are included for your model. O CustomCube Ice maker * O Ice Bin * Freezer Shelf _ Digital Temperature Control Refrigerator Light _t Snack Drawer Shelves Crispers ...Keeps fruits and vegetables fresh and crisp OFreezer Door Racks OCan Rack* ODairy Bin O Door Bins Refrigerator Door Rack *On some or all of the features ...

Use and Care Guide
Page 8
...not remove any temporary labels from Base Grille and remove. 3. Wipe with hinge, base grille, stopper etc. Do not wiggle or walk the refrigerator when trying to protect the floor. Avoid placing unit near heat sources, direct sunlight or moisture. 2. To install or replace Base Grille: 1. ... can also be injured. • Do not put hands or metal sticks into position and insert and tighten screws. Failure to your refrigerator before using. BASE GRILLE INSTALLATION Explosion Hazard Keep flammable materials and vapors, such as floor damage could occur. Install this appliance in the...
...not remove any temporary labels from Base Grille and remove. 3. Wipe with hinge, base grille, stopper etc. Do not wiggle or walk the refrigerator when trying to protect the floor. Avoid placing unit near heat sources, direct sunlight or moisture. 2. To install or replace Base Grille: 1. ... can also be injured. • Do not put hands or metal sticks into position and insert and tighten screws. Failure to your refrigerator before using. BASE GRILLE INSTALLATION Explosion Hazard Keep flammable materials and vapors, such as floor damage could occur. Install this appliance in the...

Use and Care Guide
Page 9
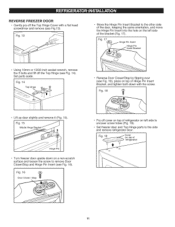
... Fig 1). Using 10mm or 13/32-inch socket wrench, remove the 3 bolts and lift off the Top Hinge Cover with freezer door. ailuretodosocouldresulitndeathor seriousinjury. ELECTRICASLHOCKHAZARD Beforeyoubegine, itherunplugtherefrigeratoorr turnoffpoweratthecircuitbreakeor rfusebox.Removfeood andanyAdjustablDe ooror UtilityBinsfromdoorsF. Fig. 1 REMOVE REFRIGERATOR DOOR • Loosen and remove the 2 bolts and the phillips head screw to remove the Middle Hinge...
... Fig 1). Using 10mm or 13/32-inch socket wrench, remove the 3 bolts and lift off the Top Hinge Cover with freezer door. ailuretodosocouldresulitndeathor seriousinjury. ELECTRICASLHOCKHAZARD Beforeyoubegine, itherunplugtherefrigeratoorr turnoffpoweratthecircuitbreakeor rfusebox.Removfeood andanyAdjustablDe ooror UtilityBinsfromdoorsF. Fig. 1 REMOVE REFRIGERATOR DOOR • Loosen and remove the 2 bolts and the phillips head screw to remove the Middle Hinge...

Use and Care Guide
Page 10
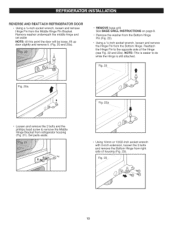
...screw to refasten the Middle Hinge Bracket and door to do so could result in top of door (Fig. 7). I Fig. 11 REPLACE FREEZER DOOR • Set the freezer door onto the Middle Hinge Pin (Fig. 9). REPLACE REFRIGERATOR DOOR • Set door onto Bottom Hinge Pin. • Place Hinge Pin of... Middle Hinge Bracket inside Hinge Pin Insert on your right as the side on top of refrigerator. You may find it...
...screw to refasten the Middle Hinge Bracket and door to do so could result in top of door (Fig. 7). I Fig. 11 REPLACE FREEZER DOOR • Set the freezer door onto the Middle Hinge Pin (Fig. 9). REPLACE REFRIGERATOR DOOR • Set door onto Bottom Hinge Pin. • Place Hinge Pin of... Middle Hinge Bracket inside Hinge Pin Insert on your right as the side on top of refrigerator. You may find it...
Use and Care Guide
Page 11
...on left side of Hinge Pin insert Bracket, and tighten both down on top of the bracket (Fig. 17). Fi- 1_' Y" _ -- Cover (on top of refrigerator on top of _ i refrigerator) & 11 Fig. 15 Middle Hinge Bracket _ Hinge Pin Turn freezer door upside down with a flat head screwdriver and remove (see Fig. ...remove refrigerator door. Fig. 13 • Move the Hinge Pin insert Bracket to the other side of the door, keeping the same orientation, and move the Hinge Pin insert into the hole on the left side to uncover screw holes (Fig. 19). • Set freezer door and Top Hinge...
...on left side of Hinge Pin insert Bracket, and tighten both down on top of the bracket (Fig. 17). Fi- 1_' Y" _ -- Cover (on top of refrigerator on top of _ i refrigerator) & 11 Fig. 15 Middle Hinge Bracket _ Hinge Pin Turn freezer door upside down with a flat head screwdriver and remove (see Fig. ...remove refrigerator door. Fig. 13 • Move the Hinge Pin insert Bracket to the other side of the door, keeping the same orientation, and move the Hinge Pin insert into the hole on the left side to uncover screw holes (Fig. 19). • Set freezer door and Top Hinge...
Use and Care Guide
Page 12
... 2 bolts and the phillips head screw to do while the Hinge is still attached. NOTE: This is easier to remove the Middle Hinge Bracket from refrigerator housing (Fig. 21).
... 2 bolts and the phillips head screw to do while the Hinge is still attached. NOTE: This is easier to remove the Middle Hinge Bracket from refrigerator housing (Fig. 21).

Use and Care Guide
Page 13
... left side of housing keeping the same orientation, and reattach with the two screws. Line up screw holes and mount on the left side of refrigerator housing (Fig. 30). It is not used on all models. Fig. 26 • Take Door Closer/stop and flip (see Fig. 27). The ...model you have may not include this part. NOTE: The Refrigerator Door Closer/Stop is not used on all models. Tighten Hinge Pin Bracket to hole on a non-scratching surface. • With door upside down, loosen...
... left side of housing keeping the same orientation, and reattach with the two screws. Line up screw holes and mount on the left side of refrigerator housing (Fig. 30). It is not used on all models. Fig. 26 • Take Door Closer/stop and flip (see Fig. 27). The ...model you have may not include this part. NOTE: The Refrigerator Door Closer/Stop is not used on all models. Tighten Hinge Pin Bracket to hole on a non-scratching surface. • With door upside down, loosen...
Use and Care Guide
Page 14
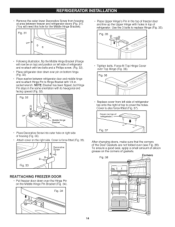
... Bracket (Fig. 34). NOTE: Bracket has been flipped, but Hinge Pin stays in . Fig. 38 Corners \ / REATTACHING FREEZER DOOR • Put freezer door down over Top Hinge (Fig. 36). Fig.31 PlaceUpperHinge'sPininthetopoffreezedr oor andlineuptheUpperHingewithholesintopof refrigerator. socket wrench. Fig. 36 • Replace cover from left side of the Door Gaskets are not folded over...
... Bracket (Fig. 34). NOTE: Bracket has been flipped, but Hinge Pin stays in . Fig. 38 Corners \ / REATTACHING FREEZER DOOR • Put freezer door down over Top Hinge (Fig. 36). Fig.31 PlaceUpperHinge'sPininthetopoffreezedr oor andlineuptheUpperHingewithholesintopof refrigerator. socket wrench. Fig. 36 • Replace cover from left side of the Door Gaskets are not folded over...

Use and Care Guide
Page 15
... is uneven, follow the instructions below : 1. Have someone push against the top of the refrigerator takes some of the refrigerator. Your refrigerator has two Front Leveling Screws - Replace the Top Hinge Cover. 4. NOTE: Having someone hold the freezer door so the space between your refrigerator seems unsteady or you should be leveled, if necessary, adjust the Leveling...
... is uneven, follow the instructions below : 1. Have someone push against the top of the refrigerator takes some of the refrigerator. Your refrigerator has two Front Leveling Screws - Replace the Top Hinge Cover. 4. NOTE: Having someone hold the freezer door so the space between your refrigerator seems unsteady or you should be leveled, if necessary, adjust the Leveling...
Use and Care Guide
Page 16
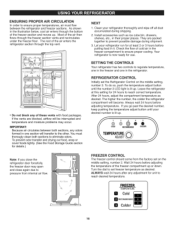
...top vent. • Do not block any of cold air in the freezer compartment to ensure proper cooling. You must flow between both sections to eliminate odors. ENSURING PROPER AiR CiRCULATiON In order to ensure proper temperatures, air must thorougly clean both sections, any odors formed in one in the refrigerator... such as ice cube bin, drawers, shelves, etc., in it. REFRIGERATOR CONTROL Initially set freezer temperature as desired. Check the flow of these vents with food packages. Leave the refrigerator at least 2 or 3 hours before adjusting temperature. To do so,...
...top vent. • Do not block any of cold air in the freezer compartment to ensure proper cooling. You must flow between both sections to eliminate odors. ENSURING PROPER AiR CiRCULATiON In order to ensure proper temperatures, air must thorougly clean both sections, any odors formed in one in the refrigerator... such as ice cube bin, drawers, shelves, etc., in it. REFRIGERATOR CONTROL Initially set freezer temperature as desired. Check the flow of these vents with food packages. Leave the refrigerator at least 2 or 3 hours before adjusting temperature. To do so,...

Use and Care Guide
Page 17
.... Vegetables with plastic wrap or aluminum foil. For dated products, check date code to the refrigerator. Always remember to next highest number, wait 24 hours, then re-check m FREEZER section too warm/ice not made fast enough - Heavy ice usage - items How to Keep...with tight lids can also be correct for the entire appliance (refrigerator and freezer sections). ADJUSTING CONTROL SETTINGS Give the refrigerator time to cool down completely before doing this. Room temperature very warm Turn REFRIGERATOR control to wait at least 24 hours between adjustments. It is...
.... Vegetables with plastic wrap or aluminum foil. For dated products, check date code to the refrigerator. Always remember to next highest number, wait 24 hours, then re-check m FREEZER section too warm/ice not made fast enough - Heavy ice usage - items How to Keep...with tight lids can also be correct for the entire appliance (refrigerator and freezer sections). ADJUSTING CONTROL SETTINGS Give the refrigerator time to cool down completely before doing this. Room temperature very warm Turn REFRIGERATOR control to wait at least 24 hours between adjustments. It is...
Use and Care Guide
Page 18
...-permeable wrap Y_CAUTION: Do not keep beverage cans or plastic beverage containers in freezer package could have food odor and taste transferred throughout the refrigerator and freezer, and food in the freezer compartment. Packaging Successful freezing depends on correct packaging. Freezing Your freezer will freeze within 24 hours (no air or moisture can close tightly...
...-permeable wrap Y_CAUTION: Do not keep beverage cans or plastic beverage containers in freezer package could have food odor and taste transferred throughout the refrigerator and freezer, and food in the freezer compartment. Packaging Successful freezing depends on correct packaging. Freezing Your freezer will freeze within 24 hours (no air or moisture can close tightly...
Use and Care Guide
Page 19
... them to fit different heights of items will make finding the exact item you want . • To remove a shelf= Tilt the front of time the refrigerator door is open, saving energy. NOTE: Make sure that shelves are adjustable to meet your individual storage needs. SNACK DRAWER (On Some Models) To remove... shelf up and pull out. Failure to do so may break if exposed to drawer stop . 19 Slide Out Shelves (On Some Models) You can slide some glass shelves in and out of your refrigerator as bumping. Adjustable Shelves Remove shelves from one side to secure the hooks in the slots. it...
... them to fit different heights of items will make finding the exact item you want . • To remove a shelf= Tilt the front of time the refrigerator door is open, saving energy. NOTE: Make sure that shelves are adjustable to meet your individual storage needs. SNACK DRAWER (On Some Models) To remove... shelf up and pull out. Failure to do so may break if exposed to drawer stop . 19 Slide Out Shelves (On Some Models) You can slide some glass shelves in and out of your refrigerator as bumping. Adjustable Shelves Remove shelves from one side to secure the hooks in the slots. it...
Use and Care Guide
Page 20
Lift the drawer up and toward you to any setting between _Z_ and To replace crisper, slide back in fully past the drawer stop . 2. Adjust the control to pull out and remove. 3. Pullcrisper drawer out to drawer stop . \ CRISPER HUMiDiTY CONTROL You can control the amount of humidity in the moisturesealed crispers. CRISPER AND CRISPER COVER To remove the crisper: 1.
Lift the drawer up and toward you to any setting between _Z_ and To replace crisper, slide back in fully past the drawer stop . 2. Adjust the control to pull out and remove. 3. Pullcrisper drawer out to drawer stop . \ CRISPER HUMiDiTY CONTROL You can control the amount of humidity in the moisturesealed crispers. CRISPER AND CRISPER COVER To remove the crisper: 1.


