Use and Care Guide
Page 1
® TOP FREEZER REFRIGERATOR CONGELADOR SUPERIOR REFRIGERADOR CONGI_LATEUR SUPI_RIEUR REFRIGI_RATEUR Models / Modelos / ModUles 795.6997_, 795.7997_, 795.6937_, 795.7937_, 795.6991 795.7991 795.6929_ 795.7929_ = color number, n_mero de color, num_ro de couleur m Z _3 r" m cn z m Z_ O r=, =11 Z m MFL61920622 Printed in Mexico Sears Brands Management Corporation, Hoffman Estates, IL 60179 www.sears.com
® TOP FREEZER REFRIGERATOR CONGELADOR SUPERIOR REFRIGERADOR CONGI_LATEUR SUPI_RIEUR REFRIGI_RATEUR Models / Modelos / ModUles 795.6997_, 795.7997_, 795.6937_, 795.7937_, 795.6991 795.7991 795.6929_ 795.7929_ = color number, n_mero de color, num_ro de couleur m Z _3 r" m cn z m Z_ O r=, =11 Z m MFL61920622 Printed in Mexico Sears Brands Management Corporation, Hoffman Estates, IL 60179 www.sears.com
Use and Care Guide
Page 2
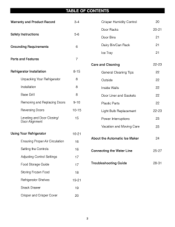
...instructions 5-6 Grounding Requirements 6 Parts and Features 7 Refrigerator installation Unpacking Your Refrigerator Installation Base Grill Removing and Replacing Doors Reversing Doors Leveling and Door Closing/ Door Alignment 8-15 8 8 8 9-10 10-15 15 Using Your Refrigerator Ensuring Proper Air Circulation Setting the Controls Adjusting Control... Settings Food Storage Guide Storing Frozen Food Refrigerator Shelves Snack Drawer Crisper and Crisper Cover 16-21 16 16 17 17 18 19-21 19 2O Crisper Humidity Control Door Racks Door Bins Dairy Bin/Can ...
...instructions 5-6 Grounding Requirements 6 Parts and Features 7 Refrigerator installation Unpacking Your Refrigerator Installation Base Grill Removing and Replacing Doors Reversing Doors Leveling and Door Closing/ Door Alignment 8-15 8 8 8 9-10 10-15 15 Using Your Refrigerator Ensuring Proper Air Circulation Setting the Controls Adjusting Control... Settings Food Storage Guide Storing Frozen Food Refrigerator Shelves Snack Drawer Crisper and Crisper Cover 16-21 16 16 17 17 18 19-21 19 2O Crisper Humidity Control Door Racks Door Bins Dairy Bin/Can ...
Use and Care Guide
Page 3
... out from unauthorized modifications made to this limited warranty shall be liable for a particular purpose, are limited to filters, belts, light bulbs, and bags. 2. TOP FREEZER REFRIGERATOR ® Kenmore Appliance Warranty lone Year Limited Warranty When installed, operated and maintained according to all instructions supplied with the product. 5. If this warranty applies for : 1. Damage...
... out from unauthorized modifications made to this limited warranty shall be liable for a particular purpose, are limited to filters, belts, light bulbs, and bags. 2. TOP FREEZER REFRIGERATOR ® Kenmore Appliance Warranty lone Year Limited Warranty When installed, operated and maintained according to all instructions supplied with the product. 5. If this warranty applies for : 1. Damage...
Use and Care Guide
Page 4
.... Once you contact Sears concerning your Request = no functional failure excluded from time to power fluctuations. [] $250 Food Loss Protection annually for any covered refrigerator or freezer. [] Rental reimbursement if repair of information available whenever you purchase the Agreement, a simple phone call anytime day or night, or schedule a service appointment ...major home items, in the U.S.A. Sears Installation Service For Sears professional installation of any reason during the product warranty period, we cal! Your new Kenmor# _ product is a risk free purchase.
.... Once you contact Sears concerning your Request = no functional failure excluded from time to power fluctuations. [] $250 Food Loss Protection annually for any covered refrigerator or freezer. [] Rental reimbursement if repair of information available whenever you purchase the Agreement, a simple phone call anytime day or night, or schedule a service appointment ...major home items, in the U.S.A. Sears Installation Service For Sears professional installation of any reason during the product warranty period, we cal! Your new Kenmor# _ product is a risk free purchase.
Use and Care Guide
Page 5
...OFF position does not remove power to safety messages that inform you of this use gasoline or other flammable vapors and liquids in the freezer compartment - SAVE THESE INSTRUCTIONS Thisis thesafetyalertsymbolI.t alerts you to the light circuit. • Do not store bottles in the vicinity ...vegetables and prepared foods. Be careful closing doors when children are damp or wet. Before replacing a burned-out light bulb, unplug the refrigerator or turn off -color should not be refrozen and should not be eaten. Have the wall outlet and the circuit checked by pulling on...
...OFF position does not remove power to safety messages that inform you of this use gasoline or other flammable vapors and liquids in the freezer compartment - SAVE THESE INSTRUCTIONS Thisis thesafetyalertsymbolI.t alerts you to the light circuit. • Do not store bottles in the vicinity ...vegetables and prepared foods. Be careful closing doors when children are damp or wet. Before replacing a burned-out light bulb, unplug the refrigerator or turn off -color should not be refrozen and should not be eaten. Have the wall outlet and the circuit checked by pulling on...
Use and Care Guide
Page 6
... properly grounded three-prong wall outlet. Child entrapment and suffocation are finished, reconnect the refrigerator to the electrical source and reset the control (thermostat, refrigerator control or freezer control, depending on the model) to avoid any hazard. If the supply cord is... legislation. If you are not problems of installation, cleaning, or removing a light bulb, turn the control (Thermostat, Refrigerator Control or Freezer Control, depending on the model) to harm stratospheric ozone. Children should always be replaced by a qualified electrician to ensure...
... properly grounded three-prong wall outlet. Child entrapment and suffocation are finished, reconnect the refrigerator to the electrical source and reset the control (thermostat, refrigerator control or freezer control, depending on the model) to avoid any hazard. If the supply cord is... legislation. If you are not problems of installation, cleaning, or removing a light bulb, turn the control (Thermostat, Refrigerator Control or Freezer Control, depending on the model) to harm stratospheric ozone. Children should always be replaced by a qualified electrician to ensure...
Use and Care Guide
Page 7
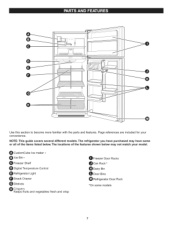
.... Page references are included for your model. O CustomCube Ice maker * O Ice Bin * Freezer Shelf _ Digital Temperature Control Refrigerator Light _t Snack Drawer Shelves Crispers Keeps fruits and vegetables fresh and crisp OFreezer Door Racks OCan Rack* ODairy Bin O Door Bins Refrigerator Door Rack *On some or all of the features shown betow may...
.... Page references are included for your model. O CustomCube Ice maker * O Ice Bin * Freezer Shelf _ Digital Temperature Control Refrigerator Light _t Snack Drawer Shelves Crispers Keeps fruits and vegetables fresh and crisp OFreezer Door Racks OCan Rack* ODairy Bin O Door Bins Refrigerator Door Rack *On some or all of the features shown betow may...

Use and Care Guide
Page 8
... tighten screws. Please reinstall shelves according to your thumb. When moving it , as gasoline, away from the bottom front part of refrigerator. BASE GRILLE INSTALLATION Explosion Hazard Keep flammable materials and vapors, such as floor damage could occur. To remove the Base Grille 1.... To remove any remaining tape or glue, rub the area briskly with your refrigerator. These products can result in the shipping position. NOTE: For proper air circulation, best cooling and energy consumption results, maintain a ...
... tighten screws. Please reinstall shelves according to your thumb. When moving it , as gasoline, away from the bottom front part of refrigerator. BASE GRILLE INSTALLATION Explosion Hazard Keep flammable materials and vapors, such as floor damage could occur. To remove the Base Grille 1.... To remove any remaining tape or glue, rub the area briskly with your refrigerator. These products can result in the shipping position. NOTE: For proper air circulation, best cooling and energy consumption results, maintain a ...

Use and Care Guide
Page 9
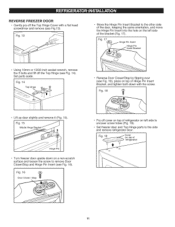
TOOLSNEEDED: • 10mmor 13/32-incshockewt rench (with2-inchextensionfor bottomdoorhinge) • No.2 Phillipsheadscrewdriver • Flat-headscrewdrivefrorprying REMOVE FREEZER DOOR • Gently pry off the Top Hinge (see Fig 1). Set parts aside. Set aside. Fig. 1 REMOVE REFRIGERATOR DOOR • Loosen and remove the 2 bolts and the phillips head screw to remove the Middle Hinge Bracket...
TOOLSNEEDED: • 10mmor 13/32-incshockewt rench (with2-inchextensionfor bottomdoorhinge) • No.2 Phillipsheadscrewdriver • Flat-headscrewdrivefrorprying REMOVE FREEZER DOOR • Gently pry off the Top Hinge (see Fig 1). Set parts aside. Set aside. Fig. 1 REMOVE REFRIGERATOR DOOR • Loosen and remove the 2 bolts and the phillips head screw to remove the Middle Hinge Bracket...

Use and Care Guide
Page 10
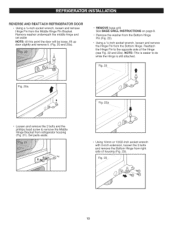
... Before you face the unit. Hold door in place and line up the Upper Hinge with the holes in refrigerator housing. Place Upper Hinge's Pin in the top of freezer door and line up the Middle Hinge Bracket with holes in death or serious injury. TOOLS NEEDED • ...2 Phillips head screwdriver • 1Ainch socket wrench • Flat-head screwdriver for prying 10 I Fig. 11 REPLACE FREEZER DOOR • Set the freezer door onto the Middle Hinge Pin (Fig. 9). REPLACE REFRIGERATOR DOOR • Set door onto Bottom Hinge Pin. • Place Hinge Pin of Middle Hinge Bracket inside Hinge Pin...
... Before you face the unit. Hold door in place and line up the Upper Hinge with the holes in refrigerator housing. Place Upper Hinge's Pin in the top of freezer door and line up the Middle Hinge Bracket with holes in death or serious injury. TOOLS NEEDED • ...2 Phillips head screwdriver • 1Ainch socket wrench • Flat-head screwdriver for prying 10 I Fig. 11 REPLACE FREEZER DOOR • Set the freezer door onto the Middle Hinge Pin (Fig. 9). REPLACE REFRIGERATOR DOOR • Set door onto Bottom Hinge Pin. • Place Hinge Pin of Middle Hinge Bracket inside Hinge Pin...
Use and Care Guide
Page 11
... the left side of refrigerator on top of the bracket (Fig. 17). Fig. 17 i_ Hinge PHiningtnesePrtin insert Bracket Using 10mm or 13/32-inch socket wrench, remove the 3 bolts and lift off cover on left side to uncover screw holes (Fig. 19). • Set freezer door and Top Hinge parts to remove ...Door Closer/Stop and Hinge Pin insert (see Fig.13). Set parts aside. Fig. 16 Door Closer / Stop • Pry off the Top Hinge (see Fig. 18), place on top of Hinge Pin insert Bracket, and ...
... the left side of refrigerator on top of the bracket (Fig. 17). Fig. 17 i_ Hinge PHiningtnesePrtin insert Bracket Using 10mm or 13/32-inch socket wrench, remove the 3 bolts and lift off cover on left side to uncover screw holes (Fig. 19). • Set freezer door and Top Hinge parts to remove ...Door Closer/Stop and Hinge Pin insert (see Fig.13). Set parts aside. Fig. 16 Door Closer / Stop • Pry off the Top Hinge (see Fig. 18), place on top of Hinge Pin insert Bracket, and ...
Use and Care Guide
Page 12
... Hinge. Reattach the Hinge Pin to do while the Hinge is still attached. o Using a 1A-inch socket wrench, loosen and remove the Hinge Pin from refrigerator housing (Fig. 21). Using 10mm or 13/32-inch socket wrench with 2-inch extension, loosen the 3 bolts and remove the Bottom Hinge from right side...
... Hinge. Reattach the Hinge Pin to do while the Hinge is still attached. o Using a 1A-inch socket wrench, loosen and remove the Hinge Pin from refrigerator housing (Fig. 21). Using 10mm or 13/32-inch socket wrench with 2-inch extension, loosen the 3 bolts and remove the Bottom Hinge from right side...

Use and Care Guide
Page 13
...; With flat-head screwdriver, carefully pry off and remove the cover over the screw holes on all models. • At thispoint,removetheDecorativBeoltonbottomon refrigeratohrousingfromtheleftsideof refrigerator (Fig.24).Youwill needthisholefortheBottomHinge. Now move the Bracket to the other two screws to door (Fig. 28). Fig. 30 Fig. 27 Hinge...Bolt to the left side of housing. Fig. 28 Hinge Pin Bracket • Move the Bottom Hinge to hole on left side of refrigerator housing (Fig. 30). Fig. 26 • Take Door Closer/stop and flip (see Fig. 27). Line up screw holes and...
...; With flat-head screwdriver, carefully pry off and remove the cover over the screw holes on all models. • At thispoint,removetheDecorativBeoltonbottomon refrigeratohrousingfromtheleftsideof refrigerator (Fig.24).Youwill needthisholefortheBottomHinge. Now move the Bracket to the other two screws to door (Fig. 28). Fig. 30 Fig. 27 Hinge...Bolt to the left side of housing. Fig. 28 Hinge Pin Bracket • Move the Bottom Hinge to hole on left side of refrigerator housing (Fig. 30). Fig. 26 • Take Door Closer/stop and flip (see Fig. 27). Line up screw holes and...
Use and Care Guide
Page 14
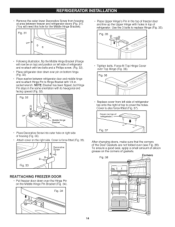
...Hinge Pin to replace Hinge (Fig. 35). Fig. 32 Bracket • Tighten bolts. Fig. 34 14 Force-fit Top Hinge Cover over pin on left side of refrigerator top onto the right of gaskets. Cover is force-fitted (Fig. 33). -_ ..... /J / I I Decorative €... outer hole on the right side. Cover (on top of housing (Fig. 33). Fig. 38 Corners \ / REATTACHING FREEZER DOOR • Put freezer door down over Top Hinge (Fig. 36). Fig.31 PlaceUpperHinge'sPininthetopoffreezedr oor andlineuptheUpperHingewithholesintopof refrigerator. Fig. 36 • Replace cover from left ...
...Hinge Pin to replace Hinge (Fig. 35). Fig. 32 Bracket • Tighten bolts. Fig. 34 14 Force-fit Top Hinge Cover over pin on left side of refrigerator top onto the right of gaskets. Cover is force-fitted (Fig. 33). -_ ..... /J / I I Decorative €... outer hole on the right side. Cover (on top of housing (Fig. 33). Fig. 38 Corners \ / REATTACHING FREEZER DOOR • Put freezer door down over Top Hinge (Fig. 36). Fig.31 PlaceUpperHinge'sPininthetopoffreezedr oor andlineuptheUpperHingewithholesintopof refrigerator. Fig. 36 • Replace cover from left ...

Use and Care Guide
Page 15
...the rear by turning both Leveling Screws clockwise. Move the refrigerator into a 3-prong grounded outlet. NOTE: Having someone hold the freezer door so the space between your refrigerator seems unsteady or you should be leveled, if necessary, ...adjust the Leveling Legs to adjust the Leveling Screws (Fig. 39). Gently pry off the Leveling Screws. Open both Leveling Screws the same amount. 5. Plug refrigerator power cord into its final position. 2. Replace the Top...
...the rear by turning both Leveling Screws clockwise. Move the refrigerator into a 3-prong grounded outlet. NOTE: Having someone hold the freezer door so the space between your refrigerator seems unsteady or you should be leveled, if necessary, ...adjust the Leveling Legs to adjust the Leveling Screws (Fig. 39). Gently pry off the Leveling Screws. Open both Leveling Screws the same amount. 5. Plug refrigerator power cord into its final position. 2. Replace the Top...
Use and Care Guide
Page 16
..., air must flow between both sections, any of the air enters the refrigerator section through the top vent. • Do not block any odors formed in one in the freezer and one section will transfer to reach desired temperature. Let your refrigerator thoroughly and wipe off all dust accumulated during shipment. 3. Always wait 24...
..., air must flow between both sections, any of the air enters the refrigerator section through the top vent. • Do not block any odors formed in one in the freezer and one section will transfer to reach desired temperature. Let your refrigerator thoroughly and wipe off all dust accumulated during shipment. 3. Always wait 24...

Use and Care Guide
Page 17
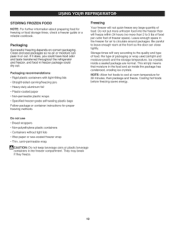
... and keep the temperature colder. Place in plastic bag or plastic container and store in the refrigerator or freezer, start by items Turn FREEZER control to adjust temperatures in crisper. Cover leftovers with tight lids can also be correct for your ... food odor and taste transfer throughout the refrigerator. Cheese Milk Store in freezer packaging and freeze. CONDITION/ REASON: RECOMMENDED ADJUSTMENT: m REFRIGERATOR section too warm - Controls not set correctly for normal household refrigerator use . Setting the freezer control to keep berries in their original container...
... and keep the temperature colder. Place in plastic bag or plastic container and store in the refrigerator or freezer, start by items Turn FREEZER control to adjust temperatures in crisper. Cover leftovers with tight lids can also be correct for your ... food odor and taste transfer throughout the refrigerator. Cheese Milk Store in freezer packaging and freeze. CONDITION/ REASON: RECOMMENDED ADJUSTMENT: m REFRIGERATOR section too warm - Controls not set correctly for normal household refrigerator use . Setting the freezer control to keep berries in their original container...
Use and Care Guide
Page 18
... temperature. Do not use • Bread wrappers • Non-polyethylene plastic containers • Containers without tight lids • Wax paper or wax-coated freezer wrap • Thin, semi-permeable wrap Y_CAUTION: Do not keep beverage cans or plastic beverage containers in the food and air inside a sealed package are... normal. NOTE: Allow hot foods to 3 Ibs of food per cubic foot of freezer space). If it does, you could have food odor and taste transferred throughout the refrigerator and freezer, and food in or out.
... temperature. Do not use • Bread wrappers • Non-polyethylene plastic containers • Containers without tight lids • Wax paper or wax-coated freezer wrap • Thin, semi-permeable wrap Y_CAUTION: Do not keep beverage cans or plastic beverage containers in the food and air inside a sealed package are... normal. NOTE: Allow hot foods to 3 Ibs of food per cubic foot of freezer space). If it does, you could have food odor and taste transferred throughout the refrigerator and freezer, and food in or out.
Use and Care Guide
Page 19
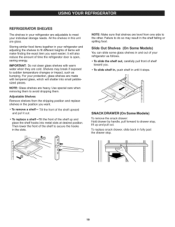
...of the shelf upward and pull it stops. Use special care when removing them to the other. All the shelves in your refrigerator are adjustable to drawer stop . 19 SNACK DRAWER (On Some Models) To remove the snack drawer: Hold drawer by handle, pull forward to meet your... refrigerator as bumping. REFRIGERATOR SHELVES The shelves in this unit are glass. it will shatter into metal slots at desired position. NOTE: Glass shelves are...
...of the shelf upward and pull it stops. Use special care when removing them to the other. All the shelves in your refrigerator are adjustable to drawer stop . 19 SNACK DRAWER (On Some Models) To remove the snack drawer: Hold drawer by handle, pull forward to meet your... refrigerator as bumping. REFRIGERATOR SHELVES The shelves in this unit are glass. it will shatter into metal slots at desired position. NOTE: Glass shelves are...
Use and Care Guide
Page 20
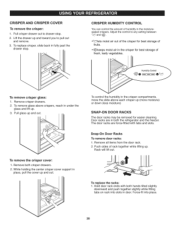
To replace crisper, slide back in the moisturesealed crispers. Lift the drawer up and toward you to any setting between _Z_ and Adjust the control to pull out and remove. 3. Pullcrisper drawer out to drawer stop . \ CRISPER HUMiDiTY CONTROL You can control the amount of humidity in fully past the drawer stop . 2. CRISPER AND CRISPER COVER To remove the crisper: 1.
To replace crisper, slide back in the moisturesealed crispers. Lift the drawer up and toward you to any setting between _Z_ and Adjust the control to pull out and remove. 3. Pullcrisper drawer out to drawer stop . \ CRISPER HUMiDiTY CONTROL You can control the amount of humidity in fully past the drawer stop . 2. CRISPER AND CRISPER COVER To remove the crisper: 1.


