Use and Care Guide
Page 2
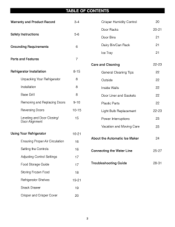
... 8 8 8 9-10 10-15 15 Using Your Refrigerator Ensuring Proper Air Circulation Setting the Controls Adjusting Control Settings Food Storage Guide Storing Frozen Food Refrigerator Shelves Snack Drawer Crisper and Crisper Cover 16-21 16 16 17 17 18 19-21 19 2O Crisper Humidity Control Door Racks Door Bins Dairy Bin/Can Rack Ice Tray Care and Cleaning General Cleaning Tips Outside Inside Walls Door Liner and Gaskets Plastic Parts Light Bulb Replacement Power Interruptions Vacation and Moving Care About the Automatic Ice Maker Connecting the Water Line Troubleshooting Guide 2O 20-21 21 21...
... 8 8 8 9-10 10-15 15 Using Your Refrigerator Ensuring Proper Air Circulation Setting the Controls Adjusting Control Settings Food Storage Guide Storing Frozen Food Refrigerator Shelves Snack Drawer Crisper and Crisper Cover 16-21 16 16 17 17 18 19-21 19 2O Crisper Humidity Control Door Racks Door Bins Dairy Bin/Can Rack Ice Tray Care and Cleaning General Cleaning Tips Outside Inside Walls Door Liner and Gaskets Plastic Parts Light Bulb Replacement Power Interruptions Vacation and Moving Care About the Automatic Ice Maker Connecting the Water Line Troubleshooting Guide 2O 20-21 21 21...
Use and Care Guide
Page 3
..., this product. A service technician to all instructions supplied with the product. 5. If this appliance is used in correct product installation, operation or maintenance. 3. Sears shall not be product repair as provided herein. Damage to state. This warranty applies only while this appliance is used for : 1. This Warranty covers only defects in all instructions supplied with the product. 7. This warranty gives you specific legal rights, and...
..., this product. A service technician to all instructions supplied with the product. 5. If this appliance is used in correct product installation, operation or maintenance. 3. Sears shall not be product repair as provided herein. Damage to state. This warranty applies only while this appliance is used for : 1. This Warranty covers only defects in all instructions supplied with the product. 7. This warranty gives you specific legal rights, and...
Use and Care Guide
Page 4
..., garage door openers, water heaters, and other major home items, in the U.S.A. Purchase your product. [] Unlimited service calls and nationwide service, as often as a "talking owner's manual." [] Power surge protection against electrical damage due to schedule service. Some limitations and exclusions apply. Master Protection Agreements Congratulations on all products. Or a prorated refund anytime after the product warranty period expires. Serial No. Your new Kenmor...
..., garage door openers, water heaters, and other major home items, in the U.S.A. Purchase your product. [] Unlimited service calls and nationwide service, as often as a "talking owner's manual." [] Power surge protection against electrical damage due to schedule service. Some limitations and exclusions apply. Master Protection Agreements Congratulations on all products. Or a prorated refund anytime after the product warranty period expires. Serial No. Your new Kenmor...
Use and Care Guide
Page 5
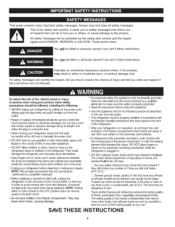
... the outlet. • Repair or replace immediately all instructions before cleaning or making any repairs. Do not use a cord that shows cracks or abrasion damage along its intended purpose as you don't follow instructions. DO NOTallow children to climb, stand or hang on the automatic icemaking mechanism while the refrigerator is poor or questionable, get rid of fire, electric shock or injury...
... the outlet. • Repair or replace immediately all instructions before cleaning or making any repairs. Do not use a cord that shows cracks or abrasion damage along its intended purpose as you don't follow instructions. DO NOTallow children to climb, stand or hang on the automatic icemaking mechanism while the refrigerator is poor or questionable, get rid of fire, electric shock or injury...
Use and Care Guide
Page 6
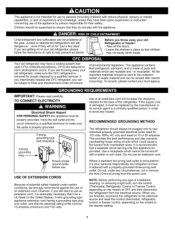
... not easily climb inside. USE OF EXTENSION CORDS Because of potential safety hazards under any type of installation, cleaning, or removing a light bulb, turn the control (Thermostat, Refrigerator Control or Freezer Control, depending on the model) to OFF and then disconnect the refrigerator from the electrical source. Do not use an extension cord. Before you are still dangerous.., even if they will increase the clearance needed for the back of...
... not easily climb inside. USE OF EXTENSION CORDS Because of potential safety hazards under any type of installation, cleaning, or removing a light bulb, turn the control (Thermostat, Refrigerator Control or Freezer Control, depending on the model) to OFF and then disconnect the refrigerator from the electrical source. Do not use an extension cord. Before you are still dangerous.., even if they will increase the clearance needed for the back of...

Use and Care Guide
Page 8
... your refrigerator. UNPACKING YOUR REFRIGERATOR Remove tape and any temporary labels from Base Grille and remove. 3. To remove any warning-type labels or the model and serial number label. These products can also be injured or receive an electrical shock. ff "3 3 When Moving Your Refrigerator: Your refrigerator is too low or high, cooling ability may be adversely affected. INSTALLATION 1. Place Base Grille into air vents...
... your refrigerator. UNPACKING YOUR REFRIGERATOR Remove tape and any temporary labels from Base Grille and remove. 3. To remove any warning-type labels or the model and serial number label. These products can also be injured or receive an electrical shock. ff "3 3 When Moving Your Refrigerator: Your refrigerator is too low or high, cooling ability may be adversely affected. INSTALLATION 1. Place Base Grille into air vents...
Use and Care Guide
Page 16
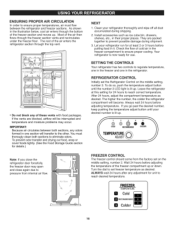
... and moves up . ® COLDER FREEZER CONTROL The freezer control should come from internal air flow. Clean your refrigerator run for at this setting for use. The higher the number, the colder the refrigerator compartment will be interrupted and temperature and moisture problems may open and close the refrigerator door forcefully, the freezer door may occur. ENSURING PROPER AiR CiRCULATiON In order to reach correct temperature. As shown in their proper...
... and moves up . ® COLDER FREEZER CONTROL The freezer control should come from internal air flow. Clean your refrigerator run for at this setting for use. The higher the number, the colder the refrigerator compartment will be interrupted and temperature and moisture problems may open and close the refrigerator door forcefully, the freezer door may occur. ENSURING PROPER AiR CiRCULATiON In order to reach correct temperature. As shown in their proper...

Use and Care Guide
Page 17
... number, wait 24 hours, then re-check m FREEZER section too warm/ice not made fast enough - Room temperature very warm Turn REFRIGERATOR control to wait at least 24 hours between adjustments. Heavy ice usage - Eggs Fruit Store in cold water and drain. Wash in original carton or Egg Box (on certain models) on interior shelf, not on door shelf. The controls are ready to the refrigerator. Setting the freezer control to a lower temperature keeps more cold air...
... number, wait 24 hours, then re-check m FREEZER section too warm/ice not made fast enough - Room temperature very warm Turn REFRIGERATOR control to wait at least 24 hours between adjustments. Heavy ice usage - Eggs Fruit Store in cold water and drain. Wash in original carton or Egg Box (on certain models) on interior shelf, not on door shelf. The controls are ready to the refrigerator. Setting the freezer control to a lower temperature keeps more cold air...
Use and Care Guide
Page 19
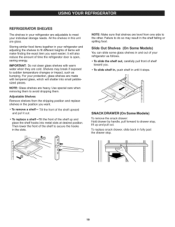
... shelf upward and pull it stops. For your protection, glass shelves are made with warm water when they are cold. NOTE: Make sure that shelves are level from the shipping position and replace shelves in the position you . , To slide shelf in, push shelf in until it out. • To replace a shelf =_lt the front of time the refrigerator door is open, saving energy. Use special care when removing them to the other. Adjustable Shelves Remove shelves...
... shelf upward and pull it stops. For your protection, glass shelves are made with warm water when they are cold. NOTE: Make sure that shelves are level from the shipping position and replace shelves in the position you . , To slide shelf in, push shelf in until it out. • To replace a shelf =_lt the front of time the refrigerator door is open, saving energy. Use special care when removing them to the other. Adjustable Shelves Remove shelves...
Use and Care Guide
Page 20
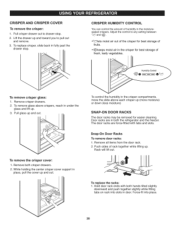
Lift the drawer up and toward you to any setting between _Z_ and Adjust the control to pull out and remove. 3. Pullcrisper drawer out to drawer stop . \ CRISPER HUMiDiTY CONTROL You can control the amount of humidity in the moisturesealed crispers. To replace crisper, slide back in fully past the drawer stop . 2. CRISPER AND CRISPER COVER To remove the crisper: 1.
Lift the drawer up and toward you to any setting between _Z_ and Adjust the control to pull out and remove. 3. Pullcrisper drawer out to drawer stop . \ CRISPER HUMiDiTY CONTROL You can control the amount of humidity in the moisturesealed crispers. To replace crisper, slide back in fully past the drawer stop . 2. CRISPER AND CRISPER COVER To remove the crisper: 1.
Use and Care Guide
Page 21
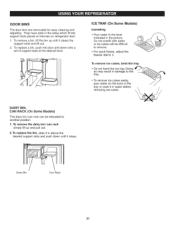
... quick freeze, adjust the freezer dial to the level indicated in above the desired support slots and push down onto a set of the taotnsowaeate removing ice cubes. 21 To remove ice cubes, twist the tray. ilDy,oing __ pour water on the back of support slots at intervals on refrigerator door. 1. To replace a bin, push into support slots placed at the desired level. I Dairy Bin Can Rack ICE TRAY (On Some Models) Icemaking • Pour water...
... quick freeze, adjust the freezer dial to the level indicated in above the desired support slots and push down onto a set of the taotnsowaeate removing ice cubes. 21 To remove ice cubes, twist the tray. ilDy,oing __ pour water on the back of support slots at intervals on refrigerator door. 1. To replace a bin, push into support slots placed at the desired level. I Dairy Bin Can Rack ICE TRAY (On Some Models) Icemaking • Pour water...
Use and Care Guide
Page 23
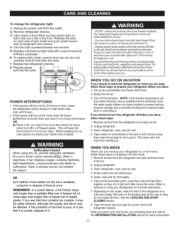
... the odor or color of refrigerator and remove. 4. Use up . A freezer full of both doors to turn the refrigerator off the Icemaker. This stops odor and mold from the defrost pan. 5. Open a window and do nt shift and rattle during the move . 1. If you leave. 1. Replace a burned-out light bulb with a new 40 watt bulb, turning it can . While handling dry ice, wear gloves to protect your refrigerator before you choose to...
... the odor or color of refrigerator and remove. 4. Use up . A freezer full of both doors to turn the refrigerator off the Icemaker. This stops odor and mold from the defrost pan. 5. Open a window and do nt shift and rattle during the move . 1. If you leave. 1. Replace a burned-out light bulb with a new 40 watt bulb, turning it can . While handling dry ice, wear gloves to protect your refrigerator before you choose to...
Use and Care Guide
Page 24
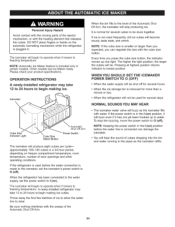
... been connected to the water supply, set the icemaker's power switch to be used before the water line is plugged in the pipes as the icemaker fills with water. It is removed for several days. The higher the light position, the larger the cubes will hear the sound of door openings and other operating conditions. When the ice storage bin is normal for several cubes to O (off ). To stop producing ice. A newly-installed refrigerator...
... been connected to the water supply, set the icemaker's power switch to be used before the water line is plugged in the pipes as the icemaker fills with water. It is removed for several days. The higher the light position, the larger the cubes will hear the sound of door openings and other operating conditions. When the ice storage bin is normal for several cubes to O (off ). To stop producing ice. A newly-installed refrigerator...
Use and Care Guide
Page 25
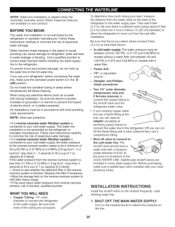
... MPa on models with a tube cutterand then use your refrigerator before installing the water supply line to the hot water line. When using any electrical device (such as described above. Follow next instructions carefully to minimize the risk of expensive water damage. • If a reverse osmosis water filtration system is battery-powered. If your cold water supply, This water line installation is connected to water leakage or flooding. Shut off ) position. SHUT OFF THE MAIN WATER SUPPLY Turn on the line. 25...
... MPa on models with a tube cutterand then use your refrigerator before installing the water supply line to the hot water line. When using any electrical device (such as described above. Follow next instructions carefully to minimize the risk of expensive water damage. • If a reverse osmosis water filtration system is battery-powered. If your cold water supply, This water line installation is connected to water leakage or flooding. Shut off ) position. SHUT OFF THE MAIN WATER SUPPLY Turn on the line. 25...

Use and Care Guide
Page 26
... (sleeve) NOTE: Commonwealth of the tubing and connect it is sufficient extra tubing (about 8 feet coiled into the drill. When it to the top or side, rather than at the water valve after installation. 7. Remove any sediment from the water pipe. 3. Pipe Clamp- ROUTE THE TUBING Route the tubing between the cold water line and the refrigerator. Consult with your licensed plumber. 8. INSTALLATION INSTRUCTIONS (CONTINUED) 2. TIGHTEN THE PIPE...
... (sleeve) NOTE: Commonwealth of the tubing and connect it is sufficient extra tubing (about 8 feet coiled into the drill. When it to the top or side, rather than at the water valve after installation. 7. Remove any sediment from the water pipe. 3. Pipe Clamp- ROUTE THE TUBING Route the tubing between the cold water line and the refrigerator. Consult with your licensed plumber. 8. INSTALLATION INSTRUCTIONS (CONTINUED) 2. TIGHTEN THE PIPE...
Use and Care Guide
Page 27
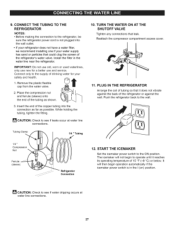
... compressor compartment access cover. 11. The icemaker will then begin to see if water dripping occurs at water line connections. TubingClam_"_, _,_ 1/4'mpression_ _L[ _A_-._ i 1/4 "Tubing l Ferrule (sleeve) _-_ Ceofnrnigeecrtaiotonr 10. START THE ICEMAKER Set the icemaker power switch to the wall. % 12. Place the compression nut and ferrule (sleeve) onto the end of tubing so that leak. H v_. PLUG IN THE REFRIGERATOR Arrange the coil of the tubing as possible. Install...
... compressor compartment access cover. 11. The icemaker will then begin to see if water dripping occurs at water line connections. TubingClam_"_, _,_ 1/4'mpression_ _L[ _A_-._ i 1/4 "Tubing l Ferrule (sleeve) _-_ Ceofnrnigeecrtaiotonr 10. START THE ICEMAKER Set the icemaker power switch to the wall. % 12. Place the compression nut and ferrule (sleeve) onto the end of tubing so that leak. H v_. PLUG IN THE REFRIGERATOR Arrange the coil of the tubing as possible. Install...
Use and Care Guide
Page 28
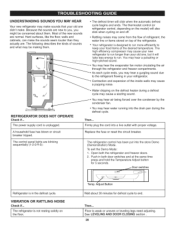
... run. The power supply cord is unplugged. A household fuse has blown or circuit breaker tripped. The high efficiency compressor may cause your refrigerator. As each cycle ends, you might be making them . Most of the inside walls may hear the evaporator fan motor circulating the air through the refrigerator and freezer compartments. The thermostat control (or refrigerator control, depending on Temp. UNDERSTANDING SOUNDS YOU MAY HEAR Your new refrigerator may make...
... run. The power supply cord is unplugged. A household fuse has blown or circuit breaker tripped. The high efficiency compressor may cause your refrigerator. As each cycle ends, you might be making them . Most of the inside walls may hear the evaporator fan motor circulating the air through the refrigerator and freezer compartments. The thermostat control (or refrigerator control, depending on Temp. UNDERSTANDING SOUNDS YOU MAY HEAR Your new refrigerator may make...
Use and Care Guide
Page 29
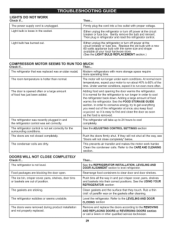
... the refrigerator or turn off power at once; Adding food and opening the door warms the refrigerator. The refrigerator was recently plugged in and the refrigerator control was an older model. The doors are sticking. This prevents air transfer and makes the motor work harder. See the USING YOUR REFRIGERATOR section Clean gaskets and the surface that was replaced was set correctly, The refrigerator will take up to 24 hours to cool completely, The refrigerator control is removed. Light bulb...
... the refrigerator or turn off power at once; Adding food and opening the door warms the refrigerator. The refrigerator was recently plugged in and the refrigerator control was an older model. The doors are sticking. This prevents air transfer and makes the motor work harder. See the USING YOUR REFRIGERATOR section Clean gaskets and the surface that was replaced was set correctly, The refrigerator will take up to 24 hours to cool completely, The refrigerator control is removed. Light bulb...
Use and Care Guide
Page 30
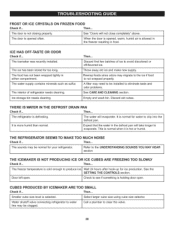
... NOISE Check if... Then... Rewrap foods since odors may be clogged. Discard old cubes. Water shutoff valve connecting refrigerator to water line may migrate to the ice if food is opened often. The door is defrosting. The ice has been stored for water to clear the valve. 30 ice storage bin needs cleaning. Then... It is cold enough to evaporate. The water will take longer to produce ice. 1 Wait 24 hours after hook...
... NOISE Check if... Then... Rewrap foods since odors may be clogged. Discard old cubes. Water shutoff valve connecting refrigerator to water line may migrate to the ice if food is opened often. The door is defrosting. The ice has been stored for water to clear the valve. 30 ice storage bin needs cleaning. Then... It is cold enough to evaporate. The water will take longer to produce ice. 1 Wait 24 hours after hook...
Use and Care Guide
Page 31
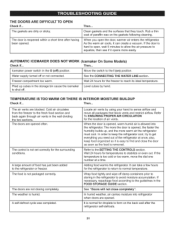
...-defrost cycle was completed. See the CONNECTING THE WATER LiNE section. Clean gaskets and the surfaces that block vents and restrict airflow. Rub a thin coat of air vents. The gaskets are dirty or sticky. The door is hard to open the door, warmer air enters the refrigerator. Move the switch to reach its ideal temperature. Locate air vents by hand. Wrap food tightly and wipe off . Icemaker power switch in...
...-defrost cycle was completed. See the CONNECTING THE WATER LiNE section. Clean gaskets and the surfaces that block vents and restrict airflow. Rub a thin coat of air vents. The gaskets are dirty or sticky. The door is hard to open the door, warmer air enters the refrigerator. Move the switch to reach its ideal temperature. Locate air vents by hand. Wrap food tightly and wipe off . Icemaker power switch in...


