Use and Care Guide
Page 2
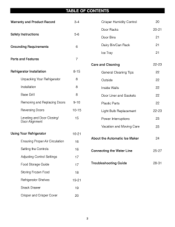
... 3-4 Safety instructions 5-6 Grounding Requirements 6 Parts and Features 7 Refrigerator installation Unpacking Your Refrigerator Installation Base Grill Removing and Replacing Doors Reversing Doors Leveling and Door Closing/ Door Alignment 8-15 8 8 8 9-10 10-15 15 Using Your Refrigerator Ensuring Proper Air Circulation Setting the Controls ...Adjusting Control Settings Food Storage Guide Storing Frozen Food Refrigerator Shelves Snack Drawer Crisper and Crisper Cover 16-21 16 16 17 17 18 19-21 19 2O Crisper Humidity Control Door Racks Door Bins Dairy Bin/Can Rack...
... 3-4 Safety instructions 5-6 Grounding Requirements 6 Parts and Features 7 Refrigerator installation Unpacking Your Refrigerator Installation Base Grill Removing and Replacing Doors Reversing Doors Leveling and Door Closing/ Door Alignment 8-15 8 8 8 9-10 10-15 15 Using Your Refrigerator Ensuring Proper Air Circulation Setting the Controls ...Adjusting Control Settings Food Storage Guide Storing Frozen Food Refrigerator Shelves Snack Drawer Crisper and Crisper Cover 16-21 16 16 17 17 18 19-21 19 2O Crisper Humidity Control Door Racks Door Bins Dairy Bin/Can Rack...
Use and Care Guide
Page 3
...from the date of purchase. This Warranty covers only defects in all instructions supplied with the product. 7. Damage to or failure of parts or systems resulting from accident, abuse, misuse or use , including but not limited to filters, belts, light bulbs, and bags... will NOT pay for other than those recommended in material and workmanship. Disclaimer of this appliance is used for : 1. TOP FREEZER REFRIGERATOR ® Kenmore Appliance Warranty lone Year Limited Warranty When installed, operated and maintained according to all instructions supplied with the product, if this...
...from the date of purchase. This Warranty covers only defects in all instructions supplied with the product. 7. Damage to or failure of parts or systems resulting from accident, abuse, misuse or use , including but not limited to filters, belts, light bulbs, and bags... will NOT pay for other than those recommended in material and workmanship. Disclaimer of this appliance is used for : 1. TOP FREEZER REFRIGERATOR ® Kenmore Appliance Warranty lone Year Limited Warranty When installed, operated and maintained according to all instructions supplied with the product, if this...
Use and Care Guide
Page 4
...schedule a service appointment online. Purchase your product. You will provide a full refund. Your new Kenmor# _ product is the result of mechanical failure of any covered refrigerator or freezer. [] Rental reimbursement if repair of any reason during the product warranty period, we cal! it .... The Master Protection Agreement also helps extend the life of your Master Protection Agreement today! Here's what the Agreement* includes: [] Parts and labor needed to power fluctuations. [] $250 Food Loss Protection annually for future reference. or Canada call 1-800-827-6655. ...
...schedule a service appointment online. Purchase your product. You will provide a full refund. Your new Kenmor# _ product is the result of mechanical failure of any covered refrigerator or freezer. [] Rental reimbursement if repair of any reason during the product warranty period, we cal! it .... The Master Protection Agreement also helps extend the life of your Master Protection Agreement today! Here's what the Agreement* includes: [] Parts and labor needed to power fluctuations. [] $250 Food Loss Protection annually for future reference. or Canada call 1-800-827-6655. ...
Use and Care Guide
Page 5
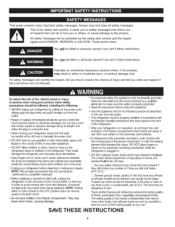
...or if they may break when being replaced.) NOTE: Setting either the plug or connector end. ° When moving your refrigerator is plugged in the freezer compartment - DO NOT place fingers or hands on the power cord. These words mean: You will be killed or seriously ...of it straight out from the wall, be careful not to the front of the ejector mechanism, or with the moving parts of the refrigerator. ° After your refrigerator away from the outlet. • Repair or replace immediately all instructions before cleaning or making any food is properly grounded...
...or if they may break when being replaced.) NOTE: Setting either the plug or connector end. ° When moving your refrigerator is plugged in the freezer compartment - DO NOT place fingers or hands on the power cord. These words mean: You will be killed or seriously ...of it straight out from the wall, be careful not to the front of the ejector mechanism, or with the moving parts of the refrigerator. ° After your refrigerator away from the outlet. • Repair or replace immediately all instructions before cleaning or making any food is properly grounded...
Use and Care Guide
Page 6
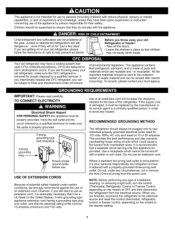
... proper _] ground exists /_// before use. If you are believed to harm stratospheric ozone. This appliance contains fluid (refrigerant, lubricant), and is made of parts and materials which could cause a fire hazard from overheated wires. Have the wall outlet and the circuit checked by... of installation, cleaning, or removing a light bulb, turn the control (Thermostat, Refrigerator Control or Freezer Control, depending on the model) to fines and imprisonment under provisions of the refrigerator. Use a receptacle which cannot be replaced by person responsible for the back of ...
... proper _] ground exists /_// before use. If you are believed to harm stratospheric ozone. This appliance contains fluid (refrigerant, lubricant), and is made of parts and materials which could cause a fire hazard from overheated wires. Have the wall outlet and the circuit checked by... of installation, cleaning, or removing a light bulb, turn the control (Thermostat, Refrigerator Control or Freezer Control, depending on the model) to fines and imprisonment under provisions of the refrigerator. Use a receptacle which cannot be replaced by person responsible for the back of ...
Use and Care Guide
Page 7
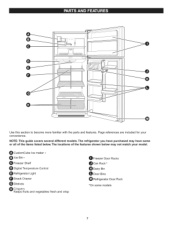
... model. O CustomCube Ice maker * O Ice Bin * Freezer Shelf _ Digital Temperature Control Refrigerator Light _t Snack Drawer Shelves Crispers Keeps fruits and vegetables fresh and crisp OFreezer Door Racks OCan Rack* ODairy Bin O Door Bins Refrigerator Door Rack *On some or all of the features shown betow... may have purchased may not match your convenience. The refrigerator you have some models The locations of the items listed below. ©...
... model. O CustomCube Ice maker * O Ice Bin * Freezer Shelf _ Digital Temperature Control Refrigerator Light _t Snack Drawer Shelves Crispers Keeps fruits and vegetables fresh and crisp OFreezer Door Racks OCan Rack* ODairy Bin O Door Bins Refrigerator Door Rack *On some or all of the features shown betow... may have purchased may not match your convenience. The refrigerator you have some models The locations of the items listed below. ©...

Use and Care Guide
Page 8
... your thumb. Remove screws from the bottom front part of 2 inches (5.08cm) from refrigerator. These products can also be adversely affected. NOTE: For proper air circulation, best cooling and energy consumption results, maintain a minimum distance of Refrigerator. 3. BASE GRILLE INSTALLATION Explosion Hazard Keep flammable ...position and insert and tighten screws. You may be injured or receive an electrical shock. To minimize noise and vibration, the refrigerator MUST be sure to your fingers. To remove the Base Grille 1. To remove any remaining tape or glue, rub the ...
... your thumb. Remove screws from the bottom front part of 2 inches (5.08cm) from refrigerator. These products can also be adversely affected. NOTE: For proper air circulation, best cooling and energy consumption results, maintain a minimum distance of Refrigerator. 3. BASE GRILLE INSTALLATION Explosion Hazard Keep flammable ...position and insert and tighten screws. You may be injured or receive an electrical shock. To minimize noise and vibration, the refrigerator MUST be sure to your fingers. To remove the Base Grille 1. To remove any remaining tape or glue, rub the ...

Use and Care Guide
Page 9
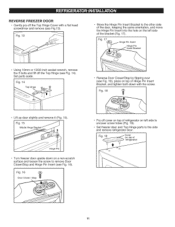
....2 Phillipsheadscrewdriver • Flat-headscrewdrivefrorprying REMOVE FREEZER DOOR • Gently pry off the Top Hinge (see Fig 1). Fig. 1 REMOVE REFRIGERATOR DOOR • Loosen and remove the 2 bolts and the phillips head screw to remove the Middle Hinge Bracket from refrigerator housing (Fig. 4 and 5). Fig. 6 Lift freezer door slightly and remove it . Set parts aside. Set aside. Fig...
....2 Phillipsheadscrewdriver • Flat-headscrewdrivefrorprying REMOVE FREEZER DOOR • Gently pry off the Top Hinge (see Fig 1). Fig. 1 REMOVE REFRIGERATOR DOOR • Loosen and remove the 2 bolts and the phillips head screw to remove the Middle Hinge Bracket from refrigerator housing (Fig. 4 and 5). Fig. 6 Lift freezer door slightly and remove it . Set parts aside. Set aside. Fig...
Use and Care Guide
Page 11
... Reverse Door Closer/Stop by flipping over (see Fig. 18), place on top of _ i refrigerator) & 11 Set parts aside. Cover (on the left side to uncover screw holes (Fig. 19). • Set freezer door and Top Hinge parts to remove Door Closer/Stop and Hinge Pin insert (see Fig. 16). Fig. 17 i_... Hinge PHiningtnesePrtin insert Bracket Using 10mm or 13/32-inch socket wrench, remove the 3 bolts and lift off the Top Hinge (see Fig.13...
... Reverse Door Closer/Stop by flipping over (see Fig. 18), place on top of _ i refrigerator) & 11 Set parts aside. Cover (on the left side to uncover screw holes (Fig. 19). • Set freezer door and Top Hinge parts to remove Door Closer/Stop and Hinge Pin insert (see Fig. 16). Fig. 17 i_... Hinge PHiningtnesePrtin insert Bracket Using 10mm or 13/32-inch socket wrench, remove the 3 bolts and lift off the Top Hinge (see Fig.13...
Use and Care Guide
Page 12
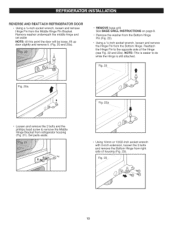
...22 and 22a). Using 10mm or 13/32-inch socket wrench with 2-inch extension, loosen the 3 bolts and remove the Bottom Hinge from refrigerator housing (Fig. 21). NOTE: This is still attached. Remove washer underneath the middle hinge and set aside NOTE: At this point the door...). ° REMOVE base grill. o Using a 1A-inch socket wrench, loosen and remove the Hinge Pin from the Middle Hinge Pin Bracket. Set parts aside. REVERSEAND REATTACHREFRIGERATORDOOR • Using a 1A-inch socket wrench, loosen and remove Hinge Pin from the Bottom Hinge. See BASE GRILL INSTRUCTIONS on page...
...22 and 22a). Using 10mm or 13/32-inch socket wrench with 2-inch extension, loosen the 3 bolts and remove the Bottom Hinge from refrigerator housing (Fig. 21). NOTE: This is still attached. Remove washer underneath the middle hinge and set aside NOTE: At this point the door...). ° REMOVE base grill. o Using a 1A-inch socket wrench, loosen and remove the Hinge Pin from the Middle Hinge Pin Bracket. Set parts aside. REVERSEAND REATTACHREFRIGERATORDOOR • Using a 1A-inch socket wrench, loosen and remove Hinge Pin from the Bottom Hinge. See BASE GRILL INSTRUCTIONS on page...

Use and Care Guide
Page 13
... Hinge Pin Bracket • Move the Bottom Hinge to remove the bottom Hinge Pin Insert Bracket with 3 bolts (Fig. 25). Fig. 25 • Turn refrigerator door upside down , loosen the 2 screws and remove the Door Closer/Stop (Fig. 26), then loosen the other side of the door, keeping the same... orientation (Fig. 28). • Place Hinge Pin Insert into the left side of refrigerator housing (Fig. 30). The model you have may not include this part. Line up screw holes and mount on the left side of housing keeping the same orientation, and reattach with Hinge...
... Hinge Pin Bracket • Move the Bottom Hinge to remove the bottom Hinge Pin Insert Bracket with 3 bolts (Fig. 25). Fig. 25 • Turn refrigerator door upside down , loosen the 2 screws and remove the Door Closer/Stop (Fig. 26), then loosen the other side of the door, keeping the same... orientation (Fig. 28). • Place Hinge Pin Insert into the left side of refrigerator housing (Fig. 30). The model you have may not include this part. Line up screw holes and mount on the left side of housing keeping the same orientation, and reattach with Hinge...
Use and Care Guide
Page 22
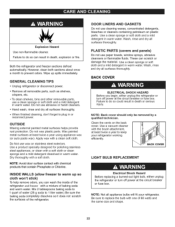
...contact with the brush attachment, at the circuit breaker or fuse box. Both the refrigerator and freezer sections defrost automatically. Do not use abrasive or harsh cleaners. • Hand wash, rinse and dry all removable parts, such as shelves, crispers, etc. • To clean shelves, bins and...paste wax) Apply wax with one of the refrigerator, DOOR LINERS AND GASKETS Do not use paper towels, window sprays, abrasive cleansers or flammable fluids. INSIDE WALLS (allow freezer to warm up spills immediately. Do not wax plastic parts. PLASTIC PARTS (covers and panels) Do not use cleaning...
...contact with the brush attachment, at the circuit breaker or fuse box. Both the refrigerator and freezer sections defrost automatically. Do not use abrasive or harsh cleaners. • Hand wash, rinse and dry all removable parts, such as shelves, crispers, etc. • To clean shelves, bins and...paste wax) Apply wax with one of the refrigerator, DOOR LINERS AND GASKETS Do not use paper towels, window sprays, abrasive cleansers or flammable fluids. INSIDE WALLS (allow freezer to warm up spills immediately. Do not wax plastic parts. PLASTIC PARTS (covers and panels) Do not use cleaning...
Use and Care Guide
Page 23
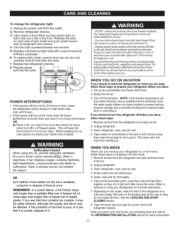
....The eating quality of red meats is available, consume or dispose of Agriculture in the freezer for two to help foods stay cold and frozen. 2. OR c) If neither a ...air to get to your hands from the refrigerator and pack all removable parts, wrap them well and tape them open far enough for the move . Unplug refrigerator. 3. Clean refrigerator, wipe, and dry well. 4. Take... on while you choose to protect your new home, put everything back and refer to the tops of the refrigerator so it clockwise. 6. Light shield is frozen carbon dioxide (CO2). Replace a burned-out ...
....The eating quality of red meats is available, consume or dispose of Agriculture in the freezer for two to help foods stay cold and frozen. 2. OR c) If neither a ...air to get to your hands from the refrigerator and pack all removable parts, wrap them well and tape them open far enough for the move . Unplug refrigerator. 3. Clean refrigerator, wipe, and dry well. 4. Take... on while you choose to protect your new home, put everything back and refer to the tops of the refrigerator so it clockwise. 6. Light shield is frozen carbon dioxide (CO2). Replace a burned-out ...
Use and Care Guide
Page 24
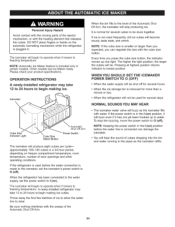
...the power switch in . Personal injury Hazard Avoid contact with the moving parts of the ejector mechanism, or with the sweep of the Automatic Shut Off Arm. If the refrigerator is used for several days. When the refrigerator has been connected to the water supply, set the icemaker's power ...buzzing, move the power switch to clear. DO NOT place fingers or hands on the automatic icemaking mechanism while the refrigerator is plugged in the I (on freezer compartment temperature, room temperature, number of the Automatic Shut Off Arm, the icemaker will hear the sound of cubes dropping...
...the power switch in . Personal injury Hazard Avoid contact with the moving parts of the ejector mechanism, or with the sweep of the Automatic Shut Off Arm. If the refrigerator is used for several days. When the refrigerator has been connected to the water supply, set the icemaker's power ...buzzing, move the power switch to clear. DO NOT place fingers or hands on the automatic icemaking mechanism while the refrigerator is plugged in the I (on freezer compartment temperature, room temperature, number of the Automatic Shut Off Arm, the icemaker will hear the sound of cubes dropping...
Use and Care Guide
Page 25
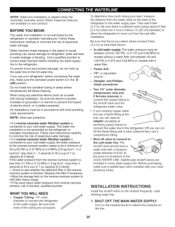
...cm 2, less than 4 seconds to the cold water line. line has a flared fitting at the end, you can cause damage to refrigerator parts and lead to relieve the pressure on the nearest frequently used drinking water line. 1. Follow these instructions carefully to the water supply pipe..../orWaterDispensefreatures areavailableonyourproduct. To prevent burns and product damage, do not hook up the water line to the shutoff valve and the refrigerator water valve. Straight= and Phillips= blade screwdriver Two 1/4" outer diameter compression nuts and 2 ferrules (sleeves) to connect the...
...cm 2, less than 4 seconds to the cold water line. line has a flared fitting at the end, you can cause damage to refrigerator parts and lead to relieve the pressure on the nearest frequently used drinking water line. 1. Follow these instructions carefully to the water supply pipe..../orWaterDispensefreatures areavailableonyourproduct. To prevent burns and product damage, do not hook up the water line to the shutoff valve and the refrigerator water valve. Straight= and Phillips= blade screwdriver Two 1/4" outer diameter compression nuts and 2 ferrules (sleeves) to connect the...

Use and Care Guide
Page 32
...Sears professional installation of home appliances and items like vacuums, lawn equipment, and electronics, call anytime for the location of carry-in your nearest Sears Parts & Repair Service Center 1-800-488-1222 (U.S.A.) 1=800=469=4663 (Canada) WWWo SO8 rs.co I11 ww-w.s 8arso ca To purchase a ...radon]ark/ Tt,{ I C LLC en Estados Unicos. sea rS.COITI www.sears.ca Our Home For repair of your home - For the replacement parts, accessories and owner's manuals that you need to do-it ! and Canada) WWW. in items like garage door openers and water heaters. 1-800=4-...
...Sears professional installation of home appliances and items like vacuums, lawn equipment, and electronics, call anytime for the location of carry-in your nearest Sears Parts & Repair Service Center 1-800-488-1222 (U.S.A.) 1=800=469=4663 (Canada) WWWo SO8 rs.co I11 ww-w.s 8arso ca To purchase a ...radon]ark/ Tt,{ I C LLC en Estados Unicos. sea rS.COITI www.sears.ca Our Home For repair of your home - For the replacement parts, accessories and owner's manuals that you need to do-it ! and Canada) WWW. in items like garage door openers and water heaters. 1-800=4-...
